DS 210 A1 - Programming for Data Science - Spring 2026
Welcome to DS 210 Section - Programming for Data Science in Rust.
This course builds on DS110 (Python for Data Science) by expanding on programming language, systems, and algorithmic concepts introduced in the prior course. The course introduces students to Rust, a compiled and high performance language. It also introduces students to important systems level concepts such as computer architecture, compilers, file systems, and using the command line.
Look at the course’s syllabus and schedule for more details.
This website is for DS 210 section A1 (MWF), if you are looking for section B1 (TR), go here.
Previous Offerings
Course Schedule
This schedule is updated frequently. Please check the readings and exercises before each class.
| Monday | Tuesday | Wednesday | Thursday | Friday |
|---|---|---|---|---|
| Jan 19 | Jan 20 | Jan 21 Lecture 1: course overview Discussion 1: rust & IDE setup | Jan 22 | Jan 23 Lecture 2: why Rust? Rust vs Python |
| Jan 26 Snow day - no class | Jan 27 | Jan 28 Lecture 3: shell & terminals Discussion 2: git Basics HW 1 out: command line and Git | Jan 29 | Jan 30 Lecture 4: shell & terminals (2) |
| Feb 2 Lecture 5: rust variables & types | Feb 3 | Feb 4 Lecture 6: rust variables & types (2) Discussion 3: leetcode exercises HW 1 due: command line and Git HW 2 out: Leetcode practice | Feb 5 | Feb 6 Lecture 7: rust variables & types (3) |
| Feb 9 Lecture 8: rust variables & types (4) HW 2 due: Leetcode practice HW 3 out: Guessing game | Feb 10 | Feb 11 Lecture 9: rust practice Discussion 4: guessing game | Feb 12 | Feb 13 Lecture 10: comparing programs |
| Feb 16 Presidents day - no class HW 3 due: Guessing game Proj 1 out: Vec | Feb 17 Lecture 11: comparing programs | Feb 18 Midterm 1 Discussion 5: SlowVec | Feb 19 | Feb 20 Lecture 12: memory |
| Feb 23 Lecture 13: memory Proj 1 (part 1) due: Vec | Feb 24 | Feb 25 Lecture 14: memory Discussion 6: FastVec | Feb 26 | Feb 27 Lecture 15: memory |
| Mar 2 Lecture 16: pointers | Mar 3 | Mar 4 Lecture 17: pointers Discussion 7: pointers and unsafe | Mar 5 | Mar 6 Lecture 18: pointers |
| Mar 9 Spring break - no class Proj 1 (part 2) due: Vec Proj 2 out: chatbot | Mar 10 Spring break | Mar 11 Spring break - no class | Mar 12 Spring break | Mar 13 Spring break - no class |
| Mar 16 Lecture 19: references Proj 2 (part 1) due: chatbot | Mar 17 | Mar 18 Lecture 20: references Discussion 8: Vec code review | Mar 19 | Mar 20 Lecture 21: references |
| Mar 23 Lecture 22: ownership & borrowing Proj 2 (part 2) due: chatbot Proj 3 out: client-server analytics | Mar 24 | Mar 25 Lecture 23: ownership & borrowing Discussion 9: chatbot code review | Mar 26 | Mar 27 Lecture 24: ownership & borrowing |
| Mar 30 Lecture 25: ownership & borrowing Proj 3 (part 1) due: client-server analytics | Mar 31 | Apr 1 Midterm 2 Discussion 10: client server analytics | Apr 2 | Apr 3 Lecture 26: traits and generics |
| Apr 6 Lecture 27: Midterm 2 solutions Proj 3 (part 2) due: client-server analytics Proj 4 out: Tic-Tac-Toe | Apr 7 | Apr 8 Lecture 28: traits and generics Discussion 11: client-server analytics code review | Apr 9 | Apr 10 Lecture 29: lifetimes |
| Apr 13 Lecture 30: managed memory in Python Proj 4 (part 1) due: Tic-Tac-Toe | Apr 14 | Apr 15 Lecture 31: managed memory in Python Discussion 12: leetcode exercises | Apr 16 | Apr 17 Lecture 32: enum and Box |
| Apr 20 Patriots day - no class Proj 4 (part 2) due: Tic-Tac-Toe | Apr 21 | Apr 22 Lecture 33: data science with polars No discussion | Apr 23 | Apr 24 Lecture 34: data science with polars |
| Apr 27 Lecture 35: multithreading | Apr 28 | Apr 29 Lecture 36: multithreading Discussion 13: Tic-Tac-Toe code review | Apr 30 | May 1 Study period - no class Proj 4 (part 3) due: Tic-Tac-Toe |
| May 4 | May 5 | May 6 Final Exam | May 7 | May 8 |
Homework, Mini Projects, and Exams
This is a list of the homework assignments, mini projects, and exams for DS 210 A1 - Spring 2026:
-
Homework 1: command line and git basics due Feb 4
-
Homework 2: Rust basics (1): Leetcode practice due Feb 9
-
Homework 3: Rust basics (2): guessing game due Feb 16
-
Midterm exam 1 (in class): Feb 18
- Basic Rust syntax
- Command line and git
-
Mini project 1: memory management - build your own vector
- Part 1: basic implementationdue Feb 23
- Part 2: doubling capacity and experimentationdue Mar 9
- Code reviewMar 18
-
Mini project 2: AI chatbot
- Part 2: basic chatbot due Mar 16
- Part 3: database and caching chatbot due Mar 23
- Code reviewMar 25
-
Midterm exam 2 (in class): April 1
- Computer organization and memory
- Rust ownership and references
- Data structures
-
Mini project 3: client-server data analytics
- Part 1: using remote procedure calls (RPCs) due Mar 30
- Part 2: using sockets due Apr 6
- Code reviewApr 8
-
Mini project 4: Tic-Tac-Toe agents
- Part 1: 3x3 Tic-Tac-Toe due Apr 13
- Part 2: 5x5 Tic-Tac-Toe with heuristic due Apr 20
- Part 3: optimization and tournament due May 1
- Code reviewApr 29
-
Final exam (12pm - 2pm; location TBD) May 6
- Course recap
- Parallelism and synchronization
- Code review and critique
- Experiment design
DS 210 A1 - Programming for Data Science
This course builds on DS110 (Python for Data Science) by expanding on programming language, systems, and algorithmic concepts introduced in the prior course. The course begins by exploring the different types of programming languages and introducing students to important systems level concepts such as computer architecture, compilers, file systems, and using the command line. It introduces Rust, a safe and high performance compiled language, and shows how to use it to implement and understand a number of fundamental data structures, algorithms, and systems concepts.
While DS110 focuses on writing small, standalone Python scripts for data science, DS210 aims to expose students to designing and implementing larger programs and software packages, as well as testing, optimizing, and evaluating these programs.
Prerequisites: CDS 110 or equivalent
Learning Objectives
By the end of this course students will:
- Be familiar with basics of computer organization and how it affects correctness and performance of programs, including the basic computer structure, memory management and safety, and basic concurrency and synchronization.
- Understand how to implement, evaluate, and optimize high performance code.
- Become more comfortable designing and implementing moderately complex software packages.
- Understand how to evaluate and improve the quality of code with respect to readability, maintenance, performance, and modularity.
- Learn basic data structures and algorithmic concepts, e.g., vectors, linked lists, stacks, and hashmaps.
Why are these concepts important?
Jobs/careers: Given the increasing competitiveness of the job market, it is crucial to have a strong technical background in building good quality and performant programs and software to acquire and succeed in data science, data engineering, and software engineering jobs at reputable employers. This course teaches fundamental concepts and practical skills crucial for such employers and jobs. Students who do not master the material in this course will struggle to succeed in such jobs (or even get their careers started).
Technical interviews: Technical interview almost always include coming up with an effective solution for a data structure or algorithmic problem and implementing it effectively in clean, good quality code. This course helps student practice this skill.
The CDS curriculum: DS 210 plays an important role in the CDS curriculum, with many higher-level courses depending on it as a pre-requisites. For many students, it is the only course where they will encounter computer organization and systems concepts that are nonetheless crucial for their success in other practical-oriented upper level courses and practicums.
Student growth and technical background: A data scientist or engineer that does not understand the basics of how a computer works cannot effectively understand why their programs behave the way that they do. The material in this course will help students move past the stage where the data science tools they use are mystery boxes. Instead, students will have a greater understanding of how and why they work, and the behind-the-scenes reasons for why they are designed the way that they are. Thus, helping student use these tools (and learn new ones) more effectively.
Lectures and Discussions
A1 Lectures: Mondays, Wednesdays, and Fridays 12:20pm -1:10pm, WED 130 (2 Silber Way)
Section A Discussions:
- A2: Wednesdays, 1:25pm – 2:25pm, FLR 122 (808 Commonwealth Ave)
- A3: Wednesdays, 2:30pm – 3:20pm, IEC B10 (888 Commonwealth Ave)
- A4: Wednesdays, 3:35pm – 4:25pm, IEC B10 (888 Commonwealth Ave)
Note: There are two sections of this course, they cover similar materials, however, their schedules, homework, and discussion sections are different. They are not interchangeable. You must attend the lecture and discussion section you are register for!
Consistently attending and participating in both lectures and discussions is expected and constitute a sizable part of your grade in this course.
Course Content Overview
- Part 1: Why Rust and why should you care? Foundations: command line, git, and Rust basics syntax and features. (Weeks 1-3)
- Part 2: Core Rust concepts. Evaluating code quality and performance. (Weeks 4-5)
- Midterm 1 (~Week 5)
- Part 3: Memory management. Data structures and algorithms. (Weeks 6-10)
- Midterm 2 (~Week 10)
- Part 4: Advanced Rust. Parallelism and Concurrency. (~Weeks 11-13)
- Part 5: Data Science & Rust in Practice (~Weeks 14-15)
- Final exam during exam week
For a complete list of modules and topics that will be kept up-to-date as we go through the term, see the lectures schedule and the list of homework and exam deadlines.
Course Format
Lectures: our lectures will involve extensive hands-on practice. Each class includes:
- Interactive presentations of new concepts, including live coding and visualizations
- Small-group exercises and problem-solving activities
- Discussion and Q&A
Because of this active format, regular attendance and participation is important and counts for a significant portion of your grade (15%).
Discussions: our TAs will work with you on technical interview-style programming exercises in small groups, provide homework support, and will be used occasionally for oral code reviews for homework solutions.
The discussions count towards the attendance portion of your grade.
Pre-work: we will generally assign short, light readings or small exercises ahead of class to help you prepare for in-class activities, and may include short quizzes (graded to completion) to help us keep track of the class’s progress. We will also periodically ask for feedback and reflections on the course between lectures.
Homework/Mini Projects: a key goal of this course is to have you write significant code, both in size and complexity. The only way to master programming is with practice. You can find a tentative schedule of our assignments and their deadlines at this page.
These are split into these categories. Together they constitute 40% of your grade:
-
Homework: we will have small weekly assignments for the first 4 weeks. These will help you get set up and familiarize yourself with the tools we will use throughout the course.
-
Mini projects: after the first 4 weeks, the course will move towards mini projects. There are group assignments for groups of 2-3 students. They span multiple weeks and contain multiple parts that build on each other, each part will be due one week at a time.
-
Code reviews/oral examination: We will also conduct code reviews/oral examination with every group about their solution during the discussion section immediately following their due date. This process will mimic code review practices in industry and offer students feedback about how they improve their solutions and programming skills. They also serve as a check to ensure students only hand in code they have written (and understood) themselves and that group members are collaborating effectively.
-
Corrections/feedback: Students will have the option to submit revised solutions in up to two mini projects of their choosing after their code reviews. This allows them to address feedback given by the teaching staff during review, earning up to 50% of the missed grade. This mimics the process for improving, approving, and merging code in the industry.
Find more details about the mini projects, code reviews, and their policies here.
Exams Two midterms and a cumulative final exam covering the concepts we see in class and in the homework and mini projects. They also include short hand-coding problems (which we will practice in class!). The exams constitute 30% of the final grade.
The course emphasizes learning through practice, with opportunities for corrections and growth after receiving feedback on assignments.
Time Commitment
In a typical week, students are expected to attend the three lectures and the discussion section (~3.5 hours) and allocate 1-1.5 hours for class pre-work. This is a coding heavy course, and students will need to allocate 7-8 hours per week on average to work on the assignment homework and mini projects.
The best way to practice for the exams is by doing the homework and mini projects and engaging in the lecture pre-work and in-class activities. However, we will adjust the assigned workload during the week of exams to allow students some time to review the lecture notes and material, if they so wish.
In total, we expect students to allocate 12-13 hours per week to DS 210 between attending lectures, discussion, and assignments.
This is a programming heavy course that push students to practice and improve their programming skills. We believe this is crucial to the student’s careers, growth, and job prospects. In return, the teaching staff commits to dedicating themselves to helping the students in and outside of class, and providing them with feedback, resources, and guidance to ensure they succeed.
We are on your side as you battle programming, computers, and the Rust compiler.
A1 Course Staff
Section A1 Instructor: Kinan Dak Albab
Email: babman@bu.edu
Office hours: Mondays 11:00am - 12:00pm and Fridays 1:30pm - 2:30pm @ CDS 1336
If you want to meet but cannot make office hours, send a private note on Piazza with at least 2 suggestions for times that you are available, and we will find a time to meet.
A1 TAs
-
Taishan Chen (utallow@bu.edu)
Office Hours: TBD -
Zach Gentile (zgentile@bu.edu)
Office Hours: Mondays 2:00pm - 4:00pm, location TBD
A1 CAs
-
Emir Tali (etali@bu.edu)
Office Hours: Wednesdays 11:30am - 1:20pm, location TBD -
Matthew Morris mattmorr@bu.edu)
Office Hours: TBD -
Kesar Narayan (kesar@bu.edu)
Office Hours: TBD -
Lingjie Su (sljleo@bu.edu)
Office Hours: TBD
Course Websites and Material
- Syllabus (this document)
- Interactive lecture notes
- Schedule page
- Homework, Mini project, and exam deadlines
Piazza
- Announcements and additional information
- Questions and discussions
- Code from lectures and discussion sections
- In-class coding exercises and their solutions
Gradescope
- Homework and in class activities submission
- Gradebook
- Programming exercises and challenges
- The standard for practicing for technical interviews!
Other Resources
The Rust Language Book
by Steve Klabnik, Carol Nichols, and Chris Krycho, with contributions from the Rust Community
This is a great resource that goes over the various Rust languages features in detail. It starts with the basics (variables, types, and loops) and ends with more advanced features (concurrency, unsafe).
Brown University Experimental Rust Course
This is a fork of the official Rust Language Book with integrated short quizzes and language visualizations.
- Website: https://rust-book.cs.brown.edu/index.html
- Repo: https://github.com/cognitive-engineering-lab/rust-book
Grading, Homework, and Exams
Grade breakdown
Your grade will be determined as:
- 40% assignments
- 3 Homework in the beginning of the semester (5%)
- 4 mini projects (35%)
- 15% attendance: includes lectures and discussion sections.
- 15% final exam
- 10% mid term 1
- 10% mid term 2
- 10% pre-work, surveys, and in-class activities
We will use the standard map from numeric grades to letter grades (>=93 is A, >=90 is A-, etc). For the midterm and final, we may add a fixed number of “free” points to everyone uniformly to effectively curve the exam at our discretion - this will never result in a lower grade for anyone.
We will use gradescope to track grades over the course of the semester, which you can verify at any time and use to compute your current grade in the course for yourself.
Some mini projects will offer opportunities for extra credit which provide a supplement on top of the grades from the above (i.e., allow students to get more than 100% or make up for lost work).
Assignments Grading and Policies
Mini projects
Our 4 mini projects are graded equally as follows:
- 60% correctness and performance: whether your code passes our tests within the allocated time.
- 40% code reviews / oral examination: include code quality, collaboration, and analysis/reflection.
You will get partial credit for solutions that do not pass all the tests or that take longer than the allocated time. This partial credit is proportional to how far your solution is from one that meets our tests and performance. You may receive some partial credit for code that does not compile or otherwise fail to pass any of the tests, provided that it demonstrates some conceptual understanding of the material.
Group work
The 3 Homework are individual work. Our mini projects are for groups of 2-3 students.
All students in a group must be registered for the same discussion section.
We expect students to contribute equally to these projects, and provide some guidelines for how they can split the work among themselves. Groups with drastically unequal contribution between their members will receive grade penalties.
All students in the group will share the correctness and performance grade component, but they will receive individual grade for the code reviews.
Code reviews
We will have 4 code reviews in total, one for each mini project. We will hold the code reviews during the discussion sections immediately following the mini project deadline. We will review late submissions at their current state, provided they are sufficiently near completion. If you have no code or progress to show during code review, you will receive a 0 on that mini project.
Code review format: Each group will have their own code review during the discussion section they are registered for (roughly 15 minutes long). The reviewer will be the instructor or one of the TAs.
Code review contents: The code reviews will provide you with feedback about the design of your code and any potential issues. The review will include verbal questions directed at the entire group, and specific questions for individual students. The review will go over your code and your commit history. It will also provide you with feedback.
We will ask students to explain certain code blocks, justify their design or approach, or compare it with other hypothetical approaches. They will also contain reflection questions that ask you to draw conclusions or highlight lessons you learned from working on the assignment.
Absences: All members of a group need to be present for their code review. A group may request an alternative time for a code review provided reasonable justification, and we will work with them to find a suitable arrangement, e.g., in office hours.
We ask that students give us at least 2 days notice before requesting rescheduling. Missing code review without a document excused or without giving prior notice may result in 0 for that mini project.
Corrections and resubmissions
Students will have the chance to resubmit their solutions for up to two mini projects of their choosing after the code review. The deadline for resubmission is Mondays, at 11:55pm.
Students can use the feedback they received in the code review to improve their code, e.g., make it pass all the tests cases, execute faster, or have a better design and overall code quality. This allows them to earn up to 50% of any grades they missed in their original submission.
Online Resources and AI Use
Wholesale use of AI in the homework and mini projects is forbidden. We define wholesale to mean asking AI to generate chunks of code, such as entire functions, structs, or complex multi-line code blocks.
We encourage you not to mindlessly use AI to help with your assignment. This can lead to over reliance on AI and defeat the purpose of the assignment: for you to practice your coding skills. Limited use of AI, e.g., to find particular API calls, is allowed, provided you are able to explain your code, design choices, and reason about the decisions you made during code review. The same applies to other resources, such as stackoverflow. You will need to document such code with a comment and provide a link to the online resource or relevant prompts you used.
AI Use Document: You will be required to submit a short document with each assignment describing how you used AI, if at all. We will confirm your understanding of the code, and whether any AI use was within acceptable parameters in the code reviews.
Over reliance on AI: If you are unable to adequately explain your code or answer questions about it in code review due to over-reliance on AI consistent with your AI use document, you may lose a significant portion of your code review portion of the grade.
Academic dishonesty: If you fail to honestly report your use of AI or online resource and we confirm this via our code review, you will receive 0 on that mini project, and your final grade in the course will be capped at a B. A repeat violation will result in an automatic F. We may refer egregious cases to appropriate CDS and BU committees.
Due date and late submission
Our homework and mini projects are generally due on Mondays, 11:55pm. Students have the option to submit up to two days late for a maximum of 80% of the assignments grade.
Attendance
We will track attendance in lectures via in class polls. These polls track the location of the students to ensure they are physically at class.
We understand that unexpected circumstances can happen: students may miss up to 3 lectures and 1 discussion section without having to provide an excuse
We will accommodate documented absences within reason and inline with BU’s policies and guidelines, but may ask for official documentation.
Course Policies
Exams
The final will be during exam week, date and location TBD. The two midterms will be in class during normal lecture time.
If you have a valid conflict with a test date, you must tell us as soon as you are aware, and with a minimum of one week notice (unless there are extenuating circumstances) so we can arrange a make-up test.
If you need accommodations for exams, schedule them with the Testing Center as soon as exam dates are firm. See below for more about accommodations.
Deadlines and late work
Homework and mini projects will be due on the date specified in gradescope.
If your work is up to 48-hours late, you can still qualify for up to 80% credit for the assignment. After 48 hours, late work will not be accepted unless you have made prior arrangements due to extraordinary circumstances.
Collaboration
Mini projects are group based, and members of a group are expected to contribute equally to the solution.
You are free to discuss problems and approaches with other students beyond your group, but must do your own coding. If a significant portion of your solution is derived from someone else’s work (your classmate, a website, a book, etc), you must cite that source in your writeup.
You must also understand your solution well enough to be able to explain it during code review. You will not be penalized for using outside sources as long as you cite them appropriately and meet the code review expectations.
Academic honesty
You must adhere to BU’s Academic Conduct Code at all times. Please be sure to read it here.
In particular: cheating on an exam, passing off another student’s work as your own, or plagiarism of writing or code are grounds for a grade reduction in the course and referral to BU’s Academic Conduct Committee.
If you have any questions about the policy, please send us a private Piazza note immediately, before taking an action that might be a violation.
AI use policy
You are allowed to use GenAI (e.g., ChatGPT, GitHub Copilot, etc) to help you understand concepts or lecture notes.
For Homework and mini projects, you are only allowed to use AI in limited, piece-meal fashion, e.g., to search for a particular API, or explain a very specific error you are encountering. You should understand that this may help or significantly impede your learning depending on how you use it.
If you use GenAI for an assignment, you must cite what you used and how you used it (for brainstorming, autocomplete, generating comments, fixing specific bugs, etc.). You must understand the solution well enough to explain it during code review.
If you fail to report how you used GenAI for an assignment in adequate detail, or if you are unable to explain the basics of the solution in code review, this may result in a 0 for that assignment. A serious, repeat violation will earn you an automatic F in the course.
Your professor and TAs/CAs are happy to help you write and debug your own code during office hours, but we will not help you understand or debug code that generated by AI.
For more information see the CDS policy on GenAI.
Attendance and participation
Since a large component of your learning will come from in-class activities and discussions, attendance and participation are essential and account for 10 and 15% of your grade, respectively.
Attendance will be taken in lecture through polls which will open at various points during the lecture. If you miss such a poll (e.g., due to being significantly late to class), that will count as an absences. The polls use a custom made website that confirms your location. Attempting to submit such a poll from a different location (e.g., your home) will be detected and may constitute an instance of academic dishonesty/cheating.
Understanding that illness and conflicts arise, up to 3 absences are considered excused and will not affect your attendance grade.
In most lectures, there will be time for small-group exercises, either on paper, GitHub, or gradescope. To receive participation credit on these occasions, you must identify yourself on paper or in the repo/gradescope submission. These submissions will not be graded for accuracy, just for good-faith effort.
Occasionally, we may ask for volunteers, or may cold call students randomly to answer questions or present problems during class. You will be credited for participation/in-class activities for such contributions.
Absences
This course follows BU’s policy on religious observance. Otherwise, it is generally expected that students attend lectures and discussion sections. If you cannot attend classes for a while, please let me know as soon as possible. If you miss a lecture, please review the lecture notes on this website before the next class.
Accommodations
If you need accommodations, let us know as soon as possible. You have the right to have your needs met, and the sooner you let us know, the sooner we can make arrangements to support you.
This course follows all BU policies regarding accommodations for students with documented disabilities. If you are a student with a disability or believe you might have a disability that requires accommodations, please contact the Office for Disability Services (ODS) at (617) 353-3658 or access@bu.edu to coordinate accommodation requests.
If you require accommodations for exams, please schedule that at the BU testing center as soon as the exam date is set.
Re-grading
You have the right to request a re-grade of any homework or test. All regrade requests must be submitted using the Gradescope interface. If you request a re-grade for a portion of an assignment, then we may review the entire assignment, not just the part in question. This may potentially result in a lower grade.
Corrections
You are welcome to submit corrections on your mini projects. This is an opportunity to take the feedback you have received during code review, reflect on it, and then demonstrate growth. Corrections involve submitting an updated version of the mini project alongside the following reflections in a document:
- A clear explanation of the issues or feedback
- What misconception(s) led to it
- An explanation of the correction
- What you now understand that you didn’t before
After code review, you will have until the following Monday to submit corrections. You can only submit corrections on a good faith attempt at the initial submission (not to make up for a missed or severely incomplete assignment).
Satisfying this criteria completely for any particular mini project will earn you back up to 50% of the points you originally lost (no partial credit).
DS210 Course Overview
Lecture 1: Wednesday, January 21, 2026
This lecture introduces DS 210 A1: Programming for Data Science, covering course logistics, academic policies, grading structure, and foundational concepts needed for the course.
Overview
This course builds on DS110 (Python for Data Science). That, or an equivalent is a prerequisite.
We will spend the bulk of the course learning Rust, a modern, high-performance and more secure programming language. While running and using Rust, we will cover important foundational concepts and tools for data scientists and programmers:
- Tools
- Shell commands
- Git version control
- Computer architecture and systems
- Overview of CPU architectures and instruction sets
- Memory layouts and memory management
- Basic parallelism and synchronization
- Algorithmic foundations
- Basics of runtime analysis and big O notation
- Basic data structures (vectors, linked-lists, hashmaps) and their uses
Why is it important for data science students to learn these concepts?
- It is important to have a strong technical background in effective programming for your future careers. This includes understanding how the computer works, and how that affects the performance and correctness of your programs.
- You need knowledge of data structures and algorithms and to be able to put that knowledge into clean, concise code to succeed at technical interviews.
- Many upper courses in the CDS curriculum require a good background in the topics we will learn in 210.
- This course and the handson programming practice are an opportunity for technical and professional growth.
Consult the syllabus for detailed information about the course objectives.
New This Semester
We’ve made some significant changes to the course based on observations and course evaluations.
- Homework/mini projects: more and larger mini projects that focus on re-enforcing the systems and algorithmic concepts from class and give you more experience with intermediately complex programs.
- Code review sessions: to provide you with feedback about your code, mimic industry code review processes, and ensure you carry out the work yourself rather than outsource your work and thinking to AI.
- Less emphasis on exams: the exams will focus on the concepts we learn in the course and less on pen-and-paper coding, as well as a smaller portion of your overall grade.
Question: What have you heard about the course? Is it easy? Hard? Do these changes above align with your impressions?
Course Timeline and Milestones
The course is roughly split into these units:
- Part 1: Foundations (command line, git) & Rust Basics (Weeks 1-3)
- Part 2: Core Rust Concepts (Weeks 4-5)
- Midterm 1 (~Week 5)
- Part 3: Memory management and data structures. (Weeks 6-10)
- Midterm 2 (~Week 10)
- Part 4: Advanced Rust. Parallelism and Concurrency. (~Weeks 11-13)
- Part 5: Data Science & Rust in Practice (~Weeks 14-15)
- Final exam during exam week
Additionally, the course will have weekly homework and mini projects, usually due on Mondays. Check the deadlines page.
Course Format
Lectures with hands on exercises and active discussion. Attendance is required.
Discussions will review and reinforce lecture material and provide further opportunities for hands-on practice. We will allocate specific discussion sections for code reviews. Attendance is also required.
Pre-work will be assigned before most lectures to prepare you for in-class activities. These are typically short readings followed by a short quiz.
Homework and Mini projects are the key to learning the material in this course and to getting a good grade. They will proceed at a weekly pace. The first 3 Homework are smaller, individual assignments to help you get familiar with the basics. The 4 mini projects are longer, group assignments to help you practice writing more complex code.
Exams 2 midterms and a cumulative final exam covering the concepts we learn in class.
Full details here.
Course Websites
You have been added to Piazza, we will also add you to Gradescope.
-
Piazza:
- Announcements and additional information
- Questions and discussions
-
Gradescope:
- Homework
- Gradebook
Grading and Policies
Grade distribution:
- 40% homework and mini projects
- 15% attendance (lectures and discussion sections)
- 15% final exam
- 10% mid term 1
- 10% mid term 2
- 10% participation, pre-work, and in class activities
Important course and grading policies:
- code reviews for mini projects
- corrections and resubmissions for mini projects
- late submissions
- We encourage you to not use AI during your mini projects work, but if you must, you need to follow our
AI use policy
- You must report your use of AI and online resources along your submission
- If we judge that you over-relayed on AI given what you reported (e.g., during code reviews), we will deduct grades appropriately
- If we judge that you did not honestly report AI use, you will receive a 0 for the mini project. A repeat violation is an automatic F.
- Other course policies: exams, collaboration, absences, accommodations.
We are not trying to be strict around AI-use for no reason. Instead, we believe this is necessary to ensure you get proper programming practice and truly learn this material. Given our policies and justification, do you feel like this policy is reasonable? Do you agree with it? Do you feel it is too restrictive?
Why Rust?
Lecture 2: Friday, January 23, 2026
Code examples
A common question we get from students is why did we chose to use Rust for this course instead of a different language? Why not continue with Python since it was used in DS 110?
It is important for us to explain our rational in some detail, and demonstrate to you the motivation behind these decisions. Throughout the course, you will struggle with some Rust-specific concepts and idiosyncrasies. We want you to understand that there is a reason you have to put up with (and overcome) all the hurdles of learning a new languages and in dealing with the Rust syntax, compiler, and borrow checker.
Why learn a new programming language? Why not continue to use Python?
Learning a second programming language builds CS fundamentals and teaches you to acquire new languages throughout your career.
Importantly, it also helps you distinguish what is an inherent property of how computers or algorithms work, and what is simply an incidental design decision, implementation choice, or a convention from a particular programming language ( and why that language made these choices, which often has deep and interesting justifications).
Example 1: What do we mean by an incidental choice?
Consider the following Python code:
print('hello world!')
We are all familiar with what this code does. However, nothing in it is particularly insightful about the essence of computers
or programming or even necessary given how they work. The fact that printing uses the word print is incidental. Other languages use
a different word for it, e.g., println in Rust, cout in C++, or console.log in Javascript.
In Python 3, printing is a function call, as evident by the parenthesis following print above. But it does not have to be this way:
in Rust, it is a macro (as we will see later), and even in Python 2, you could print using print "hello world".
Finally, Python does not really distinguish between " and ', but other languages, like Rust, do!
Example 2: Diving deeper into good and bad design choices
Consider the following Python code:
x = 2
y = '3'
print(x + y)
What is the output of running this code?
The above code produces a runtime error when run:
TypeError: unsupported operand type(s) for +: 'int' and 'str'
Is this the result of a fundamental aspect of how computers work? Not really. In fact, other languages similar code will have different behaviors.
In Javascript and Java, 2 + "3" results in “23”! These languages implicitly upgrade 2 to a string. Interestingly, in Javascript, 2 * "3" give 6, but not in Java!
If you were responsible for designing your own language. What alternative behaviors would you consider for
2 + '3'?
Some of your answers:
- “23”
- 5
- an error only if the string is truly a string, e.g.,
2 + 'hello', and 5 otherwise.
Some other answers we think would not be good:
- 0 or the empty string
- 5 for
2 + '3'but2hellofor2 + 'hello' - The number 23 (as a number, not a string).
It seems like there is a range of answers that are acceptable/somewhat reasonable, and a range of clearly unreasonable answers. What are the criteria that distinguish the two?
- Whether the choice reflects our natural/intuitive expectations as humans/programmers
- Whether the choice is confusing or has many corner cases
- Whether the choice results in silent failures if the program is executed that are hard to debug
Example 3: What are the tradeoffs at play when looking at competing choices
Consider the following Python code:
if 10 > 0:
  x = 5
  print(f"hello world {x}")
The below Rust code is equivalent:
fn main() {
  if 10 > 0 {
    let x = 5;
    println!("hello world {x}");
  }
}
Running both pieces of code (e.g., using the Rust playground) reveals
that they both produce identical output: hello world 5.
What are the most visible differences between the two code snippets
- The Rust code is contained within a function whose name is
main. - Python uses
:and indentation, Rust uses{and}. - Python delimits statement with new lines, Rust uses
;. - Variable declaration looks different, python does not distinguish from initial variable declaration and changing it in the future, Rust does by requiring initial declaration use
let.
We will understand what (1) and (4) mean later in the course. Let’s focus on (2) and (3).
The following code is valid in Rust, however the same style in Python would not work: (a) the code is not indented properly, and (b) multiple statements share the same line.
fn main() {
if 10 > 0 {
let x = 5; println!("hello world {x}");
}
}
Which do you prefer?
- Some of you prefer Python’s style. Reasons include:
- being easier to read
- looking nicer and shorter (no
mainfunction) - you are already more familiar with Python: that code feels more natural
- Others prefer Rust:
- no issues with indentation (e.g., mixing spaces and tabs): these are a major headache when writing Python code
So, both approaches have nice things (and not so nice things). What dimensions are at odds here?
How nice the code looks and how easy it is to read vs how easy it is to write! E.g., indented code looks nicer
and shorter than code with { and }, but dealing with spaces and tabs is a headache while writing the code.
We call the first readability and the second writability. Sometimes these are subjective, sometimes they are less so.
We will see many more examples later.
Okay, you convinced us that we should learn a second language. Why Rust specifically?
Rust is a compiled language! It is very fast! It is also very different from Python!
What about other compiled and fast languages, like C++?
Compared to C++, Rust offers two important advantages:
Memory safety: Rust lets you see how data structures work in memory and manage your own memory, while reducing the risk of making various memory-related mistakes (e.g., a lot of the C/C++ headaches)
Strong type system: Rust has a strong type system that helps programmers writing Rust code ensure their programs are correct, memory safe, and type safe. We will understand what that means in the future.
In other words, the Rust compiler gives you errors and hints about your code to help you write code correctly, rather than allow you to write code any way you want, and then have to deal with fixing it when you encounter various errors during runtime.
Furthermore, Rust is experiencing growing adoption in industry and academia a like. This spans many fields, from low-level systems programming (e.g. the Linux kernel), software engineering, to data science and scientific computing!
We will investigate these notions in more depth later.
Rust, The Rust Compiler, and Speed
A big reason for why we want to teach you a compiled language, and specifically Rust, is that it is fast. But how fast is Rust (or compiled languages in generally) you may ask.
Consider our very first, proper code example.
In this example, you can see two equivalent pieces of code in Rust and Python. The code first creates a list with many numbers (10 million numbers!), then sums all these numbers using a simple loop.
In the code, we measure the elapsed time between the start and end of that loop. In other words, the time that it takes to sum up the 10 million numbers.
First, we run the python code using cd src && python3 example.py. On my machine, the sum takes ~310ms. This is impressive! Imagine how long it would take
you, a human, to add up 10 million numbers.
Next, we run the rust code using cargo run. On my machine, the result takes 30ms. That is a 10x improvement! In other words,
if you were a company in the business of adding numbers (which is more or less what all the big AI companies do), you just cut down
your compute costs by a factor of 10! Big savings!
But wait. It gets better. We can ask Rust (specifically, the Rust compiler) to automatically optimize our code as much as it can using
cargo run --release. Now, the result takes ~1.5ms an impressive 200x speedup, or alternatively, a 200x reduction in compute costs.
BIG SAVINGS.
REALLY REALLY BIG SAVINGS.

What is a compiler? Why is it fast?
The content of the python file example.py is human-readable (some may disagree). It contains things like comments, variables with intelligible names, among other things.
Importantly, it is not written in a computer’s native tongue: the ol’ zeros and ones.
Notice how we ran the python code. We first type in the python3 command, then give it the name of the file we want to run. The python3 command is a translator: it is
responsible for reading out the file one line at a time, and translating it to the computer as it goes through it, telling the computer what to do.
This is a lot like when you watch a live TV speech in a foreign language: the TV station super imposes the voice of a live interpreter, that translates every sentence from the speaker’s
language to English, allowing us to understand what the speaker says, but, often at a noticeable delay.
The python3 command does exactly that (which is why it is in fact called the Python interpreter), except the delay it introduces is even more significant (in relative terms), thus causing slower execution of code.
Rust instead does not have an interpreter, it is a compiled language. We can see how that operates using the following commands in our example code above:
# This compiles (or builds) but does not run the code
cargo build
# This takes us to the folder where the compiler produces the compiled code
cd target/debug/
# The compiled code is in a file called example
# This runs it
./example
You can see that our Rust code, once compiled, can be run directly, without any other commands: there are no interpreters!
Furthermore, we can print the contents of the compiled file. Note that it is not human-readable at all! This is all in zeros and ones, in the computer’s native tongue.
# This takes us to the folder where the compiler produces the compiled code
cd target/debug/
# print the content of the compiled file
cat ./example
Finally, cargo run is simply a helpful shortcut that first compiles the code, then runs the compiled code.
Rust lets us get more visibility into how the computer works
Look at our second code example:
rows.rs and columns.rs are almost identical. Both create a large matrix of dimensions 10,000x10,000 (100 million elements) and sum all its elements
while timing the duration required for the sum.
The one difference is that rows.rs goes through the matrix one row at a time, starting from the first row. While the columns.rs goes one column at a time,
starting from the left most column.
Both add the same number of elements (100 million), so it stands to reason that they will take a similar amount of time. Let us see if that is the case:
cargo run --bin rows     # runs rows.rs
cargo run --bin columns  # runs columns.rs
On my machine, there is a noticeable difference: columns.rs is roughly 3x slower than rows.rs! Why?
It turns out this difference is entirely related to how the computer works, and not the algorithmic nature of either code (which is similar). Specifically, it has to do with how the CPU in a computer fetches the numbers from its memory (i.e., RAM), and how the numbers inside the matrix are placed in that memory. We will look at the details of computer memory and its structure later.
Key takeaway: the important lesson is that we need to understand how the computer works to inform us in how to write the most efficient formulation of our desired program.
Shell & Terminals
Lecture 3: Wednesday, January 28, 2026, and
Lecture 4: Friday, January 30, 2026
Every movie with hackers

The matrix had a legit terminal though

What is the terminal?
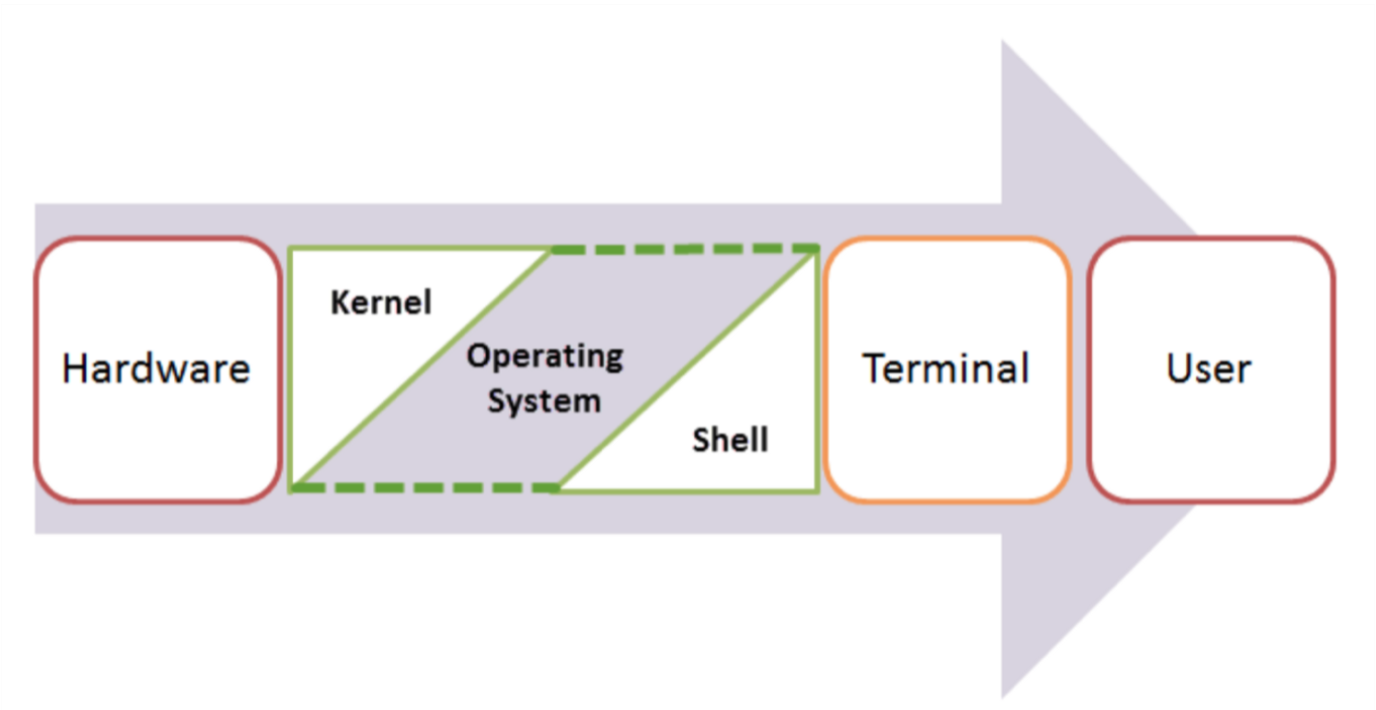
Shell, Terminal, Console, Command line… too many words?
- The command line is the interface where you type commands to interact with your computer.
- The command prompt is the character(s) before your cursor that signals you can type and can be configured with other reminders.
- The terminal or console is the program that opens a window and lets you interact with the shell.
- The shell is the command line interpreter that processes your commands. (You might also encounter “a command line” in text-based games)
Terminals are more like applications and shells are more like languages.
Some famous Terminals:
- Terminal (macOS)
- iTerm2 (macOS)
- GNOME Terminal (Linux)
- Konsole (Linux)
- Command Prompt (Windows)
- PowerShell (Windows)
- Git Bash (Windows)
Famous Shell interpreters:
- Bash (Bourne Again SHell) - most common on Linux and macOS (Kinan’s favorite)
- Zsh (Z Shell) - default on modern macOS
- Fish (Friendly Interactive SHell) - user-friendly alternative
- Tcsh (TENEX C Shell) - popular on some Unix systems
- PowerShell - advanced shell for Windows
We often use all these words interchangeably in speech:
- “Open your terminal”
- “Type this command in the shell”
- “Run this in the command line”
- “Execute this in your console”
What is this all good for?
Lightning fast navigation and action
# Quick file operations
ls *.rs                    # Find all Rust files
grep "TODO" src/*.rs       # Search for TODO comments across files
wc -l data/*.csv           # Count lines in all CSV files
Question: How would you to this “manually”?
It’s how we’re going to build and manage our rust projects
# Start your day
git pull                             # Get latest code from GitHub (today's discussion sections)
# ... code some features ...
cargo run                            # Demo your new feature
cargo test                           # run your tests
git add src/main.rs                  # Stage your changes
git commit -m "Add awesome feature"  # Save your work
git push                             # Share with the team
For when your UI just won’t cut it
Confused by “invisible files” and folders?
ls -la
Need to find a file where you wrote something a while ago?
grep -r "that thing I wrote 6 months ago"
Modify lots of files at once?
# Rename 500 photos at once
for file in *.jpg; do mv "$file" "vacation_$file"; done

# Delete all files older than 30 days
find . -type f -mtime +30 -delete
“Why is my computer fan running like it’s about to take off?”
df -h              # See disk space usage immediately
ps aux | grep app  # Find that app that's hogging memory
top                # Live system monitor
In other words, the command line provides:
- Speed: Much faster for repetitive tasks
- Precision: Exact control over file operations
- Automation: Commands can be scripted and repeated
- Remote work: Essential for server management
- Development workflow: Many programming tools use command-line interfaces
The file system and navigation
Everything starts at the root
Root Directory (/):
In Linux, the slash character represents the root of the entire file system.
(On a Windows machine you might see “C:" but on Linux and MacOS it is just “/”.)
(We’ll talk more about Windows in a minute)
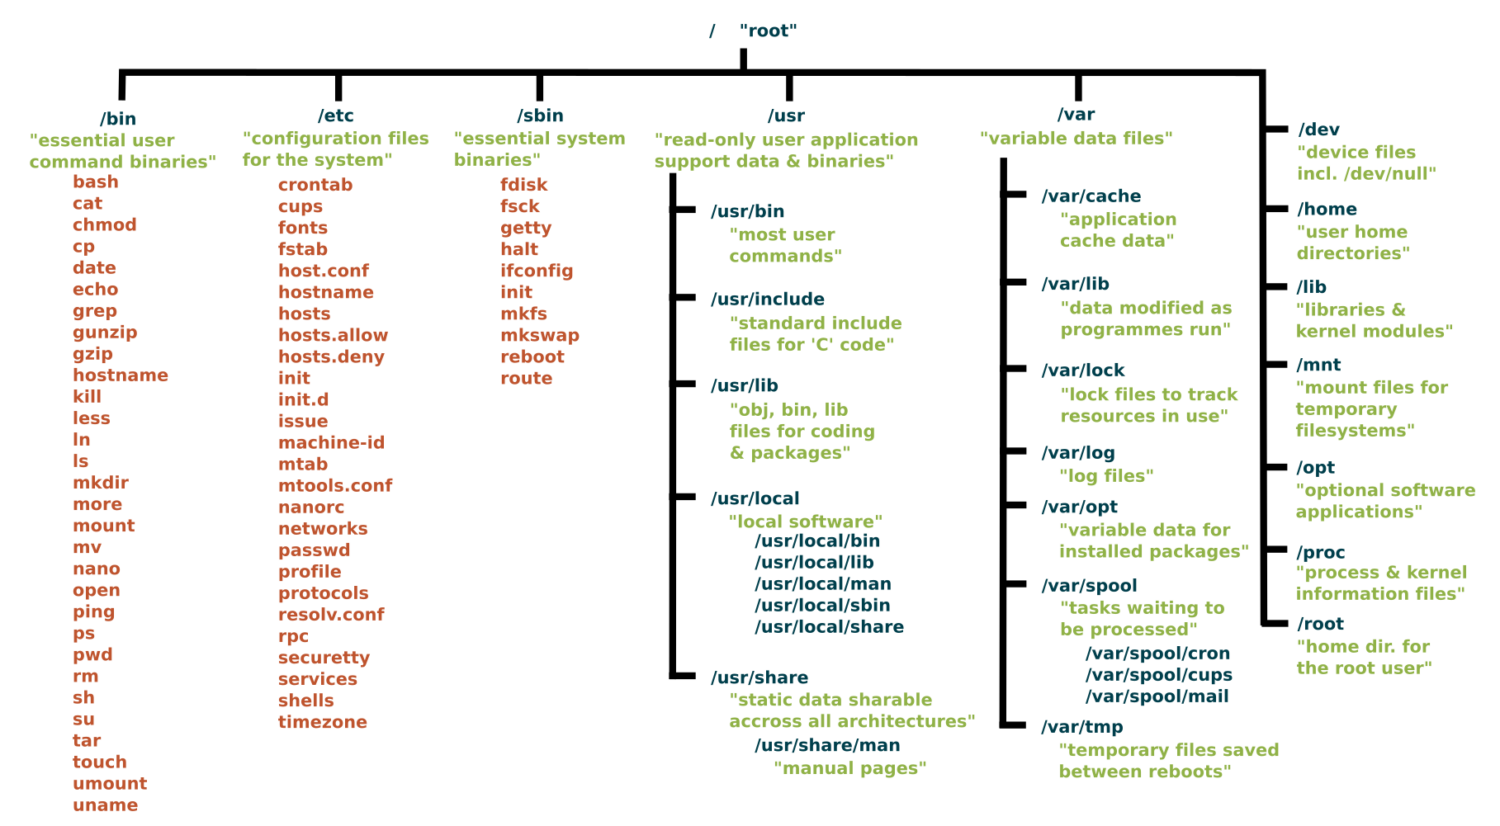
Key Directories You’ll Use:
/                          # Root of entire system
├── home/                  # User home directories
│   └── username/          # Your personal space
├── usr/                   # User programs and libraries
│   ├── bin/               # User programs (like cargo, rustc)
│   └── local/             # Locally installed software
└── tmp/                   # Temporary files
Navigation Shortcuts:
~= Your home directory.= Current directory..= Parent directory/= Root directory
Let’s take a look / basic navigation demo
Demo time! First let’s look at the command prompt…
Maybe half of your interactions with the shell will look like:
pwd                   # Print working directory
ls                    # List files in current directory
ls -a                 # List files including hidden files
ls -al                # List files with details and hidden files
cd directory_name     # Change to directory
cd ..                 # Go up one directory
cd ~                  # Go to home directory
Tips:
- Use
Tabfor auto-completion (great for paths!) - Use
Up Arrowto access command history - Try
control-cto abort something running or clear a line - You can’t click into a line to edit it, use left/right arrows (or copy-paste)
What’s going on here?
The command line takes commands and arguments.
ls -la ~
The grammar is like a command in English: VERB (NOUN) (“eat”, “drink water”, “open door”)
ls is the command, -la and ~ are arguments.
Flags / Options
Special arguments called “options” or “flags” usually start with a dash - and can be separate or combined. These are equivalent:
ls -la
ls -al
ls -a -l
ls -l -a
BUT they typically need to come before other arguments:
ls -l -a ~   # works!
ls -l ~ -a   # does not work
Winblows (or is it Windows?)
If you use Windows, I am sorry for you.
macOS and Linux are both built on top of Unix, so they share many similarities.
Windows is entirely different
dirinstead oflscopyandmoveinstead ofcpandmv
Thankfully, Windows decided to support the same language as Unix, e.g. via PowerShell and the Linux subsystem for Windows.
We strongly recommend Windows users install a terminal with
bashso we can speak the same language. Git comes with a Git Bash terminal built in!
One thing is unavoidable: different paths
/vsC:\Users\(vote for which is a back slash!)- This incompatibility has caused more suffering than metric vs imperial units.
Essential Commands for Daily Use
The rest of the 80% of bash commands you will mostly ever use
Demo time!
mkdir project_name        # Create directory
mkdir -p path/to/dir      # Create nested directories
touch notes.txt        # Create empty file
echo "Hello World" > notes.txt  # Overwrite file contents
echo "It is me" >> notes.text   # Append to file content

cat filename.txt          # Display entire file
head filename.txt         # Show first 10 lines
tail filename.txt         # Show last 10 lines
less filename.txt         # View file page by page (press q to quit)
nano filename.txt          # Edit a file

cp file.txt backup.txt    # Copy file
mv old_name new_name      # Rename/move file
rm filename               # Delete file
rm -r directory_name      # Delete directory and contents
rm -rf directory_name     # Delete dir and contents without confirmation
Understanding ls -la Output
-rw-r--r-- 1 user group 1024 Jan 15 10:30 filename.txt
drwxr-xr-x 2 user group 4096 Jan 15 10:25 dirname
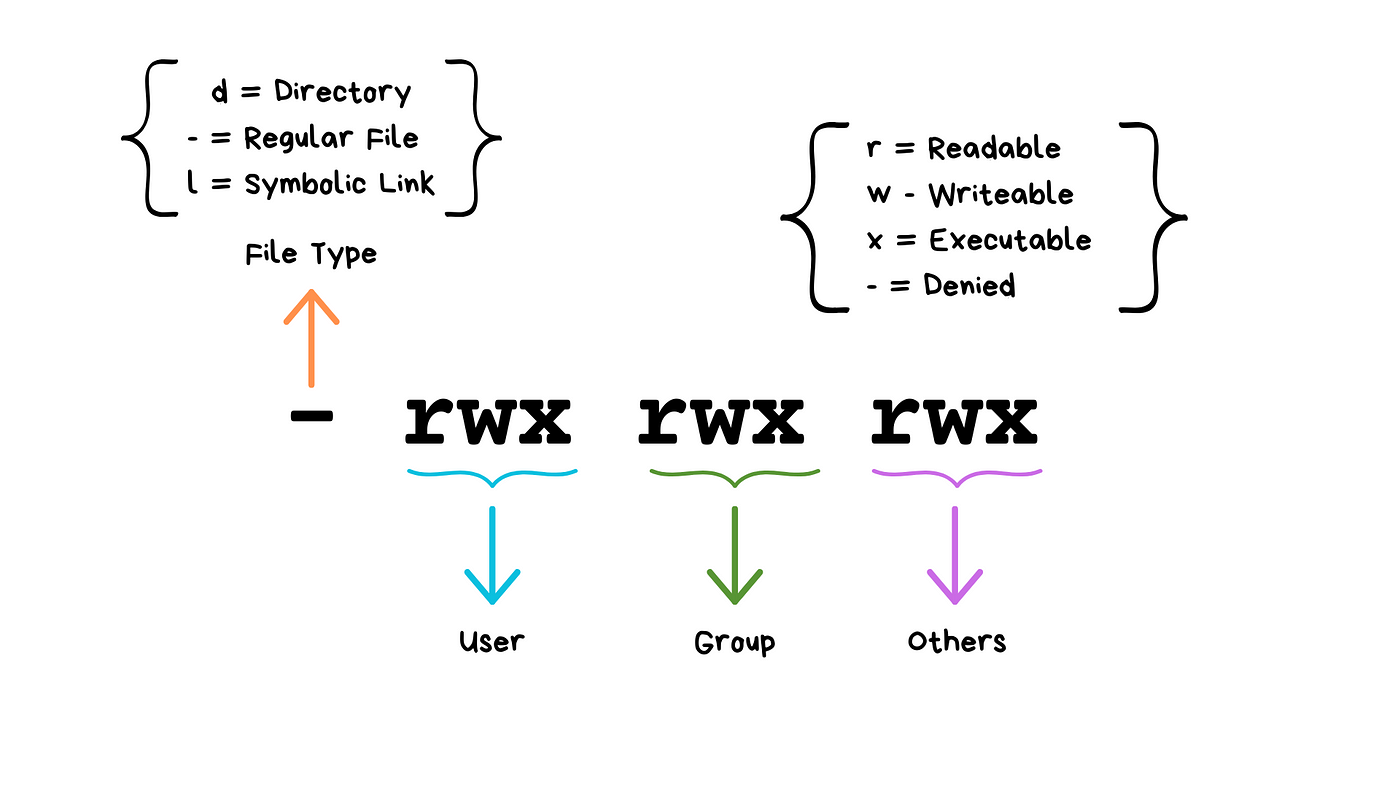
(Don’t worry about “groups”!)
We will see these kinds of permissions again in Rust programming!
Common Permission Patterns
rw-r--r--: Files you can edit, others can readrwxr-xr-x: Programs you can run, others can read/runrw-------: Private files only you can access
Don’t have permission?
You can use sudo!
sudo rm <protected_file> # removes file even if you do not have permissions
Combining Commands with Pipes
ls | grep ".txt"          # List only .txt files
cat file.txt | head -5    # Show first 5 lines of file
ls -l | wc -l            # Count number of files in directory


# Find large files
ls -la | sort -k5 -nr | head -10

# Count total lines in all rust files
cat *.rs | wc -l

# Save output of command in a file called `results.txt`
ls -la > results.txt
ls -la >> results.txt  # append
How does Shell find your commands and programs
cargo --version   # uses our earlier installation of Rust
firefox           # opens firefox!
When you execute a command, shell looks for an executable file with that exact name in specific locations (folders).
which cargo
which firefox
These specific locations are defined by the PATH environment variable.
echo $PATH
Question: Say we run a new command and get an error that says the shell cannot find it or recognize it. What could the reasons possibly be?
Shell scripts
Shell script files typically use the extension *.sh, e.g. script.sh.
Shell script files start with a shebang line, #!/bin/bash. They tell the computer which shell to use for that file!
#!/bin/bash
echo "Hello world!"
To execute shell script you can use the command:
source script.sh
In Class Activity
Part 1: Access/Install Terminal Shell
Directions for MacOS Users and Windows Users.
macOS Users:
Your Mac already has a terminal! Here’s how to access it:
-
Open Terminal:
- Press
Cmd + Spaceto open Spotlight - Type “Terminal” and press Enter
- Or: Applications → Utilities → Terminal
- Press
-
Check Your Shell:
echo $SHELL # Modern Macs use zsh, older ones use bash -
Optional: Install Better Tools (do this after class):
Install Homebrew (package manager for macOS)
/bin/bash -c "$(curl -fsSL https://raw.githubusercontent.com/Homebrew/install/HEAD/install.sh)"Install useful tools
brew install tree # Visual directory structurebrew install ripgrep # Fast text search
Windows Users:
Windows has several terminal options. For this exercise we recommend Option 1, Git bash.
When you have more time, you might want to explore Windows Subsystem for Linux so you can have a full, compliant linux system accessible on Windows.
PowerShell aliases some commands to be Linux-like, but they are fairly quirky.
We recommend Git Bash or WSL:
-
Option A: Git Bash (Easier)
- Download Git for Windows from git-scm.com
- During installation, select “Use Git and optional Unix tools from the Command Prompt”
- Open “Git Bash” from Start menu
- This gives you Unix-like commands on Windows
-
Option B (do this after class): Windows Subsystem for Linux (or for shortWSL)
# Run PowerShell as Administrator, then: wsl --install # Restart your computer # Open "Ubuntu" from Start menu -
Option C (acceptable for today if you have to): PowerShell (Built-in)
- Press
Win + Xand select “PowerShell” - Note: depending on your version, some commands may differ from what we will show you (uses
dirinstead ofls, etc.) - Not recommended for this course (or life in general).
- Press
Verify Your Setup (Both Platforms)
Run each of these commands in your terminal of choice:
pwd              # Should show your current directory
ls               # Should list files (macOS/Linux) or use 'dir' (PowerShell)
which ls         # Should show path to ls command (if available)
echo "Hello!"    # Should print Hello!
Part 2: Mini Scavenger Hunt
Complete these steps using only the command line!.
You can work in groups of up to 3 people.
You can use echo "text" > file_name to write to the file, or text editor nano.
Feel free to reference the cheat sheet below, the notes above, or use Google for help!
- Navigate to your desktop directory/folder
Hint1: use
cd <path to desktop>to navigate.
Hint2: On mac, your desktop is located at
~/Desktop. On Windows, it is usually underc:\Users\<your username>\Desktop.
Hint3: verify you are in your desktop folder using
pwd.
- Create a directory called
treasure_huntin your course projects folder.
Hint: use
mkdir.
- In that directory create a file called
command_line_scavenger_hunt.txtthat contains your name and the name of your group members, if any.
Hint: confirm the content of your file using
cat <filename>.txt.
- Then, run these lines and record the output into that
.txtfile:
whoami                    # What's your username?
hostname                  # What's your computer's name?
pwd                       # Where do you start?
echo $HOME                # What's your home directory path?
Hint: use
>>to append the output of a command to your file!
-
Inside the same directory, create another text file named
clue_1.txtwith the content “The treasure is hidden in plain sight” -
Create a sub directory called
secret_chamber -
In the
secret_chamberdirectory, create a file calledclue_2.txtwith the content “Look for a hidden file” -
Create a hidden file in the
secret_chamberdirectory called.treasure_map.txtwith the content “Congratulations. You found the treasure” -
When you’re done, change to the parent directory of
treasure_huntand run the commandzip -r treasure_hunt.zip treasure_hunt.- Or if you are on Git Bash, you may have to use the command
tar.exe -a -c -f treasure_hunt.zip treasure_hunt
- Or if you are on Git Bash, you may have to use the command
On windows, if you are unable to create this zip file, add an
error.txtfile insidetreasure_huntand put the error you received in it. You can then use the regular Windows graphical interface to zip the files.
-
Upload
treasure_hunt.zipto gradescope. You only need to upload once per group. -
Optional: For Bragging Rights Create a shell script that does all of the above commands and upload that to Gradescope as well.
Deadline: If you are not able to finish this exercise in class, you’ll have until 11:55PM tonight to finish it from home and upload to Gradescope. If you need help, ask us questions via Piazza.
Command Line Cheat Sheet
Basic Navigation & Listing
Mac/Linux (Bash/Zsh) or Windows with Git Bash or Linux subsystem:
# Navigate directories
cd ~                    # Go to home directory
cd /path/to/directory   # Go to specific directory
pwd                     # Show current directory

# List files and directories
ls                      # List files
ls -la                  # List all files (including hidden) with details
ls -lh                  # List with human-readable file sizes
ls -t                   # List sorted by modification time
Windows (PowerShell/Command Prompt):
# Navigate directories
cd ~                    # Go to home directory (PowerShell)
cd %USERPROFILE%        # Go to home directory (Command Prompt)
cd C:\path\to\directory # Go to specific directory
pwd                     # Show current directory (PowerShell)
cd                      # Show current directory (Command Prompt)

# List files and directories
ls                      # List files (PowerShell)
dir                     # List files (Command Prompt)
dir /a                  # List all files including hidden
Get-ChildItem -Force    # List all files including hidden (PowerShell)
Finding Files
Mac/Linux:
# Find files by name
find /home -name "*.pdf"           # Find all PDF files in /home
find . -type f -name "*.log"       # Find log files in current directory
find /usr -type l                  # Find symbolic links

# Find files by other criteria
find . -type f -size +1M           # Find files larger than 1MB
find . -mtime -7                   # Find files modified in last 7 days
find . -maxdepth 3 -type d         # Find directories up to 3 levels deep
Windows:
# PowerShell - Find files by name
Get-ChildItem -Path C:\Users -Filter "*.pdf" -Recurse
Get-ChildItem -Path . -Filter "*.log" -Recurse
dir *.pdf /s                       # Command Prompt - recursive search

# Find files by other criteria
Get-ChildItem -Recurse | Where-Object {$_.Length -gt 1MB}  # Files > 1MB
Get-ChildItem -Recurse | Where-Object {$_.LastWriteTime -gt (Get-Date).AddDays(-7)}  # Last 7 days
Counting & Statistics
Mac/Linux:
# Count files
find . -name "*.pdf" | wc -l       # Count PDF files
ls -1 | wc -l                      # Count items in current directory

# File and directory sizes
du -sh ~/Documents                 # Total size of Documents directory
du -h --max-depth=1 /usr | sort -rh  # Size of subdirectories, largest first
ls -lah                            # List files with sizes
Windows:
# Count files (PowerShell)
(Get-ChildItem -Filter "*.pdf" -Recurse).Count
(Get-ChildItem).Count              # Count items in current directory

# File and directory sizes
Get-ChildItem -Recurse | Measure-Object -Property Length -Sum  # Total size
dir | sort length -desc            # Sort by size (Command Prompt)
Text Processing & Search
Mac/Linux:
# Search within files
grep -r "error" /var/log           # Search for "error" recursively
grep -c "hello" file.txt           # Count occurrences of "hello"
grep -n "pattern" file.txt         # Show line numbers with matches

# Count lines, words, characters
wc -l file.txt                     # Count lines
wc -w file.txt                     # Count words
cat file.txt | grep "the" | wc -l  # Count lines containing "the"
Windows:
# Search within files (PowerShell)
Select-String -Path "C:\logs\*" -Pattern "error" -Recurse
(Select-String -Path "file.txt" -Pattern "hello").Count
Get-Content file.txt | Select-String -Pattern "the" | Measure-Object

# Command Prompt
findstr /s "error" C:\logs\*       # Search for "error" recursively
find /c "the" file.txt             # Count occurrences of "the"
System Information
Mac/Linux:
# System stats
df -h                              # Disk space usage
free -h                            # Memory usage (Linux)
system_profiler SPHardwareDataType # Hardware info (Mac)
uptime                             # System uptime
who                                # Currently logged in users

# Process information
ps aux                             # List all processes
ps aux | grep chrome               # Find processes containing "chrome"
ps aux | wc -l                     # Count total processes
Windows:
# System stats (PowerShell)
Get-WmiObject -Class Win32_LogicalDisk | Select-Object Size,FreeSpace
Get-WmiObject -Class Win32_ComputerSystem | Select-Object TotalPhysicalMemory
(Get-Date) - (Get-CimInstance Win32_OperatingSystem).LastBootUpTime  # Uptime
Get-LocalUser                      # User accounts

# Process information
Get-Process                        # List all processes
Get-Process | Where-Object {$_.Name -like "*chrome*"}  # Find chrome processes
(Get-Process).Count                # Count total processes

# Command Prompt alternatives
wmic logicaldisk get size,freespace  # Disk space
tasklist                           # List processes
tasklist | find "chrome"           # Find chrome processes
File Permissions & Properties
Mac/Linux:
# File permissions and details
ls -l filename                     # Detailed file information
stat filename                     # Comprehensive file statistics
file filename                     # Determine file type

# Find files by permissions
find . -type f -readable           # Find readable files
find . -type f ! -executable       # Find non-executable files
Windows:
# File details (PowerShell)
Get-ItemProperty filename          # Detailed file information
Get-Acl filename                   # File permissions
dir filename                       # Basic file info (Command Prompt)

# File attributes
Get-ChildItem | Where-Object {$_.Attributes -match "ReadOnly"}  # Read-only files
Network & Hardware
Mac/Linux:
# Network information
ip addr show                       # Show network interfaces (Linux)
ifconfig                          # Network interfaces (Mac/older Linux)
networksetup -listallhardwareports # Network interfaces (Mac)
cat /proc/cpuinfo                 # CPU information (Linux)
system_profiler SPHardwareDataType # Hardware info (Mac)
Windows:
# Network information (PowerShell)
Get-NetAdapter                     # Network interfaces
ipconfig                          # IP configuration (Command Prompt)
Get-WmiObject Win32_Processor      # CPU information
Get-ComputerInfo                   # Comprehensive system info
Platform-Specific Tips
Mac/Linux Users:
- Your home directory is
~or$HOME - Hidden files start with a dot (.)
- Use
man commandfor detailed help - Try
which commandto find where a command is located
Windows Users:
- Your home directory is
%USERPROFILE%(Command Prompt) or$env:USERPROFILE(PowerShell) - Hidden files have the hidden attribute (use
dir /ahto see them) - Use
Get-Help commandin PowerShell orhelp commandin Command Prompt for detailed help - Try
where commandto find where a command is located
Universal Tips:
- Use Tab completion to avoid typing long paths
- Most shells support command history (up arrow or Ctrl+R)
- Combine commands with pipes (
|) to chain operations - Search online for “[command name] [your OS]” for specific examples
Rust Variables and Types
or how I learned to stop worrying and love the types1
Lecture 5: Monday, February 2, 2026, and
Lecture 6: Wednesday, February 4, 2026, and
Lecture 7: Friday, February 6, 2026.
Lecture 8: Monday, February 9, 2026.
Code examples
Rust is a statically typed programming language! Every variable must have its type known at compile time. This is a stark difference from Python, where a variable can take on different values from different types dynamically.
This has some really deep consequences that differentiate programming in Rust from that in Python.
To illustrate this better, let’s start with a simple motivating example from Python.
Motivating example
Let’s start with the following simple example from Python. Let’s say we have two Python lists names and grades.
The first stores the names of different students in a class. The second one stores their grades. These lists are index-aligned:
the student whose name is at names[i] has grade grades[i].
names = ["Kinan", "Matt", "Taishan", "Zach", "Kesar", "Lingie", "Emir"]
grades = [ 0,      100,    95,        88,     99,      98,       97]
# Kinan's grade is 0, Kesar's grade is 99
Now, imagine we need to write some Python code to print the grade of a student given their name. Let’s say the name
of this target student is stored in a variable called target.
# Alternatively, the value of target might be provided by the
# user, e.g., via some nice UI
target = "Kesar"
Our first observation is that the grades and names are index-aligned. So to find the grade of “Kesar”,
we need to find the index of “Kesar” in names. Let’s do that using a helper function. Here’s a reasonable first attempt:
def find_index(target, names):
    # iterate from 0 up to the length of names.
    for i in range(len(names)):
        if target == names[i]:
            return i
Now, we can use find_index to retrieve the grade of “Kesar” as follows.
target = "Kesar"
index = find_index(target, names)
print(grades[index])
This indeed works! and if we run it, we will see the correct output.
99
The code will also work for many other values of target, e.g. “Kinan”, “Matt”, “Emir”, etc.
However, what about if we search for a target who is not in names? For example target = tom?
In this case, find_index never finds a name equal to target, and so its for loop finishes without ever returning any i.
def find_index(target, names):
    for i in range(len(names)):
        # when target = 'Tom'
        # then this condition is False for all elements in names
        if target == names[i]:
            # this is never reached for target = 'Tom'
            return i

    # instead, when target='Tom' the execution reachs this point.
    # What should we return here?
    return ?????
A good follow up question is what should find_index return in such a case?
Discuss this with your neighbor and come up with a candidate value!
Option 1: return -1
Many languages, e.g., Java, use -1 to indicate having not found something. Let’s consider what happens
if we try that out in our Python example. In this case, our find_index function becomes:
def find_index(target, names):
    for i in range(len(names)):
        if target == names[i]:
            return i
    return -1
So what would happen in this case if we search for a target that does not exist?
target = "Tom"
index = find_index(target, names)
print(grades[index])
In this case, find_index returns -1. So, index is equal to -1, and we print grades[-1]. In python, an index of -1
corresponds to the last element in the list. So, our program will print the last grade in the list.
97
This is no good! Tom’s grade is not 97! That’s Emir’s grade. In fact, Tom has no grade at all!!! This kind of silent problem is the worst kind you can have, because you may not even realize that it is a problem. Imagine if there were thousands of students. You run the code and see this output. You may not realize that the target you were looking for isn’t there (or that you made a typo the student’s name), and think that the output is accurate!
You can find the code for this option here.
Option 2: return “Not found”
A different option would be to return “Not found” or some special kind of similar message.
This is curious! find_index now sometimes returns an index (which is a number, i.e., of type int), and sometimes returns a string (in Python, that type is called str)!
def find_index(target, names):
    for i in range(len(names)):
        if target == names[i]:
            return i
    return "Not found"

target = "Tom"
index = find_index(target, names)
print(grades[index])
In this case, index is equal to `“Not found”. So, our last line is equivalent to saying:
grades["Not found"]
This makes no sense! Imagine someone asks you to look up an element in a list at position “Not found”, or position “hello!”, or any other string. What would you do? I would freak out. So does Python, running this code results in the following error:
TypeError: list indices must be integers or slices, not str
In my opinion, this is a little better than option 1. At least, it is visible and obvious that something wrong went on. But it is still not good.
You can find the code for this option here.
Option 3: return “Not found” then manually check the type
How about we check the type of whatever find_index returns before we attempt to access the list of grades?
It turns out we can ask Python to tell us what type a variable (or any value or expression) has! This happens at runtime: we cannot actually determine the type ahead of time. Only when the program is executing/all inputs have been supplied.
def find_index(target, names):
    for i in range(len(names)):
        if target == names[i]:
            return i
    return "Not found"

target = "Tom"
index = find_index(target, names)
if type(index) == int:
    print(grades[index])
else:
    print('not found')
If we run this code, the output we see is:
not found
Finally, we have a solution that works! If the name is in the list, the program will print the grade, and otherwise
it will print not found.
One of the reasons we had to go through all these steps is that Python has dynamic typing. The same function or variable may return or contain different types when you run the program with different inputs.
Furthermore, neither Python nor our program help us out by telling us what the possible types are, or that we checked all of them. We have to figure this out ourselves, and remember to do the checking manually.
You can find the code for this option here.
What about Rust?
Let’s look at the same problem in Rust. The beginning is similar to the Python code.
fn main() {
    let names = vec!["Kinan", "Matt", "Taishan", "Zach", "Kesar", "Lingie", "Emir"];
    let grades = vec![ 0,      100,    95,        88,     99,      98,       97];

    let target = "Matt";
    // we need to find Matt's grade
}
However, we can already see one difference. If you look at this code in a Rust IDE, such as VSCode, you will notice that it automatically fills in the type of each variable. As shown in the screenshot below.
For example, VScode tells us that the type of target is a string (Rust calls this &str, more on the & part later), and the type of grades is Vec<i32>, in other words, a vector (which is what Rust calls
Python lists) that contains i32s in it!
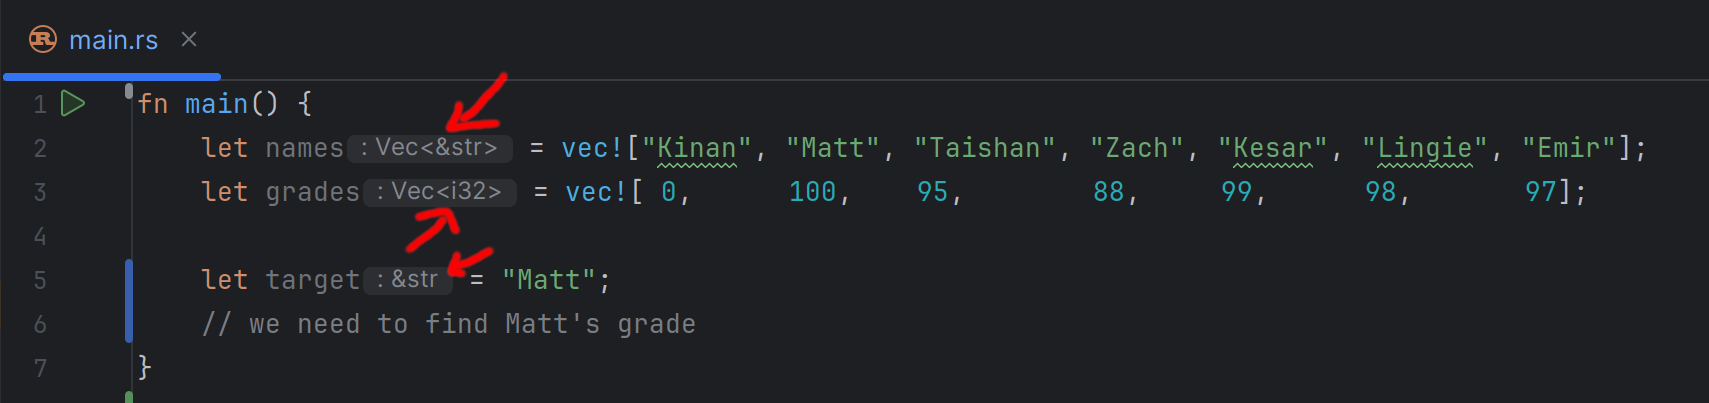
This is quite cool. Not only do we know the type of every variable. We also know information about any other elements or values inside that variable. E.g., the type of the elements inside a vector!
It turns out, we can also write these types out explicitly ourselves in the program. For example:
fn main() {
    let names: Vec<&str> = vec!["Kinan", "Matt", "Taishan", "Zach", "Kesar", "Lingie", "Emir"];
    let grades: Vec<i32> = vec![ 0,      100,    95,        88,     99,      98,       97];

    let target = "Matt";
    // we need to find Matt's grade
}
Furthermore, if we specify types that are inconsistent with the values assigned to a variable, we will get a compiler error!
#![allow(unused)]
fn main() {
// This should not work: "Kinan" is a string, not an i32.
let target: i32 = "Kinan";
}
error[E0308]: mismatched types
  |
  |     let target: i32 = "Kinan";
  |                 ---   ^^^^^^^ expected `i32`, found `&str`
This is a consequence of an important design decision in Rust. It follows a strong static typing philosophy, where every variable (and expression) needs to have a single type that is known statically. In other words, a type that is determined at compile time before the program runs and does not change if you run the program with different inputs again.
Fortunately, Rust has support for type inference. With type inference, we do not have to write out every type in the program explicitly. Instead, we can often (but not always!) skip the types, and let the language deduce it automatically. Hence, VSCode being able to show us the types in the example above.
Now, let’s move on to the next step in the program. We need to implement a find_index function in Rust.
In Rust, function definitions (or more accurately, function signatures) look like this:
#![allow(unused)]
fn main() {
fn find_index(target: &str, names: Vec<&str>) -> usize {
  // the body of the function with all its code goes here.
}
}
There are a few important differences between this and Python:
- Rust uses
fn(short for function) to indicate a function definition, Python usesdef(short for definition). - Every argument to the function must have an explicitly defined type in Rust. For example, we explicitly state that
targethas type&str(i.e. string). - The function must state explicitly what type of values it returns (if any). This is the
-> usizepart, which tells us that this function return values of typeusize(Ausizein Rust is a type that describes non-negative numbers that can be used as indices or addresses on the computer).
Now, we can try to fill in the function body, mimicking the same logic from Python but using Rust syntax.
#![allow(unused)]
fn main() {
fn find_index(target: &str, names: Vec<&str>) -> usize {
    for i in 0..names.len() {
        if target == names[i] {
            return i;
        }
    }
    return "Not Found";
}
}
We can see a few syntax differences that we already covered earlier in class:
- Python relies on
:and indentation to specify where a code block starts and end (e.g., the body of a function, for loop, or if statement). Rust instead uses{and}. - Rust’s syntax for ranges is
<start>..<end>, e.g.,0..names.len(), while Python usesrange(0, len(names)).
However, a deeper difference has to do with the types. The code above does not compile in Rust, and gives us the following error.
error[E0308]: mismatched types
  |
  | fn find_index(target: &str, names: Vec<&str>) -> usize {
  |                                                  ----- expected `usize` because of return type
  |     return "Not Found";
  |            ^^^^^^^^^^^ expected `usize`, found `&str`
This makes sense. We had already promised Rust that find_index would only return elements that have type usize, but then tried to return “Not Found”, a string!
We can try to change the function signature to return strings, e.g. with -> &str. However, this results in a different error: “Not found” is now OK, but return i is not, since i
is not a string (and is in fact a usize).
So, it appears as if we are in a catch 22: no matter what type we chose to specify as the return, we will sometimes try to return a value of a different type.
One quick and dirty fix is to always return usize. So, instead of returning “Not Found”, we can return some special number that indicates that the value is not found. We can try returning -1, but we will get a similar error,
since -1 is not a usize (it cannot be negative!). The best we can do is return names.len() and hope that callers manually check this value with an if statement before using it.
fn find_index(target: &str, names: Vec<&str>) -> usize {
    for i in 0..names.len() {
        if target == names[i] {
            return i;
        }
    }
    return names.len();
}

fn main() {
    let names = vec!["Kinan", "Matt", "Taishan", "Zach", "Kesar", "Lingie", "Emir"];
    let grades = vec![ 0,      100,    95,        88,     99,      98,       97];

    let target = "tom";
    let index = find_index(target, names);
    if index < grades.len() {
        let grade = grades[index];
        println!("{grade}");
    } else {
        println!("Not found");
    }
}
This code works, although it is not an ideal approach. What if we forgot to add in the if index < grades.len() check? The program would crash with an out of range error. We will see how we can improve it next.
You can find the code for this option here.
Using Option
The main challenge we face is that find_index needs to return some special value/type to indicate not finding something, but only rarely. Rust does not let us return different type dynamically the same way Python does.
So, we need a way to let Rust understand, using types, that there are different cases that find_index may encounter and return.
Fortunately, Rust already has a type builtin that does this. The Option type.
#![allow(unused)]
fn main() {
fn find_index(target: &str, names: Vec<&str>) -> Option<usize> {
  // code goes here
}
}
This tells Rust that find_index will sometimes (i.e., optionally) return some usize, but it may sometimes not find anything and instead return nothing. Option is a special kind of type (called an Enum, we will learn more about those later) that
can only be constructed in two ways: either, it is a None which indicates that it is empty, or it is a Some(<some value>) which indicates that it has something in it. Furthermore, following Rust’s philosophy, the type of that something is known,
in this case, usize.
If we had alternatively said Option<&str> or Option<i32> (or even Option<Option<i32>>), then the type of that something would correspondingly be a string, an i32 number, or another option that may have an i32 number in it, respectively.
Great. Now we can re-write the above function, and if we find no matches, we can return None, while if we find some matching index i, we return Some(i).
#![allow(unused)]
fn main() {
fn find_index(target: &str, names: Vec<&str>) -> Option<usize> {
    for i in 0..names.len() {
        if target == names[i] {
            return Some(i);
        }
    }
    return None;
}
}
This is much better!
The last thing we know need to consider is how we call find_index. Previously, we wrote let i = find_index(target, names);, back then VSCode would helpfully tell us that i has type usize.
Now however, it has type Option<usize>. So we cannot use it the same way as before. For example, Rust gives us an error if we try to do grades[i], since i is an Option! Which makes sense,
what does it mean to look up a value in a list by an index that may or may not exist?
[E0277]: the type `[i32]` cannot be indexed by `Option<usize>`
  |
  |     let grade = grades[i];
  |                        ^ slice indices are of type `usize` or ranges of `usize`
Python cannot do this! Remember how it did not inform us that the index could have been None (in option 2) or a string (in option 3). In Python, we had to manually remember this fact, and manually check which case it was in the code. But, because Rust knows all the types it can remind us of this if we forget.
We can fix our code as follows:
fn main() {
    let names = vec!["Kinan", "Matt", "Taishan", "Zach", "Kesar", "Lingie", "Emir"];
    let grades = vec![ 0,      100,    95,        88,     99,      98,       97];

    let target = "tom";
    let i = find_index(target, names); // i has type Option<usize>
    if i.is_none() {
        println!("Not found");
    } else {
        let value = i.unwrap();  // value has type usize
        let grade = grades[value];
        println!("{grade}");
    }
}
Take a closer look at the following:
- We can check whether an Option is None or Some using
is_none(). - we can use
.unwrap()to extract the value inside the Option when it is Some.
This code does the job, and you can find it at here.
One reasonable question is what would happen if we use unwrap() on an Option that is None. For example, what do you think would happen if we run this code? (try running it with the Rust playground to confirm your answer).
fn main() {
    let i: Option<usize> = None;
    println!("This is crazy, will it work?");
    let value = i.unwrap();
    println!("it worked!");
    println!("{value}");
}
Our program runs, but crashes with an error mid way through:
This is crazy, will it work?
thread 'main' (39) panicked at src/main.rs:4:19:
called `Option::unwrap()` on a `None` value
match Statements
The previous code is almost the ideal approach, but it suffers from one problem. We may make a mistake while checking the cases that an Option (or indeed, other types like Option) may have,
and as a result, call unwrap() when we should not, thus causing an error and a crash.
In fact, unwrap() is really really dangerous! It is almost always better not to use it.
Thankfully, Rust offers us a unique and helpful feature. By using match, we can check all the cases of an Option or similar type, exhaustively and without danger. Here is an example:
fn main() {
    let names = vec!["Kinan", "Matt", "Taishan", "Zach", "Kesar", "Lingie", "Emir"];
    let grades = vec![ 0,      100,    95,        88,     99,      98,       97];

    let target = "tom";
    let i = find_index(target, names);
    match i {
        None => println!("Not found"),
        Some(value) => {
            let grade = grades[value];
            println!("{grade}");
        }
    }
}
So, how does match work?
- You typically match on a value whose type has different cases, like
Option(more accurately, on Enums, which we will explain more in detail later in the course). - You specific the value you want to match on immediately after
match. In the above, we are matching onibecause we saidmatch i { ... }. matchhas a corresponding{and}, like a function, loop, or if statement body.- Within that body, we list the different cases that the value/type may have. These have the following shape:
<case> => <code>,- if the case has nothing in it, we can just write down its name, e.g.,
None. If it has a value, we can tell Rust to put that value in a variable for us and give it a name, for example, ifihas something in it, Rust will put it insidevalue. - the code may be a single statement (like the print in
None) or many statements (line withSome). In the later case, we need to use{and}to specify where the code block starts and ends. - Finally, you must use
,to separate the different cases.
- if the case has nothing in it, we can just write down its name, e.g.,
In my opinion, this is the best solution we have seen. You can find it here.
Why do I think it is the best solution? Because, Rust helps us a lot when using a match statement. Specifically, if we forget a case, Rust will give us a compile error and tell us exactly what case(s) we missed.
For example, imagine we wrote this code (omitting the None case because we forgot):
#![allow(unused)]
fn main() {
    match i {
        Some(value) => {
            let grade = grades[value];
            println!("{grade}");
        }
    }
}
Rust will give us the following error (and in fact VSCode will suggest to add the fix for us!).
error[E0004]: non-exhaustive patterns: `None` not covered
  |
  |     match i {
  |           ^ pattern `None` not covered
HashMaps
The code we came up with is great for cases where we want to look up one student’s grade. However, imagine we needed to look up the grades for several students. Can we use our code to do that?
One suggestion is to manually edit the value of target and re-run the code to look at each student’s
grade individually. This works for a handful of students, but will get tedious afterwards.
A different suggestion is to have a vector of targets, and execute our logic for each of them.
In other words, for each of these targets, we first find its index in names using find_index, then print the grade.
This provides the correct but functionality, but it may be slow if we have millions of records and we want to look at thousands of students.
Because, for every student, we have to execute find_index again, and thus loop through all the names again. (We call this a linear time
algorithm or O(n). We will get to the details of this later)
Can we find someway of going through the names only once, and then quickly retrieve as many targets as we want to?
Yes!
We can use a HashMap!
What is a HashMap?
It turns out, the storage layout (i.e., the format of the data) we had is not ideal for these kinds of target lookups, because it uses vectors (i.e. Python lists) whose indices can only be numbers (in a contiguous range from 0 to some n).
A HashMap allows us to look up data by an index with a type of of our choosing (called key). So, we can transform the data such that the name of the student is the key to getting
their grade! You have already seen this concept in Python, except Python calls these dictionaries instead of HashMaps!
Here is a Python solution that does this using dictionaries, which you should be familiar with from DS110.
The solution has two steps: First, it inserts the data into the dictionary, which we call map. Second, it can quickly lookup that data in one step using map[<key>], where <key> is the name of the student, e.g. “Kesar”.
Importing HashMap
Let’s translate that to Rust. The name Rust gives to this datastrcture is HashMap instead of dictionary. We can create a new HashMap using HashMap::new().
HashMap is provided to us by Rust, but we have to import it. In Rust, we do that using use std::collections::HashMap;.
Mutability – Inserting data into a HashMap
Let’s look at the following example using Rust playground.
use std::collections::HashMap;

fn main() {
    let map = HashMap::new();
    map.insert("Kinan", 0);
    map.insert("Matt", 100);
}
This code creates an initially empty HashMap, and store it in a variable called map. Then, it inserts two entries to the map. The first has key “Kinan” and value 0, the second has key “Matt” and value 100.
This makes sense. However, if we try to compile or run the code with Rust, we will get the following compiler error.
error[E0596]: cannot borrow `map` as mutable, as it is not declared as mutable
  |
  |     let map = HashMap::new();
  |         ^^^ not mutable
  |     map.insert("Kinan", 0);
  |     --- cannot borrow as mutable
  |     map.insert("Matt", 100);
  |     --- cannot borrow as mutable
  |
help: consider changing this to be mutable
  |
  |     let mut map = HashMap::new();
  |         +++
Rust complains about the variable map not being declared as mutable. It turns out, by default, all Rust variables are immutable2.
Definition:
im·mu·ta·ble
adjective
unchanging over time or unable to be changed
“an immutable fact”
This is a philosophical decision on the part of the Rust inventors: one of the main sources of bugs when writing large codebases is to assume that some variable remains unmodified or contain some know value, while having some other, far away part of the code change it, thus causing various bugs.
We need to tell Rust that we map should really be mutable. Thankfully, Rust’s compiler error already containers a helpful suggestion, adding the mut keyword.
use std::collections::HashMap;

fn main() {
    let mut map = HashMap::new();
    map.insert("Kinan", 0);
    map.insert("Matt", 100);
}
What would happen if you forget to import HashMap and skipped the first line?
Looping through the content of a HashMap
Rust allows us to iterate through the entire content of a HashMap as below.
use std::collections::HashMap;

fn main() {
    let mut map = HashMap::new();
    map.insert("Kinan", 0);
    map.insert("Matt", 100);
    for (key, value) in map {
        println!("{key} = {value}");
    }
}
Note that iterates over the keys and values at the same time. (You may have seen this in Python using .items())
The code above produces this output. Although on your computer, the output may have a different order.
Matt = 100
Kinan = 0
Getting a value from a HashMap by key
But what if we want to retrieve a single value from the HashMap given a key?
Fortunately, this is very easy (and fast!). We can use map.get(<key>). For example:
use std::collections::HashMap;

fn main() {
    let mut map = HashMap::new();
    map.insert("Kinan", 0);
    map.insert("Matt", 100);
    let value = map.get("Kinan");
}
What do you think the type of value is? Hint: put this code in VSCode and see what it tells you!
Initially, one may think that value will have a numeric type.
However, imagine if we had provided a key that does not exist in the map! E.g., map.get("Tom").
This is the same problem we encountered before!
It turns out, the Rust developers are smart, and they have thought of this, this is why map.get(...) returns an Option<...>!
In other words, if we have a HashMap<&str, usize>, get will return an Option<usize>3.
We know how to handle Option types! We can use a match statement as before.
use std::collections::HashMap;

fn main() {
    let mut map = HashMap::new();
    map.insert("Kinan", 0);
    map.insert("Matt", 100);
    let value = map.get("Kinan");
    match value {
        None => println!("Not found"),
        Some(value_actually) => println!("{value_actually}")
    }
}
What would happen in Python if you attempt to access a dictionary using a non existing key? e.g.,
map["tom"]?
Putting it all together
We can put all of this together to build our final solution, which you can find here
Understanding this code will help you a lot with homework 2!
Clone this repo to your computer using git (or use
git pullif you already cloned it),
and openmodule_4_variables_and_types/4_hash_mapin VSCode.
Run the code and see if you can predict what the outputs will be.
Also, take a look at what types VSCode shows for the different variables, and see if you can understand why they have these types!
-
If you did not get this reference, you are missing out on one of the greatest movies of all time. Watch it. ↩
-
Change and mutability is a constant in our lives. Unlike in Rust, almost nothing is immutable in reality. If you want to intuitively feel what it means to be immutable or unchanged, listen to this album. ↩
-
In reality, it will return
Option<&usize>, but do not worry about these pesky&s for now. We will go over them later in the course. ↩
Rust Practice
Lecture 9: Wednesday, February 11, 2026.
This module gives you some practice creating, editing, and running Rust projects.
Step 1: Create the Project
We will create a project from the terminal / command line. Use Git Bash if you are on windows.
-
Open a terminal, and navigate to the folder where you would like your project to appear using
cd. -
Run
cargo new exampleto create a new project. In this case, we named this projectexample, but you can change the name to whatever you feel like. -
Confirm the project was created correctly by navigating to its folder using
cd exampleand running it usingcargo run. -
Use
pwdto the exact location where you created the folder.
You should see a similar output to the screenshot below, but the location of your project may be different.
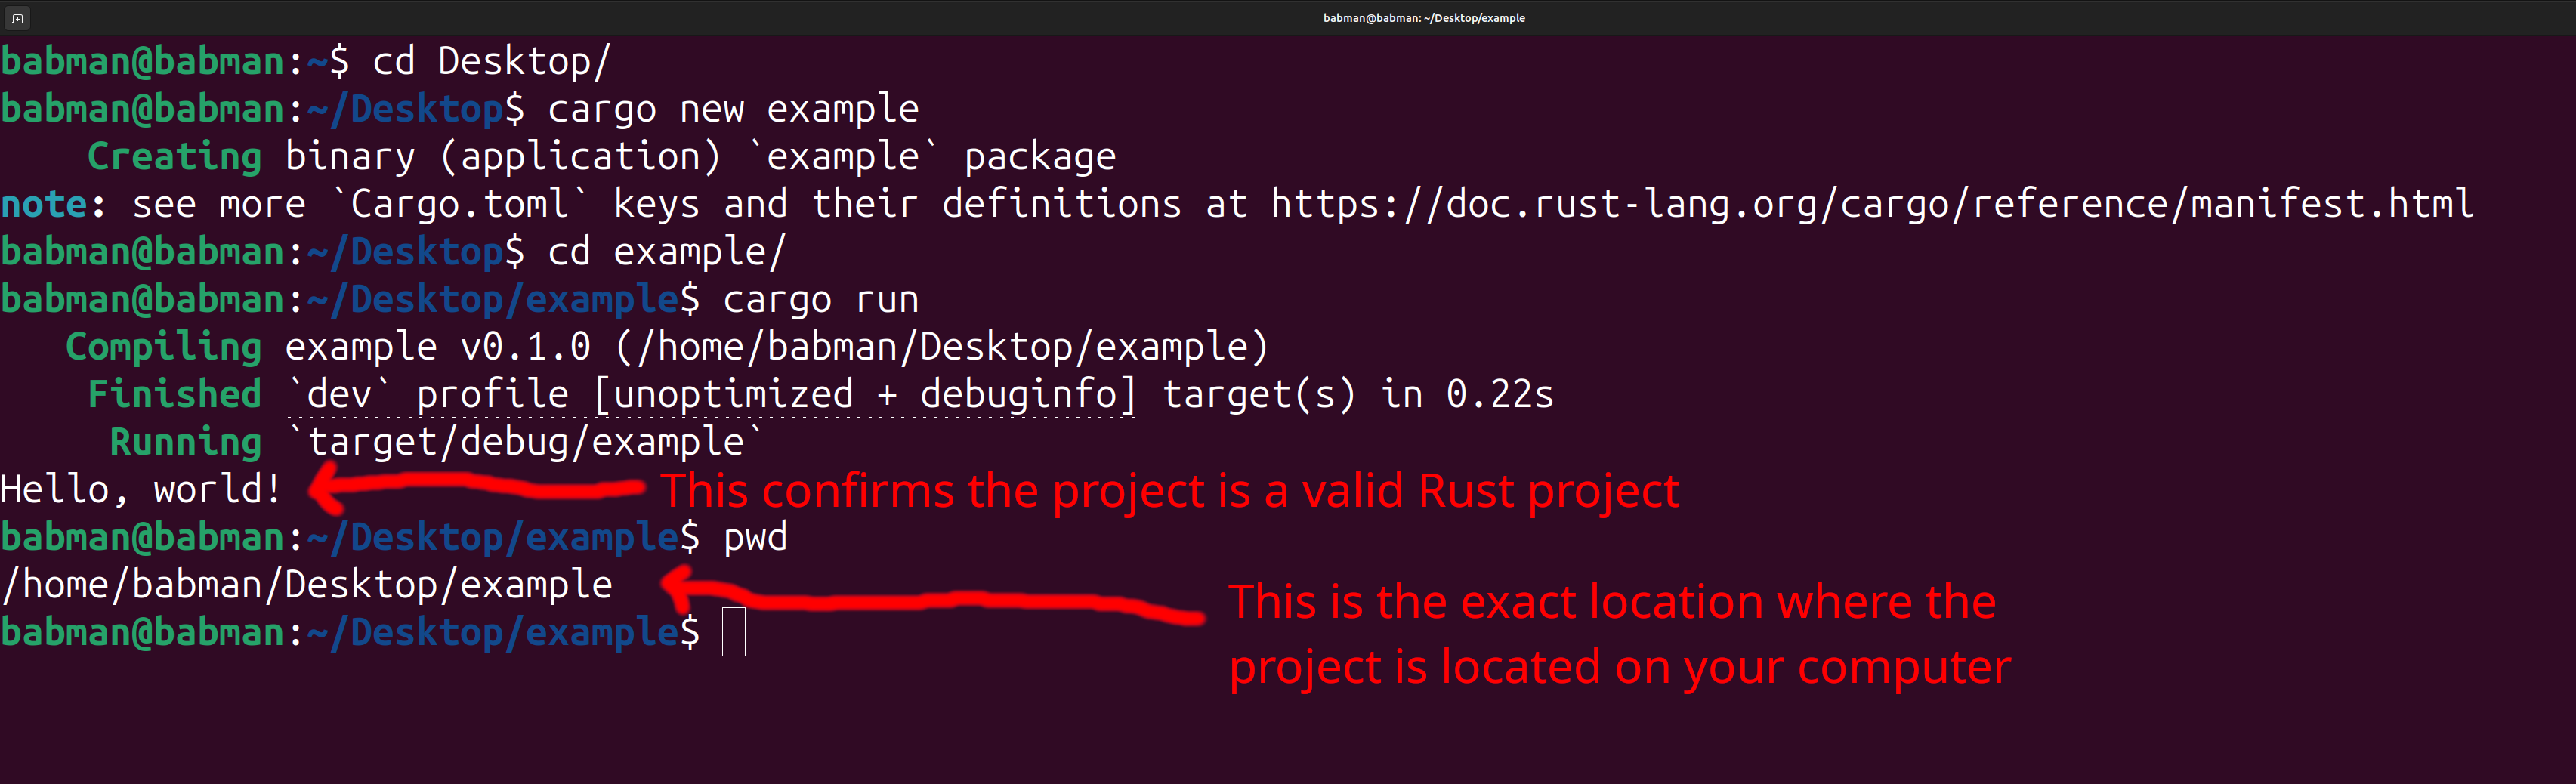
Step 2: Open the project with VSCode
Open your VSCode, then use the file menu to click on open folder. You need to use open folder and not open.

Then navigate to the location from step (4) above where you placed the project, and open the project’s folder.

Finally, use the left navigation panel to look inside src and open file main.rs to see the code. You should see the content of the file open, as well as a run button
right on top of the main function. Click run to confirm it works successfully.

If you do not see the run button, double check that (1) rust analyzer is installed in VSCode, and (2) you used open folder and opened the correct folder – e..g, the example folder on your desktop.
Step 3: Modify and run the code
Change the code to the following:
fn main() {
    let x = 10;
    let y = 15;
    let sum = 10 + 15;
    println!("{x} + {y} = {sum}!");
}
If you followed all the steps correctly, you will see VSCode add in the type of x, y, and sum automatically on your behalf, as shown in the screenshot below.
You can run the code from the command line using cargo run, and you can also run it from VSCode as below.
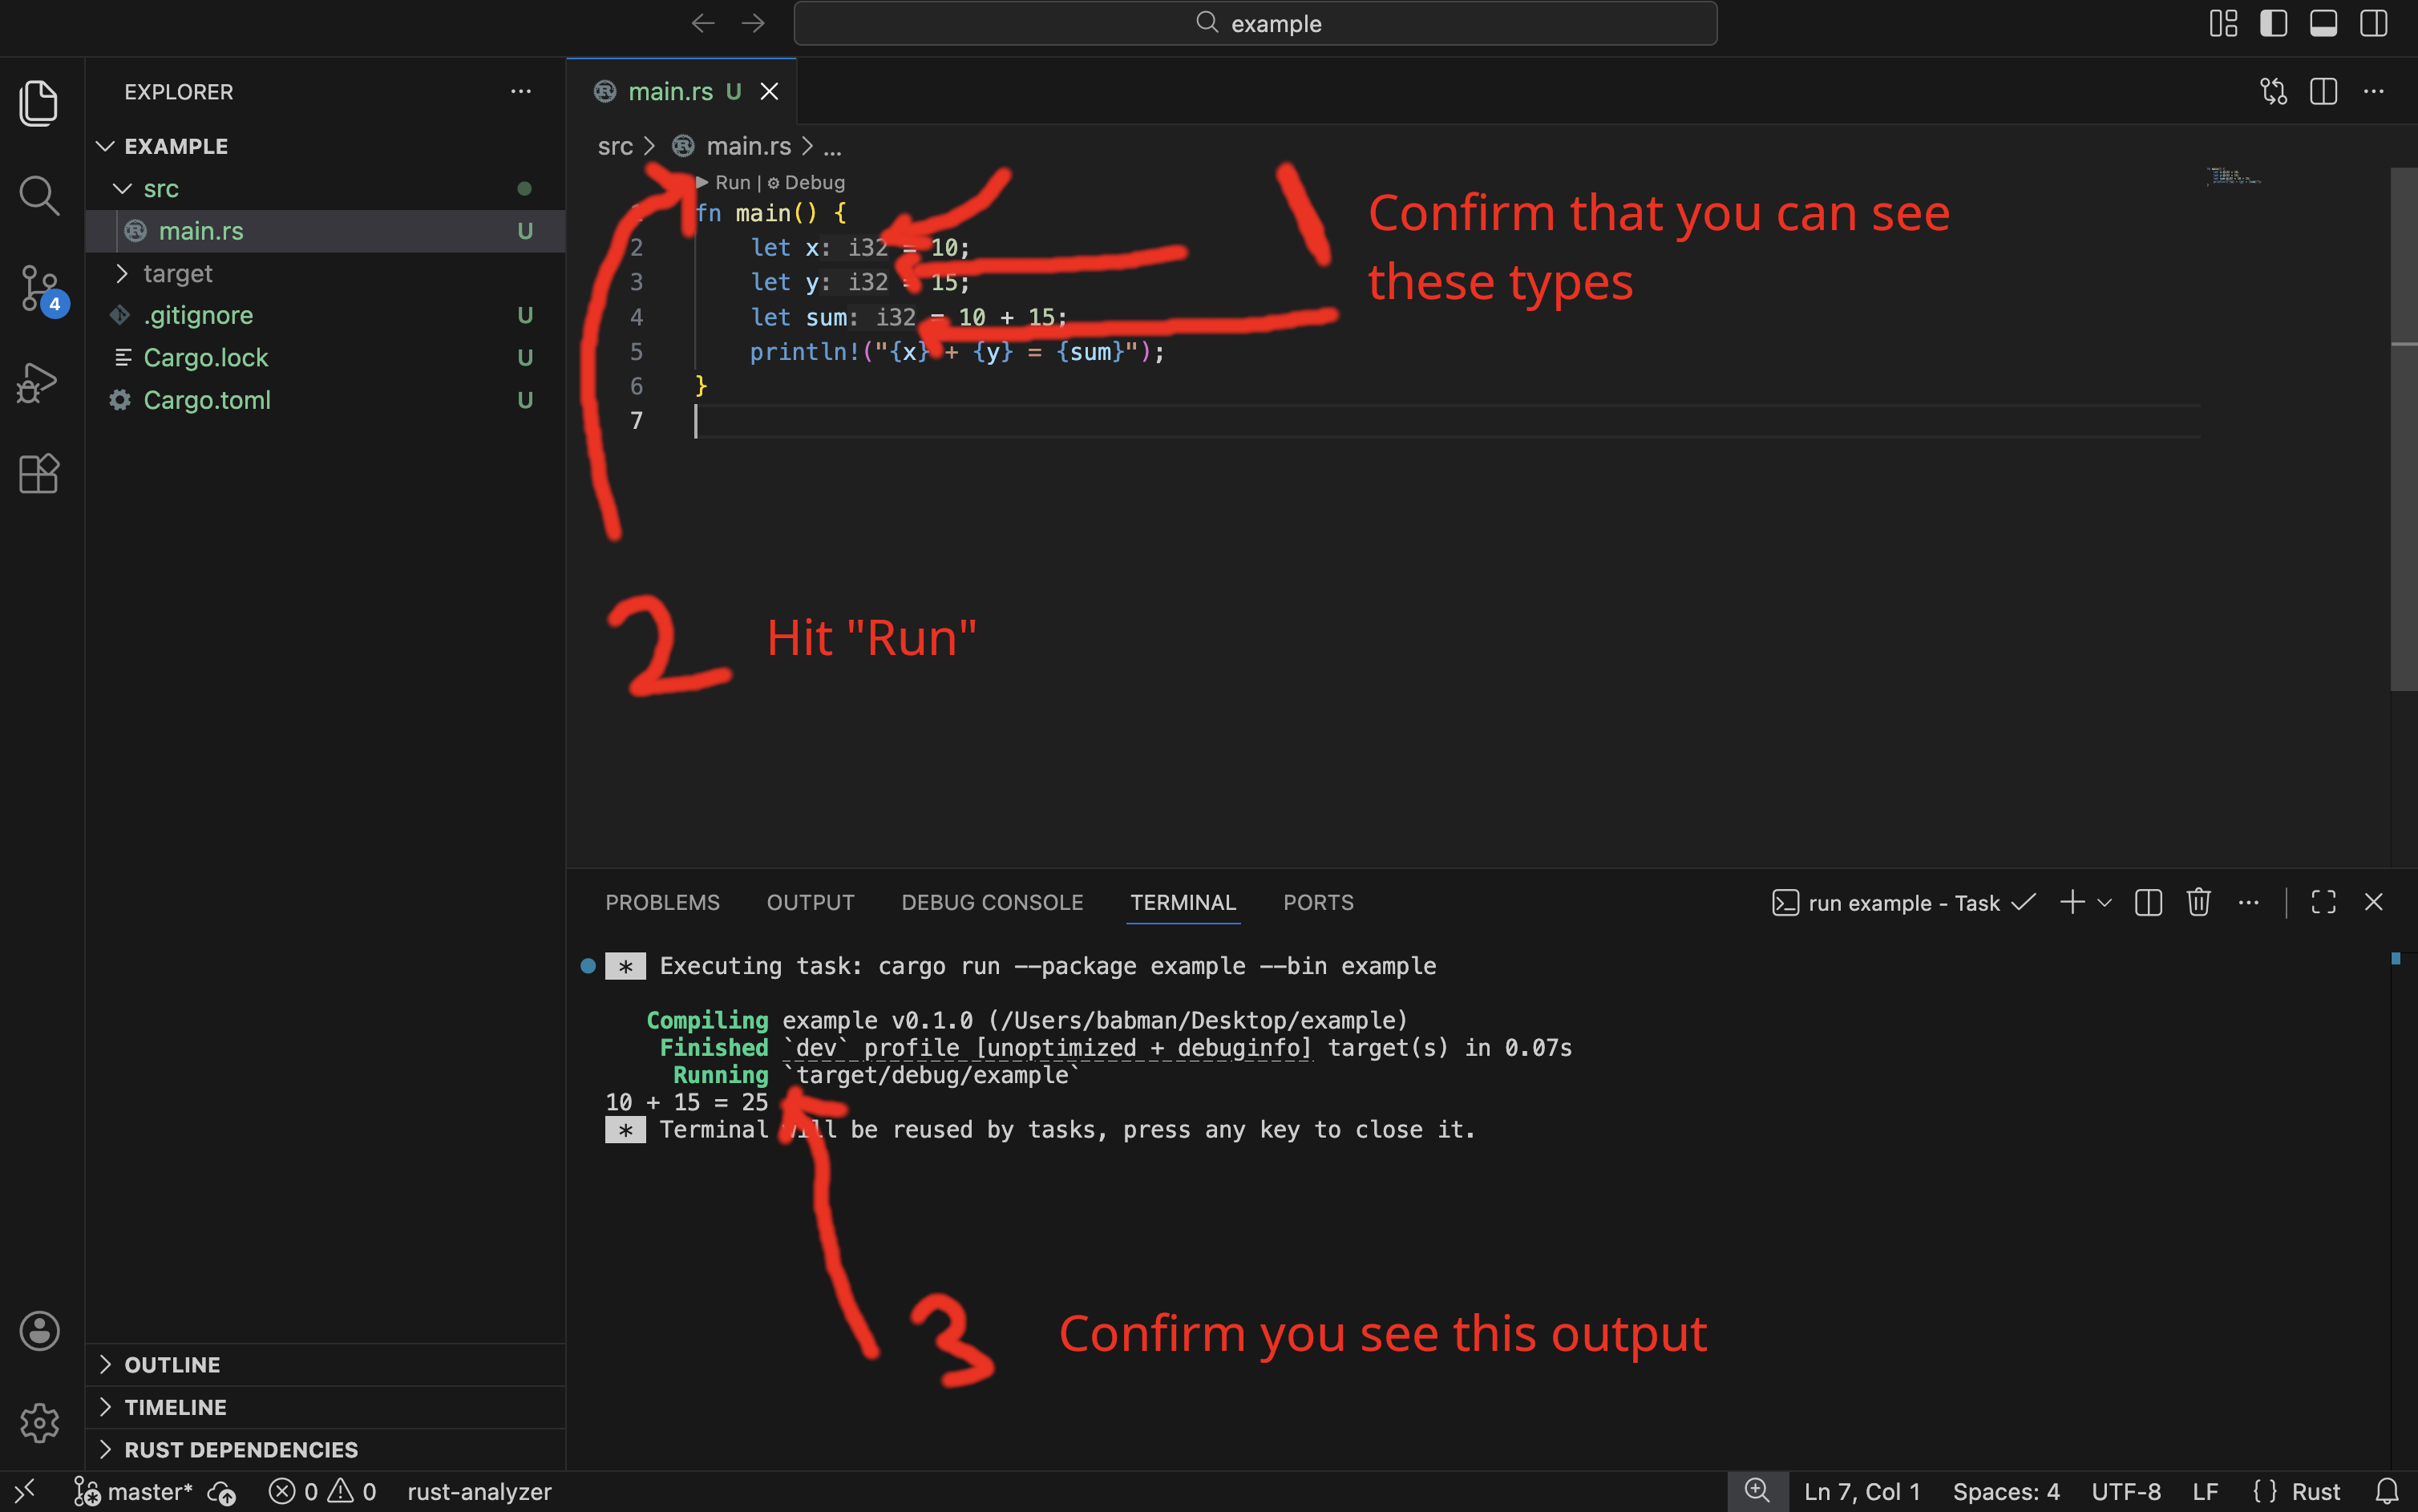
Step 4: Work on our first in class activity on Gradescope
For Wednesday, February 11, we will work on
Lecture 9: Option, HashMap, and match practice which you can find on Gradescope.
Erase all the code from src/main.rs and, instead, copy the provided code from Gradescope to src/main.rs.
You will see an error in VScode around the map variable being immutable. Remember what we learned in class about how to fix that error!
Then, continue to the remaining two questions.
Step 5: Work on our second in class activity on Gradescope
For Friday, February 13, we will work on
Lecture 10: loops and conditionals which you can find on Gradescope.
Erase all the code from src/main.rs and replace it with the provided code from Gradescope.
Add the missing code to solve the problem.
Comparing and Evaluating Programs
Lecture 10: Friday, February 13, 2026, and
Lecture 11: Tuesday, February 17, 2026.
Code examples
What Makes a Good Program – How To Evaluate Different Programs That Do The Same Thing
One problem can usually be solved in many many different ways. These differences may stem from following an entirely different algorithm for how to solve the problem, structuring and organizing the code in a different way, or even the unique “artistic” style of the program author.
So, if you are looking at different programs that aim to solve the same problem, how do you know which one is better? In other words, how do you chose which one to use? This also applies to when you are developing the solution yourself. You may brainstorm different competing approaches, but you will eventually have to choose one to implement.
There are several metrics by which you can judge a program. Sometimes, these metrics may be at odds, and it is up to you to prioritize some over others based on the context of the problem at hand. These metrics include:
- Correctness: Does the program actually solve the problem? Does it solve it correctly for all possible inputs? Does it produce accurate results consistently? This is often (but not always) non-negotiable, and in this course, you are always expected to implement correct programs.
- Performance: How fast does the program run? Faster programs are often desirable because they save money! However, this is not always clear cut to evaluate: some programs may be faster for certain kinds or sizes of inputs while being slower for others.
- Memory consumption: How much memory/space does the program consume? This often has implications on program performance, but can be important on its own if dealing with really large inputs that strain the available memory on a computer.
- Readability: Is the program easy to understand by someone else if they read it? Is the main idea behind and why it works clear? This is often important in the real world where programs need to be developed and maintained by a team of different programmers.
- Ease of Development: How complex is it to implement this program? How long would it take the programmer to implement, optimize, test, and document the program to a satisfactory degree?
- Ease of Maintenance or Updating: How easy is it to update the solution if the problem is changed slightly or if the circumstances change a little? Can the solution be generalized to other similar problems or other contexts?
Some of these metrics are more objectives than others. E.g., you can design experiments to benchmark exactly how long a program takes to execute in different setups and workloads (performance), but two reasonable programmers may disagree on how readable or how much effort is required to develop a particular program.
We will explore this further using two examples.
Example 1 - Contains Duplicate
Remember the contains duplicate problem that you had to solve for homework 2.
In this problem, we are given a vector with n elements, and we need to discover if some element(s) in it are duplicated.
For example, the vector [1, 2, 3, 1, 5] has a duplicate (1) but [1, 3, 2, 5, 4] does not.
The Solutions
There are different ways of solving this problem, we will explore three approaches which you can find in the courses’ code repository.
Solution 1
Our first idea is to use sorting to order the elements of the vector.
For example, if our input is [1, 2, 3, 1, 5], we can sort it so that it becomes
[1, 1, 2, 3, 5].
Note that after sorting, any duplicates would appear consecutively in the vector. Thus, we can simply check if any consecutive elements are the same.
#![allow(unused)]
fn main() {
fn contains_duplicate(mut numbers: Vec<i32>) -> bool {
    numbers.sort();

    for i in 0..numbers.len() - 1 {
        if numbers[i] == numbers[i+1] {
            return true;
        }
    }
    return false;
}
}
Solution 2
A different idea is to count how many times each element appears in the vector.
Essentially, we can construct a hash map that maps each element to how many times it appears in the vector.
For example, if the input vector was [1, 2, 3, 1, 5], we would construct the following counts map:
{
  1: 2,
  2: 1,
  3: 1,
  5: 1
}
After constructing this map, finding out whether there are duplicates becomes easy: we can look at
all the elements and their counts, and check if any have a count that is greater than 1.
Here’s an implementation of this idea below:
#![allow(unused)]
fn main() {
fn contains_duplicate(numbers: Vec<i32>) -> bool {
    // Construct a map from element to its count
    let mut map = HashMap::new();
    for num in numbers {
        let value_in_map = map.get(&num);
        match value_in_map {
            None => {
                map.insert(num, 1);
            },
            Some(count) => {
                map.insert(num, count + 1);
            }
        }
    }

    // Now that we have counted all of the elements
    // we can check if any have a count that is greater
    // than 1.
    for (num, count) in map {
        if count > 1 {
            return true;
        }
    }

    return false;
}
}
Solution 3
We can improve solution 2 by using the following observation: we actually do not need the full count of every element, just whether the element has a count greater than 1. A different way of phrasing it is that while we are iterating through the vector, we just need to know if the current element is one we have seen before or not, and not the exact count of how many times we have seen it.
We can use a HashSet to realize this. Unlike a HashMap, a HashSet stores a set of keys without associating
them with any values. Inserting an element into a HashSet as well as retrieving an element from it are both fast,
constant-time operations.
You can think of the HashSet<T> as similar to a HashMap<T, bool> that maps elements that exist in the set to true,
and does not contain any mappings for elements outside the set.
We can use HashSet to come up with the code below:
#![allow(unused)]
fn main() {
fn contains_duplicate(numbers: Vec<i32>) -> bool {
    let mut set = HashSet::new();

    for num in numbers {
        if set.contains(&num) {
            return true;
        }
        set.insert(num);
    }

    return false;
}
}
Comparing The Solutions
Performance (Analytical)
Solution 1’s performance depends on sorting. Most good sorting algorithms take O(n log(n)) steps to complete their sort,
where n is the size of the vector. The loop following the sort simply goes through the vector once from start to end, and thus
takes roughly n steps. So in total, this program needs roughly O(n log(n)) steps.
Solution 2 and Solution 3 on the other hand take O(n) steps: solution two contains two loops: the first one
goes over the vector and manipulates the HashMap. Inserting and retrieving elements from a HashMap can each be done
in constant time (i.e., roughly one step), thus this loop has roughly O(n) steps. The second loop is also similar.
Solution 3 contains just one simple loop with n steps, since inserting and retrieving elements from a HashSet is also constant time (~ one step).
So, analytically, solution 1 takes O(n log(n)) while solutions 2 and 3 take O(n). So it appears that solutions
2 and 3 are equivalent and solution 1 is slowed.
Performance (Empirical)
The code we provide on GitHub benchmarks the solutions to see how long they take to execute with a vector with 10,000,000 elements and no duplicates. Surprisingly, we find that solution 1 is a little faster than solution 3, and much faster than solution 2. How come?
While the analytical analysis we did above with the big O notation is often very helpful, it is a rough analysis and skips over important details. Specifically, it glosses over what the “steps” actually entail and treats them as the same.
Sorting entails performing a bunch of comparisons (i.e. <) and swaps. These are really fast and simple operations
that a computer can execute blazingly quickly. Inserting into a HashMap is more complicated: it involves allocating
memory, freeing memory, and hashing keys behind the scenes. While that is constant time (i.e., a fixed number of steps
that does not depend on the size of the map), it is more complicated than a single <.
Furthermore, log(n) is actually quite a small quantity: for n = 10,000,000, log_2(n) is roughly 23. While a factor of 23
can be significant, the simplicity of the operations associated with it in solution 1 still wins over solution 2.
With that said, if n gets big enough, solution 2 will eventually win out, as the log(n) factor grows and eventually over
takes the complexity of the operations.
Solution 3 and Solution 1 are much closer in terms of runtime. Solution 3 can be optimized a little further
by issuing only one HashSet operation: it turns out insert returns whether the element is new or not, and so
we can use that and skip the contains() call.
Furthermore, Solution 3 has a subtle performance advantage: it will stop as soon as it detects a duplicate. imagine if the input vector is very large, but starts with two duplicates immediately. Solution 3 will detect that after two iterations and immediately return, while solutions 1 and 2 will need to complete sorting the entire vector and counting all of its elements, respectively, before getting to detecting the duplicates.
So, which of these solutions is actually faster? Well, that depends on the parameters of the problem:
- How big is the vector? If the vector is incredibly large, solution 1 will eventually become slower, but otherwise, it is faster than solution 2.
- Do we expect to have a lot of duplicates in our inputs? If so, solution 3 will be faster as it can stop as soon as it detects a duplicate!
- Are our input vectors small or medium in size (e.g. millions of elements)? Do they have no or few duplicates? Then, Solution 1 is probably fastest.
Readability, Ease of Development and Maintenance
Which of these programs is simplest to understand? Solution 1 and 3 are both much shorter, so it is easier to understand what they do. However, To understand why solution 1 works, you need to understand how sorting affects duplicates and make them appear in consecutive locations.
What about scenarios where the problem is changed slightly? Say, we want to instead find if an element appears 3 times or more, rather than just duplicates (count of 2)? Solution 3 will no longer, as it does not have the ability to track how many times an element appears. Solution 1 could still work, but now, it will need to check whether any 3 consecutive elements are the same. For example, by changing the loop to:
#![allow(unused)]
fn main() {
for i in 0..numbers.len() - 2 {
  if numbers[i] == numbers[i+1] && numbers[i+1] == numbers[i+2] {
    return true;
  }
}
}
What if we need to find if an element appears 100 times? It is still possible to do that with solution 1, but it can get really hairy: you either need to copy that condition above over 100 times, or use a nested loop to check each 100 elements. This also makes it much slower!
On the other hand, solution 2 is really easy to update to match these new requirements. You can simply change one line in its last loop as follows:
#![allow(unused)]
fn main() {
for (num, count) in map {
  if count > 100 {
    return true;
  }
}
}
We will see another example of this below.
Example 2 - Majority Element
Let’s move on to the majority element problem, which you also had to solve in homework 2.
In this problem, we are given a vector with n elements, and we need to return its majority element.
The majority element is the element who appears more than half the times in the vector.
For example, [1, 2, 3, 1, 1, 1] has majority element 1, and [1, 3, 3, 2, 3] has majority element 3.
By definition, the majority element has to appear more than n/2 times.
On the other hand, vector [1, 2, 1, 3, 1, 2] does not have a majority element. Sure, 1 is the most common
element in it, but it is not the majority as it appears exactly n/2 times, not greater than n/2 times.
The problem states that you can assume that a majority element exists in every vector you are given.
You can find our solutions here.
Solution 1
We can adapt solution 2 from contains duplicate above, which highlights how flexible that approach is.
#![allow(unused)]
fn main() {
fn majority_element(numbers: Vec<i32>) -> i32 {
    let n = numbers.len();

    // Construct a map from element to its count
    let mut map = HashMap::new();
    for num in numbers {
        let value_in_map = map.get(&num);
        match value_in_map {
            None => {
                map.insert(num, 1);
            },
            Some(count) => {
                map.insert(num, count + 1);
            }
        }
    }

    // Now that we have counted all of the elements
    // we can check if any have a count that is greater
    // than 1.
    for (num, count) in map {
        if count > n / 2 {
            return num;
        }
    }

    panic!("no majority element");
}
}
Notice how we only needed to change a couple of lines!
Solution 2
A different approach is to rely on sorting. If a majority element exists (which the problem says we can assume), and we sort the vector, then the majority will be guaranteed to appear at the mid point of the vector.
For example, if you sort [1, 2, 3, 1, 1, 1], you will get [1, 1, 1, *1*, 2, 3].
Similarly, if you sort [1, 3, 3, 2, 3], you will get [1, 2, *3*, 3, 3]. We highlight the middle
element (i.e. the element at index n/2) using stars.
Notice that in both cases, the middle element was the majority element.
With some more thinking, you can even mathematically prove this: the majority element appears more than n/2 times. When you sort the vector, all these occurrences appear consecutively. So they must occupy a contiguous chunk of size greater than n/2. There is no way to fit n/2 contiguous elements in a vector of size n without spilling over the mid point!
We can code this solution as follows:
#![allow(unused)]
fn main() {
fn majority_element(mut numbers: Vec<i32>) -> i32 {
    numbers.sort();
    return numbers[numbers.len() / 2];
}
}
Solution 3
Finally, we consider a radically different solution. The majority element is, by definition, very common. So, if we pick a random element, chances are, that element is the majority element.
So, we can pick a random element, check if it is the majority element, return it if it is, and otherwise, repeat the process with a new random element, and so on.
The odds of us getting unlucky and not choosing the majority element after k tries become increasingly smaller
and smaller as we make more tries.
In fact, you can even prove that the probability of getting unlucky after k tries is at most 0.5^k, since
the probability of selecting the majority element at any step is at least 0.5.
To give you a sense of how this probability grows, when k = 1, the probability is less than 1/2. For k = 3, the probability is less than 1/8. For k = 10, the probability is less than 0.001. For k = 100, the probability is so so tiny that I would bet my arm, leg, and favorite guitar against it happening.
We can code this solution up as follows:
#![allow(unused)]
fn main() {
fn majority_element(numbers: &Vec<i32>) -> &i32 {
    loop {
        // println!("Guessing again");
        let random_number = helpers::random_element(v);

        let mut count_of_random_number = 0;
        for i in numbers {
            if random_number == i {
                count_of_random_number += 1;
            }
        }

        if count_of_random_number > numbers.len() / 2 {
            return random_number;
        }
    }
}
}
Comparing Solutions
Performance
Solution 1 and 2 take O(n) and O(n log(n)) steps, for similar reasons to example 1. Solution 3
takes roughly O(k * n) where k is the number of guesses taken until the majority element is found.
Realistically, k will be quite small (around ~2 on average), and importantly, it does not depend
on how large the vector is.
Run the provide code using these commands and see which are solutions are fastest and by how much
cargo run --bin sol1 --release
cargo run --bin sol2 --release
cargo run --bin sol3 --release
Readability and Understandability
Which of these solutions is easiest to understand? Both in terms of what the code does, and in terms of why it works.
Imagine, you were not provided with the explanation about why sorting results in the majority element showing up in the mid point, or the explanation about the probability of finding the majority element by guessing randomly. Would it be difficult for you to understand these concepts on your own?
Ease of Maintenance
Imagine that the problem was updated in the future so that you cannot assume that the majority element exist.
Instead, that you must return a special value, e.g., -1 or None, when a majority element does not exist (or produce an error).
How easy is it to modify each of these solutions to do that?
What if the problem is changes to finding the most common element, even if it is not the majority element?
Consider these metrics and pick your favorite solution. As with most things that have to do with taste, this is subjective and there might be many acceptable answers, but you have to be ready to provide your justifications for why that is the case!
Computer Memory
Lecture 12: Friday, February 20, 2026, and
Lecture 13: Monday, February 23, 2026, and
Lecture 14: Wednesday, February 25, 2026, and
Lecture 15: Friday, February 27, 2026.
The important concepts we will learn in this module:
- Bits and bytes
- Addresses
- Stack vs Heap
- Allocation, deallocation, and scopes
Motivation
Look at the following program. Feel free to run it using the run icon in the top right corner of the snippet.
fn main() {
    let x1: i32 = 10;
    let x2: i32 = 20;
    let y: i32 = x1 + x2;
    println!("{y}");
}
This program is really simple: it stores two values, 10 and 20, inside to variables named x1 and x2, both of type i32. It then computes the sum of both and stores it in a variable called y, also of type y. Finally, it prints the value of variable y.
Imagine if you were going to perform this computation the old school way, on a pen and paper without a computer. You would do something like:
- Write down 10 and 20 on the piece of paper, perhaps on top of each other (long addition style)
- You would then do some thinking and add the numbers together, perhaps digit by digit writing down each digit.
- Eventually you will end up with the final answer, 30, written out on a piece of paper.
Crucially, this process required you to write down and operate over different numbers. In other words, you used the paper to store the values. If you had many numbers that you had to deal with (e.g., a balance sheet), you might even given each of these number a name (e.g., balance, revenue, etc), and write that name down next to the number (e.g., in a table or schedule).
The computer executes the program above in a surprisingly similar way to the pen and paper approach! Specifically,
- The computer stores 10 and 20 in its memory.
- The computer retrieves 10 and 20, adds them up (using some process that is quite similar to long addition) and writes the output, 30, to its memory.
- The program writer uses names, such as x1 and x2 (or balance and revenue), to refer to these values and operate on them.
In this analogy, the program memory behaves like the pen and paper, and the variable name behaves like the label, name, or title that we give to the numbers on the piece of paper. In many ways, a computer program is nothing more than a sequence of instructions that tell the computer to store data elements, give them names, and operate on them to produce new data elements, etc.
The pen and paper analogy is surprisingly effective: imagine we kept operating on these numbers and creating new ones for a really long time, eventually, we would run out of paper! Similarly, a computer program that runs for a very long and continually produces new data would eventually run out of memory. Thus, it is crucial that the computer and programmer can free up memory that is no longer needed, a kin to how you would use an erased to get rid of some old numbers on the piece of paper to make space to write down new ones.
Bits and bytes
One major difference between the pen and paper analogy and the computer memory is that computers (and their memory) does not write down numbers (or strings) the way we do on a piece of paper. Instead, they store values in binary encoding using bits. A bit is a single digit that can either be 0 or 1. It turns out we can represent any value you could think of using just bits in binary encoding. Here’s some examples:
the number 0 ====> 0 in binary
the number 1 ====> 1 in binary
the number 2 ====> 10 in binary
the number 3 ====> 11 in binary
the number 4 ====> 100 in binary
the character 'A' ==> 1000001 in binary (using ASCII encoding)
The exact details of how values are encoded in binary using bits is not important for us. What is important is that this encoding exists and is used by the computer. If you are curious, feel free to read more about binary numbers and ASCII encoding for strings.
The most basic unit of memory on a computer is a byte, which is made out of 8 bits. For example, these values are all 1 byte long:
00000000 ===> value 0
00000001 ===> value 1
00000101 ===> value 5
11111111 ===> value 255
In Rust, both i8 and u8 are numeric types that are one byte long. E.g., they represent numeric values that fit in 8 bits.
u8 is for 8-bit long non negative numbers, which range from 0 to 255 inclusive. Values bigger than 255 need more than 8 bits
and thus would not fit inside a variable of type u8. Similarly, i8 represents signed 8-bit long numbers between -128 and 127. Values
outside that range similarly would not fit in 8 bits and thus won’t fit inside an i8.
fn main() {
    println!("u8 values are between {} and {} inclusive", u8::MIN, u8::MAX);
    println!("i8 values are between {} and {} inclusive", i8::MIN, i8::MAX);
}
Rust similarly has types i16 and u16 (16 bits or 2 bytes long), i32 and u32 (32 bits or 4 bytes long), and i64 and u64 (64 bits or 8 bytes long). Each of these can fit larger and larger values but require more and more space to store.
The smallest unit of space on modern computers is one bytes. This means that values of a type that is logically smaller than a byte, still take up a whole byte of storage. For example, bool can only store true or false (i.e. 1 or 0), and thus could have been as small as a single bit, but it still takes a whole byte (8 bits) on the computer.
fn main() {
    println!("size of i8 is {} bytes", size_of::<i8>());
    println!("size of u8 is {} bytes", size_of::<u8>());
    println!("size of i32 is {} bytes", size_of::<i32>());
    println!("size of u32 is {} bytes", size_of::<u32>());
    println!("size of bool is {} bytes", size_of::<bool>());
}
Computer Memory
So, where does the computer store all these bits and bytes? It turns out, the computer has a hierarchy of storage:
- Hard Disk Drive (HDD) or Solid State Drive (SSD): this is where your computer store your files, such as games or word documents. On modern computers, this is often in the 100s of Gigabytes or even Terabytes. A gigabyte is roughly 1 billion bytes (1 with 9 zeros next to it).
- Random access memory (RAM), sometimes called main memory or just memory: this is where the computer stores all your program variables (numbers, vectors, etc). RAM is often a few Gigabytes (e.g. 8 or 16).
- CPU caches and registers: these are a lot smaller and is where the computer stores values as it operates on them directly (e.g. right when it has to add two numbers). These are not important for this course.
Reading data from a hard drive or SSD is several orders of magnitude slower than reading it from RAM. However, hard drive and SSDs are a lot cheaper (per gigabyte) than RAM. They are also persistent: if you shutdown your computer then turn it on again, you retain all of your files on the hard drive, but lost everything on your RAM!
When we talk about memory in this course, we mean RAM.
So, what does the RAM look like? You can think of RAM is a long strip made out of cells that are each one byte long. In other words, a cell in the RAM would perfectly fit an i8 or u8. On the other hand, an i32 or a u32 would need 4 cells in RAM.
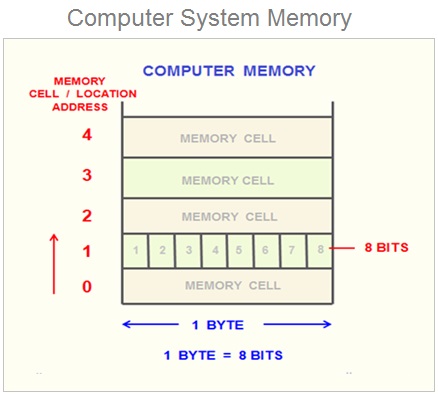
Source: https://www.learncomputerscienceonline.com/what-is-computer-memory/
Because RAM is usually several gigabytes in size, it means that it contains a ridiculously large number of cells, upwards of several billions. Thus,
the computer needs a way to refer to different cells. These are called addresses and in many ways, they work like human addresses.
Imagine the BU campus had a really long road, let’s call it RAM Rd, that has billions of house. The first house would have address 1 RAM Rd, Boston, MA. 02215. The second house would be 2 RAM Rd, Boston, MA. 02215, and so on.
Memory addresses follow the same concept (except, we would not need a road name, city/state, or a zip code). The first cell would have address 0, the second cell would have address 1, the third cell would have address 2, and so on. Because RAM is so big, these address can get quite big. Thus, address on modern computer can be up to 8 bytes (64 bits) in size. In rust, they are often represented using type usize.
fn main() {
    println!("Addresses are {} bytes in size", size_of::<usize>());
    println!("They can range between {} and {} inclusive", usize::MIN, usize::MAX);
}
We can confirm this by asking Rust and the computer to show us the address of a variable. Note that because addresses can get really big, Rust prints them in hexadecimal form.
fn main() {
    let x: u8 = 10;
    // {:p} instructs Rust to print in address form.
    //      the p stands for pointer, which we will learn about later.
    // &x   asks Rust to give us a pointer/reference/address for x.
    //      we will learn more about pointers and references later.
    println!("x has address {:p}", &x);
}
The Stack
Run the following program and look at the output addresses.
fn main() {
    let x1: u8 = 10;
    let x2: u8 = 20;
    let x3: u32 = 30;
    let x4: String = String::from("welcome all to DS 210!");
    println!("Address of x1 {:p}", &x1);
    println!("Address of x2 {:p}", &x2);
    println!("Address of x3 {:p}", &x3);
    println!("Address of x4 {:p}", &x4);
}
We can see the following observations:
- The addresses are ordered: x1 has an earlier (smaller) address, then x2, then x3, then x4.
- x2’s address is one away from x1. Remember that the smallest unit of memory (a cell) is one byte in size.
This means that x1 takes up one byte, followed immediately by x2. This is expected because, x1 has type
u8. - x3’s address is similarly one byte away from x2, as x2 is also a
u8. - x4’s address is 4 bytes away from x3! This is because x3 is a
u32, which requires 4 bytes (thus 4 cells) in memory.
By default, variables in Rust are stored on the stack. The stack is quite nice to use for us programmers:
- It has fast allocation and de-allocation
- It is completely automatic: Rust and the computer automatically figure out where to store new variables and when to free them or get rid of them to save space.
- It is simple to understand because it follows the LIFO principle: Last in First out.
Crucially, each variable or piece of data that Rust stores on the stack needs to have a fixed and known size. So that Rust knows how far away the next variable or value should be from it. This means that data with an unknown size or a size that can change dynamically, cannot be stored on the stack!
The heap
Let’s look at the following code:
fn main() {
    let x1: i8 = 10;
    let mut s1: String = String::from("hello");
    let x2: i8 = 20;
    println!("address of x1 {:p}", &x1);
    println!("address of s1 {:p} and size of s1 {}", &s1, size_of::<String>());
    println!("address of x2 {:p}", &x2);
}
You can see that s1 appears to be stored in the stack, between x1 and x2. You can also see that s1 is 24 bytes in size.
However, the contents of a string is dynamically adjustable, e.g., we can add more characters to it. If the strings contents were stored on the stack, this could create a problem: new variables (such as x2) may be stored immediately following s1 on the stack, meaning that we
would not have any free space or room to add more elements to the string. Alternatively, if we try to reposition s1 to the end of the stack, e.g., until after x2, we would create a gap of empty but unusable space where s1 used to be and violate LIFO.
As a result, we need a different approach for such dynamically resizable data! Look at the output of this code:
fn main() {
    let x1: i8 = 10;
    let mut s1: String = String::from("hello");
    let x2: i8 = 20;
    println!("address of x1 {:p}", &x1);
    println!("address of s1 {:p} and size of s1 {}", &s1, size_of::<String>());
    println!("address of x2 {:p}", &x2);

    s1.push_str(" everyone!");
    println!("address of s1 {:p} and size of s1 {}", &s1, size_of::<String>());
    println!("{s1}");
}
Notice the following:
- When we print s1, we see the modified string “hello everyone!”.
- At the same time, the address of
s1remains unchanged. - Furthermore, the size of
s1remains unchanged (24 bytes)!!!!!
This seems wrong! How could the size of the string remain the same even though we just made it a lot longer than it was before?
Well, this is because a string in Rust actually consists of 3 components: the length of the string (the number of characters in it), the
capacity of the string (how much empty space is currently available for the string to grow into), and the address (or pointer, ptr for short) of where the characters of the strings are actually stored! It does not contain the characters of the string
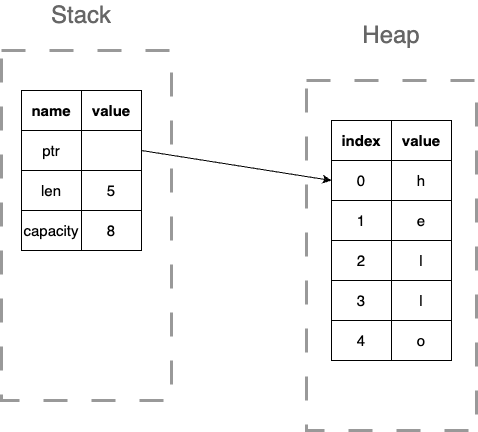
The characters are actually stored in a different part of memory, called the heap:
- Allocation and deallocation to the heap is slower than the stack.
- Heap allocations does need to have a fixed size.
- Heap memory can be allocated and deallocated in any order and not only LIFO.
This allows String to have the best of both words: it has a known and fixed size on the stack, allowing Rust to deal with variables of type string
easily, including automatically adding or removing them from the stack using LIFO. At the same time, it means that the characters of the
string can be dynamically modified and resized, as they are stored on the heap. However, this means that the code of String would need to
manually manage the heap memory, including when to allocate it, when to free it, when to resize it to a new size and move over characters to it,
etc.
Strings are not the only type that behaves this way: any type that deals with dynamic, resizable data must also allocate, manage, and free its own heap memory. This include Vec, HashMap, HashSet and many many other types. You will have hands-on experience with what this entails when you implement FastVec in project 1!
fn main() {
    let mut v1: Vec<i8> = vec![5, 4];
    println!("address of v1 on the stack {:p}", &v1);
    println!("address of first element of v1 (on the heap) {:p}", &v1[0]);
    println!("address of second element of v1 (on the heap) {:p}", &v1[1]);
}
Scopes
It turns out that every variable in Rust has a scope: this represents a portion of the code where the variable is active and can be used (called in scope). Outside of this portion, a variable is inactive and cannot be used (out of scope).
Rust variables take on the scope of the blocks of code they are defined in. For example, run the code below, then edit it to see what happens if you use variables when they go out of scope!
fn main() {
    // x1 is in scope until the end of the main function.
    let x1: i8 = 10;
    if x1 > 5 {
        // x2 is in scope inside this if branch,
        // it cannot be accessed outside of it.
        let x2: i8 = 20;
        println!("{x2}");
    }

    println!("{x1}");
    // try to print x2 here, what do you see?
    // println!("{x2}");

    for i in 0..3 {
        // x3 is in scope inside the for loop body,
        // it cannot be accessed outside of it.
        let x3: i8 = 30;
        println!("{x3}");
    }

    // try to print x3 here, what do you see?
    // println!("{x3}");

    {   // you can use curley braces to define your nested scope!
        // x4 is in scope within these curley braces!
        let x4: i8 = 50;
        println!("{x4}");
    } // end of scope for x4

    // try to print x4 here, what do you see?
    // println!("{x4}");
}
Because a variable cannot be used after it goes out of scope, that means that Rust can erase that variable from memory (and specifically, the stack) to save space! Furthermore, it may chose to reuse that space for a different new variable later.
This gives us the LIFO behavior of the stack: a variable defined later in a program cannot have a bigger scope than an active in-scope variable defined before it. Thus, the later variable will be erased or freed first! To convince yourself of this fact look at the above program. Say we are inside the for loop: there are two active variables, x1 and x3. Notice how x3, which was defined later, goes out of scope earlier than x1.
Furthermore, if a type manages some heap memory, such as Vec or String, it can provide code to free up or deallocate that memory that Rust can automatically invoke when the variable goes out of scope. This is why in Rust, we view variables or values as owning their heap memory and resources.
struct SimpleExample {
    // imagine we have some resources on the heap
    // ptr_to_heap: *mut i32,
}
// We can define our own destructor that tells Rust
// how to free/deallocate the heap resources
impl Drop for SimpleExample {
    fn drop(&mut self) {
        // free(self.ptr_to_heap);
        println!("destructor called!");
    }
}

fn main() {
    let x1: SimpleExample = SimpleExample {};

    {
        let x2: SimpleExample = SimpleExample {};
        println!("address of x2 {:p}", &x2);
    }

    println!("After curley braces");
    println!("address of x1 {:p}", &x1);

    println!("Right before main is over");
}
Module 8: (Unsafe) Pointers
Lecture 16: Monday, March 2, 2026, and
Lecture 17: Wednesday, March 4, 2026, and
Lecture 18: Friday, March 6, 2026.
This module looks at the following concepts:
- What are pointers and what they useful for?
- Why are pointers dangerous?
Pointers
In the previous module, we learned about the structure of the computer memory, specifically:
- It is made out of 1 byte sized cells, each labeled by unique address.
- It consists of a stack (fixed sized automatic allocation) and a heap (dynamic allocation with manual memory management).
So far, we looked at many programs that store and manipulate data, and while we know now that this data is stored in memory in some cells with an address, we have only referred to them using variable names. For example:
fn main() {
    let x1: i32 = 10;
    let x2: i32 = 20;
    let y: i32 = x1 + x2;
    println!("{y}");
    // This program stores 3 pieces of data, 10, 20, and 30
    // in different locations in memory.
    // We did not need to know where these locations are or what their
    // addresses are. Instead, we could refer to the values using
    // their variable names, e.g., x1 and x2.
    println!("address of x1 {:p}", &x1);
    println!("address of x2 {:p}", &x2);
    println!("address of x3 {:p}", &y);
}
This was true because we either used fixed size data that is stored on the stack (e.g., x1, x2, and y in the example above are all i32s stored on the stack) or dynamic sized data using Rust provided dynamic types, such as Vec and String. While Vec and String perform a variety of dynamic heap allocations and memory manipulation, they do it behind the scenes so that programmers like us do not have to worry about then.
However, to get better at programming, we have to look at how these manipulation work behind the scenes.
Pointers and Addresses
Look at the below code.
fn main() {
    let x1: i32 = 10;
    let ptr_x1: *const i32 = &x1 as *const i32;
    println!("address of x1 {:p}", &x1);
    println!("size of x1 {}", size_of::<i32>());
    println!("pointer ptr_x1 points to address {:p}", ptr_x1);
    println!("size of ptr_x1 {}", size_of::<*const i32>());
    println!("address of ptr_x1 {:p}", &ptr_x1);
}
We have two variables here. The first is x1, which is located at some address.
The second, ptr_x1 has a strange type we have not seen before *const i32.
This type is read as a constant pointer to an i32. ptr_x1 does not actually
contain an i32 inside of it. Instead, it contains a memory address, and if we follow
that memory address, we would find an i32 there.
We can confirm this by looking at the output of the above code:
- The address inside
ptr_x1matches the address ofx1. - The size of
ptr_x1is 8 bytes, which is the size required to store addresses, while an i32 is 4 bytes.
Notice that both x1 and ptr_x1 are variables of a fixed size. They are both stored on the stack.
x1 is stored as 4 bytes that contain the value 10, and ptr_x1 is stored as 8 bytes that contain
the address of x1. We can confirm this by observing that the address of ptr_x1 is 4 bytes after the address of x1.
In other words, the memory layout for this program looks as below.
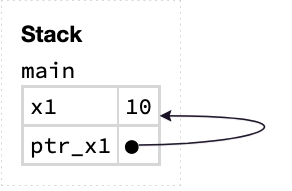
Dereferencing a Pointer
The most important operation we can do to a pointer is dereference it. This tells the computer to follow the address stored inside the pointer and look at whatever value is stored there.
fn main() {
    let x1: i32 = 10;
    let ptr_x1: *const i32 = &x1 as *const i32;
    unsafe {
        println!("{}", *ptr_x1);
    }
}
Dereferencing is done using the * operator. So *ptr_x1 tells the computer to dereference ptr_x1, which in this case
leads to x1 and the value 10.
unsafe: Dereferencing a pointer is one of the most dangerous things you can do on a computer: at the time of dereferencing, there is no guarantee
that the address you dereference is a valid address, contains a value of the type you think it does, has its data initialized, or points
to data that has not been modified or used by other parts of the program.
As a result, using it require explicitly using an unsafe block. This tells the compiler to allow us to use unsafe operations that are
potentially dangerous, and that we as programmers will take responsibility for them.
A pointer simply comprises an address of some piece of data. It does not contain any fact or copies of that data. If after creating the pointer, the data the pointers points to changes, dereferencing the pointer would show the new data.
fn main() {
    let mut x1: i32 = 10;
    let ptr_x1: *const i32 = &x1 as *const i32;
    x1 = 30;
    unsafe {
        println!("{}", *ptr_x1);
    }
}
We can also use dereferencing to modify the data the pointer points to.
fn main() {
    let mut x1: i32 = 10;
    let ptr_x1: *mut i32 = &mut x1 as *mut i32;
    unsafe {
        *ptr_x1 = 50;
    }
    println!("{x1}");
}
Note that this requires a mutable pointer, instead of a const pointer. Try to change the muts to const in the code above and see what errors the Rust compiler gives you!
Allocating Data on the Heap
As discussed in the previous module, a String or a Vec simply contains a len, capacity, and a pointer to the characters or elements,
which are stored on the heap. This enables dynamically resizing, e.g., by adding many elements to the vector.
fn main() {
    let mut v: Vec<i32> = vec![10, 20];
    v.push(30);
    println!("{:?}", v);
}
After line 2 when the initial vector is created the memory layout looks like this:
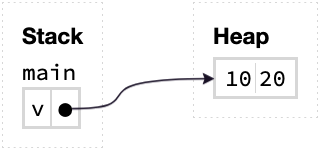
Then, after pushing 30 to the vector, the memory layout becomes:
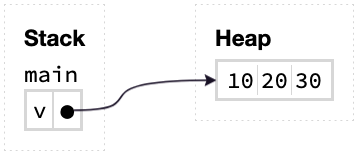
How does this work? Programmers can tell the computer to allocate memory on the heap using a memory allocator (malloc).
extern crate libc;

fn main() {
    unsafe {
        let ptr: *mut i32 = libc::malloc(4) as *mut i32;
        println!("ptr points to address {:p}", ptr);
    }
}
Allocation, like most pointer operations, is unsafe. When we allocate memory on the heap, we need to tell the computer how many bytes to allocate. In this case, we allocate 4 bytes, which is the size of an i32.
But what values does the allocated memory contain? The answer is –– it depends. Integers are really simple types with a simple memory layouts, allocators often initializes them to 0. However, a more complicated type, such as a string or a vector, may not be initialized properly, because it is more complex, e.g., it contains more pointers inside of it!
Thus, you are not supposed to read data on the heap until you have initialized first, using std::ptr::write(...).
extern crate libc;

fn main() {
    unsafe {
        let my_ptr: *mut String = libc::malloc(size_of::<String>()) as *mut String;
        println!("my_ptr points to address {:p}", my_ptr);
        std::ptr::write(my_ptr, String::from("hello!"));
        println!("{}", *my_ptr);
    }
}
Freeing Data on the Heap
Remember that unlike the stack, the heap is not automatically managed by the computer or Rust.
Thus, if we manually allocate data on the heap, we are responsible for manually freeing it when we are done with it.
extern crate libc;

fn main() {
    unsafe {
        let my_ptr: *mut String = libc::malloc(size_of::<String>()) as *mut String;
        println!("my_ptr points to address {:p}", my_ptr);
        std::ptr::write(my_ptr, String::from("hello!"));
        println!("{}", *my_ptr);
        libc::free(my_ptr as *mut libc::c_void);
    }
}
However, freeing only frees the memory allocated by malloc. If that memory in of itself contains more pointers to heap allocations, those
will not get freed. For example, the string in the above example does not get properly destructed. To do so, we must remember to
call std::ptr::read(...) before freeing.
fn main() {
    unsafe {
        let my_ptr: *mut String = libc::malloc(size_of::<String>()) as *mut String;
        println!("my_ptr points to address {:p}", my_ptr);
        std::ptr::write(my_ptr, String::from("hello!"));
        println!("{}", *my_ptr);
        std::ptr::read(my_ptr);
        libc::free(my_ptr as *mut libc::c_void);
    }
}
Pointer Arithmetic
We can also allocate sequence of elements on the heap. For example,
fn main() {
    unsafe {
        // Allocate 2 i32s (2 * 4 bytes = 8 bytes).
        let my_ptr: *mut i32 = libc::malloc(size_of::<i32>() * 2) as *mut i32;
        println!("address of my_ptr is {:p}", my_ptr);
    }
}
In this case, the returned pointer points to the first one of the two i32s. We can get a pointer to the second one using add(...).
fn main() {
    unsafe {
        let ptr0: *mut i32 = libc::malloc(size_of::<i32>() * 2) as *mut i32;
        let ptr1: *mut i32 = ptr0.add(1);
        println!("address of ptr0 is {:p}", ptr0);
        println!("address of ptr1 is {:p}", ptr1);
    }
}
Notice how ptr1 is 4 bytes (i.e., one i32 value) away from ptr0.
Remember that this kind of pointer manipulations can be very dangerous. What if we moved the pointer forward too much and got outside the allocated region? It is your job as a programmer to ensure this does not happen!
You will have a chance to practice dealing with pointers extensively when implementing the FastVec project.
Why are Pointers Dangerous?
The reason pointers are really dangerous is that the Rust compiler cannot guarantee whether they point to valid data or not.
For example, the pointer may point to data that was freed, ran out of scope and was destroyed, or be the result of some operation that take it out of range.
For example, one of the most common mistakes programmers in pointer-based languages make is to double-free. If you run the above program, you will see that it unexpectedly crash due to a double freeing error!
fn main() {
    unsafe {
        let ptr0: *mut i32 = libc::malloc(size_of::<i32>() * 2) as *mut i32;
        libc::free(ptr0 as *mut libc::c_void);
        libc::free(ptr0 as *mut libc::c_void);
    }
}
More serious errors are also possible (and sometimes easy to make). Consider the below program.
fn main() {
    let mut ptr: *mut Vec<i32> = std::ptr::null_mut();
    {
        let mut v: Vec<i32> = vec![1, 2, 3, 4, 5];
        ptr = &mut v as *mut Vec<i32>;
        // v goes out of scope here and gets destroyed.
    }

    println!("ptr is now a dangling ptr");
    unsafe {
        println!("{}", (&*ptr)[0]);
    }
}
To avoid these issues, Rust actively dissuades the use of raw pointers. Instead, Rust encourages us to use its safe references, a pointer like concept that provides many of the advantages of pointers without the risk!
We will see references in more detail in the next module.
Module 9: References Basics
Lecture 19: Monday, March 16, 2026, and
Lecture 20: Wednesday, March 18, 2026, and
Lecture 21: Friday, March 20, 2026.
In this module, we will learn about:
- Using references as opposed to pointers.
- Passing data by reference, by move, and by copy.
References
References are really similar to pointers: they are also based on addresses. However, unlike pointers, they are safe to use!
fn main() {
    let x1: i32 = 10;
    let ref_x1: &i32 = &x1;
    println!("address of x1 {:p}", &x1);
    println!("ref_x1 refers to address {:p}", ref_x1);
    println!("ref_x1 refers to values {}", ref_x1);
}
Pointers can be created in many ways:
- They can be created by taking the address of an existing value/variable.
- They can be created using malloc.
- They can be created by manipulating other pointers (e.g. using ptr.add(
)).
By contrast, references can only be created by taking the address of an existing value or variable! This means that, unlike pointers, we know that references are guaranteed to start as valid address referring to valid memory.
But even if a reference is valid in the beginning, how can Rust know it remains valid over time? To demonstrate this, let’s consider the following code.
fn main() {
    let mut v: Vec<String> = vec![String::from("str1"), String::from("str2")];
    // pointer to the first element.
    let ptr0: *const String = &v[0] as *const String;

    // We are inserting many elements to the vector.
    // This causes the vector to resize and changes the location
    // of its elements in memory.
    for i in 0..10 {
        v.push(format!("str{}", i));
    }

    // Now, the old ptr address is no longer valid.
    println!("address of first element used to be {:p}", ptr0);
    println!("address of first element became {:p}", &v[0]);

    unsafe {
        println!("dereferncing the pointer");
        println!("{}", *ptr0);
        println!("program done!");
    }
}
The above code is unsafe and quite dangerous. The pointer ptr0 becomes dangling after pushing new elements to the vector. Meaning that dereferencing it is dangerous. Indeed, the code crashes when attempting to dereference it.
By contrast, look at the code below. Rust realizes this code is potentially dangerous and does not let us compile it! Specifically, it realizes that after creating ref0, but before using it, the vector is mutated using push, which causes dangerous behavior.
Try to run the code and look at the compilation error.
fn main() {
    let mut v: Vec<String> = vec![String::from("str1"), String::from("str2")];
    // reference to the first element.
    let ref0: &String = &v[0];

    // We are inserting many elements to the vector.
    // This causes the vector to resize and changes the location
    // of its elements in memory.
    for i in 0..10 {
        v.push(format!("str{}", i));
    }

    // Now, the old ptr address is no longer valid.
    println!("{}", ref0);
}
This gives us the first rule of Rust references: we are not allowed to have mutable and const references active at the same time! Rust checks for this as it keeps track of the duration during which a reference is active, i.e., where it is last used.
Contrast the above code with the following one. Here, we print ref0 before mutating the variable. Rust correctly realizes that ref0 is no longer used after printing. So, it is no longer active.
This means we have no active references to v, and can mutate it by pushing.
fn main() {
    let mut v: Vec<String> = vec![String::from("str1"), String::from("str2")];
    // reference to the first element.
    let ref0: &String = &v[0];
    println!("{}", ref0);

    for i in 0..10 {
        v.push(format!("str{}", i));
    }

    println!("done");
}
Rust also does not allow having more than one mutable reference active at the same time, for the same reason. But, it allows having many const references at the same time, since none of them modify the data and are all safe.
fn main() {
    let mut x1: i32 = 10;
    let r1: &i32 = &x1;
    let r2: &i32 = &x1;
    println!("r1 refers to {}", r1);
    println!("r2 refers to {}", r2);
    // This code run because all referens are const.
    // Change one or both references to a mut reference
    // and see what happens!
    // e.g.,
    // let r1: &mut x1 = &mut x1;
}
Rust also ensures that the data that a references refers to remains alive for as long as the reference is active.
We will learn a system based on permissions to help us understand how and why Rust does these checks about references in the next module.
Passing Data by Reference
One of the most popular uses of reference is to use them to simplify and speed up passing data to functions as parameters.
For example, consider the following helper function that returns the index of the mid point of a vector.
fn midpoint(v: &Vec<i32>) -> usize {
    return v.len() / 2;
}

use std::time::{Instant};

fn main() {
    // Make a big vector with 1,000,000 elements.
    let mut my_vec = Vec::with_capacity(1000000);
    for i in 0..1000000 {
        my_vec.push(i);
    }

    let time = Instant::now();
    let mid = midpoint(&my_vec); // pass by ref
    println!("Took {:?}", time.elapsed());
    println!("Mid point element is {}", my_vec[mid]);
}
Compare how long this took to the case where we pass the vector by cloning it.
fn midpoint2(v: Vec<i32>) -> usize {
    return v.len() / 2;
}

use std::time::{Instant};

fn main() {
    // Make a big vector with 1,000,000 elements.
    let mut my_vec = Vec::with_capacity(1000000);
    for i in 0..1000000 {
        my_vec.push(i);
    }

    let time = Instant::now();
    let mid = midpoint2(my_vec.clone()); // pass by clone/copy
    println!("Took {:?}", time.elapsed());
    println!("Mid point element is {}", my_vec[mid]);
}
Passing by ref is much faster: it does not create a copy of the element of the vector. It merely passes the address of that vector to the
function. On the other hand, clone() copies the elements of the vector one by one and puts them in a new vector, and passes it to the function.
Which takes a lot more time and space.
Alternatively, we can try to pass the vector by move.
fn midpoint3(v: Vec<i32>) -> usize {
    return v.len() / 2;
}

use std::time::{Instant};

fn main() {
    // Make a big vector with 1,000,000 elements.
    let mut my_vec = Vec::with_capacity(1000000);
    for i in 0..1000000 {
        my_vec.push(i);
    }

    let time = Instant::now();
    let mid = midpoint3(my_vec); // pass by move
    println!("Took {:?}", time.elapsed());
    println!("Mid point element is {}", my_vec[mid]);
}
Try to compile the above code, you will notice that the compiler produces an error. specifically, that
my_vec can no longer be used after calling midpoint3, because it has been moved! Moving passes ownership of the data
over to the function completely. Moving does not create a new copy of the data, so its performance is close to passing by ref,
at the same time, it allows the function to have full control and ownership of the data, unlike a reference.
We can fix the above compiler error by changing the function slightly, e.g., so that it returns the mid element.
fn midpoint3(v: Vec<i32>) -> i32 {
    let mid = v[v.len() / 2];
    return mid;
}

use std::time::{Instant};

fn main() {
    // Make a big vector with 1,000,000 elements.
    let mut my_vec = Vec::with_capacity(1000000);
    for i in 0..1000000 {
        my_vec.push(i);
    }

    let time = Instant::now();
    let mid = midpoint3(my_vec); // pass by move
    println!("Took {:?}", time.elapsed());
    println!("Mid point element is {}", mid);
}
Compared to ref, it may appear like move is slower. In reality, this difference is because move passes ownership of the vector to midpoint3, so, when midpoint3 is complete, the vector goes out of scope and gets freed/destroyed, which takes some time. We can ask Rust to not destroy the vector in order to focus on the time required to pass by move only.
fn midpoint3(v: Vec<i32>) -> i32 {
    let mid = v[v.len() / 2];
    // Do not destroy/free v.
    std::mem::forget(v);
    return mid;
}

use std::time::{Instant};

fn main() {
    // Make a big vector with 1,000,000 elements.
    let mut my_vec = Vec::with_capacity(1000000);
    for i in 0..1000000 {
        my_vec.push(i);
    }

    let time = Instant::now();
    let mid = midpoint3(my_vec); // pass by move
    println!("Took {:?}", time.elapsed());
    println!("Mid point element is {}", mid);
}
Now, the performance of move is comparable to reference.
Finally, remember that you can also by data by mut reference, and not just regular reference.
fn add_0_to_vec(v: &mut Vec<i32>) {
    v.push(0);
}
fn main() {
    let mut v: Vec<i32> = Vec::new();
    add_0_to_vec(&mut v);  // by mut ref
    println!("{:?}", v);
}
In summary, we have the following way to pass data to a function:
- pass by copy/clone:
- pros: gives the function a separate copy of the data it can control and modify without affecting the original data.
- cons: slow and uses extra memory.
- pass by ref:
- pros: very fast.
- cons: if const ref, the function cannot modify the data, if mut ref, the function can modify the data and the changes will affect the original data and original function.
- pass by move:
- pros: very fast and gives the function control and ownership of the data.
- cons: the data is moved to the new function; it cannot be used in the original function again.
Remember these pros and cons! We may ask you about them in the midterm :)
Consider the following exercise questions:
- If you are asked to build a function that prints a given vector. Would you choose to pass the vector by clone, ref (const or mut), or move? Why?
- If you are asked to build a function that removes all even numbers from a vector, how would you pass the vector and why?
- If you are asked to build a function that creates a sorted copy of a vector while keeping the original vector unchanged, how would you pass the vector? why?
Module 10: Ownership, Borrowing, and Permissions.
Lecture 22: Monday, March 23, 2026, and
Lecture 23: Wednesday, March 25, 2026, and
Lecture 24: Friday, March 27, 2026, and
Lecture 25: Monday, March 30, 2026.
In this module, we will learn about:
- How the Rust compiler (specifically, borrow checker) ensures that Rust references are safe.
- How to understand the rules of the borrow checker using a system of permissions.
- Ownership and how it works in Rust.
Rust References are Safe
Let us first demonstrate that Rust references are safe, before diving deeper into why.
Let’s look at the code below that uses pointers.
pub fn helper_function(v: &mut Vec<String>) {
    for i in 0..2 {
        v.push(format!("{}", i));
    }
}

pub fn main() {
    let mut v: Vec<String> = vec![String::from("hello"), String::from("bye")];
    let e0: *const String = &v[0] as *const String;

    helper_function(&mut v);

    println!("v = {:?}", v);
    println!("At first, address of the first element was {:p}", e0);
    println!("But now, the address of the first element is {:p}", &v[0]);
    unsafe {
        println!("e0 points to {}", *e0);
    }
    println!("done");
}
Run this code and you will see that the program does not complete execution successfully (e.g., “done” does not get printed).
Instead, the program exhibits an error while running when it tries to dereference pointer e0.
Let’s break down what the code does:
- The code creates a vector with two strings inside it: “hello” and “bye”.
- The code creates a pointer
e0that points to the first element ("hello"). - The code then uses a helper function to push more strings to the vector. This causes the vector to resize and move all its contents to a bigger heap allocation (just like with
FastVecin your projects). This means that the stringhellois no longer at the old address. This is confirmed by the print statements which show the address of"hello"changing. - The code tries to dereference the pointer
e0, which is now dangling and points to the old address. This is an invalid dereference and causes undefined behavior (in this case, a “segmentation” error).
Now, let’s try to translate this code to use references instead of pointers.
pub fn helper_function(v: &mut Vec<String>) {
    for i in 0..2 {
        v.push(format!("{}", i));
    }
}

pub fn main() {
    let mut v: Vec<String> = vec![String::from("hello"), String::from("bye")];
    let e0: &String = &v[0];

    helper_function(&mut v);

    println!("e0 refers to {}", *e0);
    println!("done");
}
The code is very similar to the previous code. It just defines e0 as a reference (the type is &String) instead of a pointer.
We know that this reference would have the old address if we are able to run this code, for a similar reason to the pointer case above.
However, if you try to run the code, the Rust compiler would not let you. Specifically, it will give you an error. Specifically, it will tell you that you cannot mutably borrow v when the code calls helper_function, because v was already borrowed earlier when the code created e0. This is precisely why references are safe: the Rust compiler would not accept to compile code that results in dangling or invalid references.
Important note: In general, you will find the Rust compiler to often be inflexible about borrowing. It will not allow you to compile code that you may think is natural or normal, and sometimes even safe, because it is stringent in how it applies its rules. Be sure however that in most cases, it is doing that to protect you from you.
Important exercise
Researchers recently invented a visualization tool called Aquascope that can visualize to you what would have gone wrong had the Rust compiler not rejected your code due to borrowing issues. You can find Aquascope at https://cel.cs.brown.edu/aquascope/.
Go to that URL, and copy in the above code that uses references. Then, click on interpret. This will show you exactly what would have happened had Rust allowed you to run the code above. We will guide you through the steps here one step at a time.
Copy the code, and click interpret
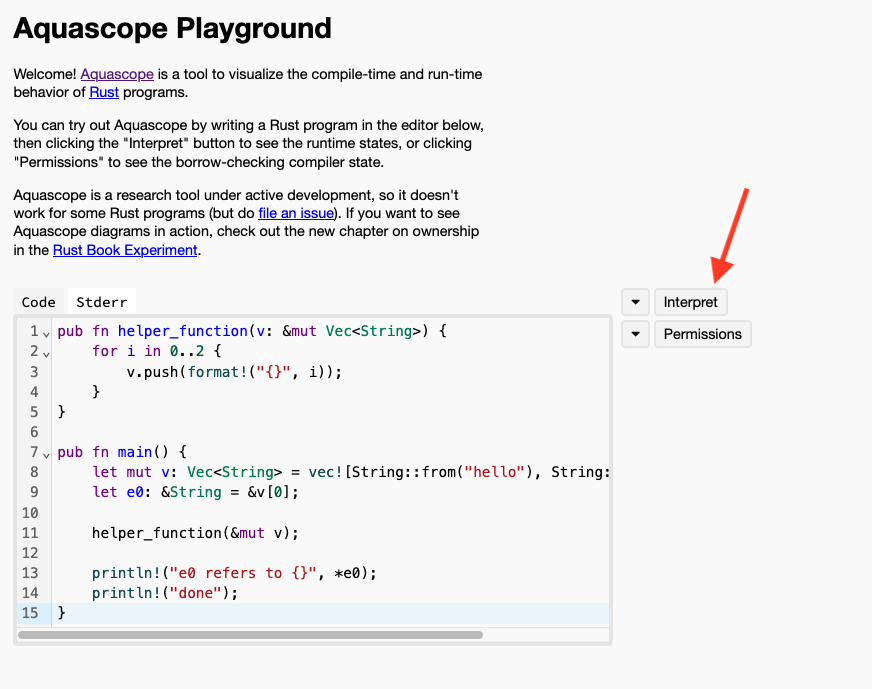
Aquascope will then visualize to you what the memory of the program looks like after each step of the execution. You will see that Aquascope will give each step in your program a name. For example, L1 (right next to the main function signature) represents when your program just starts executing at the very top of the main function, L3 represents the step when the program creates the reference e0,
and L8 represents the step when the program tries to print what e0 refers to. Notice that L8 is colored red (because it is where the dangerous error would have occurred).
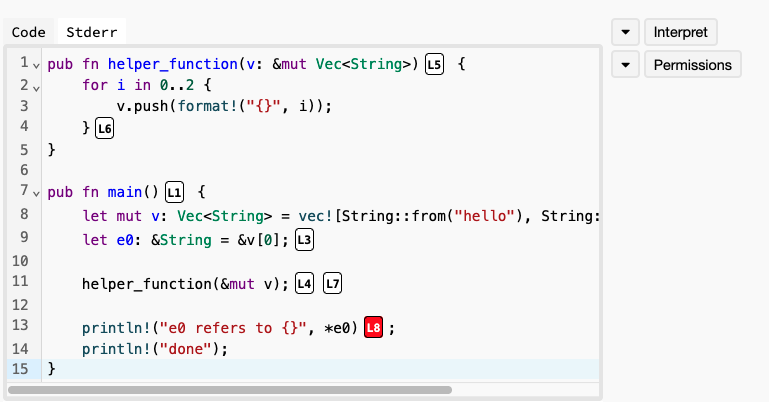
You can scroll down in the web page and you will see a visualizing of the memory of the program at each step. For example, at L1, the memory is empty because the program would have just started executing the program.
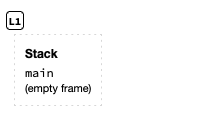
You can also see what the memory would have looked like at L3. In this case, you will see a vector v on the stack with its elements on the heap (in this case, two strings, hello and bye). You will also see a variable e0 on the stack that refers to the first element in the vector.
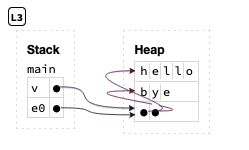
Finally, you can see what the memory looks like at L8: the vector now has more elements stored at other locations in the memory, and the reference e0 is now dangling. Aquascope explains this error in a small message above the memory visualization.
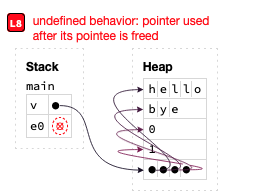
Follow the visualizations carefully one step at a time, identify when and why the reference become dangling.
Borrowing Rules
So, how does Rust know whether a reference is safe (and thus accept compiling the program) and when it may be dangerous (and reject to compile the program and give an error)?
The answer is Rust’s borrowing rules:
- Rust does not allow having more than one active mutable reference to the same data at any time.
- Rust does not allow mixing mutable and const references to the same data at the same time.
- Rust does not allow using a reference after the data it refers to has expired or was destroyed, i.e., exceeded its lifetime.
The analogy here is similar to borrowing a physical object, such as a Guitar. When we create a reference to some data, we are “borrowing it”. Many of us can borrow it with const references, i.e., many of us can watch someone play the guitar. However, only one of us can borrow it with a mutable reference, i.e., only one of us can change the guitar’s tuning for example. Finally, if the data gets destroyed, the references become invalid and cannot be used, e.g., no one can play or tune the guitar anymore if someone destroys it.
The above program violates the second rule: it tries to borrow the vector twice at the same time, first using a const reference e0, then using a mutable reference when calling helper_function.
Here’s a different program that violates the third rule. In this case, we borrow v using e0, then, while the reference is still active, we destroy v using drop. Try to run this code, and you will see that the Rust compiler detects this and produces an error. Specifically, the error says that the code tries to move v (to drop) while v is borrowed.
pub fn main() {
    let v: Vec<i32> = vec![20, 30];
    let e0: &i32 = &v[0];

    drop(v);

    println!("e0 refers to {}", *e0);
    println!("done");
}
Exercise: Use Aquascope to find out what would go wrong if Rust had let you run this code.
Ownership
Rust’s philosophy and design is based on the notion of ownership. Specifically, that a variable or a piece of data owns the resources associated with that data. The resources we are specifically talking about here are any heap allocations required for that data.
In other words, a vector owns the memory its elements are stored at in the heap. A string also owns the memory where its characters are on the heap, etc.
Rust uses this idea to ensure the following:
- The data allocates and initializes any memory it needs when it is created. E.g., a vector allocates the data it needs on the heap.
- The memory and resources can be destroyed or freed when the object that owns them is destroyed.
We can see how this directly inspires the third borrowing rule above: if some data is destroyed, all resources it owns are destroyed with it, and thus we should no longer use references to it.
In many ways, the idea of ownership is tightly related to the ability to destroy the object. We will look at this deeply when we talk about permissions next.
Let’s revisit our three types of passing data to functions from earlier in light of this view of ownership.
Ownership and Move
When we move data, we are transferring ownership of it from one variable to another. For example, look at this code:
fn main() {
    let x: String = String::from("hello");
    // this moves x to y
    let y: String = x;
    println!("{}", y);
    // println!("{}", x);
}
The code above moves the String "hello" and all of its resources and heap allocations from x to y.
This means that after the move, y owns the string and allocations and controls when they get deleted.
It also means that x no longer owns it!
Try to print x and run the code, what do you think will happen?
Ownership and Clone
On the other hand, when we clone something, we create a new copy of it and give that copy new ownership. The original data is unaffected, and remains owned by whatever was owning it before.
fn main() {
    let x: String = String::from("hello");
    // this clones x to y
    let mut y: String = x.clone();
    // y.push_str(" everyone!");
    println!("{}", y);
    println!("{}", x);
}
Try to modify y by adding more characters to it. What do you think will happen? What if we drop x? would y be affected?
Ownership and References/Borrowing
Finally, when we borrow some data, we do not transfer over its ownership nor do we copy it elsewhere. We simply create a reference to it.
fn main() {
    let x: String = String::from("hello");
    // this borrows x
    let y: &String = &x;
    println!("{}", y);
    drop(y);
    println!("{}", x);
}
Notice how in the above, we can use print x and its borrow y, and that we can drop the reference y without affecting the string, since it is owned by x.
Note however that while x remains the owner of the string, our ability to use it gets restricted while it is actively being borrowed.
Specifically, borrowing rule 3 above tells us that we cannot destroy it while y is active, but could destroy it after y is done.
Permissions
A great way to understand why the borrowing rules exist and why they keep references safe is to view them from the lens of permissions.
Let’s start with a really simple program.
fn main() {
    let x: String = String::from("hello");
    let mut y: String = String::from("bye");
    println!("{}", x);
    println!("{}", y);
    drop(x);
    drop(y);
}
Let us consider what permissions we have over each of the two variables above:
- We can print
x, meaning that it has read permissions to the data. Also,xowns the string, meaning that it has the permission to destroy it – we call this ownership permissions. However, we cannot edit the contents ofx, since it is not mutable, so it does not have write permissions. - On the other hand
yhas read, write, and ownership permissions.
We can confirm this using Aquascope. Copy the above code into Aquascope, and then click on permissions. We will guide you with screenshots below.
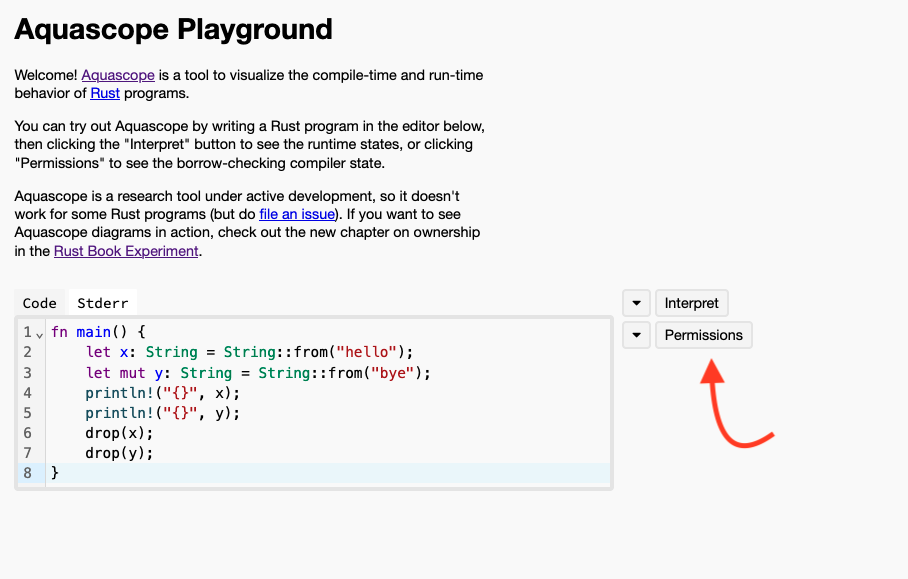
After you click on permissions. Aquascope will show the permissions associated with variables at every step of the program.
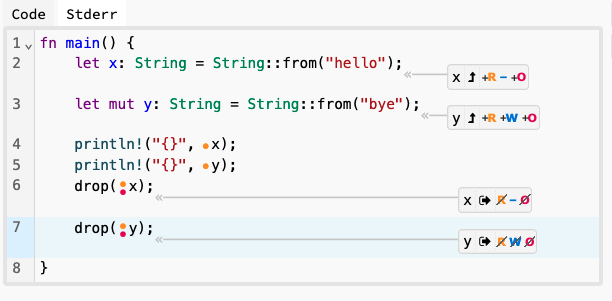
Notably, you will see that variable y has permissions R (for read), W (for write) and O (for ownership) when it is defined in the second line in the main function. While x only has R and O (and no W). At the end of the function, you will see that x loses all permissions when it gets dropped, same with y.
Let’s continue thinking with the lens of permissions looking at this next code example.
fn main() {
    let x: i32 = 10;
    x = x + 1;
    println!("{}", x);
}
What permissions does x have? We can find out using Aquascope (or by thinking a little) that the answer is R and O, and no W (because it is not mut). Looking at the next line x = x + 1, what permissions does this require from x? Well, we need to read x to add one to it, so it requires R permissions, but it also requires W. However, x does not have W!
This explains why the Rust compiler does not accept this code and produces an error! It also explains the fix, which is changing the code to use let mut x: i32 = 10;, because that change adds W permissions to x!
Permissions after borrowing
Let’s look at this code and think about ownership of its variables:
fn main() {
    let x: i32 = 10;

    let r: &i32 = &x;

    println!("{}", r);

    println!("{}", x);
}
Step 1: Let’s start with the first line: when x is created, we know it has R and O permissions.
Step 2: After that, we borrow x and create a reference r to it. Let’s think about what impact this has over its permissions:
rhas read permissions to the data that it refers to (i.e. tox). Aquascope describes this using*r, which we know is the Rust operation for dereferencing. So,*rhasR.*rdoes not haveWpermissions since this is not a mutable reference.*rdoes not haveOpermissions: the reference merely refers to the value10and does not own it!
This makes sense but is not the whole picture, when we create r, we also change the permissions of x:
- We can still read
xand borrow it with const read-only references, soxstill hasRpermissions. - However, since we have an active reference
rthat refers to it, we can no longer destroy this data, soxloses itsOpermissions!
This explains why we would not be able to move or drop x while reference r is active: we no longer have that permission! Try it: add a drop(x) in between defining r and printing it, and see what error the Rust compiler will give you!
Step 3: So far so good. What about after we print r? Well, now the reference is no longer active since we are done using it. Meaning that:
*rloses all its permissions.xis no longer actively borrowed, thus, it regains itsOpermissions.
Step 4: Finally, after x is printed and goes out of scope, x is destroyed and loses all its permissions as well.
Aquascope confirms all this for us, as you see below.
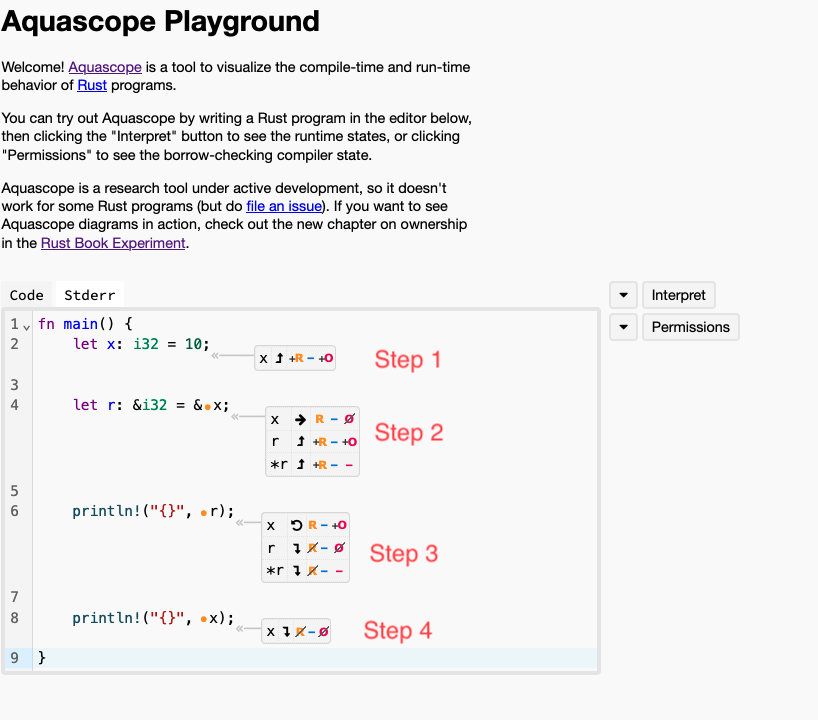
Note that Aquascope also shows permissions for r as well as *r. This is not really meaningful – it is simply an indication that r owns the address inside of it (or the reference itself, but not what data it refers to).
Permissions after mutable borrowing.
Let’s make the code mutably borrow x.
fn main() {
    let mut x: i32 = 10;

    let r: &mut i32 = &mut x;

    println!("{}", r);

    println!("{}", x);
}
Let’s think about the permissions again:
xstarts withR,W, andO.- When we create
r,*rgetsRandWpermissions (but obviously notO). At the same time,xlosesRpermissions – remember that Rust will not allow us to mix mut borrows and const borrows so we can no longer readx. Furthermore,xalso losesWpermissions: we cannot modify it anymore as Rust only allows one active mutable borrow at a time. It also losesOpermissions since Rust will not allow us to destroy it whileris active. rloses all permissions after it expires, andxregainsR,W, andO.xloses all permissions after it is done.
Exercise: confirm this using Aquascope!
Now, let’s look at one last example.
fn main() {
    let mut x: i32 = 10;

    let r: &i32 = &x;

    println!("{}", r);

    println!("{}", x);
}
In this case, x is defined with mut, so it starts with R, W, and O.
What about r? It is a regular reference, but it refers to mutable data! Do you think *r would have W permissions?
Furthermore, when we create r, x becomes actively borrowed! Does x lose any permissions? If so, which ones and why?
Use Aquascope to find the answers to the above questions and try to understand why! Refer to the borrowing rules above for help.
Exercises and Practice for the Midterm
To make sure you fully understand the topics in this module, try to solve these exercises. For each exercise, you must do the following without running the code or using VScode:
- First, figure out what permissions the variables and references have at various steps of the program.
- Determine whether Rust would allow the program to compile or not! The answer to this question is the same as where the program abides by the three borrowing rules, or whether the permissions of the variables and references it match how the program uses them.
- If the program violates the borrowing rules or permissions, think about what would happen if Rust allows it to run: will it cause some undefined or dangerous behavior? How and Why?
We will ask you similar questions on the exam! So, try to solve the questions using a pen and paper (or a text editor without IDE or Rust compiler support).
After you finish an exercise, you can check your answers for by:
- comparing the
permissionsyou come up with what Aquascope shows for each program. - running the code using the playground and seeing if the Rust compiler accepts it or gives an error.
- using the
interpretfeature of Aquascope to find out if there will be dangerous or undefined behavior had the Rust compiler accepted the program.
Exercises:
- Exercise 1: https://play.rust-lang.org/?version=stable&mode=debug&edition=2024&gist=fe1469af8c9d0016d018f8ea3076dc1f
- Exercise 2: https://play.rust-lang.org/?version=stable&mode=debug&edition=2024&gist=9ff4b51730f4932fdcba4a494c1da0db
- Exercise 3: https://play.rust-lang.org/?version=stable&mode=debug&edition=2024&gist=4e8b2f18def78fd48140775a44cf88f2
- Exercise 4: https://play.rust-lang.org/?version=stable&mode=debug&edition=2024&gist=b342f85ba6ea74f0d764dfd41b155103
- Exercise 5: https://play.rust-lang.org/?version=stable&mode=debug&edition=2024&gist=e8d928a708af78ff6adac2cf44d6a224
Hint: Exercise 4 has a trick question ;)
Module 11: Traits, Derive, and Generics
Lecture 26: Friday, April 3, 2026, and
Lecture 28: Wednesday, April 8, 2026.
In this module, we will learn about:
- How we can use generics to reduce code duplication.
- How to define shared behavior among many types using traits.
- How to combine traits and generics using trait bounds to write general reusable code!
- Learn about popular builtin traits and how we can implement them for our types using derive.
Example Scenario: Library
Let’s start with the following example that we will re-use throughout these notes. In this scenario, we are a public library that users check out books from.
Our starting point is defining what a book is. This is a new type! We can use struct to define it.
In this scenario, let’s say a book is made out of a title and an author name, both strings, and an ISBN and an edition
number, both integers.
pub struct Book {
  pub title: String,
  pub author: String,
  pub isbn: u64,
  pub edition: u64,
}
In this case, we can represent our library’s stock as a vector containing many books, perhaps including several copies of the same book! As an example, let’s say our library contains three copies of various editions of the first Harry Potter book, and one copy of the Art of Computer Programming.
let library_books: Vec<Book> = vec![
    Book {
      title: String::from("Harry Potter and The Philosopher's Stone"),
      author: String::from("JK Rowling"),
      isbn: 10,
      edition: 1,
    },
    Book {
      title: String::from("Harry Potter and The Philosopher's Stone"),
      author: String::from("JK Rowling"),
      isbn: 10,
      edition: 1,
    },
    Book {
      title: String::from("Harry Potter and The Philosopher's Stone"),
      author: String::from("JK Rowling"),
      isbn: 10,
      edition: 2,
    },
    Book {
      title: String::from("The Art of Computer Programming"),
      author: String::from("Donald Knuth"),
      isbn: 33,
      edition: 1,
    },
];
Now, say a user walks into our library looking for some book, say the first Harry Potter book, and wanting to borrow it. We will need to check our stock to find out whether we have any available copies of that book. Let’s build a function that does that.
// `book` is the book the user is looking for.
// `library_books` is the vector of books we have available.
// the function should return how many matching copies we have in our library.
fn available_copies(book: &Book, library_books: &Vec<Book>) -> u64 {
  let mut count = 0;
  for b in library_books {
    // check if `b`, the book we are currently looking at, matches
    // the requested book.
    if b.title == book.title
        && b.author == book.author
        && b.isbn == book.isbn
        && b.edition == book.edition {
       count += 1;
    }
  }
  return count;
}
Let’s put all this together and test our code. Run the code below and observe its output!
pub struct Book {
  pub title: String,
  pub author: String,
  pub isbn: u64,
  pub edition: u64,
}

// `book` is the book the user is looking for.
// `library_books` is the vector of books we have available.
// the function should return how many matching copies we have in our library.
fn available_copies(book: &Book, library_books: &Vec<Book>) -> u64 {
  let mut count = 0;
  for b in library_books {
    // check if `b`, the book we are currently looking at, matches
    // the requested book.
    if b.title == book.title
        && b.author == book.author
        && b.isbn == book.isbn
        && b.edition == book.edition {
       count += 1;
    }
  }
  return count;
}

fn main() {
  let library_books: Vec<Book> = vec![
    Book {
      title: String::from("Harry Potter and The Philosopher's Stone"),
      author: String::from("JK Rowling"),
      isbn: 10,
      edition: 1,
    },
    Book {
      title: String::from("Harry Potter and The Philosopher's Stone"),
      author: String::from("JK Rowling"),
      isbn: 10,
      edition: 1,
    },
    Book {
      title: String::from("Harry Potter and The Philosopher's Stone"),
      author: String::from("JK Rowling"),
      isbn: 10,
      edition: 2,
    },
    Book {
      title: String::from("The Art of Computer Programming"),
      author: String::from("Donald Knuth"),
      isbn: 33,
      edition: 1,
    },
  ];

  let target_book = Book {
      title: String::from("Harry Potter and The Philosopher's Stone"),
      author: String::from("JK Rowling"),
      isbn: 10,
      edition: 1
  };

  let count = available_copies(&target_book, &library_books);
  println!("The library has {} copies", count);
}
Our First Trait: PartialEq
One downside of our code is how we implemented equality checking between books (the if statement inside available_copies).
The check is too verbose: it compares every field inside the two books to each other. This is not ideal: imagine if the
programmers had to change the Book type, by adding or removing some fields from it (e.g., to support having multiple authors for one book).
The programmers would then need to remember to change the code inside available_copies to match their changes to Book.
It also looks unnatural.
Perhaps a better approach is to replace that if statement with something more natural. For example, if b == book { ... }!
Modify the code above to use a direct equality check, run it, and look at the output!
You will find that Rust gives the following compile-time error:
error[E0369]: binary operation `==` cannot be applied to type `&Book`
  --> src/main.rs:16:10
   |
16 |     if b == book {
   |        - ^^ ---- &Book
   |        |
   |        &Book
   |
note: an implementation of `PartialEq` might be missing for `Book`
  --> src/main.rs:1:1
Rust essentially complains about the equality check with ==. Specifically, Rust tells us that it does not
know what equality means for books: we defined the type Book ourselves, but did not tell Rust how to compare two books!
A good start would be to implement our own equality check function for Book. For example:
impl Book {
  pub fn check_equals(&self, other_book: &Book) -> bool {
    return self.title == other_book.title
        && self.author == other_book.author
        && self.isbn == other_book.isbn
        && self.edition == other_book.edition;
  }
}
Now, we can call this function to check if two books are equal, e.g., using if b.check_equals(book) { ... }.
Here’s the complete code below, run it and observe the output!
pub struct Book {
  pub title: String,
  pub author: String,
  pub isbn: u64,
  pub edition: u64,
}

impl Book {
  pub fn check_equals(&self, other_book: &Book) -> bool {
    return self.title == other_book.title
        && self.author == other_book.author
        && self.isbn == other_book.isbn
        && self.edition == other_book.edition;
  }
}


// `book` is the book the user is looking for.
// `library_books` is the vector of books we have available.
// the function should return how many matching copies we have in our library.
fn available_copies(book: &Book, library_books: &Vec<Book>) -> u64 {
  let mut count = 0;
  for b in library_books {
    // check if `b`, the book we are currently looking at, matches
    // the requested book.
    if b.check_equals(book) {
       count += 1;
    }
  }
  return count;
}

fn main() {
  let library_books: Vec<Book> = vec![
    Book {
      title: String::from("Harry Potter and The Philosopher's Stone"),
      author: String::from("JK Rowling"),
      isbn: 10,
      edition: 1,
    },
    Book {
      title: String::from("Harry Potter and The Philosopher's Stone"),
      author: String::from("JK Rowling"),
      isbn: 10,
      edition: 1,
    },
    Book {
      title: String::from("Harry Potter and The Philosopher's Stone"),
      author: String::from("JK Rowling"),
      isbn: 10,
      edition: 2,
    },
    Book {
      title: String::from("The Art of Computer Programming"),
      author: String::from("Donald Knuth"),
      isbn: 33,
      edition: 1,
    },
  ];

  let target_book = Book {
      title: String::from("Harry Potter and The Philosopher's Stone"),
      author: String::from("JK Rowling"),
      isbn: 10,
      edition: 1
  };

  let count = available_copies(&target_book, &library_books);
  println!("The library has {} copies", count);
}
This is better, but it is explicitly calling check_equals. It is more natural to use ==. Modify the above code to use == and try to run it again.
error[E0369]: binary operation `==` cannot be applied to type `&Book`
  --> src/main.rs:26:10
   |
26 |     if b == book {
   |        - ^^ ---- &Book
   |        |
   |        &Book
   |
note: an implementation of `PartialEq` might be missing for `Book`
  --> src/main.rs:1:1
The same error!
Rust is unaware that check_equals correspond to ==. Why would it?! Rust does not understand English, and has no way
of knowing that we intended for check_equals to define how to do ==.
How can we inform Rust of this intention? We can using traits!
Specifically, Rust provides a trait called PartialEq, which corresponds to the == operation. We can implement it for Book instead.
impl PartialEq for Book {
  fn eq(&self, other_book: &Book) -> bool {
    return self.title == other_book.title
        && self.author == other_book.author
        && self.isbn == other_book.isbn
        && self.edition == other_book.edition;
  }
}
Now, we can put all this together. Look at what the if condition now checks in available_copies. Run the code to confirm it works.
pub struct Book {
  pub title: String,
  pub author: String,
  pub isbn: u64,
  pub edition: u64,
}
impl PartialEq for Book {
  fn eq(&self, other_book: &Book) -> bool {
    return self.title == other_book.title
        && self.author == other_book.author
        && self.isbn == other_book.isbn
        && self.edition == other_book.edition;
  }
}


// `book` is the book the user is looking for.
// `library_books` is the vector of books we have available.
// the function should return how many matching copies we have in our library.
fn available_copies(book: &Book, library_books: &Vec<Book>) -> u64 {
  let mut count = 0;
  for b in library_books {
    if b == book {
       count += 1;
    }
  }
  return count;
}

fn main() {
  let library_books: Vec<Book> = vec![
    Book {
      title: String::from("Harry Potter and The Philosopher's Stone"),
      author: String::from("JK Rowling"),
      isbn: 10,
      edition: 1,
    },
    Book {
      title: String::from("Harry Potter and The Philosopher's Stone"),
      author: String::from("JK Rowling"),
      isbn: 10,
      edition: 1,
    },
    Book {
      title: String::from("Harry Potter and The Philosopher's Stone"),
      author: String::from("JK Rowling"),
      isbn: 10,
      edition: 2,
    },
    Book {
      title: String::from("The Art of Computer Programming"),
      author: String::from("Donald Knuth"),
      isbn: 33,
      edition: 1,
    },
  ];

  let target_book = Book {
      title: String::from("Harry Potter and The Philosopher's Stone"),
      author: String::from("JK Rowling"),
      isbn: 10,
      edition: 1
  };

  let count = available_copies(&target_book, &library_books);
  println!("The library has {} copies", count);
}
Traits
Traits are Rust’s way of defining a contract. Think of it as Rust’s way of declaring that some types implement certain behavior.
For example, the PartialEq trait defines a contract for equality checking. Specifically, instances of any type that implements PartialEq
can be compared against each other using ==. Another example is the Clone trait: instances of types that implement Clone can be cloned using .clone()!
Thinking about traits involves two facets:
- What is the trait definition or contract?
- What types implement this trait (and how)?
Let’s start by looking at the definition of PartialEq. We put a simplified version of its implementation
below. If you are curious, you can look at its docs for more details.
pub trait PartialEq {
    // Required method that we must implement for our types
    // when we implement PartialEq for them.
    // Self: our type that we are implementing the trait for (for example, Book).
    fn eq(&self, other: &Self) -> bool;
}
We highlight the following:
- We define a trait using the
traitkeyword and then giving the trait a name, similar to howstructorfnworks. - Inside the trait, we can define one or more function signatures. These are the behaviors required by the trait contract.
- Every type that implements this trait must implement all these functions.
- The trait itself does not specify how these functions are implemented – notice how they have no bodies!
- Instead, when we implement a trait for some type, that’s when we have to provide the function body and implementation.
For example, this is how we implemented PartialEq for Book above:
impl PartialEq for Book {
  fn eq(&self, other_book: &Book) -> bool {
    return self.title == other_book.title
        && self.author == other_book.author
        && self.isbn == other_book.isbn
        && self.edition == other_book.edition;
  }
}
We highlight the following observations:
- The syntax for implementing a trait is
impl <trait name> for <type name>. - Inside the
implblock, you need to provide an implementation for every function that the trait defines.
Specifically, if you make a typo in the name of the function (say equals instead of eq), or if you mess up the
signature, the compiler will give you an error.
You can read more about traits in the Rust book.
Other Builtin Traits
In addition to PartialEq, Rust has a number of other commonly used builtin traits:
- Clone: indicates that instances of a type can be cloned.
- Debug: indicates that instances of a type can be printed using
println!("{:?}", <instance>);. - Display: indicates that instances of a type can be printed using
println!("{}", <instance>);. - PartialOrd: indicates that instances of a type can be compared to each other using
<,>, etc.
Furthermore, there are several common and widely used traits that are provided by common libraries in Rust. We have seen some of them already in project 3!
- Serialize: indicates that instances of a type can be serialized, i.e., transformed to binary or to JSON.
- Deserialize: indicates that instances of a type can be deserialized, i.e., retrieved from binary or from JSON.
Derive
When we define a custom type, like Book, it is common to implement many of these traits for that type (when they make sense).
In many cases, this implementation is not interesting: to implement PartialEq, we frequently simply want to compare all matching fields from two objects.
When implementing Clone, we often simply want to clone every field.
In these cases, Rust allows us to use derive to automatically implement these traits for our types, without writing out all the code and implementation.
For example, instead of impl PartialEq for Book {...} block, we can instead just write the following:
#[derive(PartialEq)]
pub struct Book {
  pub title: String,
  pub author: String,
  pub isbn: u64,
  pub edition: u64,
}
You can derive more than one trait by separating them with a comma. For example #[derive(PartialEq, Clone)].
Exercise: modify the scenario code above to use derive instead of manual implementation of the trait. Run the code to confirm it works.
When should you use derive?
Use derive for builtin or external traits where you want to implement them the “default” way, as in, by applying the trait to a type’s fields or components.
When should you not use derive?
derive is not available for all traits. If you define your own custom trait, it will not be derivable by default. You will need to implement your own
derive macro for it to enable automatic deriving.
Furthermore, even if a trait support derive, you may still want to manually implement it if you want to specify custom, non-default logic for how to implement
its behavior.
For example, the default PartialEq implementation compares all the fields in the two objects to each other. However, let’s say that we want to consider books with the same
ISBN to be equal regardless of edition. This way, if the only available copy of the Harry Potter book has edition 2, the user can still find it and check it out!
// This is a non-default implementation of PartialEq.
// If this is our goal, then we cannot use derive.
impl PartialEq for Book {
  fn eq(&self, other_book: &Book) -> bool {
    return self.isbn == other_book.isbn;
  }
}
Exercise: modify the scenario code above to compare books based on ISBN only. Run the code. How many available copies of the first Harry Potter book get identified after your modification?
Using Generics to Avoid Code Duplication
Our available_copies function seems like a helpful and reusable helper function: it counts how many matching elements a vector contains. You could
imagine using it for all sorts of examples, not just a library with books! However, the way we implemented this function is very specific:
it only works for a Book and a vector of Books. It would not work for, for example, a String with a vector of Strings!
Let’s see if we can change that using generics. Rather than defining this function for the specific Book type (this is often called a concrete type),
we can define it for a generic/general type T as follows:
#![allow(unused)]
fn main() {
fn count_occurrences<T>(element: &T, vector: &Vec<T>) -> u64 {
  todo!()
}
}
Let’s dig deeper into this function signature:
- Notice that we renamed the function and parameters name to something more general:
- Instead of calling the function
available_copies, which is highly specific to the library example, we called itcount_occurrences. This expresses the same behavior but in a more general way! - Similarly, instead of calling the parameters
bookandlibrary_books, we renamed them toelementandvector.
- Instead of calling the function
- After the function name, we added
<T>: this represents a type parameter. In some ways, it is similar to a regular parameter (e.g., element): it’s something that the caller of the function must provide. However, unlike a regular parameter that the caller provides a value for (e.g., a specific book or element), the caller must provide a type for the type parameter.- When reading the function signature, think of
Tas a generic unspecified type. It can take on any type the caller wants to. For example, it may becomeStringif the caller uses this function with strings, orBookif the caller uses books, etc.
- When reading the function signature, think of
- The type of the function parameters are different:
- The element (or book) used to be of type
&Book, now it is&T. - The vector used to be of type
&Vec<Book>, now it is&Vec<T>.
- The element (or book) used to be of type
Imagine what would happen if a caller sets T to be Book. If you plug Book in for T, the signature of the function collapses to the old one!
Functions can take more than one generic parameters. For example, we could have written the function as fn count_occurrences<T, F>(element: &T, vector: &Vec<F>) -> u64 { ... }. However, this allows the caller to provide different types for each type parameter. For example, they could set T to String and F to u32. This does not make a lot of sense for our particular use case, since we want the provided element to have the same type as the elements inside the vector.
OK, let’s go ahead and implement the body of the function:
#![allow(unused)]
fn main() {
fn count_occurrences<T>(element: &T, vector: &Vec<T>) -> u64 {
  let mut counter = 0;
  // e's type is &T
  for e in vector {
    if e == element {
      counter += 1;
    }
  }
  return counter;
}
}
Try to run this code. We will encounter a familiar compile-time error:
error[E0369]: binary operation `==` cannot be applied to type `&T`
 --> src/main.rs:7:10
  |
7 |     if e == element {
  |        - ^^ ------- &T
  |        |
  |        &T
Rust is unsure of how to compare instances of T with each other. This makes sense! Remember how
previously, Rust was unsure how to compare instances of Book! We had to implement (or derive) PartialEq for Book to explain to Rust what equality checking for Book means.
We need to do something similar here. However, T is not a concrete or known type. We cannot
implement or derive any trait for T, because we do not even know what T is!
Trait Bounds
This is where trait bounds come in. We cannot implement anything for T, but we can pose a constraint about what types callers may plug in for that T. Specifically, we want to say that a caller can use any type they want for T, as long as that type implements PartialEq.
#![allow(unused)]
fn main() {
fn count_occurrences<T: PartialEq>(element: &T, vector: &Vec<T>) -> u64 {
  let mut counter = 0;
  // e's type is &T
  for e in vector {
    if e == element {
      counter += 1;
    }
  }
  return counter;
}
}
Now this code compiles, because we specific that T must implement PartialEq (and therefore has equality checking defined).
Trait bounds can get complex sometimes, e.g., if we need a type to implement several traits. For that, we can use the where syntax to make expressing these constraints easier. For example:
#![allow(unused)]
fn main() {
fn count_occurrences<T>(element: &T, vector: &Vec<T>) -> u64
// we could also use T: PartialEq + Clone
where T: PartialEq,
      T: Clone {
  let mut counter = 0;
  // e's type is &T
  for e in vector {
    if e == element {
      counter += 1;
    }
  }
  return counter;
}
}
Putting this all together, we get the following code:
#[derive(PartialEq)]
pub struct Book {
  pub title: String,
  pub author: String,
  pub isbn: u64,
  pub edition: u64,
}

// `book` is the book the user is looking for.
// `library_books` is the vector of books we have available.
// the function should return how many matching copies we have in our library.
fn count_occurrences<T: PartialEq>(element: &T, vector: &Vec<T>) -> u64 {
  let mut count = 0;
  for e in vector {
    // check if `b`, the book we are currently looking at, matches
    // the requested book.
    if element == e {
       count += 1;
    }
  }
  return count;
}

fn main() {
  let library_books: Vec<Book> = vec![
    Book {
      title: String::from("Harry Potter and The Philosopher's Stone"),
      author: String::from("JK Rowling"),
      isbn: 10,
      edition: 1,
    },
    Book {
      title: String::from("Harry Potter and The Philosopher's Stone"),
      author: String::from("JK Rowling"),
      isbn: 10,
      edition: 1,
    },
    Book {
      title: String::from("Harry Potter and The Philosopher's Stone"),
      author: String::from("JK Rowling"),
      isbn: 10,
      edition: 2,
    },
    Book {
      title: String::from("The Art of Computer Programming"),
      author: String::from("Donald Knuth"),
      isbn: 33,
      edition: 1,
    },
  ];

  let target_book = Book {
      title: String::from("Harry Potter and The Philosopher's Stone"),
      author: String::from("JK Rowling"),
      isbn: 10,
      edition: 1
  };

  let count = count_occurrences(&target_book, &library_books);
  println!("The library has {} copies", count);
}
Notice how we call the count_occurrences function in main. We do not need to explicitly provide
the types we want the generic type parameter T to become. Instead, Rust automatically deduces this from the type of target_book and library_books.
Exercise: Modify the code so that Book does not implement/derive PartialEq. Do you think that code should work? Run it and see if your intuition was correct! Try to understand the error message given what we discussed.
Exercises
Exercise 0: Reading and Quiz
Read chapters 10, 10.1, and 10.2 in the Rust book and answer the quiz at the end of 10.1 and 10.2!
After you answer all the questions in a quiz, you will see a report showing you which of your answers were correct and which were not. Use the rust playground to validate your answers and find out why you might have been incorrect!
Exercise 1: Derive
Create a new Rust project, open it with VSCode, and copy over the last complete code sample into your VSCode.
Let’s say our library also has magazines that users can borrow. A magazine has a name, a month, and a year. The name is a String, the month and year are integers.
- Define a type/struct to represent these magazines.
- Create a vector of magazines for representing what magazines your library has.
- Use
count_occurencesto count how many copies of a particular magazine the library has.
Note: the copy of the magazine must match all of the name, month, and year.
Exercise 2: Custom Trait
Now, define a new custom Trait, call it Checkout. This trait should define a function checkout, for checking out an item from the library.
Implement Checkout for both Book and Magazine. The implementation should print out the information of the item along with “checked out!”.
Hint: how should self be passed to checkout? All you need is to print the item (i.e. read permissions!).
Exercise 3: Generic Function and Trait Bounds
Implement a generic function that takes some item that a user wants to checkout, and a vector of similar items representing the library. It finds the first matching copy of that item in the vector. Removes it from the vector, and checks it out!
Use this function to checkout a book and a magazine from our library!
Hint: consider implementing a non generic version of this function just for books as a starting point!
Hint: how should you pass the item and the vector of items to the function? Do you need to modify either of them?
Hint: what trait bounds should the generic type satisfy? You need to be able to checkout the type, and you also need to check equality to find a matching copy.
Solution for books only: https://play.rust-lang.org/?version=stable&mode=debug&edition=2024&gist=30eb603812ba9e72b3965252adb50385
Generic solution: https://play.rust-lang.org/?version=stable&mode=debug&edition=2024&gist=435c839e1bd09e80ea6ac0e21a08adbc
Module 12: Lifetimes in Rust
Lecture 29: Friday, April 10, 2026.
This module is based on earlier notes by Tom Gardos and Lauren Wheelock
This module introduces Rust’s lifetime system, which ensures memory safety by tracking how long references remain valid. We’ll explore lifetime annotations, the borrow checker, lifetime elision rules, and how lifetimes work with functions, structs, and methods.
By the end of this module, you should be able to:
- Understand how the borrow checker prevents dangling references
- Write explicit lifetime annotations when required by the compiler
- Apply lifetime elision rules to understand when annotations are optional
- Use lifetimes in function signatures, structs, and methods
- Combine lifetimes with generics and trait bounds
- Debug lifetime-related compilation errors effectively
Background Readings
Read the following sections from “The Rust Programming Language” book:
Lifetimes Overview
Lifetimes ensure that references are valid for as long as the code needs them to be. Specifically, their goal is to allow the Rust compiler to detect and prevent dangling references.
Note: you can separate declaration and initialization in Rust. We will use this feature in these notes to illustrate lifetimes.
fn main() {
    let r;  // declaration
    r = 32;  // initialization
    println!("r: {r}");
}
The Rust Compiler Borrow Checker
Let’s start with the following code:
fn main() {
    let r;

    {
        let x = 5;
        r = &x;
    }

    println!("r: {r}");
}
Before running the code, think about the following questions:
- In which lines of code is
ralive? I.e., where canrbe used?- Think about what the scope of
ris.
- Think about what the scope of
- In which lines of code is
xalive? (or what is its scope!) - What happens after
xgoes out of scope? - Should Rust allow this program to compile and run? What bad thing might happen if it did?
Feel free to use aquascope to interpret the program to answer question 4!
Let’s annotate the sections of code where r and x are alive. In Rust terminology, this is called a Lifetime! Rust uses a special naming pattern for lifetimes: 'a (single quote followed by identifier)
fn main() {
    let r;                // ---------+-- 'a
                          //          |
    {                     //          |
        let x = 5;        // -+-- 'b  |
        r = &x;           //  |       |
    }                     // -+       |
                          //          |
    println!("r: {r}");   //          |
}                         // ---------+
In this case, r’s scope is the entirety of the main function as represented by lifetime 'a.
On the other hand, x’s scope is the nested curly braces represented by lifetime 'b.
We can see that 'b is much shorter than 'a. Meaning that r might be used after x goes out of scope (and gets destroyed!). Meaning that r becomes a dangling reference!
This is why Rust does not allow this program to compile! You can confirm this by running the program and observing the output.
This gives us the golden rule of lifetimes in Rust: You cannot assign something with a shorter lifetime to something that outlives it!
The direction is important: assigning something with a short lifetime (x, 'b) to a longer lifetime (r, 'a) risks dangling references. The other way around is OK: a reference that expires before the data it refers to expires is not dangerous!
We can fix the above code rewriting it so that the lifetime 'a survives as long as 'b.
fn main() {
    let r;                // ----------+-- 'a
                          //           |
    let x = 5;            // --+-- 'b  |
                          //   |       |
    r = &x;               //   |       |
                          //   |       |
    println!("r: {r}");   //   |       |
                          //   |       |
}                         // --+-------+
Now, both x and r are in scope until the end of the main function, and thus their lifetimes 'b and 'a expire at the same time.
Generic Lifetimes in Functions
In the above example, we used lifetimes as comments to annotate where variables go out of scope. This was a conceptual tool to help us understand what was going on. We did not need to actually specify these lifetimes to Rust in the code: the Rust borrow checker automatically identifies and reasons about them.
Now, let’s see an example of why we need to be able to specify lifetimes.
Say we want to build a function to compare two strings and return a reference to the longest one. It makes sense to pass these strings by references, since we do not need to own them in this function.
// compare two string slices and return reference to the longest
fn longest(x: &String, y: &String) -> &String {
    if x.len() > y.len() {
        return x;
    } else {
        return y;
    }
}

fn main() {
    let string1 = String::from("abcd");
    let string2 = String::from("xyz");

    let result = longest(&string1, &string2);
    println!("The longest string is {result}");
}
Run the code and you will notice that we have a compile time error! Read the error carefully. What is the problem?
The problem is the compiler is unable to know for certain what the reference that longest returns
refers to. It might refer to x, it might also refer to y. As a result, it cannot know what its
lifetime is in general!
In part, this happens because the compiler analyzes the function longest() in isolation, without looking at how main uses it – this is important, as a function might be used many times in different ways and in different places! So, Rust wants to make sure it is safe in isolation and under any circumstances!
Explicitly Annotating Lifetimes in Functions
We can fix this by explicitly annotating the lifetimes of the parameters. Let’s start with annotating each parameter with its own unique different lifetime.
We have to decide which lifetime to annotate the return value with. This is a catch 22, the compiler would not be happy with either choices.
// compare two string slices and return reference to the longest
fn longest<'a, 'b>(x: &'a String, y: &'b String) -> &'a String {
    if x.len() > y.len() {
        return x;
    } else {
        return y;
    }
}
Try to run the above code: the compiler will be OK with the line that returns x, since the lifetime of x is 'a, which matches the return type. However, it will be produce a compile error for the line that returns y, since its lifetime 'b does not match the return type of the function &'a String.
Edit the code so that the return type is &'b String and run it. You will see that now the compiler produces an error in the flip side.
The only way forward is to annotate x, y, and the return type with the same lifetime!
// compare two string slices and return reference to the longest
fn longest<'a>(x: &'a String, y: &'a String) -> &'a String {
    if x.len() > y.len() {
        return x;
    } else {
        return y;
    }
}

fn main() {
    let string1 = String::from("abcd");
    let string2 = String::from("xyz");

    let result = longest(&string1, &string2);
    println!("The longest string is {result}");
}
You can run the code above and confirms that it indeed works! It is easy to see how since both string1 and string2 live the same duration in the main function – both of their scopes is the rest of the main function!
Detour: Lifetimes and References Syntax
Names of lifetime parameters must start with an apostrophe (’) and are usually all lowercase and very short, like generic types
&i32        // a reference with inferred lifetime
&'a i32     // a reference with an explicit lifetime
&'a mut i32 // a mutable reference with an explicit lifetime
Detour: The Static Lifetime
'static is a special lifetime designation that represents values that live for the
entire duration of the program.
This mostly applies to constants (such as constant strings) and certain heap-allocated values.
#![allow(unused)]
fn main() {
let s: &'static str = "I have a static lifetime.";
}
While the temptation of using 'static may be strong (since it lives long enough for any trait bound!), avoid using it when you can use more fine grained lifetimes!
For more, see for example:
- https://doc.rust-lang.org/rust-by-example/scope/lifetime/static_lifetime.html
Back from Detour: What if the Lifetimes are not equal?
Using a single lifetime in longest may make sense when looking at the function in isolation.
But, what if when we call the function, we provide two parameters with different lifetimes?
// compare two string slices and return reference to the longest
fn longest<'a>(x: &'a String, y: &'a String) -> &'a String {
    if x.len() > y.len() {
        return x;
    } else {
        return y;
    }
}

fn main() {
    let s1 = String::from("abcd");      // ----------+-- 'l1
    {                                   //           |
        let s2 = String::from("xyz");   // --+-- 'l2 |
                                        //   |       |
        let result = longest(&s1, &s2); //   |       |
        println!("{}", result);         //   |       |
                                        // --+       |
    }                                   //           |
                                        // ----------+
}
Now, s1 and s2 have lifetimes 'l1 and 'l2, and 'l1 outlives 'l2. Yet, surprisingly, Rust
accepts and runs this code with no problems!
This is because Rust allows assigning things with a longer lifetime to shorter lifetimes!
Specifically, Rust selects the shorter of the two lifetimes, 'l2, and automatically assigns it
to 'a when calling longest.
This is safe – it means that longest believes that x lives less than it actually does, which will not cause any dangling references!
Consider what this means for result: longest returns a reference with lifetime 'a, and since Rust sets 'a to the shorter of the two lifetimes, then result has lifetime 'l2.
We can confirm this by attempting to use result past 'l2 as below:
// compare two string slices and return reference to the longest
fn longest<'a>(x: &'a String, y: &'a String) -> &'a String {
    if x.len() > y.len() {
        return x;
    } else {
        return y;
    }
}

fn main() {
    let s1 = String::from("abcd");      // ----------+-- 'l1
    let result;                         //           |
    {                                   //           |
        let s2 = String::from("xyz");   // --+-- 'l2 |
        result = longest(&s1, &s2);     //   |       |
                                        // --+       |
    }                                   //           |
    println!("{}", result);             //           |
                                        // ----------+
}
Notice that the Rust borrow checker produces a compile-time error for the above program. Specifically, the error identifies that s2 does not live long enough (i.e., that ’l2 is too short!).
Lifetime of return type must match lifetime of at least one parameter
What do you think would happen if we ask Rust to run this code?
#![allow(unused)]
fn main() {
fn longest<'a, 'b, 'c>(x: &'a String, y: &'b String) -> &'c String {
    let result = String::from("really long string");
    return &result;
}
}
Compile error!
The returned reference refers to result, but result only lives inside longest, and goes out
of scope (and thus gets dropped or destroyed) at the end of the function!
So, a function that returns a reference must refer to one of its parameters, or something deduced from those parameters (and thus must have a matching lifetime), since all other variables and data created within the function will be destroyed at the end of the function!
Lifetime Annotations in Struct Definitions
So far, we’ve only used structs that fully owned their member types. We can also define structs to hold references, but then we need lifetime annotations.
#[derive(Debug)]
struct ImportantElement<'a> {
    element: &'a String,
    index: usize
}

fn main() {
    let strings = vec![String::from("string1"), String::from("string2")];
    let e = ImportantElement {
        element: &strings[0],
        index: 0
    };
    println!("{:?}", e);
}
We need the explicit lifetime annotation because we need to help the compiler understand how long the fields inside the struct can live, which in turn governs how long instances of that struct can live.
For example, in the code above, e stores a reference element to one of the strings.
This means that e.element cannot live longer than strings, meaning that e itself cannot
live longer than strings!
We can confirm this by looking at the code below:
#[derive(Debug)]
struct ImportantElement<'a> {
    element: &'a String,
    index: usize
}

fn main() {
    let e;                           // ----------+-- 'l1
    {                                //           |
        let strings = vec![          // --+-- 'l2 |
            String::from("string1"), //   |       |
            String::from("string2"), //   |       |
        ];                           //   |       |
        e = ImportantElement {       //   |       |
            element: &strings[0],    //   |       |
            index: 0                 //   |       |
        };                           //   |       |
                                     // --+       |
    }                                //           |
    println!("{:?}", e);             //           |
                                     // ----------+
}
Rust produces a compile error for this code. The borrow checker knows that
e must have lifetime 'l1, so its type must be ImportantElement<'l1>.
However, when we assign a value to e, we provide it a reference to strings[0],
whose lifetime, 'l2, lives less than l1!
Lifetime Elision
In Rust, the cases where we can omit lifetime annotations are called lifetime elision.
e·li·sion
/əˈliZH(ə)n/
noun

the omission of a sound or syllable when speaking (as in I'm, let's, e ' en ).

* an omission of a passage in a book, speech, or film.
  "the movie's elisions and distortions have been carefully thought out"

* the process of joining together or merging things, especially abstract ideas.
  "unease at the elision of so many vital questions"
Here is a simple example of Lifetime elision. Look at this code. Does it compiler? Confirm by running it!
fn first_element(v: &Vec<String>) -> &String {
    return &v[0];
}
How come that code compiles? Shouldn’t we have to write out the lifetimes explicitly as below?
fn first_element<'a>(v: &'a Vec<String>) -> &'a String {
    return &v[0];
}
The answer is Lifetime elision! The compiler was able to automatically infer the lifetime annotations in this example.
Inferring Lifetimes: When can Lifetimes be elided?
The compiler developers decided that some patterns were so common and simple to infer that the compiler could just infer and automatically generate the lifetime specifications.
Pattern 1
Compiler assigns a unique lifetime parameter to each parameter that is a reference.
So:
// function with one parameter
fn foo(x: &i32);

// a function with two parameters
fn foo(x: &i32, y: &i32);

// and so on.
would automatically become:
// function with one parameter gets a lifetime parameter
fn foo<'a>(x: &'a i32);

//a function with two parameters gets two separate lifetime parameters:
fn foo<'a, 'b>(x: &'a i32, y: &'b i32);

// and so on.
Pattern 2
If there is exactly one input lifetime parameter, that lifetime is assigned to all output lifetime parameters
So:
fn foo(x: &i32) -> &i32would automatically become:
fn foo<'a>(x: &'a i32) -> &'a i32Pattern 3
If there are multiple input lifetime parameters, but one of them is &self or &mut self (because this is a method on a struct / type), the lifetime of self is assigned to all output lifetime parameters.
So:
struct MyType { /* .. */ }
impl MyType {
  fn foo(&self, x: &i32, y: &i32) -> &i32 { /* ... */ }
}
would automatically become:
struct MyType { /* .. */ }
impl MyType {
  fn foo<'a, 'b, 'c>(&'a self, x: &'b i32, y: &'c i32) -> &'a i32 { /* ... */ }
}
Let’s Test Our Understanding
You’re the compiler and you see this function.
fn first_word(s: &str) -> &str {...}Do any rules apply? which one would you apply first?
Answer:
First rule: Apply input lifetime annotations.
fn first_word<'a>(s: &'a str) -> &str {...}Second rule: Apply output lifetime annotation.
fn first_word<'a>(s: &'a str) -> &'a str {...}Done! Everything is accounted for.
Test Our Understanding Again
What about if you see this function signature?
fn longest(x: &str, y: &str) -> &str {...}Can we apply any rules?
We can apply first rule again. Each parameter gets it’s own lifetime.
fn longest<'a, 'b>(x: &'a str, y: &'b str) -> &str {...}Can we apply anymore rules?
No! Produce a compiler error asking for annotations.
Recap
- Lifetimes are a way to ensure that references are valid as long as we need them to be.
- The borrow checker is a tool that helps us ensure that our references are valid.
- We can use lifetime annotations to help the borrow checker understand our code better.
- We can use lifetime elision to help the compiler infer lifetimes for us.
- We can use lifetimes in function signatures, structs, and methods.
- We can combine lifetimes with generics and trait bounds.
Exercises
To prepare for our final exam, make sure you solve these exercises as practice!
Feel free to use the Rust playground or VSCode! Only look at the solutions after you write down your answers to confirm them and identify your mistakes.
Exercise 1 – Illustrate the Lifetimes
Annotate the lifetimes of the variables in the following code using the notation from the beginning of the module.
#![allow(unused)]
fn main() {
{
    let s = String::from("never mind how long precisely --"); //
    {                                                         //
        let t = String::from("Some years ago -- ");           //
        {                                                     //
            let v = String::from("Call me Ishmael.");         //
            println!("{v}");                                  //
        }                                                     //
        println!("{t}");                                      //
    }                                                         //
    println!("{s}");                                          //
}                                                             //
}
Solution
#![allow(unused)]
fn main() {
{
    let s = String::from("never mind how long precisely --"); //----------+'a
    {                                                         //          |
        let t = String::from("Some years ago -- ");           //------+'b |
        {                                                     //      |   |
            let v = String::from("Call me Ishmael.");         //--+'c |   |
            println!("{v}");                                  //  |   |   |
        }                                                     //--+   |   |
        println!("{t}");                                      //      |   |
    }                                                         //--------+ |
    println!("{s}");                                          //          |
}                                                             //----------+
}
Exercise 2 – Fix the Function with Multiple References
The following function is supposed to take a vector of strings, a default value, and an index, and return either the string at the given index or the default if the index is out of bounds. However, it won’t compile without lifetime annotations.
Add the appropriate lifetime annotations to make this code compile.
fn get_or_default(strings: &Vec<String>, default: &String, index: usize) -> &String {
    if index < strings.len() {
        return &strings[index];
    } else {
        return default;
    }
}

fn main() {
    let vec = vec![String::from("hello"), String::from("world")];
    let default = String::from("not found");
    let result = get_or_default(&vec, &default, 5);
    println!("{}", result);
}
Solution
fn get_or_default<'a>(strings: &'a Vec<String>, default: &'a String, index: usize) -> &'a String {
    if index < strings.len() {
        return &strings[index];
    } else {
        return default;
    }
}

fn main() {
    let vec = vec![String::from("hello"), String::from("world")];
    let default = String::from("not found");
    let result = get_or_default(&vec, &default, 5);
    println!("{}", result);
}
The return value could come from either strings or default, so both need the same
lifetime annotation 'a. The vector reference itself doesn’t need to live as long since
we’re returning references to its contents, not the vector itself.
Exercise 3 – Generic Type with Lifetime Annotations
The following code defines a Wrapper struct that holds both a generic value and a
reference. The struct and its method won’t compile without proper lifetime annotations.
Add the appropriate lifetime annotations to make this code compile.
struct Wrapper<T> {
    value: T,
    description: &String,
}

impl<T> Wrapper<T> {
    fn new(value: T, description: &String) -> Self {
        return Wrapper { value, description };
    }

    fn get_description(&self) -> &String {
        return &self.description;
    }

    fn get_value(&self) -> &T {
        return &self.value;
    }
}

fn main() {
    let desc = String::from("A number");
    let wrapper = Wrapper::new(42, &desc);
    println!("Value: {}, Description: {}", wrapper.get_value(), wrapper.get_description());
}
Solution
struct Wrapper<'a, T> {
    value: T,
    description: &'a String,
}

impl<'a, T> Wrapper<'a, T> {
    fn new(value: T, description: &'a String) -> Self {
        return Wrapper { value, description };
    }

    fn get_description(&self) -> &String {
        return &self.description;
    }

    fn get_value(&self) -> &T {
        return &self.value;
    }
}

fn main() {
    let desc = String::from("A number");
    let wrapper = Wrapper::new(42, &desc);
    println!("Value: {}, Description: {}", wrapper.get_value(), wrapper.get_description());
}
The struct needs a lifetime parameter 'a because it holds a reference (description).
The impl block must also declare this lifetime parameter: impl<'a, T>. The methods
get_description and get_value don’t need explicit lifetime annotations because the
compiler can apply elision rules (the return lifetime is inferred from &self).
Module 13: Managed Memory in Python
Lecture 30: Monday, April 13, 2026, and
Lecture 31: Wednesday, April 15, 2026.
Code examples
In this module, we will learn about alternative approaches to ensuring memory safety in other languages.
Recap: Memory Safety The Rust way
Rust ensures programs are memory safe by rejecting to compile programs that are not safe, e.g., have dangling references:
- Rust provides programmers with a lot of control over the program memory with features like ownership and references.
- This control can be misused, e.g., a developer that destroys a variable by mistake while it has active references.
- Rust uses ownership (e.g., the permissions we discussed earlier using aquascope!), borrowing, and lifetimes to detect any such scenarios and produce compile errors asking the programmer to fix them.
This approach is unique to Rust, it combines giving the programmer control with memory safety and does not require any checks at runtime – everything is done by the borrow checker at compile time. This results in really fast programs.
Here is a simple example to refresh your memory:
fn main() {
    let x = String::from("hello");
    let ref_to_x: &String = &x;
    drop(x);
    println!("{}", ref_to_x);
}
The C++ Way
C++ is a very popular compiled programming language whose syntax and features are similar to Rust in many ways. It also provides programmers with complete control over the program’s memory.
However, unlike Rust, it does not have a borrow checker. It does not have lifetimes, and its notion of ownership is wacky. C++ programmers commonly use raw pointers that they have to track and manage themselves. Crucially, they have to ensure they do not cause memory issues by mistake, for example, by destroying data that has active pointers. If they do, the C++ compiler will not detect it, and their programs will misbehave at runtime in arbitrary and difficult to debug ways!
C++ is very performant and provides programmers total control and even more flexibility than Rust does, but this also includes the flexibility to shoot themselves in the foot, by writing incorrect and terribly unsafe code, if they aren’t careful.
To an extent, you can imagine that writing C++ code is similar to writing Rust code where the entire code is inside an unsafe block. For example, something like this:
fn main() {
    unsafe {
        let x = String::from("hello");
        let ptr = &x as *const String;
        drop(x);
        println!("{}", *ptr);
    }
}
Managed Memory: the Python Way
An alternative approach to Rust is for the language to take away the ability of the programmer to manage and control the memory. Instead, the language manages the memory on their behalf!
This is a very popular approach: it results in programming languages that are simple to use and learn, but comes at the expense of reducing the programmers ability to control what’s going on, and at the cost of high performance overheads.
Python is a great example of such a language: It is very easy to use and learn, but is many times slower than Rust for many tasks!
Let’s dive deep into how Python manages the memory.
How does Python Pass Arguments to Functions
Let’s start by figuring out how Python passes arguments to functions. Look at the below python sample.
# Is l1 passed to l2 by move, clone/copy, or ref?
def helper(l2):
    l2.append(3)
    print('l2', l2)


l1 = [1, 2]
helper(l1)
print('l1', l1)
In Rust, there are three ways of passing a value to a function:
- by move
- by copy/clone
- by ref (const or mut).
Let’s think about what would happen if Python passes l1 to helper using each of these approaches:
If it passes by move then l2 should print 1, 2, 3 and l1 should not print anything (or print some error). Since, in this hypothetical, we would have moved (and thus lost access to) l1.
If it passes by copy/clone then l2 would print 1, 2, 3 and l1 would print 1, 2. l1 would not be affected at all by anything that happens in helper!!
If it passes by ref then l2 and l1 would both print 1, 2, 3.
We just enumerated three hypotheses, and made predictions about what the code will do in each of them. Now, we can run the code, find out which of the predictions is true, and eliminate all the wrong options to find out what Python does. Science!
You can find this code (and all other Python samples from these notes) in our code repo. Get the code and run it using python and see what happens!
Spoiler: the output is:
l2 [1, 2, 3]
l1 [1, 2, 3]
So, Python passes arguments by (mutable) reference.
Detour: Tradeoffs
Python passes by reference by default because passing by reference is cheap: it does not copy the data!
However, the down side is that a function may mutate and corrupt data that other parts of the code needs. Thus, programmers must manually copy such data before passing it to functions, to ensure the original data remains unmodified.
For example:
# Is l1 passed to l2 by move, clone/copy, or ref?
def helper(l2):
    l2.append(3)
    print('l2', l2)


l1 = [1, 2]
tmp = l1.copy()
helper(tmp)
print('l1', l1)
In this case, tmp is still passed by reference, but tmp itself is a copy of l1. So l1 remains unmodified!
Note: Python has two notions of copies: a shallow copy (which is what we did above) and a deep copy (which is similar to a clone in Rust). You can read more about this if you are interested here.
Everything in Python is a reference!
In fact, everything in Python is a reference!
If you run the code below, you will notice that both x and y are printed as [1, 2, 3, 4, 5]!
Because they are both references to the same list! So, when we modify one, we also modify the other!
# x and y both refer to the same list!
x = [1, 2, 3]
y = x

# so, if x is modified, y is affected!
x.append(4)

# and vice versa!
y.append(5)

# We can see both modifications!
print(x)
print(y)
In fact, we can prove this by printing the addresses of x and y!
# Helper function that gives us the address of the data
# that a variable refers to
def address(var):
    return hex(id(var))

# x and y refer to the same address!
print(address(x))
print(address(y))
Alright, if everything is a reference, then:
- who owns the data? how does Python knows when to delete the data!?
- how does Python ensure none of these references become dangling!?
It turns out, Python more or less does not allow the programmer to delete the data. All that the programmer can do is delete a particular reference. Python internally keeps track of how many active references refer to the data. When that count hits 0, Python deletes the data.
In other words, all the references share the data, there is no single owner! This also means that as long as one reference to some data is active, the reference count remains above 0, meaning the data is guaranteed not to get deleted, and the reference won’t dangle!
import sys

# Print 3: x is one reference, y is one reference
# and we created one more reference when we passed
# y to sys.getrefcount() -- remember, python always
# passes by reference!
print(sys.getrefcount(y))

# Delete variable y, somewhat similar-ish to drop(y)
# in Rust.
del x

# refcount is now 2 because y is gone!
print(sys.getrefcount(y))
print(y) # the data remains!
This is a lot simpler to think about than Rust’s ownership, lifetimes, and borrow checking. Yet, it guarantees memory safety just the same. The downside is it requires:
- keeping tracking of and updating the refcount: which takes time and memory.
- programmers need to remember to copy data when they need to.
- if programmers need to ensure that some piece of data (e.g., sensitive secrets) are truly deleted, they need to make sure they got rid of all references to it from anywhere in their program.
Cycles and Garbage Collection
There is also one more down side! Cycles.
For example, consider this python code:
x = [1, 2, 3]
x.append(x)
x.append(x)
print(x)
We created a list x that contains 1, 2, and 3. Then, we appended the list x to itself.
This seems circular and impossible, however, remember that in Python, everything is a reference.
So in reality, all we’ve done is appended a reference (i.e., an address) to the list, that happens to refer back to the list itself. We do this twice.
In other words, the list in memory looks something like the graph below. Notice the two circular references from inside the list to the list itself!
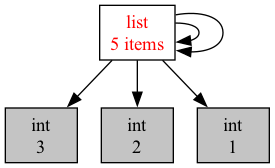
So, what do you suspect refcount will print for x?
print(sys.getrefcount(x))
That’s right! 4. x is one reference, there are two cyclical references inside x itself that refer back to x, and we created one more reference when calling getrefcount.
So, let’s say we deleted x (or that it went out of scope and became inactive). How many references
to the list would still exist?
del x
Well, we got rid of one reference, and the reference we created when calling getrefcount earlier is gone. But we still left two references inside the list. So the refcount is now 2!
However, these are meaningless references: our code has no way of using them or accessing the list. This happened because the list itself is cyclical and refers to itself, and not because it is still in use.
So, even though the list should in principle be deleted now. Python cannot delete simply based on refcount, since the refcount is not 0!
It turns out, these kind of cyclical reference chains are pretty popular (e.g., a doubly linked list!). So, Python must find some way to deal with them, or risk running out of memory.
This is where the garbage collector comes in: this is a component in the Python runtime – the part of the Python language that is attached to your Python program and runs it (and does all the work of managing the memory, the references and refcounts, etc).
The garbage collector looks at the memory of the program, and identifies any data that is no longer reachable from active variables in the program, including cyclical data like x above. It then deletes any such data, while keeping the rest in place.
We can call the garbage collector manually (this is not recommended and is only for demonstration).
import gc
print('Garabage collected', gc.collect())
Since we ran del x before, the list is now cyclical garbage. The garbage collector finds it and deletes us. The garbage collector counts the entire cycle as one data element.
This ensures that Python can delete any inactive data (so it does not run out of memory) while ensuring that no active data gets deleted prematurely, and thus deletion does not create dangling references.
It is also very slow! Garbage collection is an expensive and complicated process that requires traversing the various objects in memory and identifying if they are still active or merely cyclical. Making garbage collection as fast as it can be has been a long standing goal in programming languages research. Over the last 30-40 years, we have seen countless papers and systems that aim to improve it.
It’s gotten a lot smarter – but it is still very slow.
Python invokes the garbage collector periodically, when certain memory usage limits are met. When it does, your program will likely freeze for many many CPU cycles, until it is done collecting garbage.
You can read more about garbage collection in Python here.
How do Lists/Vectors Work in Python?
We saw how Python ensures that we cannot have dangling references because of data getting destroyed too early. However, we know that dangling references can also occur due to other reasons. For example, if the data being referred to moves to a different address in memory, the old reference may dangle!
We’ve seen examples of this with unsafe raw pointers in Rust. For example, imagine we have a raw pointer to an element in a vector. If we then push some more elements to the vector, the vector may resize (doubling its capacity), which moves all its elements to a different, bigger location in memory, and the old raw pointer becomes dangling.
Rust references protect against this by using Rust’s permissions. They lock the vector by removing write permissions if has been borrowed. This means a vector can not resize or move its elements while any of these elements are actively borrowed.
Let’s look at what Python does:
v = ["hello", "goodbye"]
x = v[0]
We created a Python list (which is the same as Vec in Rust). The list contains two elements: “hello” and “goodbye”. Then, we created a variable x and assign it to the first element in the list v[0].
We know that in Python, everything is a reference! So, x is merely a reference to the string hello. We can confirm this by looking at their addresses!
# Both of these addresses are the same!
print(address(v[0]))
print(address(x))
Now, say we push more strings to the list:
for i in range(10):
    v.append("this is a new string")
In principle, v should now resize to a much bigger capacity, and its elements should be moved to the new memory location.
So, the address of v[0] should now be different, and if x still had the old address, it might dangle.
Let’s see if we can confirm this:
print(address(v[0])) # same address as before!
print(address(x))    # same address as before!
print(x)  # this prints hello: x does not dangle!
If you run this code, you will notice that the address of x and of v[0] does not change! How come?
Well, in Python, everything is a reference. This includes elements inside a vector/list! The list does not store the elements in its heap allocated memory. It merely stores references to the elements – the elements themselves are stored in some arbitrary place in memory (also on the heap). So, when the list resizes, it moves the references to a newer, bigger location in memory. But the elements themselves remain in place.
In other words, it looks a little like this:
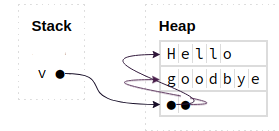
This means that in Python, we can modify lists without worry, even if we have active references to their members!
Let’s think about the advantages and disadvantages of this approach.
Advantages
-
This is simple for programmers to use: Programmers can modify lists as we see fit without worrying about having active references or causing dangling pointers! In fact, they can (almost) forget how memory works and still be able to use lists correctly without causing any dangling pointers.
-
Python can support lists that contain elements of different types and sizes: regardless of what the element is, all that is stored inside the list are references, which all have the same size (traditionally, 8 bytes). So, it is easy for python to know how to retrieve an element at index i from a list (e.g.,
v[i]), even for largei. It can simply go to the address of the ith element (which would be at an offset equal to 8 * i), and then follow the reference there.
Disadvantages
-
This approach is slower: it results in an extra dereference for every element access. E.g., to access
v[0], python has to follow the pointer insidevto the address of the first slot in the heap-allocated memory of that list, and there, python will find another reference that it has to dereference to get the actual element. In Rust, the second step is unneeded, the element is directly at the first slot. -
The approach is even slower: because it means that the elements are actually not contiguous in memory. Their references inside the list are contiguous, but the elements may be all over the place. This changes the pattern of memory accesses of even a simple for loop that goes through a list one element at a time. The loop will end up accessing elements all over memory. This has a significant negative impact on the performance of the program, since it is very unfriendly to how modern computers cache memory accesses.
-
What does it mean to copy a python list? The elements are not stored in the list, but elsewhere on the heap, with only a reference in the list. So, if we copy a list, do we simply copy the references of the elements (but still point to the same elements) or should we copy the elements themselves as well? This is the key difference between shallow and deep copy in python. Run the code below using Python on your computer and try to make sense of the output!
import copy

x = [ [1, 2], [10, 20] ]
v1 = x.copy()          # shallow copy
v2 = copy.deepcopy(x)  # deep copy

# x is not affected by adding new elements to v1 or v2.
v1.append('hello')
v2.append('goodbye')
print(x, v1, v2)

# but, x is affected if we modify the elements within v1.
# a shallow copy has references to the same elements!
v1[0].append(3)
print(x, v1)

# on the other hand, a deep copy is complete isolated
# as it copies the elements and stores new references to
# the copies.
v2[0].append(4)
print(x, v2)
Module 14: Enums and Box
Lecture 32: Friday, April 17, 2026.
In this module, we will learn how we can use Enums and Rust Boxes!
Motivation
In the previous module, we saw how in Python, everything is a reference! One consequence of this is that Python supports lists (and other collections) that contain elements of different types.
For example, the list x below contains a string and a number.
x = ['hello', 10]
print(x[0])
print(x[1])
How is this related to Python references? Well, remember FastVec, and specifically, how FastVec implement get(<index>) to retrieve an element at the given index.
Rust vectors and Python lists allocate a chunk of memory on the heap that they can dynamically resize to add or remove new elements. They keep track of the base pointer / address of this region (i.e., the address of the first element). Let’s call that address base_addr.
Python lists, Rust’s Vec, and even FastVec support accessing an element at some index i in a fast constant-time manner (i.e. O(1)). Let’s think about what a vector does when we execute something like x[i]:
- It retrieves
base_addr, the address of element0. - It adds an
offsetto thebase_addrto find the address of elementi. - It dereferences the resulting address to retrieve element
i.
Imagine if the vector x contains elements of type u8. Each of these element is one byte in size. So, the address of element i would be base_addr + i . On the other hand, if the elements were of type u64, they would be each 8 bytes in size, and so the address of element i would be base_addr + (i * 8).
More generally, if a vector contains elements of a type whose size is b bytes, the formula of the address of the ith element would be base_addr + (i * b).
But, what if the elements were of different types, as in our Python example before? Well, the formula no longer works, cause we do not know what the size is! This is one of the reasons Rust does not allow mixing different arbitrary types inside vectors.
In Python however, the list merely stores a reference to the elements, and while the elements may have different types (and thus different sizes), the references all have the same size – 8 bytes!
So, what can we do in Rust if we want to store elements of different types in a vector? We need to find a way to overcome the issue of having different element sizes! We have two approaches:
- Store the elements separately on the heap and only store a reference to them inside the vector itself – similar to Python. This is the Box approach.
- Pad the size of each element to the size of the maximum type we want to store in the vector. This is the Enum approach.
Enums
Start by reading sections 6, 6.1, 6.2, and 6.3 in the Rust book.
Rust Enums provide a way for us to say that a value is one from some predefined set of values. E.g., similar to how a bool is either true or false.
This also allows us to say that a value may be one of several types! For example, the enum below can hold a string or a u64.
#[derive(Debug)]
enum StringOrNumber {
  StringCase(String),
  NumberCase(u64)
}

fn main() {
  let x: StringOrNumber = StringOrNumber::StringCase(String::from("hello"));
  let y: StringOrNumber = StringOrNumber::NumberCase(10);
  println!("{:?}", x);
  println!("{:?}", y);
}
Exercise: edit the code above to support a third case for a boolean value!
The enum above may hold a string or a u64. However, in either case, instances of this enum have type StringOrNumber, as we saw above with x and y. It is the same type! This means we can use this enum to have a vector that mixes strings and numbers!
#[derive(Debug)]
enum StringOrNumber {
  StringCase(String),
  NumberCase(u64)
}

fn main() {
  let v = vec![
    StringOrNumber::StringCase(String::from("hello")),
    StringOrNumber::NumberCase(10),
    StringOrNumber::StringCase(String::from("bye"))
  ];
  println!("{:?}", v);
}
Matching on Enums
The one complexity with this approach is that we have to match on every element in that vector to discover whether it is a StringCase or a NumberCase in order to be able to use it.
For example, imagine we wanted to write a function that combines all the elements of a vector of strings and numbers into one big string.
#[derive(Debug)]
enum StringOrNumber {
  StringCase(String),
  NumberCase(u64)
}

fn combine_to_string(v: &Vec<StringOrNumber>) -> String {
    let mut result = String::from("");
    for i in 0..v.len() {
        let e: &StringOrNumber = &v[i];
        match e {
            StringOrNumber::StringCase(the_string) => {
                result += the_string;
            },
            StringOrNumber::NumberCase(the_number) => {
                result += &the_number.to_string();
            }
        }
    }
    return result;
}

fn main() {
  let v = vec![
    StringOrNumber::StringCase(String::from("hello")),
    StringOrNumber::NumberCase(10),
    StringOrNumber::StringCase(String::from("bye"))
  ];
  println!("{}", combine_to_string(&v));
}
Notice how after we retrieve the ith element in the loop and stored it in variable e, we needed to manually match on the possible cases for our enum to be able to retrieve the String or u64 inside e.
This can get a little verbose at times, but it prevents accidental mistakes, since it forces programmers to handle all the possible cases!
How Does This Work?
So, how come that using an Enum this way allowed us to overcome the issue with element sizes in the vector?
Well, let’s look at the size of a StringOrNumber.
#[derive(Debug)]
enum StringOrNumber {
  StringCase(String),
  NumberCase(u64)
}

fn main() {
    println!("The size of a StringOrNumber is {} bytes",
             size_of::<StringOrNumber>());
    println!("The size of a String is {} bytes",
             size_of::<String>());
    println!("The size of a u64 is {} bytes",
             size_of::<u64>());

    let x: StringOrNumber = StringOrNumber::StringCase(String::from("hello"));
    let y: StringOrNumber = StringOrNumber::NumberCase(10);
    println!("Size of x {} bytes", size_of_val(&x));
    println!("Size of y {} bytes", size_of_val(&y));
}
Notice how the size of StringOrNumber is the size of its biggest case! Even when we store a u64 inside the enum (as in y), its size is still padded to match the size of String!
So, with an enum, all the elements in the vector get padded to the maximum size of all their types. Meaning that we can use the formula from before: base_addr + (i * b).
Boxes
Read chapter 15 and 15.1 in the Rust book.
In Rust, a Box allows storing data on the heap while maintaining ownership and permissions for it. A Box is often called a smart pointer. Unlike raw pointers, which may dangle, a Box owns the data on the heap that it points to, and ensures that this data never dangles.
fn main() {
    // Regular variable on the stack.
    let x: String = String::from("hello");
    println!("address of x on the stack {:p}", &x);

    // Now, we use a box to move the data from the
    // stack to the heap!
    // The box is made out of two parts:
    // 1. the String stored on the heap,
    // 2. the address of that String (i.e. a pointer) stored on the stack.
    let b: Box<String> = Box::new(x);
    println!("Address of the box {:p}", &b);
    println!("Address of what's inside the box {:p}", &(*b));

    println!("Size of box (on stack) is {} bytes", size_of_val(&b));
    println!("Size of string inside box (on heap) is {} bytes", size_of_val(&(*b)));
}
Why Are Boxes Useful?
Box allows us to store data on the heap and keep a pointer to it. This has many uses:
- If we want to have self-referential data types, e.g, structs or enums that store instances of themselves inside of them. We can use a
Boxto put the inner instances on the heap, and only store a pointer to it inside the struct. TheConditionenum in project 3 is an example of this! - If we want to work with data of dynamic or unknown size: everything on the stack needs to have a fixed, known size at compile time. If we have some data whose exact size is not know ahead of time or may vary, we should store it on the heap using a
Box!
How Can We Use a Box to Mix Different Types in a Vec?
Box itself is a generic type. Specifically, when we use it, we must specific what type of data it points to on the heap.
fn main() { let b1: Box<String> = Box::new(String::from("hello")); let b2: Box<u64> = Box::new(10); }
So, a box that points to a string and a box that points to a number have different types, and we cannot directly combine them in a vector (what would the type of that vector be? Vec<Box<String>> or Vec<Box<u64>>? Neither work).
However, there is a workaround!
Remember our previous example with an enum. We wanted to have a vector that could store string and numbers with the goal of being able to combine all of them together to form one big string.
If that’s all we need to do, then, we can use Box by thinking creatively and outside the box.
It does not matter to us what exact type the Box points to in this case, what matters is that it is a type that can be turned to a string (so that we can combine it with the other elements).
Fortunately, there is a trait that describes this behavior (or contract)! The
ToString trait. So, we can view the elements as boxes that points to some dynamic type that’s unknown ahead of time, but that implements the ToString trait.
We can describe that to Rust by saying Box<dyn ToString>: a Box that points to some dynamic data that implements ToString:
- dyn stands for dynamic, and indicates that the exact data type is dynamic: it may not be known ahead of time and may depend on user inputs or other runtime data.
- Earlier versions of Rust accept using
Box<ToString>. But this is unrecommended.ToStringis not an actual type, it is merely a trait. By explicitly usingdyn, we make that distinction clear.
fn combine_to_string(v: &Vec<Box<dyn ToString>>) -> String { let mut result = String::from(""); for i in 0..v.len() { // we do not know what the type is exactly here, // but we know that e refers to some element of some // type that implements ToString! let e: &Box<dyn ToString> = &v[i]; result += &e.to_string(); } return result; } fn main() { // All of the above boxes point to data whose type implements // ToString! So, we can refer to all of them as `Box<dyn ToString>` let v: Vec<Box<dyn ToString>> = vec![ Box::new(String::from("hello")), Box::new(10), Box::new(String::from("byte")) ]; println!("{}", combine_to_string(&v)); }
Why Do We Need a Box For dyn?
Can’t we just say Vec<dyn ToString>?
No!
dyn ToString is not a real, fixed type. It is a dynamic quantity. Crucially, since dyn ToString can be anything (as long as it implements ToString), there is not way for Rust to know what size it will be. Because the size of dyn ToString is unknown at compile time, the vector formula we describe above would not work if the type was Vec<dyn ToString>.
fn main() { println!("Size of dyn ToString {}", size_of::<dyn ToString>()); }
It also means that Rust cannot create regular stack-allocated variables of type dyn ToString, since Rust would not know how much space they would need on the stack, or how to delete them when they go out of scope!
fn main() { let x: dyn ToString = String::from("hello"); }
Thus, the only way to use a dynamic typed object, such as dyn ToString, is to store it on the heap, where memory can be dynamically allocated. Hence, using a Box.
The technical term for things like dyn ToString (or dyn with any other traits) is a Trait Object Type.
Which Do You Prefer?
There are several tradeoffs between going the Enum route and going the Box + dyn trait route:
- Memory: Enums pad all their instances to the maximum size of all their cases. If your Enums may contain types that differ significantly in their size, this may waste a lot of memory. A
Boxdoes not pad elements, but it requires storing an additional 8 bytes to keep track of the address/pointer to the heap data. - Speed:
Boxallocates, access, and deletes data on the heap, which is a little slower than direct access. It may also have some implications on the memory access patterns (and thus caching behavior) of the program. - Complexity: Enums require verbose match statements. A
Boxwith adyn traitavoids the match statement, but only exposes the behavior or contract codified by thetraitin question.
Post-Reading Reflections
-
What if the shared behavior between the different types is more complicated, e.g., you want to be able to use multiple functions that do custom logic? What if no builtin trait offers all this behavior?
-
What if you do not know all the possible types you may want to use or mix into your vector? Alternatively, what if you know that you constantly need to support new types?
Module 15: Data Science with Polars
Lecture 33: Wednesday, April 22, 2026, and
Lecture 34: Friday, April 24, 2026.
Code examples
The Polars Library
Polars is a dataframe library written in Rust.
Dataframes: If you’ve used pandas, the concept of a dataframe should be familiar to you: A Dataframe is a two dimensional heterogeneous tabular data structure. It consists of labeled columns and rows which may hold data items of different types. In many ways, it is akin to a spreadsheet that you can programmatically interact with in your desired language to perform data analysis.
Polars is implemented in Rust for high performance. We will see a couple of cool features it supports below. You can use Polars in Rust, but you can also use it in Python, as the Polars developers have created a Python embedding for it (even though all of its internals are implemented in Rust behind the scenes).
Compared to pandas, Polars provides additional features:
- It automatically optimizes queries before executing them (more on this below).
- It automatically runs components of the queries (i.e., sub-queries) in parallel.
Application Scenario
We will start with an application scenario. Say we have the following csv data stored in a csv file called albums.csv.
band,album,rating
Humanity's Last Breath,Humanity's Last Breath,7
Meshuggah,Nothing,5
Humanity's Last Breath,Ashen,5
Meshuggah,Nothing,4
Vildhjarta,Masstaden,4
Humanity's Last Breath,Ashen,4
Vildhjarta,Dar Skogen Sjunger,4
...
Each line in this csv file represents a row of data consists of the rating that one user has provided for a given album. For example, the first data line above represents a user rating Humanity’s Last Breath self-titled debut album with a 7 out of 5 (yes, it’s that good). The data above contains a handful of lines for demonstration reasons. Assume that the actual data set contains many, perhaps millions, of ratings.
Our goal is to use Polars to analyze this data, and in particular, compute the average rating for some albums of interest.
Abstractly, you can view our query as consisting of these logical steps:
GROUP BY [band, album]
COMPUTE average(rating) per group
FILTER BY album = '<desired album>'
You will see a better language for describing queries like this called SQL in DS 310. But for now, all we need is to understand this query intuitively at a high level.
We are going to see two ways we can perform this query in Polars, the first is using eager execution, the second using lazy execution.
We provide the complete code for these examples in our repo along with instructions for how to generate an albums dataset and how to run the code. As you go through the notes below, make sure you also follow in the provided sample code and to run and experiment with the code one part at a time.
Eager Data Analytics with Polars
Eager execution is the “normal” kind of execution where when we write down some piece of code or expression, the computer executes that expression directly (also called eagerly) as soon as it encounters it.
For example, if the computer gets to a line that says let x: i32 = y + 10; while executing a Rust program, it reads the value inside of y, adds 10 to it, and puts the actual and complete result in a new
variable called x.
Let’s think how we could express the query above normally (using Polars’ eager API).
Step 0: Import Polars.
We begin by adding Polars as a dependency in our Cargo.toml file.
polars = { version = "0.53.0", features = ["polars-io", ...] }
We must also import the different types and functions we want to use from Polars.
use polars::prelude::{CsvReadOptions, CsvReader, DataFrame};
// or use polars::prelude::*; to import everything
Step 1: Read data from the CSV file.
Polars provides a CsvReader type that can read .csv files and transform them into Dataframes stored in the program’s memory.
To use the CsvReader, we must first configure it. Polars provides a lot of configurations that you can use, but in our case, all we
need is to let the reader know that the file contains a header row in the beginning and where the file is located.
let reader: CsvReader<File> = CsvReadOptions::default()
.with_has_header(true)
.try_into_reader_with_file_path(Some("albums.csv".into()))
// functions that start with try_ usually return a Result<T, Error>
// we unwrap that Result below to get the CsvReader we are looking for.
.unwrap();Now that we have a reader ready, we can ask it to read the entirety of the file in one go.
let data: DataFrame = reader.finish().unwrap();Now that we have data of type DataFrame, we can use any of its methods as we like, e.g., to explore what the data looks like:
println!("{}", data);
println!("Number of rows in dataset {}", data.height());
println!("First row in dataset {:?}", data.get_row(0).unwrap());Which gives us an album similar to the below:
shape: (7, 3)
┌────────────────────────┬────────────────────────┬────────┐
│ band ┆ album ┆ rating │
│ --- ┆ --- ┆ --- │
│ str ┆ str ┆ i64 │
╞════════════════════════╪════════════════════════╪════════╡
│ Humanity's Last Breath ┆ Humanity's Last Breath ┆ 7 │
│ Meshuggah ┆ Nothing ┆ 5 │
│ Humanity's Last Breath ┆ Ashen ┆ 5 │
│ Meshuggah ┆ Nothing ┆ 4 │
│ Vildhjarta ┆ Masstaden ┆ 4 │
│ Humanity's Last Breath ┆ Ashen ┆ 4 │
│ Vildhjarta ┆ Dar Skogen Sjunger ┆ 4 │
└────────────────────────┴────────────────────────┴────────┘
Number of rows in dataset 7
First row in dataset Row([String("Humanity's Last Breath"), String("Humanity's Last Breath"), Int64(7)])
Step 2: Group by band and album.
Before we can compute the average, we must tell Polars how we want to group the records we want to average first. E.g., if we just ask to average without any grouping, we will get one number: the average of all the ratings across all albums and bands.
Here, we want to group by the band and album.
let groups: GroupBy =
data.group_by(["band", "album"]).unwrap();Notice that the result of this operation is something of type GroupBy. This represents a collection of many DataFrames,
one per group.
Step 3: Compute the average within each group.
In Polars, the API for computing the average is called mean().
let averages: DataFrame =
groups.select(["rating"]).mean().unwrap();Note that:
- We asked to compute the mean from the
groups, not from the originaldata. - The result is a
DataFramewhere each row represents one group (i.e. one band and album) along with the average for that group.
Step 4: Filter the averages to only keep the album of interest.
Let us say we want the average rating for the album Ashen.
// Get the album column, and ensure that it contains strings.
let albums = averages.column("album").unwrap().str().unwrap();
let condition = albums.equal("Ashen");
let result: DataFrame = averages.filter(&condition).unwrap();Note that the result here is again a DataFrame. This is a recurring pattern: Polars provides APIs that allows you to manipulate
a DataFrame to create a new derived DataFrame, e.g., by filtering or aggregating the data (among many other available operations).
Now, we can print this final result:
println!("{}", result);shape: (1, 3)
┌────────────────────────┬───────┬─────────────┐
│ band ┆ album ┆ rating_mean │
│ --- ┆ --- ┆ --- │
│ str ┆ str ┆ f64 │
╞════════════════════════╪═══════╪═════════════╡
│ Humanity's Last Breath ┆ Ashen ┆ 4.5 │
└────────────────────────┴───────┴─────────────┘
Success!
You can view the full code in the provided eager.rs.
Now, follow the instructions in the README in the accompanying code on our repo and generate a much larger file, e.g., with 50 million rows, and then execute the above code against it.
cd module_15_polars
# Generate a large dataset with 50 million rows
python3 albums.py 50000000 > albums50M.csv
# Analyze the dataset using the eager version of our code
cargo run --bin eager -- albums50M.csv
On my computer, this took around 6 seconds to complete. It also used a lot of memory. Follow the instructions in the README to look at the memory consumption, specifically
the peak memory consumption (sometimes called maximum resident set size), which is the maximum amount of memory that was used at any point during execution.
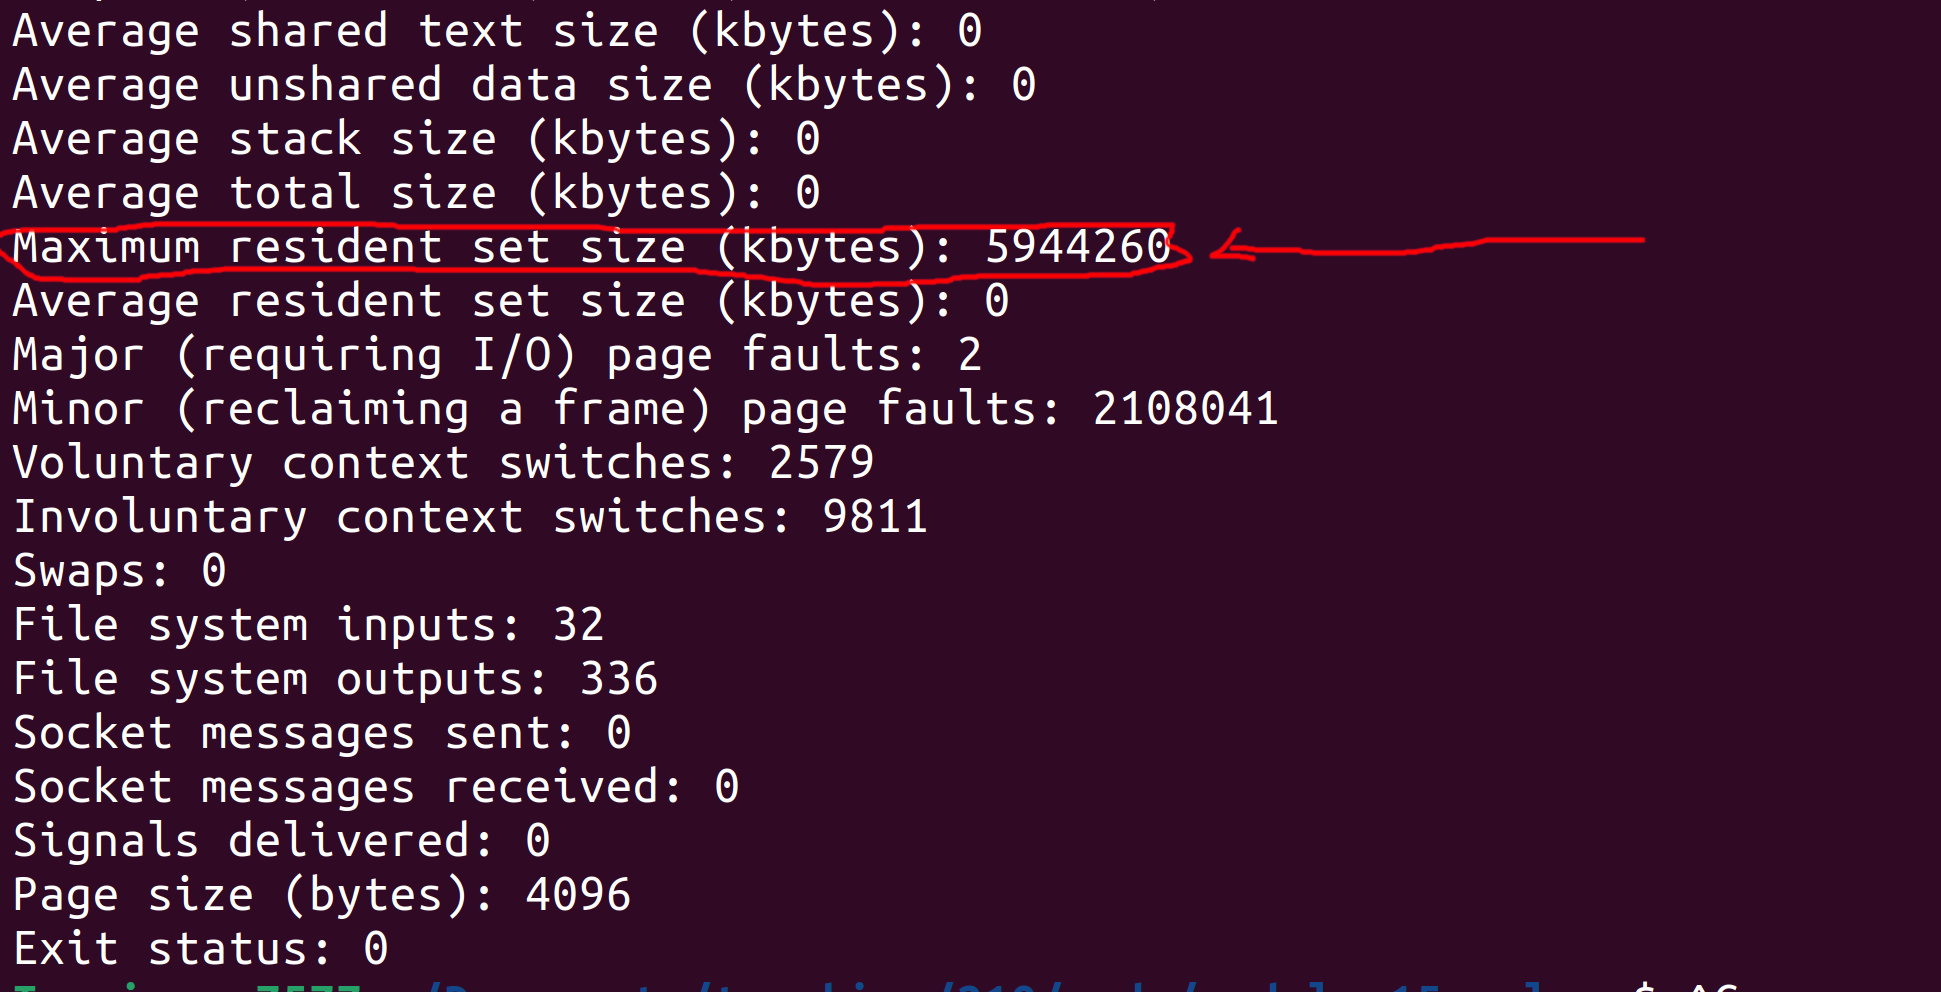
On my computer, you can see that the peak memory consumption was 5944260 Kilobytes (roughly 5.9 Gigabytes). The input albums50M.csv file is roughly 1.4 Gigabytes, so this peak memory consumption
makes some sense since we read the entire file to memory in one shot, then operate over it (which inadvertently creates some copies of it behind the scenes).
Note: depending on your OS, the output may be differently formatted (e.g. in bytes instead of kilobytes on mac), and the maximum resident set size might be called something else (e.g., peak memory consumption on mac). Note: if your computer has a small RAM, it might start lagging when working with the full 50 million entries dataset. In that case, feel free to generate and use a smaller dataset (e.g., 10 or 5 millions).
Can we do better? Let’s find out next.
Manually Optimizing Eager Queries
Let’s review the query we have written above and think about whether we can (manually) optimize it to reduce its runtime and memory usage!
READ (entire) CSV file
-> GROUP BY [band, album]
-> COMPUTE average(rating) per group
-> FILTER BY album == "Ashen"
-> PRINT ALL
Detour: Query Plan
The above summary of the query is often called a plan. There are many flavors of plans out there, from high level logical plans (similar to what we wrote above) to much lower level plans that, e.g., show nearly the full details of every operation that gets performed.
Note for the final exam: You will be asked to write and manipulate query plans on the exam, so familiarize yourself with them. You can use the exercises at the end of these notes to practice. The exact syntax you use is not important, as long as you show us the right steps in the right order.
End of Detour: Back to (Manually) Optimizing the Query
Is there something we can do to this plan (and the underlying query) to optimize it?
The key observation is finding out whether the query as planned performs any useless computation, e.g., if earlier parts of the query computes some data that later parts of the query disregard!
In this case, our query begins by computing the average rating for every group of band and album. That’s a lot of work, both for
grouping and for computing the average.
But, notice that later on, the query filters out all of these groups (and their averages) except for one album "Ashen". This means
that all the work done previously to group and compute averages for other albums was wasted/meaningless work.
We shouldn’t be asking the computer to do meaningless work! So, what can we do to avoid that? Ideally, we will only ask the computer to group and aggregate ratings for the specific album we want. It turns out that we can do that by rewriting (in this case, re-ordering) the query.
READ (entire) CSV file
-> FILTER BY album == "Ashen"
-> GROUP BY [band, album]
-> COMPUTE average(rating) per group
-> PRINT ALL
This new plan performs the filter first, which allows us to remove the vast majority of the dataset. Then, we perform the group by and average on only the remaining data.
We can go even further: since we know all the data that remains after the filter corresponds to the album "Ashen", we do not need to group by album anymore!
READ (entire) CSV file
-> FILTER BY album == "Ashen"
-> GROUP BY [band]
-> COMPUTE average(rating) per group
-> PRINT ALL
This seems easy enough to do with the plan, but how do we tell Rust and Polars that we want this version of the query instead of the one we wrote in the previous section!? Well, we have to rewrite our Rust code to reflect this new plan.
let data: DataFrame = /* read csv file using CsvReader */;
// Filter by album == Ashen.
let albums = data.column("album").unwrap().str().unwrap();
let condition = albums.equal("Ashen");
let filtered_data: DataFrame = data.filter(&condition).unwrap();
// Group by the band then compute the average rating per group.
let groups = filtered_data.group_by(["band"]).unwrap();
let result = groups.select(["rating"]).mean().unwrap();You can find the full modified code in the provided eager_optimized.rs.
Follow the instructions to run the optimized query and observe its run time and memory usage.
On my computer, when I ran the optimized code on the albums50M.csv dataset, the runtime went down to around 3.5 seconds. Furthermore, the peak memory consumption went down to around 3.8 Gigabytes! Big improvement!
Manual Optimizations Gone Wrong
Manually optimizing this query seemed easy enough, but that’s because this particular query is pretty simple. In generally, manual optimizations of this kind can be very risky if the programmer is not experienced and is not thinking carefully about what they are doing.
There are two ways manual optimizations can go wrong:
- The programmer misses some additional opportunity for optimizations and ends up with a program with subpar performance.
- The programmer rewrites their query or code in a way that actually changes what the query computer (rather than simply how it computes it) and end up with wrong results.
There errors may occur either during the logical optimization (i.e., when the programmer is rearranging the plan) or when they are changing their code to reflect the new optimized plan (e.g.,
by adding some unintentional bug to the code).
Consider the last plan above. The plan performs a group by band and then computes the average. But, is that really needed? Why not do this instead:
READ (entire) CSV file
-> FILTER BY album == "Ashen"
-> COMPUTE average(rating)
-> PRINT ALL
Consider these two scenarios:
- The query begins by filtering data for any album not named
"Ashen". This is a very peculiar album name, and it is likely thatHumanity's Last Breathis the only band that has released an album with that name. In this case, it would be OK to get rid of the group by and simply compute the average directly! So, in this case, the optimized plan we came up with could be optimized even further. - Imagine we were looking for (and thus filtered by) some other album whose name is less peculiar. For example, the great
King Crimsonreleased a terrific album calledRedin 1974. However, Taylor Swift also released a much worse album namedRedas well in 2012. If we remove the group by and directly compute the average, we would mix the great ratings the King Crimson got with the mediocre Taylor Swift album, resulting in a meaningless average rating. In this case, we would have incorrectly optimized the query and caused it to produce incorrect outputs.
The conclusion: optimizing queries and programs is dangerous business! You need to take into consideration a variety of constraints, including ones that are not explicitly expressed in the code and are instead related to contextual information you may know about the data and the business logic.
Fear not though! The next section will describe a way to have Polars automatically optimize the queries for you!
Automatically Optimized Data Analytics Query Using Lazy Execution
Let’s revisit our hand optimized query plan from above:
READ (entire) CSV file
-> FILTER BY album == "Ashen"
-> GROUP BY [band]
-> COMPUTE average(rating) per group
-> PRINT ALL
Motivation
As discussed, this is a correct query plan, but one that is prone to errors if the programmer decides to attempt to optimize it further (by removing the group by).
At the same time, this query misses another important optimization: the query reads the entirety of the CSV file to memory, then it filters out the irrelevant data.
This means that prior to the filter, the entire dataset sits in memory! Only after all of it has been read does the program start filtering out irrelevant data.
This is a serious problem: imagine if the data was so big that it would not even fit in RAM (e.g., 100GB). This is not an unrealistic scale for many datasets out there. Even in such a case, the relevant data (i.e., ratings for the album “Ashen”) may constitute only a small portion of this data set that does fit in memory (e.g., 100MB).
Thus, a much better approach is to filter the data as we read it from the file, e.g., one row at a time. This means the program will only ever store relevant data in memory, reducing the peak memory usage. Ofcourse, even in this case, the program would still need to go through the entire dataset file in order to find the relevant data, but it can do so while using less memory.
How can we implement something like this? Well, we can implement our one CSVReader that:
- In a for loop, reads one line at a time from the file.
- For each line, it applies the filter, and pushes the row of data to the DataFrame if meets the filter.
This is doable, but would require writing a bunch of code to read files one line at a time, parse comma-separate rows, etc. Furthermore, it would have to deal with a bunch of edge cases, e.g., what if one row spans several lines?
Polars LazyReader
Fortunately, Polars provides us with a reader that can do that for us so we do not have to worry about it. This is called a LazyReader.
We can use a LazyReader as follows:
let data: LazyFrame = LazyCsvReader::new("albums.csv".into())
.with_has_header(true)
.finish()
.unwrap();Compared to the previous Polars code we saw in the previous two sections, we have two big differences here:
- We are using
LazyCsvReaderinstead ofCsvReader. - With
CsvReader, the.finish().unwrap()code used to read the entire file and return aDataFrame. However, withLazyCsvReader, that code returnsLazyFrameinstead.
LazyFrame
So, what are the differences between DataFrame and LazyFrame? Well, both of them represent heterogeneous tabular data. However, while DataFrame has the entirety of the dataset within its content and in memory,
LazyFrame is merely a placeholder: it does not actually have any data yet! It is merely an object that Polars gives us that allows us to describe the query we want, without reading any data or executing that query yet.
How do I know this? Well, for one, the Polars documentation says so. But also, if we try to print the LazyFrame or even get the count of rows in it,
we will get some compile errors from Rust telling us those APIs are not available for it!
let data: LazyFrame = /* lazy read from file */;
println!("{}", data);
println!("Number of rows in dataset {}", data.height());
println!("First row in dataset {:?}", data.get_row(0).unwrap());error[E0277]: `LazyFrame` doesn't implement `std::fmt::Display`
|
| println!("{}", data);
| -- ^^^^ `LazyFrame` cannot be formatted with the default formatter
error[E0599]: no method named `height` found for struct `LazyFrame` in the current scope
|
| println!("Number of rows in dataset {}", data.height());
| ^^^^^^
error[E0599]: no method named `get_row` found for struct `LazyFrame` in the current scope
|
19 | println!("First row in dataset {:?}", data.get_row(0).unwrap());
| ^^^^^^^ method not found in `LazyFrame`
If the LazyFrame does not have any data in it, then what’s its use!? Well, we can still use the functions and APIs that Polars provides to express what query we want to execute using the LazyFrame.
The query would not get executed just yet, since LazyFrame is merely a placeholder, but now Polars would know what our desired query is. When we have expressed the entire query, we could then
ask Polars to optimize it and execute it as it sees fit!
For example, we can state the query in the same shape we started the first section with:
let data: LazyFrame = /* lazy read from file */;
let output: LazyFrame = data
.group_by([col("band"), col("album")]) // returns a LazyGroupBy
.agg([col("rating").mean()]) // returns a LazyFrame
.filter(col("album").eq(lit("Ashen")));Compared to the eager version of the query, the main differences are:
- The code is shorter and less verbose, this is because Polars spent more time carefully improving their Lazy API, since it is their recommended way of using Polars.
- The output variable has type
LazyFrame: no computation over data has been executed yet!
Automatic Plan Rewriting
We can ask Polars to show us the plan it has for the query we just wrote.
#![allow(unused)] fn main() { println!("Initial Plan: {}", output.explain(false).unwrap()); println!("Optimized Plan: {}", output.explain(true).unwrap()); }
This shows us the following output:
Initial Plan: FILTER [(col("album")) == ("Ashen")]
FROM
AGGREGATE[maintain_order: false]
[col("rating").mean()] BY [col("band"), col("album")]
FROM
Csv SCAN [albums50M.csv]
PROJECT */3 COLUMNS
ESTIMATED ROWS: 43922804
Optimized Plan: AGGREGATE[maintain_order: false]
[col("rating").mean()] BY [col("band"), col("album")]
FROM
Csv SCAN [albums50M.csv]
PROJECT 3/3 COLUMNS
SELECTION: [(col("album")) == ("Ashen")]
ESTIMATED ROWS: 43922804
Note that Polars outputs the plan in a slightly different format than ours from earlier. You should read Polars plans from the bottom up, instead of the other way around. This is a common way of representing plans that you may encounter in other contexts as well (e.g. database queries).
However, the plan still more or less shows the same information as our previous plans. Look at the initial plan. This encodes the query as we wrote it:
- It reads the Csv file (
Csv SCAN), which also includes a projection (PROJECT */3 columns). This indicates that the query wants to project (or keep) all 3 columns in the dataset. - It groups by the
bandandalbumand aggregates by computing the averageratingfor each group. - It filters based on
album == "Ashen".
On the other hand, the optimized plan looks different, and is in fact a bit more akin to our hand optimized plan:
- It reads the Csv file (
Csv SCAN) while also performing the filter byalbum == "Ashen"during the read (so only relevant data is read into memory). - It groups by
bandandalbumand computes the averageratingper group.
Finally: Executing the Query and Getting the Output
When we are happy with the query and have expressed all of its components, we can ask Polars to go ahead and actually run this query now.
It is only at this point that Polars reads any data from the file and runs the components of the query. Polars does this in one go: it will return to us the final output of the query, but will not show us any intermediate results. This gives Polars the freedom to rewrite the query and plan as it sees fit.
// Ask polars to run the query (with optimizations).
let result: DataFrame = output.collect().unwrap();
println!("{}", result);Note that the type of result is DataFrame, since calling .collect() instructs Polars to stop being lazy and actually read the data and execute the query!
Now, we can do whatever we want to the result and its data, including printing it, or using it for future eager queries, etc.
You can find the complete lazy code in the provided lazy.rs.
Follow the instructions in the README to run this code. On my computer, this code takes roughly the same amount of time as the hand optimized query (around 3.5 seconds), but it has much lower peak memory usage at under 2GB!
Note on Automatic Optimization
Polars performs query optimizations based on query rewriting rules.
These are hand written rules that the Polars developers designed. They prioritize safety and correctness: they are meant to be correct transformations that would not change the output of any possible query and are guaranteed to never be incorrect.
As a result, these rules may miss some available optimizations that are based on business logic or contextual information about the data that are known to us, e.g., from lived experience or fuzzy specification, but not known to Polars in the data schema or the query information.
This is a common theme in many other cases as well, including how SQL databases automatically optimize queries.
In practice, achieving the best performance is a cooperative and iterative task where the query developers use the automatic optimized plans as a starting point, and then may do some further rewriting or introduce additional information (e.g., indices, schema information) and ask the system to re-optimize the plan again. Query developers may do this over several iterations, including benchmarking different versions of the query, until they are satisfied with their optimizations.
Exercises
Exercise 1
We are using the same albums data set as above. You are given the following logical query plan.
READ (entire) CSV file
-> GROUP BY [band, album]
-> COMPUTE max(rating) per group
-> FILTER BY band == "Meshuggah"
-> PRINT ALL
Question 1: Describe what this query does in English.
Solution
The query finds the maximum rating for each album by the band "Meshuggah".
Question 2: You are tasked with optimizing this query by rewriting or reordering the plan. Provide the best optimized plan you can come up with that is also correct (i.e., do not change the output of the query).
Solution
READ CSV file AND FILTER BY band == "Meshuggah"
-> GROUP BY [album]
-> COMPUTE max(rating) per group
-> PRINT ALL
Explanation:
- The only relevant rows are those for the band “Meshuggah”, so we can filter the others out while scanning or reading the file.
- Since all the data we read has band “Meshuggah”, we do not need to group by the band anymore.
- However, we still need to group by
album, since “Meshuggah” may have released multiple albums and we need to find the maximum rating for each of them.
Exercise 2
We are using the same albums data set as above. You are given the following logical query plan.
READ (entire) CSV file
-> GROUP BY [band]
-> COMPUTE distinct count(album) and average(rating) per group
-> SORT BY average(rating) DESCENDING ORDER
-> FILTER BY distinct count(album) >= 2
-> PRINT FIRST ROW
Question 1: Describe what this query does in English.
Solution
The query prints the band that has the highest average rating, excluding bands that have released less than 2 albums.
Question 2: You are tasked with optimizing this query by rewriting or reordering the plan. Provide the best optimized plan you can come up with that is also correct (i.e., do not change the output of the query).
Solution
READ (entire) CSV file
-> GROUP BY [band]
-> COMPUTE distinct count(album) per group
-> FILTER BY distinct count(album) >= 2
-> COMPUTE average(rating) per group
-> SELECT ROW WITH max(average(rating))
-> PRINT ALL
Explanation:
- We cannot filter while reading the data, since we need to first compute the count of albums.
- However, we do not need to compute the average of rating directly: we can start by computing the count of albums to filter out irrelevant bands.
- We do not need to sort the entire data, we only want the maximum. Computing the maximum over
ngroups takesO(n), while computing a full sort takesO(n * log(n)).
Exercise 3
You are given a dataset with all of BU’s student records across its history. The data set includes one row per student and has the following columns: name, BUID, email, department, degree, GPA, graduation year.
You are also given the following logical query plan:
READ (entire) CSV file
-> GROUP BY [department]
-> FILTER BY GPA > 3.5
-> COMPUTE count per group
-> PROJECT [department, count]
-> PRINT ALL
Question 1: Describe what this query does in English.
Solution
For each college/department in BU, the query shows the count of graduated students with a GPA higher than 3.5.
Question 2: You are told that this query is important for the registrar office. Specifically, the registrar office is looking for the count of distinct students who graduates with a GPA higher than 3.5.
In other words, if a student graduated twice, i.e. once with a bachelor’s and then once again later with a master’s, they should count only once!
In light of this new information, you notice a bug with previous query: it counted such students twice! So you set out to fix this bug and produce this new query plan:
READ (entire) CSV file
-> GROUP BY [department]
-> FILTER BY GPA > 3.5
-> COMPUTE distinct count(name) per group
-> PROJECT [department, distinct count(name)]
-> PRINT ALL
Does this query compute the desired information correctly? Why? If not, how can you fix it?
Solution
The query is incorrect! It only counts students with distinct names. This would count a student who graduated several times only once (correct!) but it would not count different students that happen to have the same name separately (incorrect!).
The fix is to distinct count by the student’s BUID, since it is a unique identifier!
READ (entire) CSV file
-> GROUP BY [department]
-> FILTER BY GPA > 3.5
-> COMPUTE distinct count(BUID) per group
-> PROJECT [department, distinct count(BUID)]
-> PRINT ALL
Question 3: You are tasked with optimizing this query by rewriting or reordering the plan. Provide the best optimized plan you can come up with that is also correct (i.e., do not change the output of the query).
Solution
READ CSV file AND FILTER BY GPA > 3.5 AND PROJECT [department, BUID]
-> GROUP BY [department]
-> COMPUTE distinct count(BUID) per group
-> PRINT ALL
Explanation:
- Data for students with a GPA less than 3.5 is irrelevant and we can filter that data out while reading from the file!
- Furthermore, after the filter, we only need the department and BUID columns, so we can project out any irrelevant columns during reading from the file!
Discussion Section 1: Setup Rust
Date: Wednesday, January 21, 2026
Led by: Taishan Chen
Rust Compiler, IDE, and git Setup
Our first discussion sections are dedicated to help you get your machines setup with the Rust compiler and package manager (cargo),
our Rust IDE (VSCode) and Rust analyzer.
To get setup, follow these instructions and do not hesitate to ask us for help during the discussion section or office hours.
You should also install Git using these instructions.
How do you know if you have succeeded in setting up Rust
Use these steps to test that your setup is successfully.
To test your Rust (cargo) installation:
- Run the following command in your command line (Mac/Linux) or power shell (Windows):
cargo --version
The output should show cargo version 1.92.0 or later.
- Create a hello world Rust project by navigating to a folder of your choosing (e.g., your desktop) and running the following command via your command line (Mac/Linux) or power shell (Windows):
# make sure you are in the desktop directory/folder
cargo new hello_world --bin
- Run the hello world Rust project using:
# make sure you are in the desktop directory/folder
cd hello_world # change directory to inside of the hello_world project
cargo run # run the project
If successful, you should see the following output:
Hello, world!
To test VSCode
Open the hello world Rust project in VSCode, then, open src/main.rs. You should be able to see your code with syntax highlighting on.
You should also be able to run the project from within VSCode and see the above output.
To test VSCode+Rust analyzer
After you open src/main.rs in VScode, change the content of the file to:
fn main() { let x = String::from("hello!"); # Add this line println!("Hello, world!"); }
VSCode should automatically update the syntax highlighting/coloring. VSCode should be able to use Rust analyzer to automatically deduce the type of variable x and show the type next to it in gray, similar to the image shown below.
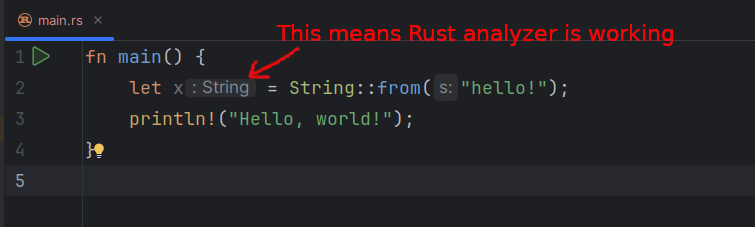
Common issues
Windows
C++ Redistributable Package: You may not have Microsoft’s visual c++ redistributable package installed. If you do not, the Rust compiler
may appear to be installed successfully but fail to work when run. You can fix this error by installing this package from here.
Path Environment Variable: If you get an error saying that cargo cannot be found or is unrecognizable when you attempt to run cargo --version,
you must manually add %USERPROFILE%\.cargo\bin to your path environment variable. You can do that by following this video, but make sure
to add %USERPROFILE%\.cargo\bin instead of what the video uses (python directory).
Missing link.ex: You may not have the C++ build tools (including the linker) installed. If so, when you try to compile/run a Rust project, you will get an error about missing link.exe.
In this case, you will need to install the windows SDK and the MSVC C++ Build tools from https://visualstudio.microsoft.com/downloads/. Choose the latest version of both that is compatible with your machine.
Mac
Mac VSCode Command Line: The default command line in VSCode on Mac is Zsh which may give you some headache or not work. If so, you can change it to bash
which is friendlier for Rust using these instructions.
Discussion Section 2: Git
Date: Wednesday, January 28, 2026
Led by: Taishan Chen
Discussion Section 3: Leetcode Exercises
Date: Wednesday, February 4, 2026
Led by: Taishan Chen
Discussion Section 4: Guessing Game
Date: Wednesday, February 11, 2026
Led by: Taishan Chen
See Homework 3: Guessing Game.
Discussion Section 5: Project 1: SlowVec
Date: Wednesday, February 18, 2026
Led by: Taishan Chen
Discussion Section 6: Project 1: FastVec
Date: Wednesday, February 25, 2026
Led by: Taishan Chen
Discussion Section 7: Pointers
Date: Wednesday, March 4, 2026
Led by: Taishan Chen
Discussion Section 8: Project 3: Client and Server
Date: Wednesday, Apr 1, 2026
Led by: Taishan Chen
Discussion Section 9: Leetcode: Frequency Tracker
Date: Wednesday, Apr 15, 2026
Led by: Taishan Chen
Homework 1: Shell and Git
The purpose of this homework is for you to practice shell commands and using git.
You can find the homework questions and submit your answers via Gradescope.
Homework 2: Leetcode practice
In this homework, you will solve two leetcode problems.
You can find the homework questions and submit your answers via Gradescope.
Homework 3: Guessing Game
In this homework, you will:
- Implement different strategies for solving “the guessing game”.
- Write tests to ensure your strategies are correct.
- Evaluate which strategy performs better in the worst case.
The Guessing Game
The game is pretty simple. The user (you!) is the challenger player: they select a random number and write it down. The computer then tries to guess the number by asking the user a series of questions. The goal of this game is to:
- Write a computer strategy that guesses the number correctly.
- Have the strategy reach this guess while only asking a small number of questions.
Here are the important concepts in this game:
The number: the target number the computer must correctly guess.The player: the entity that chooses the target number and answers questions about it. This is usually the user (you!).The strategy: the program the computer follows to guess the number. The strategy can chose to try different options and ask the player questions about them.The guess: the final answer the strategy returns, which should be equal tothe number.# of steps: how many questions the strategy needed to ask the player before returningthe guess.
Provided Code
We provide you with a lot of scaffolding code for the game as well as some examples. The provided code is under homework_3_guessing_game in our course’s GitHub repo https://github.com/rust4ds/ds210-sp26-a1-code
The code has the following structure:
src/game.rs: This is the main file for playing the game. It initializes the player and strategies, and prompts the user with instructions. You do not need to read or understand this code to complete the assignment.src/strategies.rs: This file contains two provided strategies. We suggest reading and understanding lines 15-35.BadStrategy: This strategy checks if the number is the smallest number in the range, otherwise, it just assumes it is the maximum. This is a bad and incorrect strategy that cannot guess most numbers!RandomStrategy: The strategy chooses a potential guess at random, asks the user if it is correct, and repeats until it finds the number.
src/player.rs: This defines the interface for what questions a player needs to answer. It also provides the logic underHumanPlayerfor how to print out questions to the user and how to retrieve their answers. You do not need to understand this file deeply, but feel free to skim it.src/experiment.rs: This files contains the code to evaluate which strategy is best, which you will need to run and use for part4.src/part<i>.rs: This is where you need to add your code for parts 1 through 4.
Do not modify any files other than src/part<i>.rs. Our autograder will completely disregard any modifications to the other files you make.
After you are done, you need to submit each src/part<i>.rs file via Gradescope.
Instructions
Part 0: Getting Started
Forking and Cloning the Stencil
You will need to fork, clone, and open the provided code with VSCode following these steps:
Step 1
Fork the course’s GitHub repository, which is available at https://github.com/rust4ds/ds210-sp26-a1-code. Many of you already performed this step in a previous discussion section, in which case you can skip it.
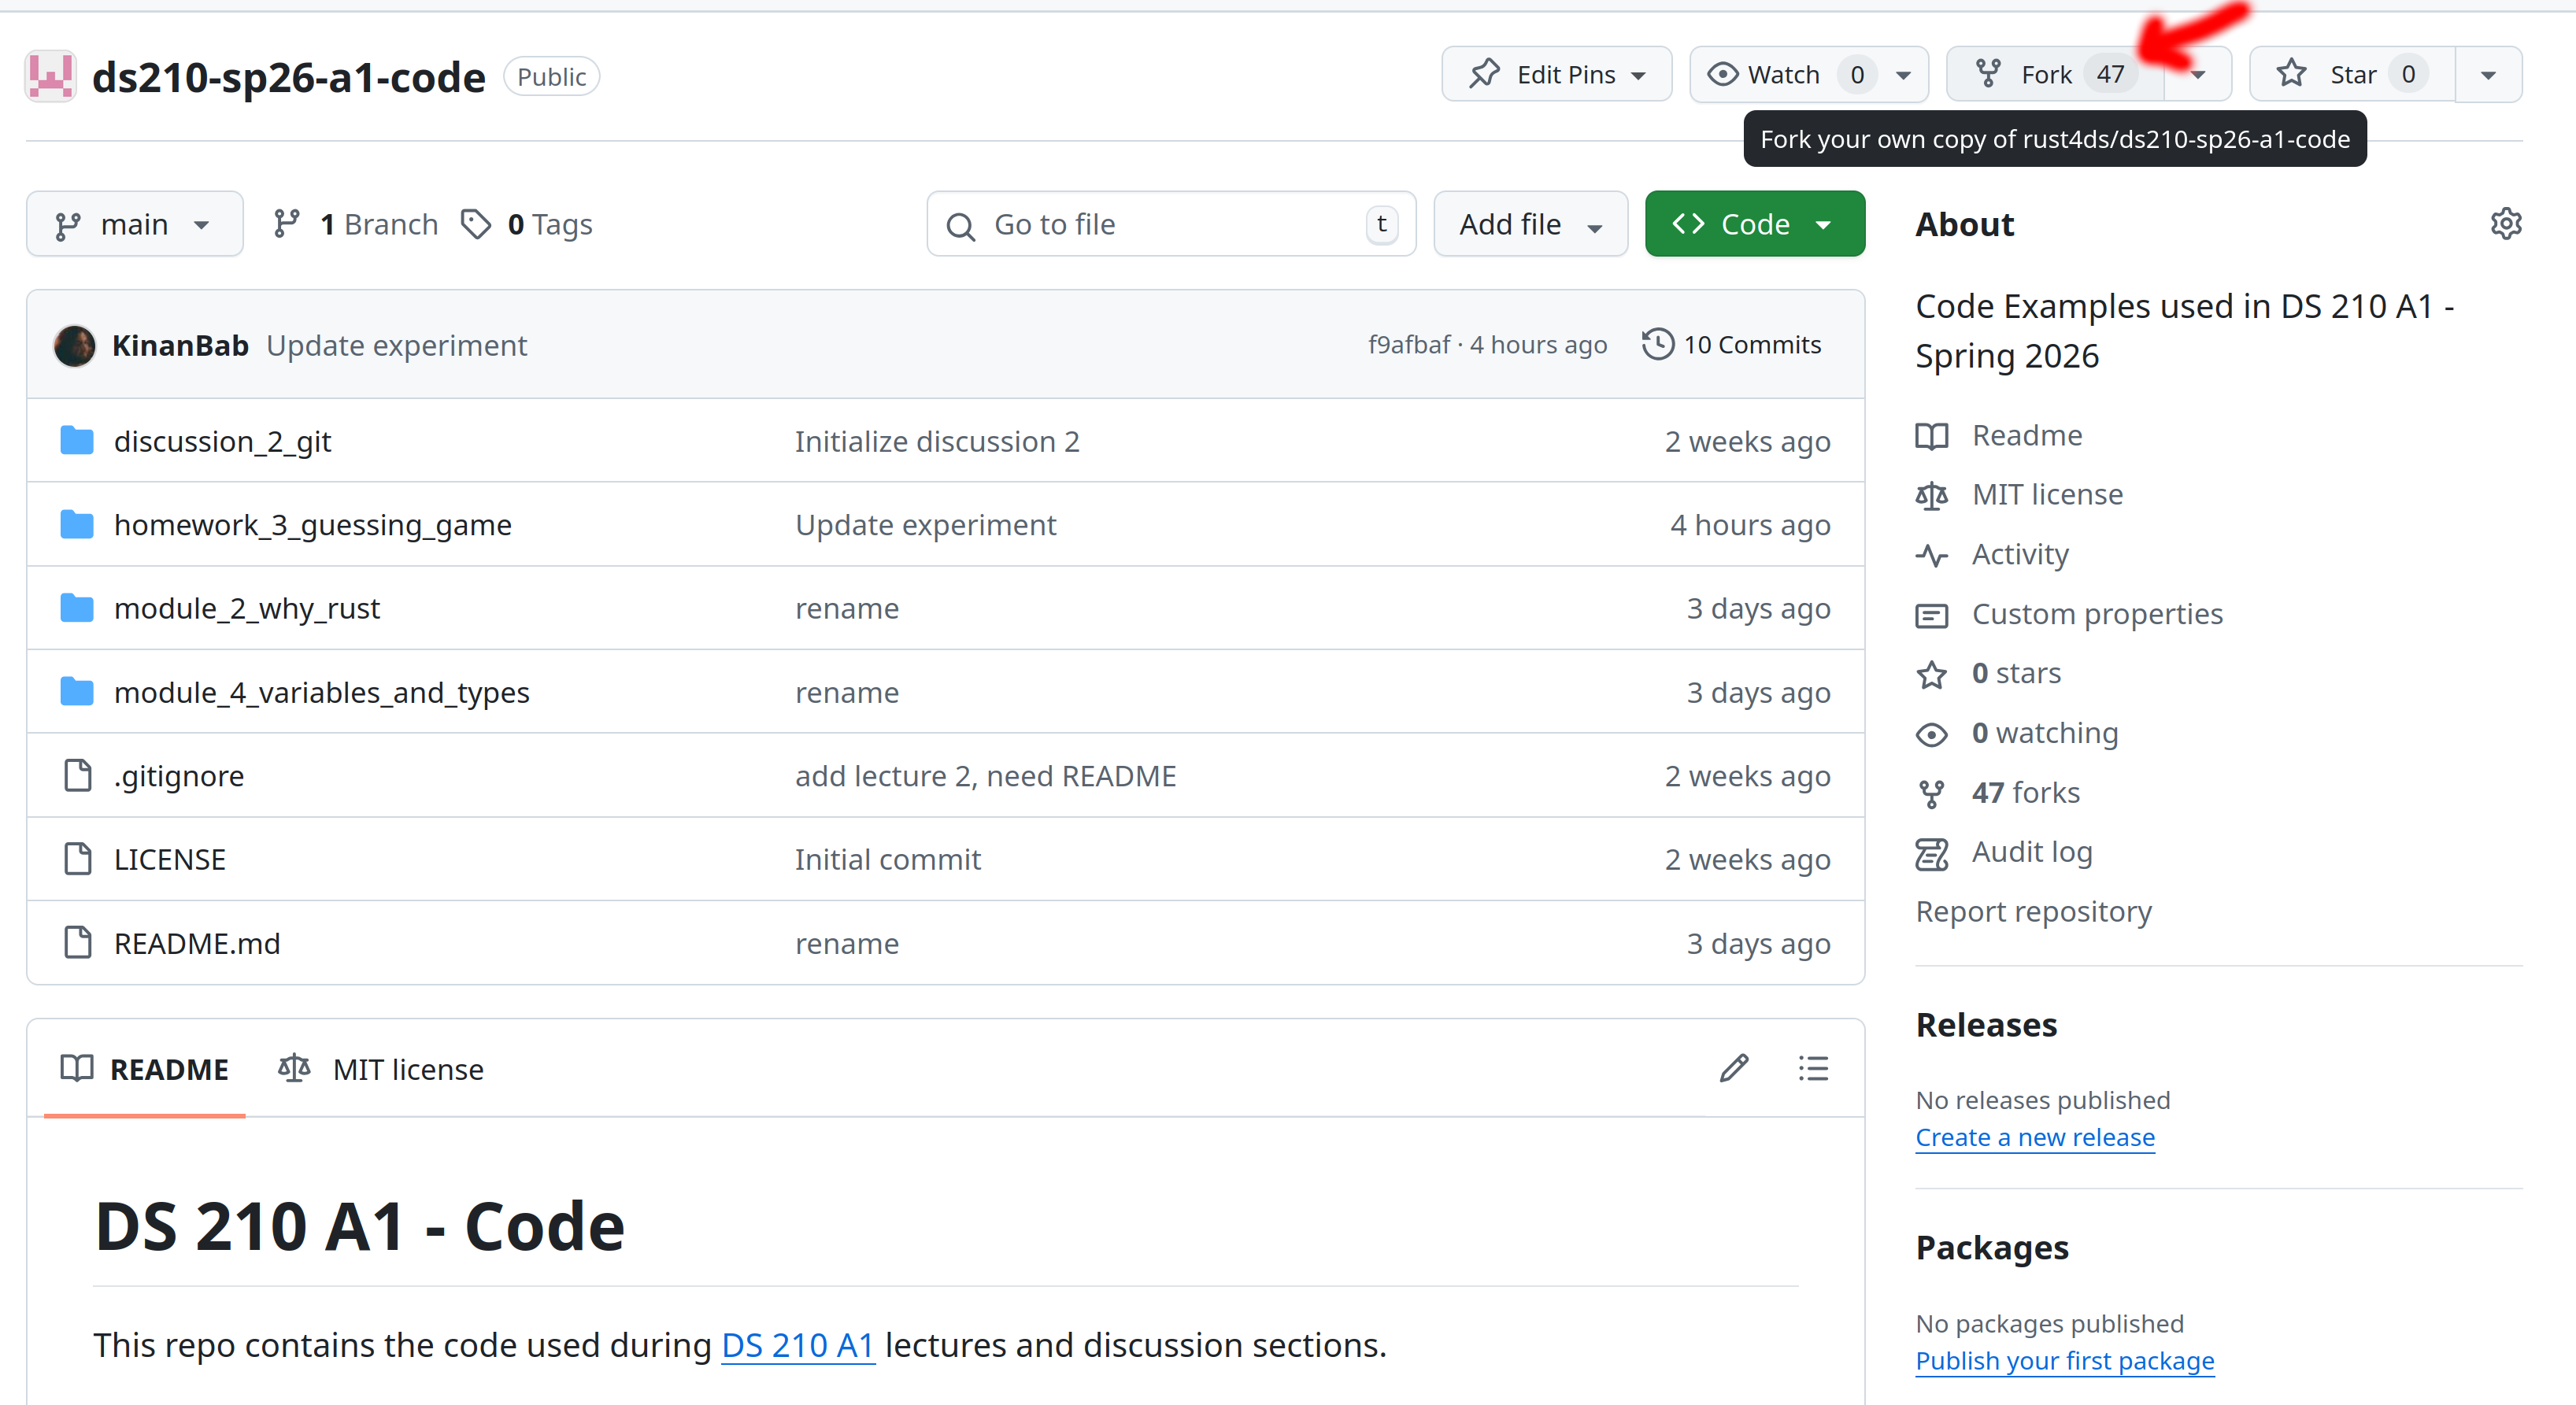
Step 2
Make sure your fork is up to date with our GitHub repo. If you look at your fork and do not see a homework 3 folder, then you need to do this step!
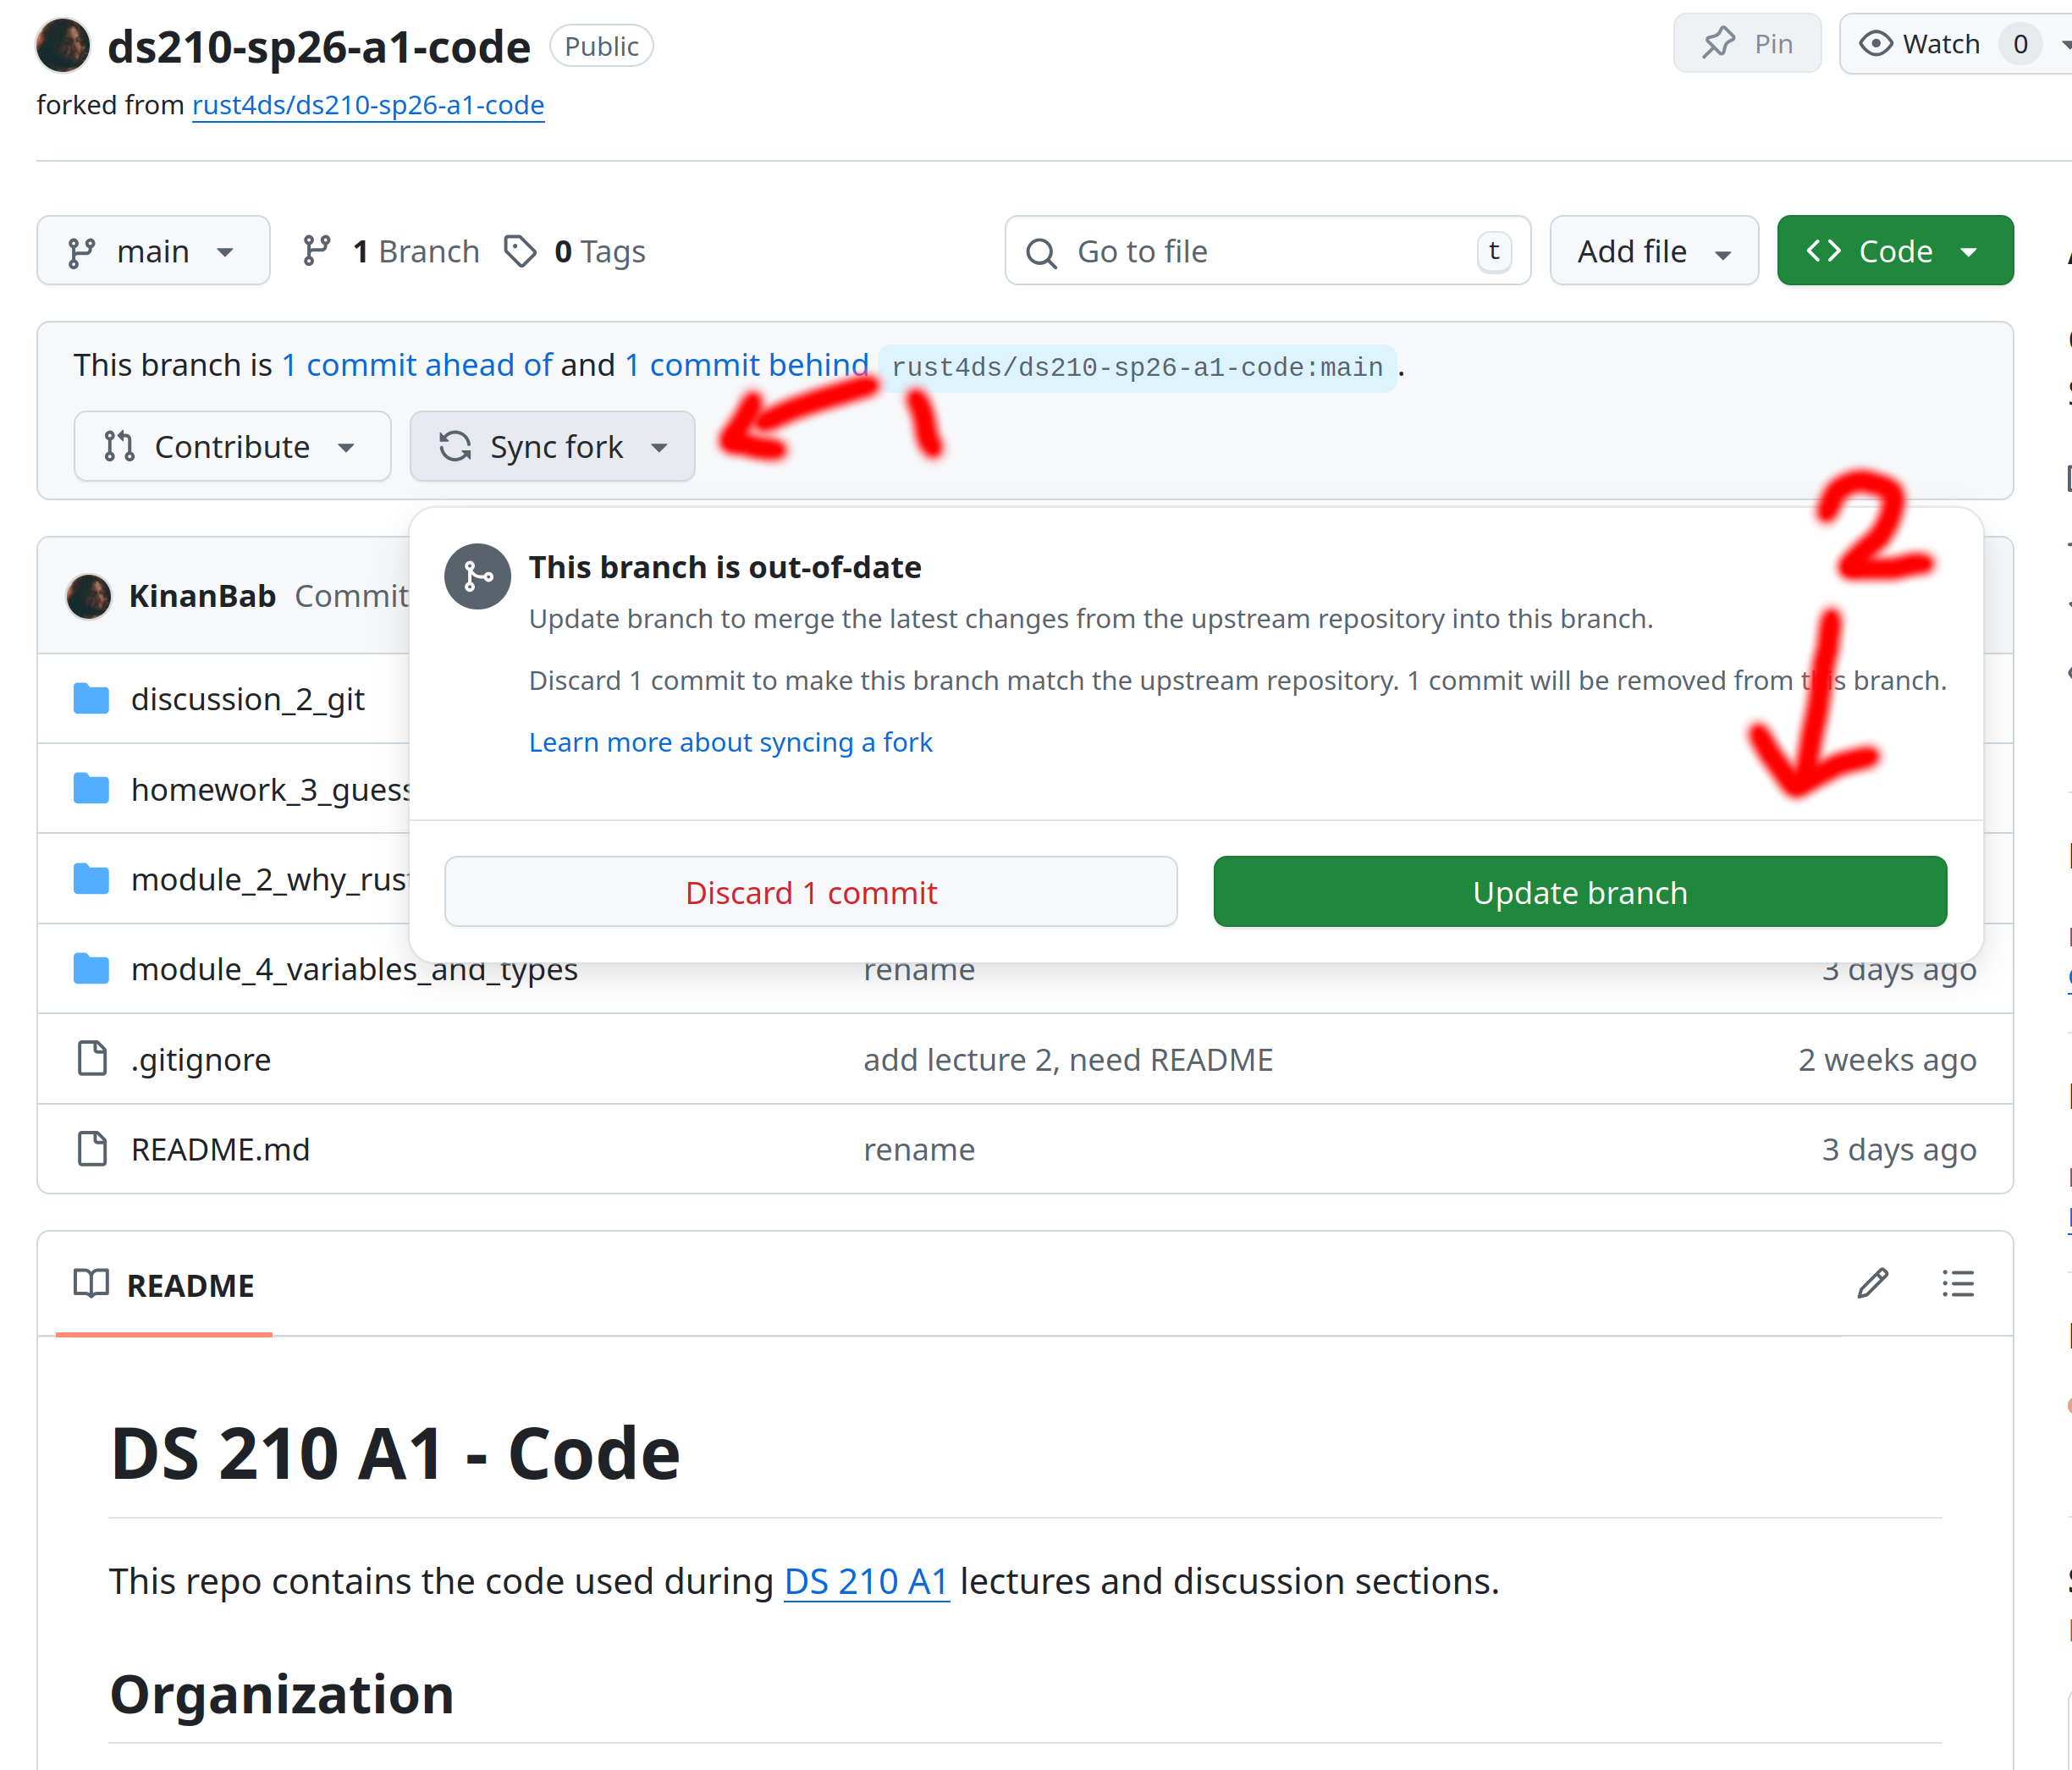
Step 3
Get the git URL for your fork from GitHub. You may want to use HTTPS or SSH depending on how you configured Git on your computer when you installed it. If you use a password to authenticate, choose HTTPS, if you use a public key, choose SSH.

Step 4
Clone your fork via the terminal (on Mac) or via Git bash (on windows). The screenshot below clones the fork to the Desktop folder, but feel free to use a different location if you desire.
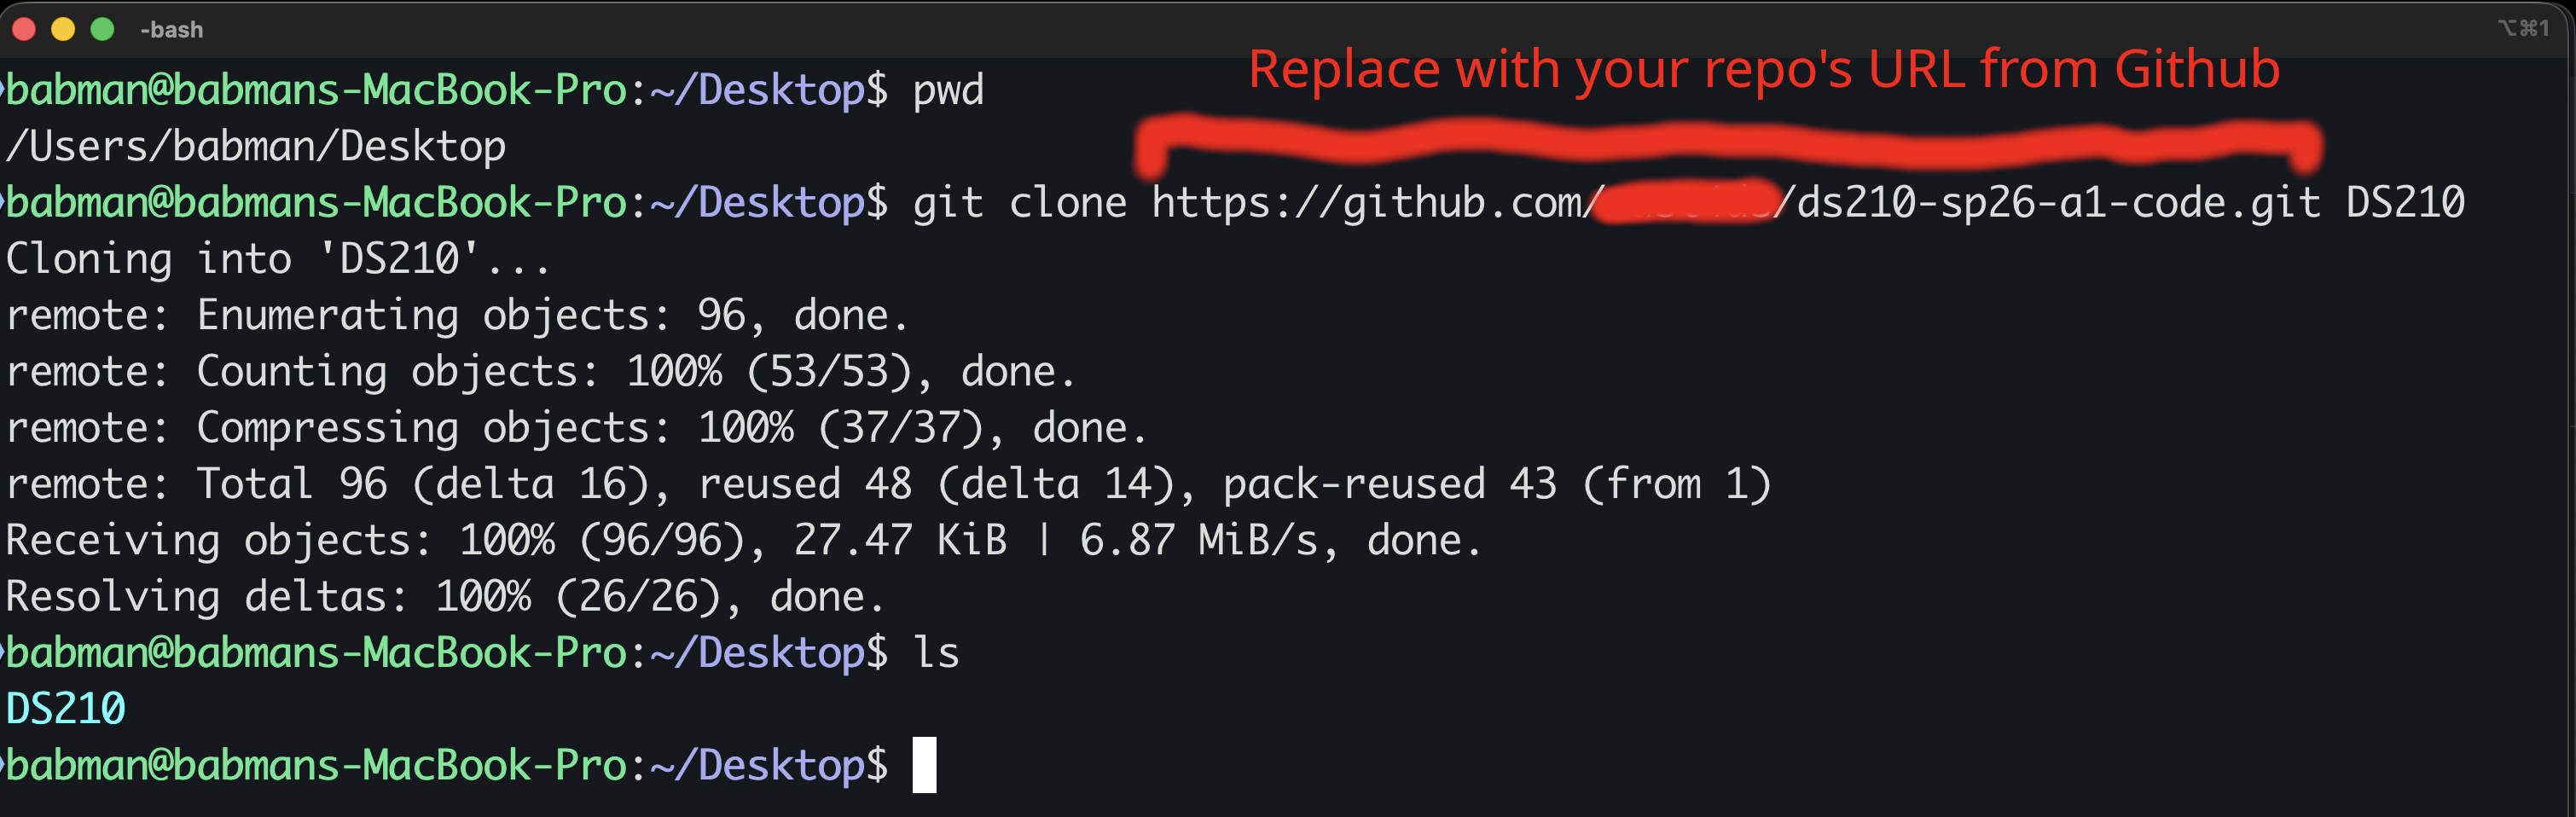
Step 5
Open the homework folder using VSCode. Make sure you open the homework folder and not a file inside it.


Step 6
Select src/part1.rs from the VSCode navigation panel (on the left of the screen), you should be able to see the
content of the file.
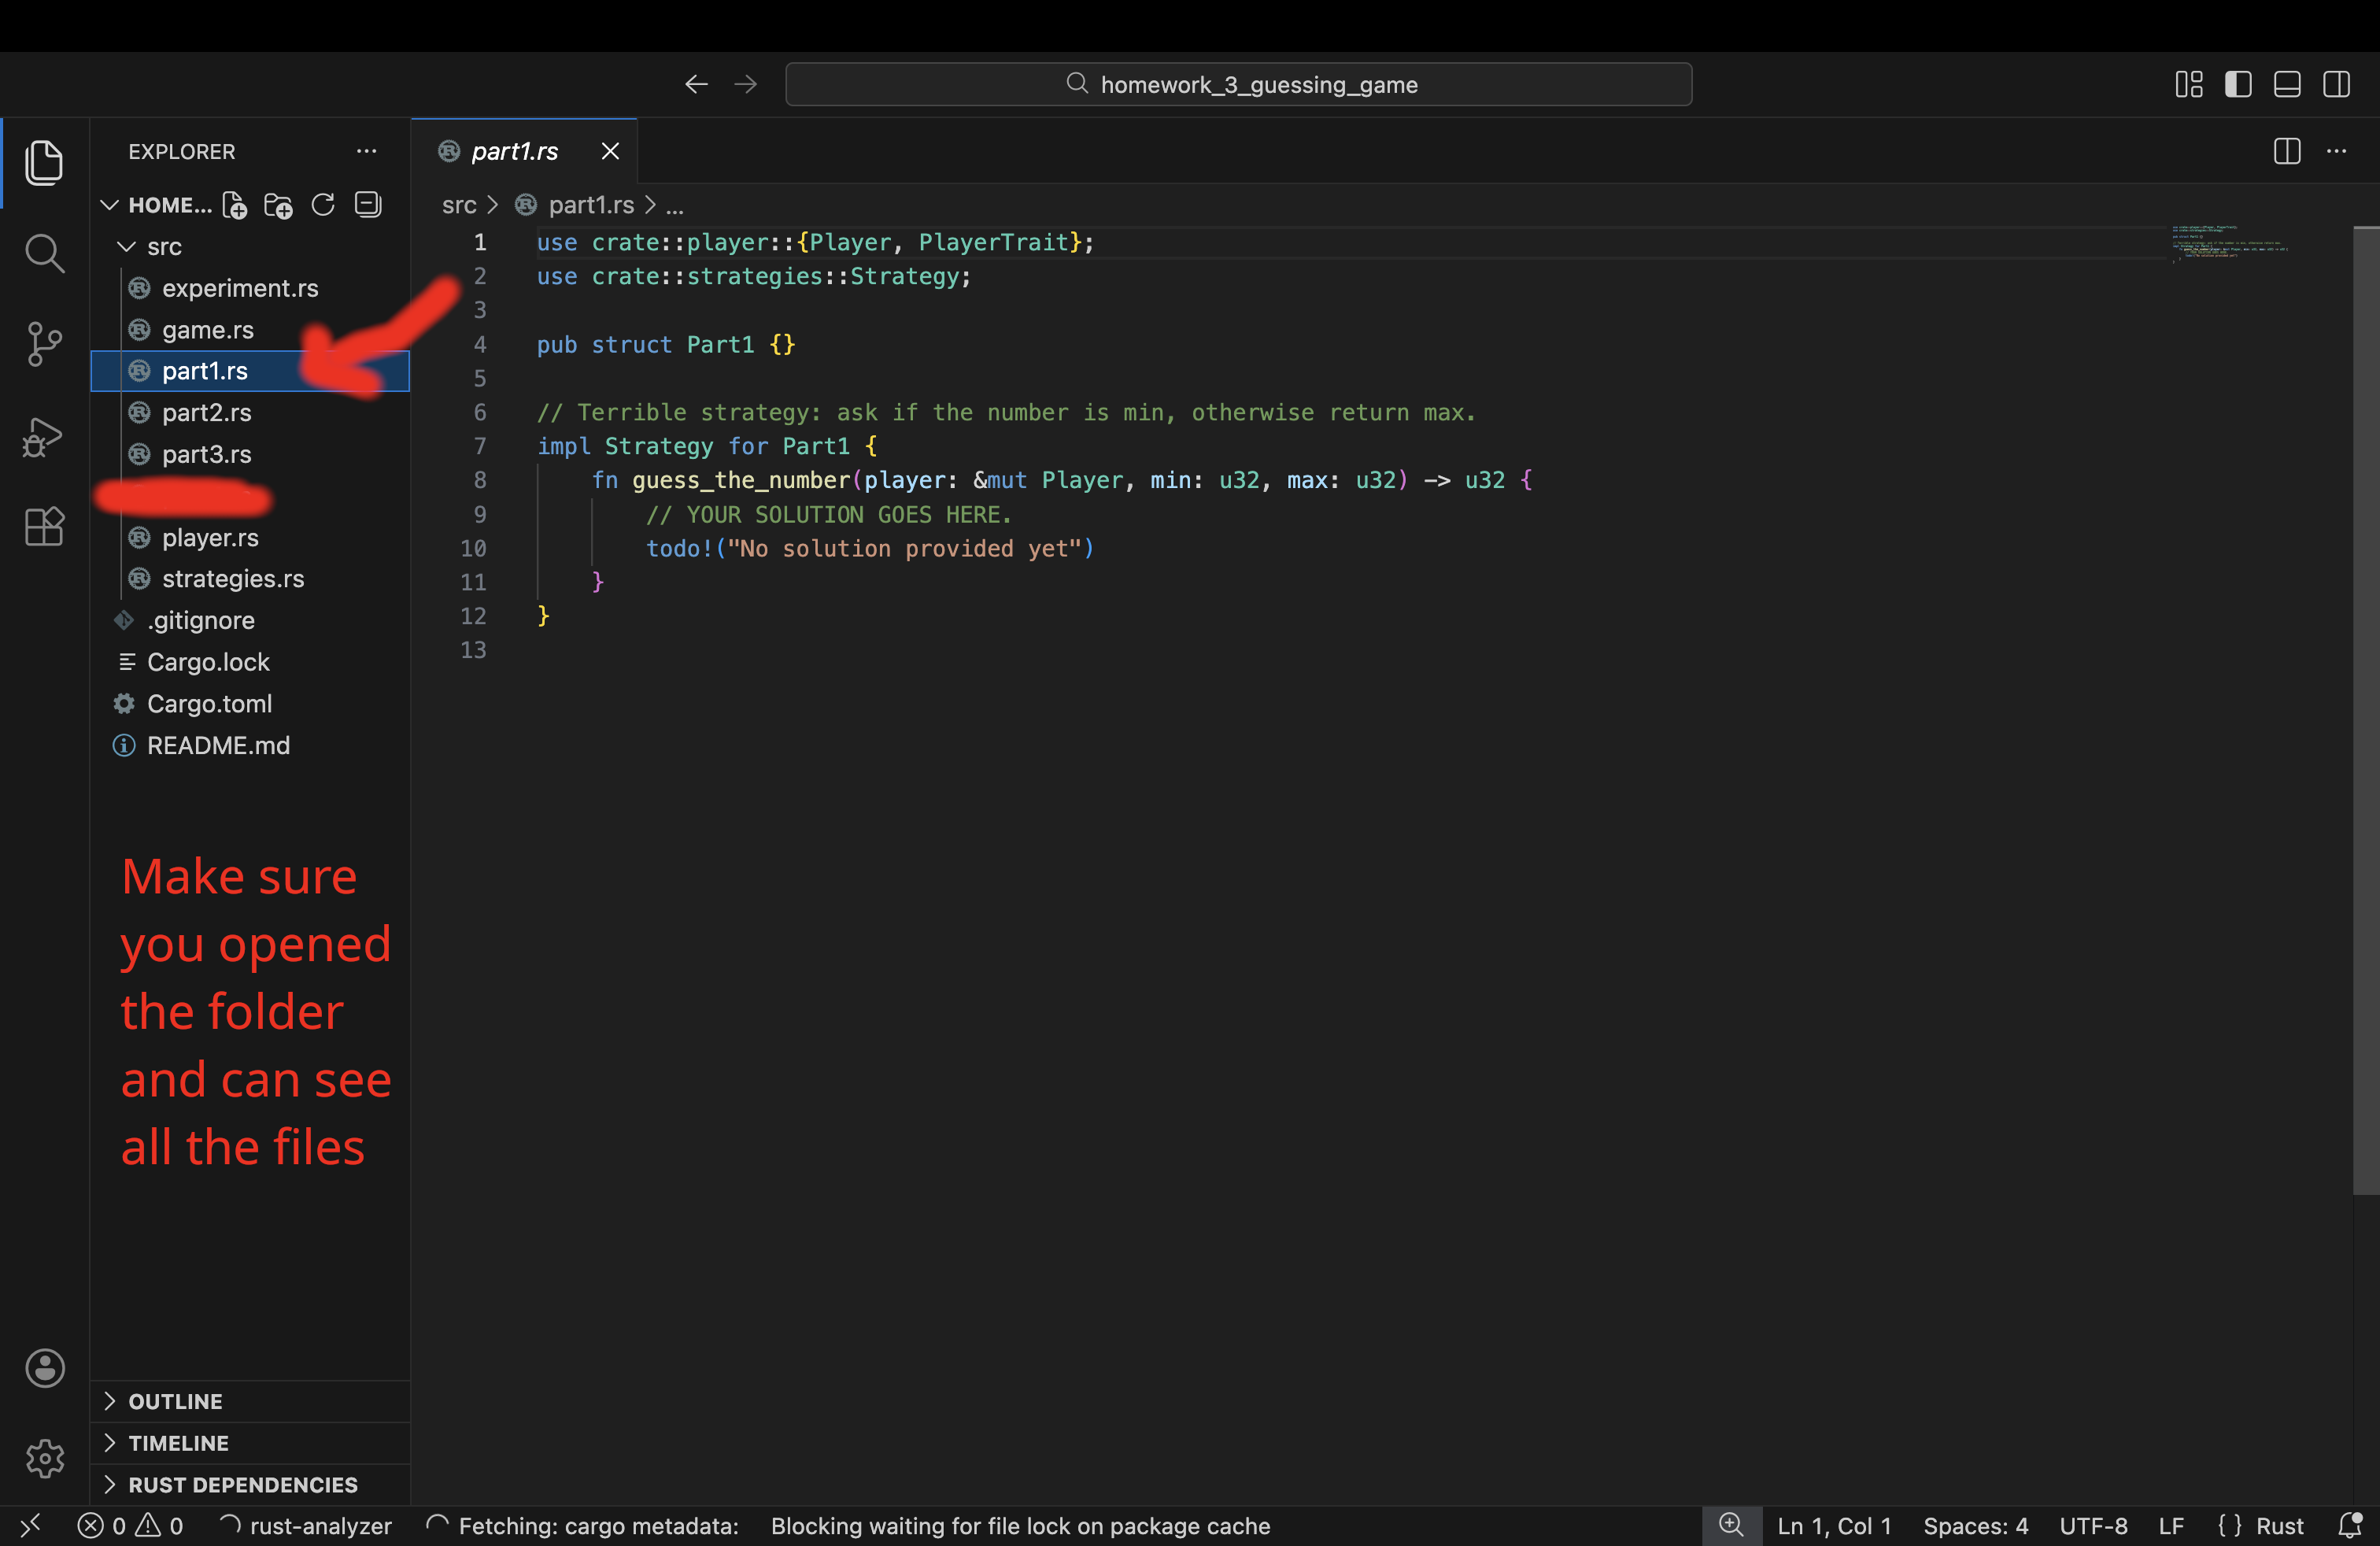
Playing the Game for The First Time
After you successfully opened the stencil with VSCode, you can start playing the game.
First, use the following command to run the game the first time. You can use the shell built into VSCode to execute it:
cargo run --bin game -- --strategy random
After you run the command, Rust may need a few minutes to compile the program, then the game will start, follow the prompts
to play the game, as shown in the screenshot below. Make sure you navigate to the homework 3 folder inside where you cloned your fork.
Use pwd to confirm your current location, and cd <PATH OF YOUR CHOICE> to change folder/directory.
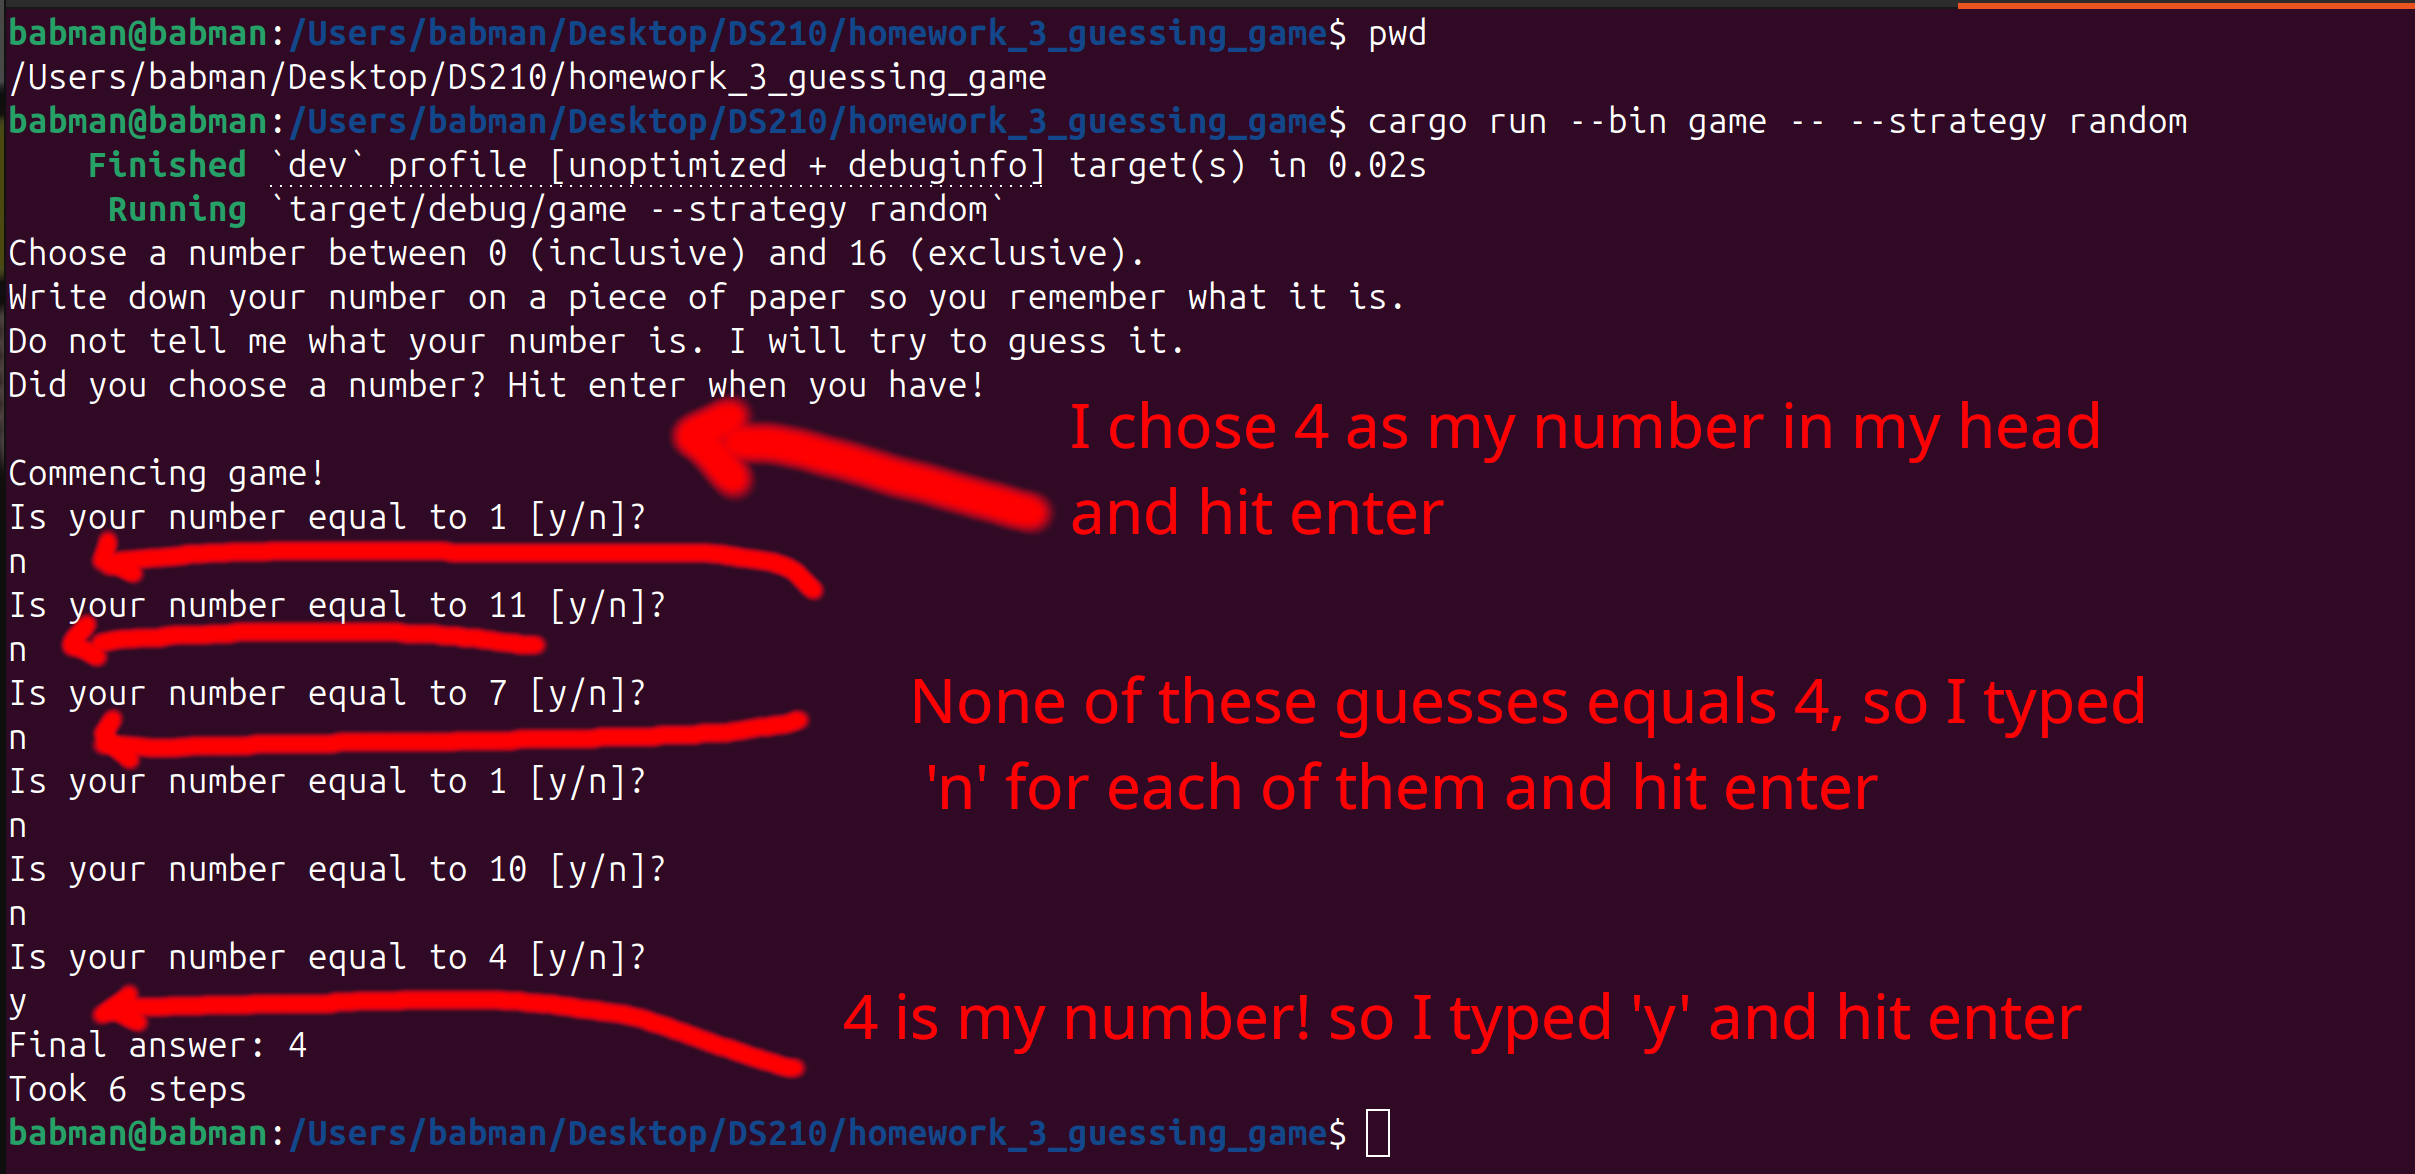
It turns out, the game supports other strategies and other configurations, use this command to list them:
cargo run --bin game -- --help
Try out a couple of different configurations to get a sense of what the game is like, for example:
cargo run --bin game -- --strategy random --min 5 --max 10
cargo run --bin game -- --strategy bad --min 2 --max 6
Finally, after you are done playing the game, try these two commands:
cargo run --bin game -- --strategy part1
cargo run --bin game -- --strategy part2
Both commands will produce an not yet implemented error! This is because it is your job in this homework to implement these two strategies, as described below!
Part 1: The “Gotta Try Them All” Strategy
If you played the game a few times as described above, it will become clear to you that:
- The
randomstrategy often takes a long time before finding the answer, often repeating bad guesses! - The
badstrategy is actually bad, and will incorrectly return answers that are wrong.
We can do better! We will think of a better strategy and implement it in src/part1.rs.
Add your solution inside the guess_the_number function (line 8).
You should remove the todo! (line 10) and replace it with your solution.
For part 1, you are tasked to implement the following strategy:
- Iterate/loop over numbers between min (inclusive) and max (exclusive).
- For each of these possibilities, ask the player if the possibility is equal to their number.
- If it is, congratulations, you found the answer! return it.
- If it is not, continue iterating to the next guess.
Hint: Look at the random strategy in src/strategies.rs (e.g. line 30) to find how you can ask the player
if the possibility equals their number.
Hint: Feel free to return some number of your choosing at the end of the function after your loop to make sure the Rust compiler is happy: your code will try all the possibilities, and one of them will be the answer, so it will never get to that point!
You can test your solution by playing the game and confirming that it always finds the right answer. Do not
forget to experiment with different values for min and max!
cargo run --bin game -- --strategy part1
When you are happy with your solution, do not forget to save it, commit it, and push it to your fork using Git. This way you will never lose it!
git add src/part1.rs
git commit -m "solution for part1"
git push
Part 2: A More Sophisticated Strategy
Part1’s strategy always produces the correct result, and is a significant improvement over random. However, if your number is big, it will take many questions before it gets to your number.
Imagine you were running with min 0 and max 64, and your number was 60. You will have to answer many questions
before the strategy finds the answer.
It turns out we can do way better, if we can ask more expressive questions.
Indeed, we provide you with player.ask_to_compare(...) function that does exactly that.
This function returns 0 if the guess equals the number, -1 if the number is smaller than the guess, and
1 if the number is greater than the guess.
#![allow(unused)] fn main() { // Assume the number is 4 let x1 = player.ask_to_compare(5); let x2 = player.ask_to_compare(4); let x3 = player.ask_to_compare(0); // x1 is 1, x2 is 0, and x3 is -1 }
How can you use this to your advantage to derive a better strategy? Implement your solution in src/part2.rs.
Hint: Imagine you ask the player to compare their number to the middle of min and max. What does it mean when the comparison
returned -1 vs 0 vs 1?
Hint: Can you repeat the above reasoning again for the next step? What about the step after it?
Hint: This idea is one of the most powerful and common ideas in programming, and has many names, e.g., binary search or
bisection.
Hint: You can code this up in many ways, but it might be simplest to code using recursion.
You can test your solution by playing the game and confirming that it always finds the right answer. Do not
forget to experiment with different values for min and max! Notice any difference with part1?
cargo run --bin game -- --strategy part2
Part 3: Testing strategies and why tests are important
Simulating a player
Let’s assume we want to test or experiment with our strategies at scale. E.g., with max = 1000.
Currently, the bottleneck is that whenever we run the game, a human user (you) has to type in y and n or other answers
to questions manually.
We can improve this by implementing a simulated player that returns the answer to different questions programmatically, without
involving the user.
Open src/part3.rs using VSCode, and complete SimulatedPlayer implementation of ask_if_equal(...) and ask_to_compare(...).
These are different than the functions we have seen in class. They are member functions that are part of SimulatedPlayer. We will cover these in more depth in class later.
For the purposes of this homework, you can think of them as regular functions that take a special self parameter. Think of this
self parameter as “simulating” the state of mind of the user player. Specifically, this self parameter is where we
will keep our simulated number!
You can access this simulated number using self.the_number. For example, you can print that number or compare it against a guess
using the following code:
#![allow(unused)] fn main() { println!("{}", self.the_number); let is_equal = self.the_number == guess; }
Hint: Mimic is_equal above to implement ask_if_equal(...).
Hint: There are three different cases in ask_to_compare(...). What are they?
Testing part1 using the simulated player
After you implement your simulated player, you should be able to run our provided tests for part 1.
cargo test --bin game part1 -- --test-threads=1
If your implementation of part1 and your implementation of the SimulatedPlayer, you should see the three tests passing.
If they do not pass, you have a bug! Go back to your code and see if you can spot it and fix it. Consider testing part1
manually by playing the game a few times.
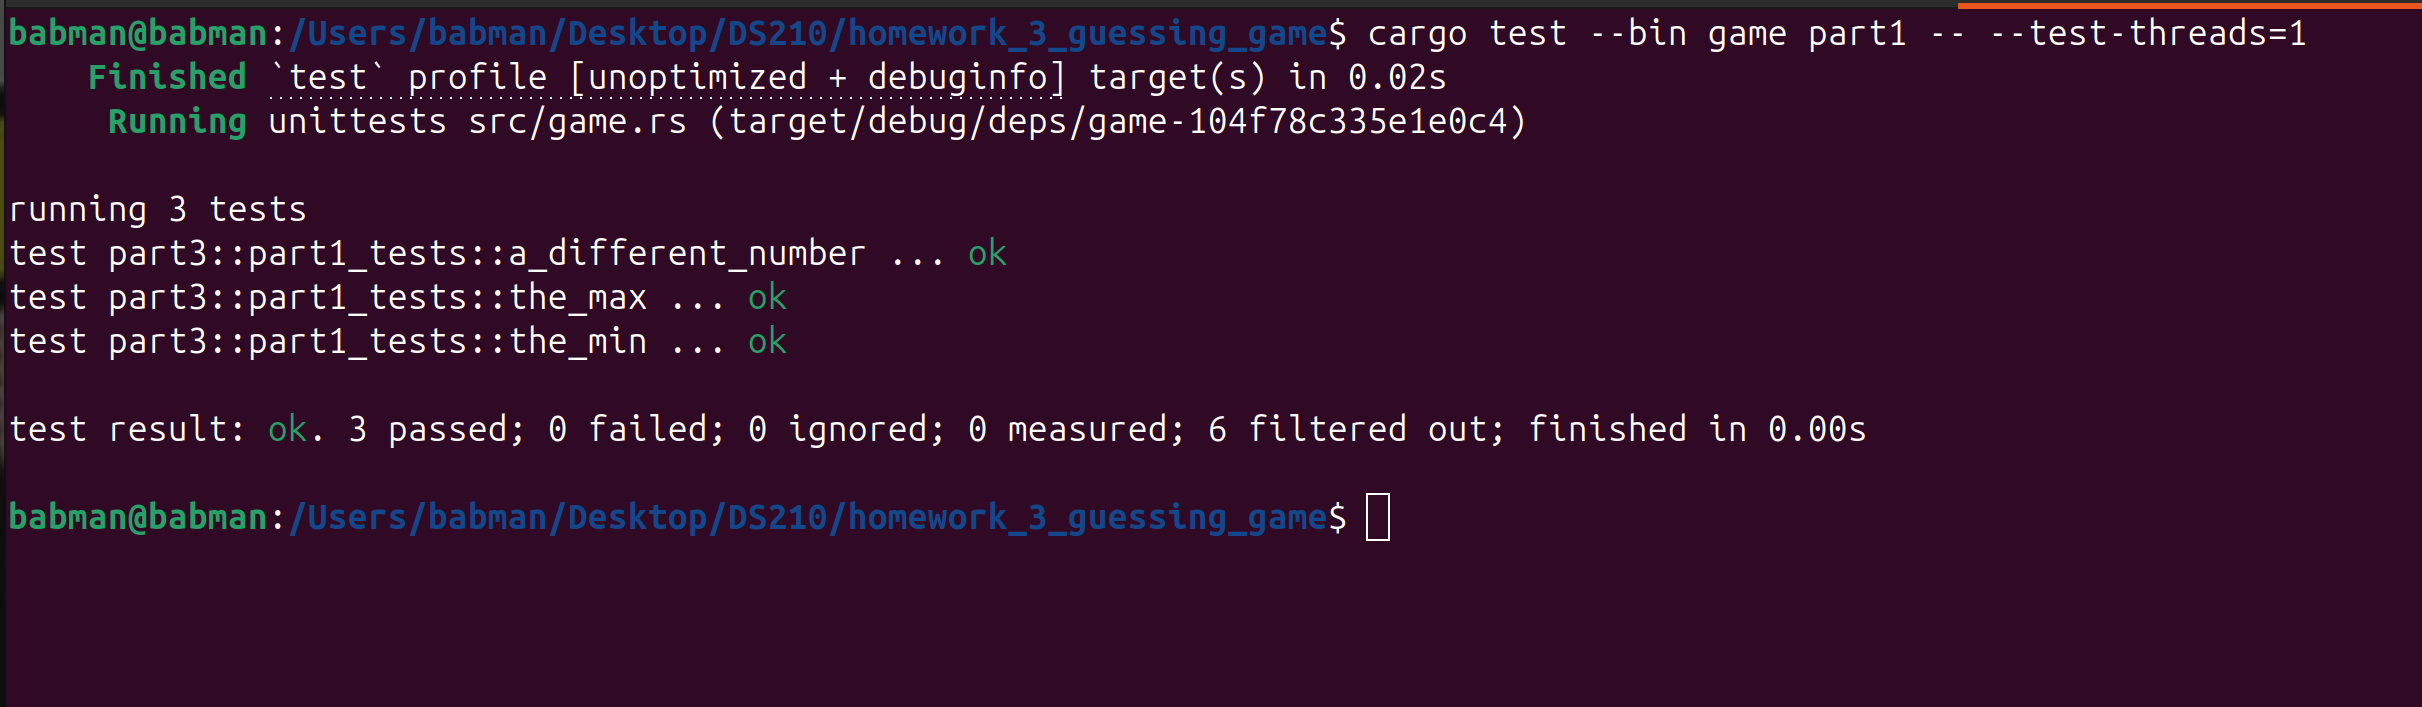
You can look at the content of these tests in src/part3.rs inside the block of code that says mod part1_tests. Read the code
slowly and try to take it in:
- There are three functions:
the_min,the_max, anda_different_number. Each correspond to one test case. - Their logic is similar, they set the parameters of the game:
min,max, and the simulatednumber. Then, they create aSimulatedPlayerwith that number. Finally, they call your part1 strategy and give it the simulated player!
Testing the bad strategy
We also provide tests for the bad strategy and for part2! However, those are incomplete and you have to add some
of their missing logic.
First, run the bad strategy tests.
cargo test --bin game bad -- --test-threads=1
You will notice that two tests the_min and the_max pass. This is not good! Had these been the only tests that we have,
we would not be able to detect that the bad strategy is bad!
Your task is to implement the missing logic (i.e., replace the todo!) in the remaining test bad_strategy_tests::a_different_number.
Your new logic should detect that bad_strategy does not work!
Run the tests again after you update the logic. Confirm that bad_strategy_tests::a_different_number fails! When you are happy with the test,
add #[should_panic] on top of the test’s function, to indicate to Rust that this test should fail. After you do that, the tests
should now pass.
#[test]
#[should_panic]
fn a_different_number() {
// your logic goes here
}
Testing the part2 strategy
Finally, you must complete the last three tests at the end of src/part3.rs. These must test part2.
Feel free to mimic the tests we provide for part1, but make sure that
- You call the
part2strategy, and notpart1. - You test that the number of steps the strategy take is small! Mimic how the tests we provide for part1 check the number of steps, but use an appropriate smaller bound.
You can run your tests using the below command. Make sure they pass!
cargo test --bin game part2 -- --test-threads=1
FYI: We will test your tests against various correct and incorrect implementations of part1 and part2. You will receive full credit if your tests accept all the correct implementations, and fail for all the incorrect implementation. Furthermore, one of the implementations we will provide for part2 will find the correct answer, but it will take many extra steps, and your tests must correctly detect this and fail/error.
Part 4: Evaluating strategies performance
After you complete the SimulatedPlayer implementation in src/part3.rs above, you can run our provided experiment to compare
the part1, part2, and random strategies.
You can run our experiment using this command:
cargo run --bin experiment
The command will create a new file plot.png. On my computer, this was created at this path
/Users/babman/Desktop/DS210/homework_3_guessing_game/plot.png. If you cloned your fork to a different direction,
the plot will be produced in the corresponding different location.
Open the plot and look at it.
The X axis shows the max: our experiment tries all values between 1 and 100. The Y axis shows how many questions each
strategy took before it returned the answer.
Answer the following questions. For each question, write about 2-3 sentences explaining your answer. You will submit these answers via Gradescope.
Question 1: Which strategy is the best?
Question 2: For part1, assume that max = 110, can you use the plot to predict how many questions the strategy will ask? What about max = 120?
Generalizing this to max = n, can you find the number of questions as a function of n?
Question 3: For part2, many values of max end up with the same number of questions. However, the number goes up every now and then. Can you find the
identify the different values of max when an increase occurs?
Hint: counting max = 1, there are 7 such “levels”.
Question 4: Is there a pattern to the levels in part2? Try to guess when the next level will occur. Using this knowledge, if max = n,
can you estimate how many questions the strategy will ask as a function of n?
Hint: it has something to do with the powers of 2. Feel free to look online for help.
Question 5: Is there anything interesting about the random strategy? Is it sometimes better than part1 or part2? Can you describe a small change
to it that you think would improve it?
Hint: play the game with the random strategy again. What is the most annoying thing about it?
Submission
Congratulations! You are done with this homework.
You can double check your work by running all the tests in one go. Confirm that all of them pass.
cargo test --bin game
Then, submit part1.rs, part2.rs, part3.rs, plot.png, and your answers to the questions in part4 via Gradescope!
Make sure you have not modifies any of the other game files before submitting.
Mini Project 1: Build your own Vector!
In this homework, you will:
- Build two versions of vector, we will start with an easier but slower one, and then implement a more complex but much faster one.
- Get familiar with memory managements including manual memory allocations and pointers, as well as Rust references and move semantics.
Group Work
You should do this project in a group with one other student. Groups of size 3 are not allowed.
The handout will give you instructions on how to split the work between the two group members. Each member is only responsible for their parts. However, note that the instructions will sometimes ask both members to do something. In this case, feel free to do that work together, or each of you separately.
The instructions will refer to student 1 and student 2. Decide of which of you is which before beginning this work.
Both members must be registered in the same discussion section!
Pre-requisites
Before you get to work on this project, read the following Rust book chapters:
- Using structs.
- Defining structs up to and excluding “Using the Field Init Shorthand”.
- Structs and Methods: ignore the box titled “Where’s the -> Operator?”.
Part 1: SlowVec
Your task in part 1 of the project is to complete the implementation of SlowVec (located in project_1_vec/slow_vec/src/lib.rs).
Our very first implementation of our own vector type.
This implementation will be a little slower, but it is easier to implement, so we will start with it.
You will implement a faster version in part 2 next week.
Step 0 - GitHub Repository: Forking and Cloning
Student 1 should fork our code GitHub repository. If you already have a fork of the repository, all you need is to update it
so it receives the latest changes from our repository. You should confirm that your fork contains project_1_vec.
Make sure you add student 2 as a collaborator to the repository using these instructions. Make sure you give student 2 admin permissions.
Both students should clone the fork to their computers.
If you need a reminder on how to fork or clone the repos, look at the instructions and screenshots from homework 3.
Step 1 - Getting Started
Both students should open the slow_vec folder using VSCode and navigate to slow_vec/src/main.rs.
main.rs
First, run the main function inside that file using VSCode or using the following command:
cd project_1_vec/slow_vec
cargo run --bin main
You will notice the program prints some output and then crashes with an error. This is because you have not completed the implementation of this Part 1 yet!
Let’s understand what this file contains.
fixed_sized_array(): The fixed_sized_array() function (line 9) demonstrates the FixedSizeArray type does and how it works.
FixedSizeArray is fully implemented for you, you do not have to change it. Although you are welcome to read its source
code (located under project_1_vec/fixed/src/lib.rs) if you are curious.
FixedSizeArray<i32> provides 4 important functions:
::allocate(n: usize): creates a newFixedSizedArraythat can store exactlynelements. It cannot store any more!.put(element: i32, i: usize): stores the givenelementat indexiin the array..get(i: usize) -> &i32: returns a reference to the element located at indexi..move_out(i: usize) -> i32: moves the element at indexiout of the array and return it.
get and move_out have almost the same exact signature, the only difference is that get returns &i32 while move_out returns i32. The & stands for reference.
For now, please think of a reference as a read only “copy” of the element. Crucially, with a reference (i.e. what get returns) you cannot modify the element.
Furthermore, the array is unchanged after calling get: the element is still in it and the element cannot be modified because it is read only.
move_out on the other hand changes the array: after calling it, the element at index i is returned and removed from the array: the array no longer has it!
The best way to understand this is by trying it out. Line 17 and 18 call get twice on the same index, and Rust executes them without a problem.
Line 21 calls move_out on index 0, uncomment line 22 so that move_out is called twice and run the code. What do you see?
What if you call get after move_out?
Finally, slow_vec_push and slow_vec_remove test out .push and .remove
slow_vec_basics(): This function (line 33) demonstrates the SlowVec type:
- Line 35 creates a new variable of type
SlowVec<i32>. You will have to complete the implementation of this type in the following steps. For now, you just need to get a sense of what its API looks like. - Line 35 already puts 10, 20, and 30 in that
SlowVec. - Notice that you can print the content of
SlowVecusingprintln!. - Line 38 to 40 iterates of the
SlowVecand prints out its elements one at a time.
Behind the scenes, SlowVec is implemented using FixedSizeArray. But it’s implementation is missing two key functions push() and remove(), you will have to implement those in the next step.
slow_vec_push() and slow_vec_remove() demo pushing and removing elements from SlowVec.
They currently produce errors because you do not have push() and remove() implemented. When you do, go back and run these functions to make sure everything is correct!
lib.rs
After you are done running and tinkering with main.rs, let us look at project_1_vec/slow_vec/src/lib.rs.
Lines 11-13 define the SlowVec type using a struct! This is Rust’s way of defining custom types. Feel free to refer back to the Rust book for information about structs!
However, there is a difference between how this struct is defined and what it looked like in main.rs.
In main.rs, we saw SlowVec<i32>, which contained elements of type i32. Here, however, we see SlowVec<T>! This is Rust’s way of making a type generic, that is, making
it work with any underlying type we later choose.
Indeed, SlowVec can be used with i32 or any other type. For example, feel free to try this code out (e.g., by putting it and running it in main.rs).
#![allow(unused)] fn main() { let slow_vec: SlowVec<bool> = SlowVec::from_vec(vec![true, false]); println!("{slow_vec}"); let element = slow_vec.get(0); // Look at the type of element in VSCode, it is &bool! // If you change the first line to use i64, the type of element automatically changes to &i64! }
We will dive much deeper into generics later in the course. For now, in your mind, think of T as being i32 whenever you see it in the code.
The SlowVec struct provides a bunch of methods (lines 16-70). Many of them are provided to you. You do not need to modify these functions and you can assume they are correct:
new(): creates a SlowVec that contains an emptyFixedSizeArrayof size 0.into_vec(...)andfrom_vec(...): transform betweenSlowVecand Rust’s built inVec. You do not need to use or understand these functions, we provide them mostly for testing and tinkering.len(...): returns the current length of theSlowVec.clear(...): clears all the elements in theSlowVec, resetting its contents to an emptyFixedSizeArray.get(...): retrieves a reference to the element at indexi. It does so by simply callinggeton the underlyingFixedSizeArray.
One important thing about many of these functions is that they take a self as a first argument. This is similar to self in Python: it is a special parameter that represents
the SlowVec that this method is called on. For example, consider the following code:
#![allow(unused)] fn main() { let my_var: SlowVec<i32> = SlowVec::from_vec(vec![10, 20, 30]); let element = my_var.get(0); }
In this case, when fn get(&self, i: usize) is called, Rust automatically assigns self to my_var and 0 to i. So,
self.fixed refers to the field called fixed (defined in line 12) that is inside my_var. This is why this call returns 10.
Step 2 - Implementation
Student 1 must implement the push function (line 62), while Student 2 must implement the remove function.
The trick to both function is similar. The fixed field is of type FixedSizeArray, so we cannot change its size.
We cannot add more elements to it nor remove any elements from it.
Thus, we have to create a new FixedSizeArray with the new desired length, move over the elements from the old fixed to it,
as well as adding the new element (in the case of push) or skipping the removed element (in the case of remove) to it, and then
replace self.fixed with it.
So, the solution to both functions have a similar structure:
#![allow(unused)] fn main() { // Create a new FixedSizeArray of a different length // If pushing, length should be old length + 1 // If removing, length should be old length - 1 // Look at the code in `lib.rs`, is there some function // that can tell us what the old length is? let tmp = FixedSizeArray::allocate(<<<<new length>>>>); // loop over self.fixed and move over its elements to tmp // either skip the one that should be removed (in case of remove) // or add the new element to the end of tmp (in case of push) ... // get rid of the old fixed field and replace it with tmp! self.fixed = tmp; }
You can test out your implementation using slow_vec_push() and slow_vec_remove() in main.rs.
Student 1 must implement and push their solution to a branch called std1 student 2 must implement and push their solution to a branch called std2
When both students are done, student2 should merge branch std1 into std2: after this merge branch std2 should contain both codes.
We will look at your git commit history: make sure you use these branches.
Step 3 - Testing and Experimenting
After finishing both solutions and merging both branches, both students should move over to branch std2 and then run the tests:
cargo test -- --test-threads=1
If you pass all the tests, then your solutions are correct and you will get full credit. If you fail some tests, go to the corresponding
file under tests/, read the failing test, and try to find out what went wrong so you can fix it.
Both students should also look at the content of src/memory.rs and then run it using this command:
cargo run --bin memory
This program confirms that SlowVec does not mismanaged memory, e.g. by losing track of data or forgetting to remove elements in memory.
You have not used any features that corrupts memory. So this is actually guaranteed by Rust.
However, in part 2, you will use some unsafe Rust features that may corrupt memory. These features allows us to implement
a faster vector. However, they are dangerous, and if you make mistakes in that implementation, your vector may lose elements or
forget to clean them up. memory.rs will come back and help you find and fix such errors in step 2.
Step 4 - Submission
When both students are happy with the code and the tests pass, student 2 must create a new branch called submission1 with all of the code. Do not change submission1 after the part 1 deadline if you do not want to incur a late submission penalty.
Student 2 must submit the code via Gradescope. You will need to provide the link to the GitHub repo. Student 2 must remember to add student 1 as a group member to that submission on Gradescope.
Both students can continue to edit std1, std2, or any branches other than submission1 for their work on part 2.
Part 2: FastVec
Your task in part 2 of the project is to complete the implementation of FastVec (located in project_1_vec/fast_vec/src/lib.rs).
This implementation will be much faster than part 1, but it will be more complicated to implement.
Step 0 - Background
Both students: Before you get to coding, you need to understand our strategy for how to make FastVec be (significantly) faster than SlowVec. This strategy relies on two parts:
- Doubling the size of the vector when pushing to a full vector.
- Manually managing memory (instead of relying on
FixedSizeArray).
Doubling Vector Size on Resize.
The main idea behind push with SlowVec is to create a new FixedSizeArray, whose length is one plus the old length, then moves over
all the previous elements to the new, bigger array. This makes it so push always takes O(n) steps, where n is the current length of your vector.
However, with Rust’s builtin Vec (and equivalent in other languages, such as a list in Python), push is O(1) (on average). How come?
These faster implementations distinguish two notions:
- The length of the vector: the number of elements currently in the vector,
- The capacity of the vector: how many elements the vector can have at most before it needs to be resized.
In SlowVec, these two were the same, thus, for every push, the SlowVec needed to be resized. In FastVec, you will notice that the struct contains len and capacity fields.
In fact, if you create a new FastVec using FastVec::new(), you will notice it starts with capacity 1 (and len 0, because it is empty). This allows you to push one element “for free”,
as the FastVec already has space for it.
The key idea is that when the capacity equals the len, the vector is full, and any future push will need to make it bigger so that it can add a new element to it.
In that case, we double the capacity (i.e., the size), rather than just increasing it by 1 (as in SlowVec).
For example, consider starting with a fresh new FastVec, and then issuing 8 pushes to it:
FastVec::newreturns an empty vector with capacity 1: len = 0, capacity = 1- First push: the vector has enough capacity to simply put the element in, without resizing. This push is
free, i.e., takes one step. len = 1, capacity = 1. - Second push: len equals capacity, the vector is full, we resize it so that capacity = 2*1 = 2, and move all previous elements to the new resized vector (similar to
SlowVec), then add the new element at the end. This takes two steps (one to move the previous element, one to add the new element). len = 2, capacity = 2. - Third push: len equals capacity, the vector is full, we resize it so that capacity = 2*2 = 4, and move all previous elements. This takes three steps. len = 3, capacity = 4.
- Fourth push: len < capacity, we simply add the new element at the end. This takes one step. len = 4, capacity = 4.
- Fifth push: len equals capacity, vector is full, resize it to capacity = 4*2 = 8. This takes 5 steps. len = 5, capacity = 8.
- Sixth, seventh, and eight pushes: len < capacity for each of these pushes, so they each take only one step, after all of them, len = 8 and capacity = 8.
Using this strategy, we pushed 8 elements, and it took 1+2+3+1+5+1+1+1 = 15 steps in total. Which averages out to less than 2 steps per element. In fact, if we use this strategy to push infinitely many elements, the average converges to 1 step per element.
If you want a more visual demonstration of what this looks like, take a look at this helpful video.
Manually Managing Memory
We will not use FixedSizeArray in this part, and instead we will directly manage the underlying memory using pointers.
This is more complex to implement (and can be dangerous if not implemented correctly as it can result in various memory corruptions and problems!).
However, it gives you way more control about when and how to allocate memory, including allocating memory without using it directly, but rather, saving some of it free for the future.
Using the provided memory allocator library (MALLOC)
To help you with memory management, we provide a memory allocator library as part of the stencil. lib.rs already uses it:
#![allow(unused)] fn main() { use malloc::MALLOC; }
The library provides you with two important functions that you will need to use:
#![allow(unused)] fn main() { // Allocate new memory with the given size (in bytes). // Returns a pointer to this newly allocated memory. malloc(bytes: usize) -> *mut u8 // Free a previously allocated region of memory // You must pass a pointer than was returned by malloc // and free will free the corresponding memory (all of it). // free remembers how many bytes that allocation was, and will // automatically free all these bytes. free(ptr: *mut u8) }
Here is an example:
#![allow(unused)] fn main() { // Allocate four bytes let ptr1: *mut u8 = MALLOC.malloc(4); // We can now do things with these four bytes // When we are done, we should free them. MALLOC.free(ptr1); }
Look closely at the type of ptr1, it is *mut u8. u8 represents a single byte in Rust. So, *mut u8 is a mutable pointer to byte(s).
But what if we want to deal with other types that are not one byte, for example, an i32? Fortunately, everything boils down to bytes on a computer, because
everything is simply zeros and ones. We just need to make sure we have allocated the correct size for that type.
An i32 is 4 bytes in size, so the above exam allocates enough memory for exactly one i32. However, it is not a good idea to try to memorize the sizes of different types.
Furthermore, we may not even know what the type is (e.g., FastVec like SlowVec is generic over any type the user of the vector chooses, denoted by T). Fortunately,
Rust has a helpful function we can use that tells us the size of a type.
#![allow(unused)] fn main() { let size_of_i32 = size_of::<i32>(); let size_of_t = size_of::<T>(); }
Now, we can allocate pointers to these other, more helpful types! We have to use the correct size (in bytes) and then cast the resulting pointer
to our desired type using the as keyword:
#![allow(unused)] fn main() { let ptr1: *mut i32 = MALLOC.malloc(size_of_i32) as *mut i32; let ptr2: *mut T = MALLOC.malloc(size_of_t) as *mut T; }
Now, what if we want to allocate memory for more than one element? It’s all bytes: we just need to make sure that we have enough of them.
#![allow(unused)] fn main() { // ptr3 can hold up to 10 elements of type i32s. let ptr3: *mut i32 = MALLOC.malloc(size_of_i32 * 10) as *mut i32; // ptr4 can hold up to n elements of type T. let ptr4: *mut T = MALLOC.malloc(size_of_t * n) as *mut T; }
Using the pointers after they are allocated
Now, we know how to allocate and free pointers. But how do we use them?
There are three ways to use a pointer:
- Writing to a pointer with
ptr::write(): this overwrites the data at the pointer with the given data. It will not free or destruct the old data, it will simply overwrite it. - Moving data out of a pointer with
ptr::read(): this will move out the data pointed to by the pointer and destroy/free that data. - Getting a reference to data pointer to by a pointer:
&*[name of your ptr]: this returns a reference to the data, it does not move out nor destroy it.
The difference between (2) and (3) is subtle: (3) leave the pointer unchanged: you can read the data again from that pointer later on and you will get the same data. (2) moves the data out, so if you try to read data from the pointer again after using it, there will be no data to read! (In fact, doing so will likely cause big problems and may result in nonsense outputs or errors).
Importantly, to use these operations correctly, you need to make sure these conditions are upheld:
- Never use
ptr::reador&*on a pointer before writing withptr::write()to that pointer (since there is no data yet). - Never use
ptr::reador&*on a pointer afterptr::read()(since the data is moved out), until you write to it again. - If a pointer has data, you must first use
ptr::read()to move it out, before usingptr::write()to write new data to it.
Rust cannot help you ensure that these conditions are met. Instead, you must do so yourself by thinking hard about your code. In fact, all of these operations are unsafe. These are special Rust operations that Rust allows us to execute to give us flexibility, but Rust cannot guarantee that they will not create problems (the technical term is undefined behavior). Instead, we must ensure that they will not create problems by carefully thinking about the code and ensuring it is correct.
To use these features, we must explicitly use the unsafe keyword, to tell Rust that we know what we are doing. If we do not use unsafe, the Rust compiler will give an error about these operations.
#![allow(unused)] fn main() { let my_pointer: *mut i32 = MALLOC.malloc(size_of::<i32>()) as *mut i32; // This tells Rust we know what we are doing and we want to use unsafe // operations. unsafe { // First write. ptr::write(my_pointer, 5); // Now, my_pointer points to 5. // Let us say we want to overide the data with 10. // We should first move the previous value out! // Then write to it. let _old_data = ptr::read(my_pointer); ptr::write(my_pointer, 10); let v: &i32 = &*my_pointer; println!("{v}"); // will print 10 let v2: i32 = ptr::read(my_pointer); // the data has been moved out of my_pointer // You should not try to read data from my_pointer again // (although it might still work with i32, but with more complicated types, it will not!) println!("{v2}"); // will print 10 } }
What about when the pointer points to many elements? We can use add() to select which element we want to look at.
#![allow(unused)] fn main() { let my_pointer_2: *mut i32 = MALLOC.malloc(size_of::<i32>() * 10) as *mut i32; unsafe { // This points to element at index 2, i.e. the third element. let ptr_2: *mut i32 = my_pointer_2.add(2); ptr::write(ptr2, 33); let this_is_33: i32 = ptr::read(ptr2); // This points to the element at index 9, i.e., the last element. let ptr_9: *mut i32 = my_pointer_2.add(9); ptr::write(ptr_9, 99); println!("{}", &*ptr_9); // add() is unsafe because if you misuse it, you might create problem, // what do you think will happen with this code? let ptr_10: *mut i32 = my_pointer_2.add(10); println1("{}", &*ptr_10); } }
main.rs and memory.rs
Just like in part 1, we provide fast_vec/src/main.rs and fast_vec/src/memory.rs to serve as a playground for you to
experiment with MALLOC and with dealing with pointers. You can them using these commands:
cargo run --bin main
cargo run --bin memory
Take a look at main.rs, and specifically, the malloc_and_ptr() function. Run it and try to understand what it outputs.
Feel free to modify it or add more code to it to experiment with other cases.
When you are confident that you understand the basics of MALLOC and pointers, move on to the next step.
Step 1 - Implement get
Student 1 Merge your submission1 branch from part 1 to the main branch, then, retrieve the changes from our course repository (the repository you forked your repo from). You must see both (1) your code from part 1 under slow_vec/ and the stencil code under for fast_vec/src/.
Both students should implement get on that main branch.
Start by assuming that the vector already has enough elements pushed to it. How would you use the pointer operations described in the background above
to retrieve the element at index i from self.ptr_to_data?
Hint: You only want to get the data, you do not want to move out or destroy it. Users of your vector should be able to get the data again in the future
if they want to. Consider using &*.
Hint: You will need to use unsafe and you will need to use self.ptr_to_data.add([your index]).
You can try out your implementation using main.rs to see if it works.
After you make the basic version work, consider what would happen if the callers provided a bad index. E.g., if i is greater than or equal to self.len.
Rather than returning random/garbage data or causing memory issues, it is best you create an error to inform users that they are using get wrong
and providing a bad index.
Consider adding this code below to the top of your function implementation.
#![allow(unused)] fn main() { if i >= self.len { panic!("FastVec: get out of bounds"); } }
After you are done, run the following test, and if it passes, move on to the next part.
cargo test get_strings -- --test-threads=1
Step 2 - Implement push and remove.
Each student should create their own separate branch, based on the main branch, and use it to do their implementation work.
Student 1 should implement remove. Unlike in part 1, you do not need to resize the vector, since FastVec can support having a capacity different than its length.
Instead, you can simply remove the element at the given index, and then move every element after it one step backwards. For example, assume you had a vector with [1, 3, 5, EMPTY] and remove(1) is called, you can implement your code such that the vector becomes [1, 5, EMPTY, EMPTY] without having to allocate new memory or resize the vector.
Consider what should happen if callers provide an index that is outside the length of the vector. Similar to get, you should panic in this case using this error message:
#![allow(unused)] fn main() { panic!("FastVec: remove out of bounds"); }
Hint: Remember to first move out the element to be removed using ptr::read.
Hint: For every index j greater than the index you want to remove, you should read the element at index j using ptr::read, then write it to index j-1 using ptr::write.
Student 2 should implement push. You should use the size doubling strategy we described above in the background.
Hint: Use MALLOC.malloc to allocate new memory of twice the size.
Hint: Move over all the elements from the previous pointer to the new pointer using ptr::read and ptr::write
Hint: Do not forget to write the new element using ptr::write and to update self.ptr_to_data, self.len, and self.capacity.
Both students should run the tests using
cargo test -- --test-threads=1
If your implementation of both push and remove is correct, all the tests should pass except one test called clear_tracker (leave that one for the last steps).
If other tests fail, look at their code (you can find it under tests/, or by using grep -R "[name of test]"). It might be not related to the function you are working on, and instead
be testing the function your teammate is working on, in which case you can ignore it.
After both students are done, student1 should merge both of their branches into a new branch called submission2. Both students will use this branch to complete the rest of the assignment.
Step 3 - Fix bug in clear
Both students You will notice that the clear_tracker test fails even when you implement both push and remove correctly.
This is because we have intentionally left a bug in the clear function we provided.
You need to fix this bug.
Look at the output of running memory.rs. You will notice that some data is not free-ed even after calling clear(). You need to make sure that data is free-ed.
Hint: remember the rules of using pointers above. How can you destroy the data the pointer is pointing to?
Hint: remember ptr::read()?
Step 4 - Run the provided experiment
Both students Use the following command to run the provided experiment:
cargo run --bin experiment --release
This will produce a plot under fast_vec/plot.png. Look at the plot. In this plot, the x-axis represents the size of the vector, and the y-axis represents the time needed to push one element to the vector with that size. For FastVec, the time is reported in microseconds, for SlowVec the time is in hundreds of microseconds.
Make sure you understand what you are seeing. E.g., which of the two implementations is faster, and what trends you see as vector sizes grow.
Step 5 - Submission
Student 1 should make sure all of your team’s code is in the submission2 branch and that you pushed it to your fork on GitHub. Then, student 1 should submit that code via Gradescope.
Mini Project 2: Build your own AI Chatbot!
In this homework, you will:
- Build three versions of basic AI chatbot of increasing complexity.
- Write user conversation history with the chatbot to persistent storage and cache hot conversations.
Group Work
Please use the same groups you used for project 1. As before, the instructions will refer to student 1 and student 2. Please decide which of you will be which before you start.
Pre-requisites
This project will reuse concepts we have seen before: structs, HashMaps, and Option.
In addition, you will encounter Result. You will also encounter async/await. However, you wont have to use either of these concepts deeply. The instructions will give you some hints as to how to use them, but feel free to skim the above link when needed.
Part 1 - Basic Chatbot
You can find the provided stencil code for our basic chatbot here. You will need to perform the following steps:
Step 0 - Installation
Updating your GitHub fork: Whichever of the two students owned the fork of our repository in project 1 should update the main branch of their fork to match our course repository (the repository you forked your repo from). You must be able to see project_2_chatbot/basic_chatbot in the GitHub web ui for your repository after doing this.
Installation: Each student should do these steps independently on their computer.
Go to your clone of the repository, switch to the main branch, and pull the changes. Confirm that you can indeed see project_2_chatbot.
Navigate to your repository’s folder using a terminal, and then execute the following commands:
cd project_2_chatbot
cd basic_chatbot
cargo run --release --features v1
This will:
- Build/compile the stencil code. This may take up to 2-5 minutes on your computer.
- Run v1 of the chatbot for the very first time on your computer.
- Because it is the first run, the stencil code will download a Llama LLM to your computer. This may take 2-10 minutes on your computer, depending on your network connection. You will see a progress bar in your terminal showing you the progress of this download.
All in all, this may take anywhere between a few minutes to a quarter of an hour on your computer. Please do this early to avoid any surprises.
After all the steps are complete, you should see Rocket has launched from http://127.0.0.1:3000 printed in your terminal, as shown in the screenshot below.
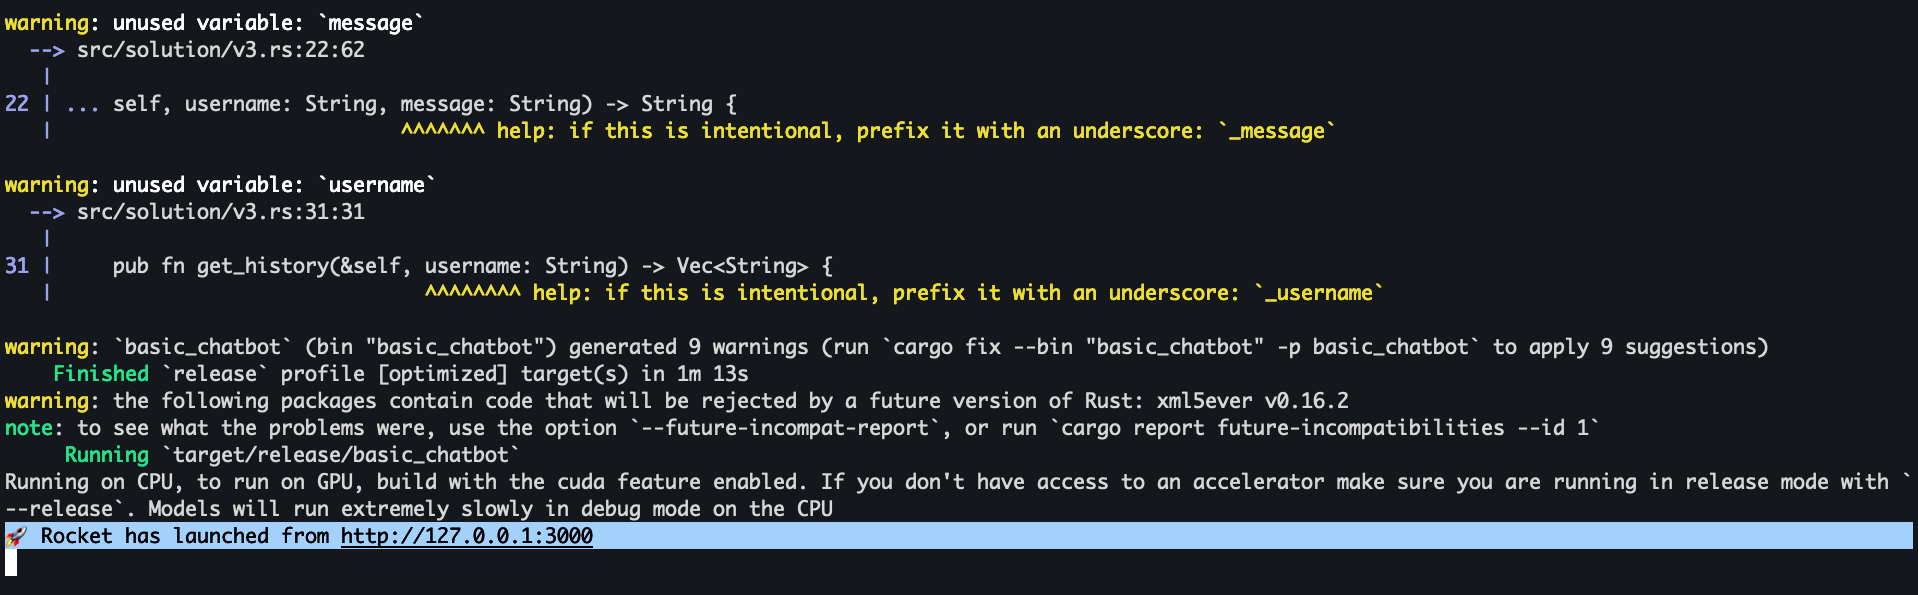
Open your favorite web browser (preferably Firefox or Chrome, but certainly not Internet Explorer or Edge,because we are not savages) and navigate to this URL http://127.0.0.1:3000. This will show you our chatbot web interface (shown below!)

First, login using any username of your choosing, then send some messages to the chatbot! As you can see in the screenshot above, the chatbot is not currently functional. Your task is to make it be a chatbot!
V1
Each student should implement this part independently. Student 1 and Student 2 should each branch of main to a new branch s1basic and s2basic, respectively. Each will work on their separate branches for now.
Open basic_chatbot using open folder in your VSCode, then navigate to src/solution/v1.rs.
You will see our provided stencil for v1, which includes:
- A
ChatbotV1struct: this represents the version 1 of your Chatbot. It stores the Llama LLM model inside of it as a field calledmodel. - A
newfunction that is a member ofChatbotV1: this function is implemented for you and the stencil executes it once when the website is launched for the very first time to construct your chatbot. - A
chat_with_userfunction that is a member ofChatbotV1: you will have to implement this function. - Several
#[allow(dead_code)]: this tells the Rust compiler not to show you irrelevant warnings if you choose to use a different version of the chatbot later on. You can ignore this.
The provided stencil code uses an external library called kalosm (see line 1). This is a library for managing
and using LLMs from Rust. The Rust compiler already installed this library for you automatically during step 0.
Let’s look a little more carefully at chat_with_user:
async: this function signature (line 15) uses pub async fn instead of pub fn which we are familiar with. This means that this function is an asynchronous function. Essentially, this tells Rust that this function may take a long time, and so while it executes, Rust can run other functions along side it.
We have to use async because kalosm is an asynchronous library. The developers of kalosm decided this because invoking an LLM takes a lot of work and time, especially on regular computers and using CPUs.
Thus, the kalosm developers wanted to allow applications to perform other tasks in the meanwhile, in order to save some time.
message: String: the chat_with_user function receives two arguments. The first is self, representing the instance of ChatbotV1 this function is called over (we have seen this before with project 1 and structs). The second is message, which contains the message the user wants to send to the chatbot and LLM.
You can confirm this by adding println!("{message}");, re-running the chatbot using cargo run --release --features v1, and then sending some messages and looking at the printed output in the terminal.
chat_session: This variable contains a Chat object. This is the interface/type that the kalosm library provides to manage and use chat sessions with the LLM. The exact type of this variable is kalosm::language::Chat<Llama>, which indicates that it is a chat session with a Llama LLM, but you can skip the kalosm::language:: part and write Chat<Llama> instead, because of the use statement on line 1.
with_system_prompt: lines 16-18 show you how the chat_session variable is initialized. We create a new chat model from the llama model we had previously stored inside self (when the Chatbot was first created using new). We then configure it to use the system prompt The assistant will act like a pirate (because I like pirates).
Your task is to complete the implementation of chat_with_user by passing the user-provided message to the chat session, and then retrieving and returning the LLM response.
We suggest you look at the add_message function provided by the kalosm library. Look at the given example for how it can be used.
The add_message function returns the response asynchronously. You can instruct Rust to wait until that entire response is ready by invoking .await on what it returns. For example
#![allow(unused)] fn main() { let asynchronous_output = chat_session.add_message(...); let output = asynchronous_output.await; // notice lack of (), await is not a function; it is a special keyword! }
Look at the type of output. How can you extract the response message string from it? Hint: it is similar to (but not exactly the same as) Option and can be dealt with using the same approaches we have seen before for Option.
Testing your chatbot: use cargo run --release --features v1 to test your chatbot. Send different messages and see if your chatbot behaves normally. Feel free to change the system prompt so the chatbot is something other than a pirate if you would like.
What happens if you ask the chatbot about something you or it had said earlier? Try telling it your name then ask it to repeat it later and see what happens.
Merging your code: After both students finish v1, student 1 should create a pull request using GitHub’s web UI from s1basic to s2basic. Student 2 should review the pull request. The pull request will contain a lot of conflicts, as both students have worked on implementing the same function.
Feel free to use GitHub’s UI to comment on the pull request and discuss each other’s code. Decide which version you like the best together (this might be subjective). Student 2 should then perform the merge into s2basic, resolving any conflicts in accordance with your decision. You will be graded on your comments during code review.
Feel free to use either the terminal, VSCode Git plugins or other Git UIs, or the GitHub web UI to do this as you see fit. You can ask AI for help with this process.
V2
All students should work on this part together on the s2basic branch after the pull request has been merged.
When testing V1, you would have noticed that the chatbot has no memory! It does not remember anything you said before. There is a good reason for this: whenever you send a new message, the stencil code calls chat_with_user. Each of these call creates a new chat_session – a blank slate! It then adds the new message to that session but then discards the session as it goes out of scope.
To make sure the chatbot has some memory, you will need to retain the chat session (notably, the message history inside it!) between calls to chat_with_user. You do not want to lose the chat_session from previous calls, instead, you want to reuse it.
Navigate to src/solution/v2.rs in VSCode. You will notice that this stencil is a lot more empty than the previous one: this is by design. It gives you the freedom to implement the chatbot anyway you like, and importantly, the freedom to store whatever you want inside the ChatbotV2 struct.
All students should discuss their ideas for this part together, and decide what type to store inside ChatbotV2. Then, they should find a way to initialize that data correctly inside the new function. Finally, they can copy in the implementation of chat_with_user from v1, and adapt it to the new struct in v2.
Testing your solution: Use this command to test your solution:
cargo run --release --features v2
You should test to ensure that your chatbot remembers things you had said previously.
Additionally, do the following test. Run the chatbot, open your browser and navigate to the chatbot page, then login using your name and tell the chatbot something about you: your name or favorite color, etc.
Then, in a new tab, navigate to the chatbot page again, and log in using a different username, for example, Sophie. Do not tell the chatbot anything. Instead, just ask it for your name or favorite color. See what happens! Is this behavior good behavior? Can you think of any problems that may arise from it in practice?
V3
As your testing in v2 should have shown: your chatbot now has memory, but it cannot distinguish between the histories of different users. Instead, it is all mashed in together. In part 3, your task is to separate or isolate this memory by user.
Navigate your VSCode to src/solution/v3.rs. You will notice that this stencil code is also nearly empty, giving you freedom to store and manage whatever data and state you want within the ChatbotV3 struct. You will also notice that chat_with_user here takes one extra argument: username.
All students should discuss together what kind of data they want to store in the struct and modify the struct definition and the new function together accordingly. One of them should push this code to s2basic, and then student 1 should merge that with s1basic. Confirm that you can see all of the commits from v2 and v3 (so far) on that branch after merging.
Hint: do you think you can achieve the desired functionality while storing only one chat session? Do you need more sessions? How many do you need? Hint: should there be some linking between the username and the corresponding chat session?
After completing the struct definition and new function, student 1 and student 2 should complete chat_with_user and get_history independently on s1basic and s2basic.
Student 1: you need to retrieve the correct chat session. After that, you should add the message to it and retrieve the response similarly to v1 and v2.
Hint: what if this is the very first message a user sends? Hint: what if this is the second (or later) message a user sends?
You can test your code using the same workflow as v2: login as two users from two different tabs and see if the chatbot leaks information about one user to the other. Note: your chatbot should still remember information across sent by the same user/in the same tab.
Student 2: you need to retrieve the chat session as well. Then, rather than adding a message, you need to retrieve and return the history of the user’s conversation so far as a vector of strings Vec<String>.
We suggest you look at the session function from kalosm and its history function. Look at the examples provided by kalosm in the two links above for inspiration. Consider printing the history using println!("{:?}", YOUR HISTORY VARIABLE);.
This function’s purpose is to display the history in the UI after a user logs back in (see property 3 in the description below). Thus, this cannot be completely tested without also having your teammates implementation of chat_with_user completed.
Merging, Testing, and Submission
After both students are happy with their respective functions in v3, student 1 should create a new branch basic_submission based off s1basic. Student 2 should then merge s2basic into basic_submission.
After the merge, the basic_submission branch should contain all the code for v1, v2, and v3 including both chat_with_user and get_history.
Each student should do some manual testing by running the below command and opening several tabs to chat with the chatbot concurrently:
cargo run --release --features v3
The students should verify that the v3 solution meets these properties:
- The chatbot never reveals information given to it by one user to a different user, no matter how persuasive that second user is.
- The chatbot remembers earlier information given to it by the same user. If it does not,
chat_with_userhas some bug that needs fixing! - After you chat with the chatbot as some specific user, say
Sophie, you can refresh the page (or open a new tab) and login in as that same user again, and you will see all of your previous messaging history in the page. If this does not work, thenget_historyhas some bug that needs fixing!
Students should feel free to apply fixes to their code and push it to basic_submission, but should coordinate with each other to avoid trying to apply the same fix at the same time.
It is also a good idea to run v1 and v2 one or two times again after you are done with all changes, just in case.
When you are done, student 1 can submit your solution via Gradescope. Make sure you add your teammate to the submission as a group submission.
Part 2 - Storing and Caching History
In the previous part, you implemented a chatbot that keeps track of the conversation history for independent conversations by independent users separately.
However, one down side of the v3 implementation is that if the Rust application is terminated, i.e. by closing the terminal you ran it from, and then restarted again (by calling cargon run ...), the entire history is lost.
The reason this happens is that the history is saved inside your chatbot struct (and more specifically, inside a variable in the stencil code that contains an instance of your struct). Like all variables in any program, this data is lost when the program is closed or terminated.
To fix this, we will need to save the data to a file, so that it survives the program even if the program is terminated, and then read the data from that file in future executions of the program.
Git instructions: We will not tell you what to do with Git, branches, or merges. Instead, we will leave it up to you to decide how to proceed. Just make sure that (1) you start by branching out from your basic_submission from Part 1,
(2) you DO NOT modify basic_submission, and (3) you end up with the complete tested code from all students on your team on a branch called complete_chatbot.
V4 - File Chatbot
Start by implementing the missing code in file_library.rs and v4.rs, both located under file_chatbot/src/solution/. Then comments in the code point you towards helpful functions provided by the Kalosm
library for writing and loading a LlamaChatSession to and from bytes. The comments also point you to fs::write and fs::read for writing and reading bytes to and from a file, respectively.
Student 1 should implement chat_with_user and save_chat_session_to_file. Student 2 should implement get_history and load_chat_session_from_file.
You will be able to test your code when all students are done and you have combined your implementations. Then you can do the following flow for testing:
cd file_chatbot/
cargo run --release
# after the program starts running, open http://127.0.0.1:3000 in your browser, log in as your user of choice, and chat with the bot.
# after you are done chatting, kill the previous command using either ctrl+c or by closing the terminal
# run the below command again to start the chatbot from scratch
cargo run --release
# open http://127.0.0.1:3000 in your browser, log in as the same user, you should see your history from the previous run and the chatbot
# should be able to remember information you told it earlier.
# if you log in as a different user, you should not see that history and the chatbot should not be able to remember any facts from it
All students should fix any issues they encounter while trying out the chatbot together. When you are happy with the chatbot and it appears to work as expected, run the following commands:
cd experiments/
cargo run --bin experiment1 --release
The code of this experiment is provided to you. It chats with your implementation of V3 and V4. After some chatting. It will retrieve the history (which calls get_history(...) behind the scenes) for both V3 and V4, and it will print the time
it took to retrieve the history in both cases.
Identify which version is slower! Try to reason about why.
V5 - Cache Chatbot
The above experiment should convince you that reading and writing to a file is actually a lot slower than interacting with data stored inside a variable!
If computer memory was unlimited, one could just keep (a copy of) all the conversations in the memory of the program. However, memory is limited, and if there are thousands or millions of users, the conversations would easily fill up the memory.
A common alternative that programmers use is to employ caching: The overall idea is to keep only the needed conversations in the program’s memory (e.g., inside a variable or data-structure of some kind, like a HashMap or a Vector)
One challenge is it is difficult to predict with certainty which conversations are going to be needed in the future, and which ones are not going to be needed. Instead, we have to try to make guesses. Specifically, to guess which conversations should be cached (kept in memory) and which should not be (not kept in memory, and instead have to be read from files).
A popular and easy to understand caching strategy is to least recently used (LRU). Here, if the limit on cached conversations is reached, the next time we see a new conversation that we need to cache, we would need to (1) make space for it by kicking out a previous conversation (often called evicting) and (2) put the new conversation in its place.
So, which conversation should we kick out? The LRU strategy is to kick out the least recently used conversation. You can see an example of this in action at this link. Feel free to skip over the parts titled Thoughts about Implementation Using Arrays, Hashing and/or Heap, Efficient Solution - Using Doubly Linked List and Hashing, and Time Complexity.
We will implement this strategy inside cache_chatbot. You are given a fast and correct implementation of an LRU cache (you can look at it inside cache_chatbot/src/solution/fast_cache.rs). You are also given the basic structure for the chatbot in cache_chatbot/src/solutions/v5.rs.
Crucially, note that ChatbotV5 struct contains the Llama model (which you can use to create Chat objects, same as previous parts) and a cache where you can cache conversations. Your tasks is to implement chat_with_user and get_history.
Specifically, both of these implementations first try to find the relevant conversation in the cache – this code is already given. There are two cases:
- the conversation is found in the cache, which returns the underlying
chatobject. You can use that chat object directly to retrieve the history or add a new message. - The conversation is not the cache. In this case, you will need to create a new
Chat, and read its content from a file (if one exists) or initialize it as an emptyChatif none exists.
Either way, this conversation now becomes the most recently used one, and you must therefore add it to the cache, including any new messages sent to or received from it.
Student 1 should implement get_history and student 2 should implement chat_with_user.
Testing your code: ChatbotV5 is configured to keep no more than 3 conversations in the cache. You should test your code to ensure the following behavior is true:
- Open 3 tabs and log in as 3 different users, after the first login, they must all get inserted into the cache, and continuing to use them should not require reading from files after the first read.
- Open a 4th tab and log in as a new user and begin chatting. The least recently used of the three earlier conversations should get removed from the cache, and the new conversation should replace it.
- If you login or interact with a conversation that was removed from the cache, your code will read it from its corresponding file, and then put it back in the cache.
Hint: feel free to use print statements in your code to identify which cases (e.g., chat found or not found in cache) are being execute.
Hint: make sure you always write the new conversation session to the corresponding file, so that if the conversation ever gets evicted from the cache in the future, it will be stored / backed up in the file.
Finally, run the following commands to see how much time caching saves compared to V4:
cargo run --bin experiment2 --release
Building your own Cache
We gave you an implementation of LRU cache using a Rust library. In this part, you are asked to implement your own LRU cache using a HashMap and a vector. This implementation will be slower than the cache given to you, but it is a good learning experience!
You should add your implementation to cache_chatbot/src/slow_cache.rs. The file also includes instructions on how to implement it. Read the file slowly and try to take it in.
student 1 should implement remove_least_recently_used, and student 2 should implement mark_as_most_recently_used.
Testing your solution: After you are both done with your implementation. All students should first run these commands:
cd cache_chatbot
cargo run --bin slow_cache
This will run the main file inside cache_chatbot/src/slow_cache.rs, which contains some basic tests. If it produces errors, use the printed messages to help you debug your implementation.
Then, all students should run our provided tests (against which you will be graded) using:
cd cache_chatbot
cargo test
If all tests pass, your final step is to run our cache experiment:
cd experiments
cargo run --bin experiment3 --release
This experiments compares the performance of the given LRU cache and your HashMap+Vector LRU cache. Which one is faster?
Submission Instructions
After you are done, make sure all your code is on a branch called complete_chatbot.
Please make sure that v4 and v5 behave as expected, and that you are able to run experiments 1, 2, and 3. Finally, make sure that the slow_cache tests run.
Then, student 1 should submit the GitHub repo and branch to Gradescope. Remember to add all the students on your group as teammates.
Mini Project 3: Build a client/server data analytics stack!
In this homework, you will:
- Build a small data analytics library capable of computing simple relational queries with various types of aggregation.
- Developer a client that defines the analytics to compute, and a server that executes the provided analytics over a dataset it controls.
Part 1: Build the Analytics Library
Your task for part 1 is to build out the missing features in the provided analytics library, which you can find on our course’s GitHub repo
at project_3_client_server_analytics/analytics_lib.
Stencil Layout
Open the analytics_lib folder in VSCode and look at its content. You will notice two directories:
srcwhich contains the provided stencil code as well as where you will provide your solutions.testswhich contains various tests that we will use to grade you, and you can use to ensure your code is correct.
Furthermore, src itself contains the following important files:
-
dataset.rs: This file contains theDatasetstruct, which is our provided type that represents an entire dataset (read from a csv file). For example,project_3_client_server_analytics/grades.csv.Datasetcontainscolumns, a vector of pairs each describing one column in the csv file (e.g. grade) and the type of data in that column (e.g. Integer). It also containsrows, a vector of rows that contain the actual data.Rowis a vector of values, and provides API to either get a specific value by reference or move all the values out of the row.Valueis an enum with two cases: it either contains anIntegeror aString. To use data of typeValueyou have to use amatchstatement to check for either cases, similarly to how you couldmatchon anOptiontype.
-
query.rs: This file contains the structs that represent our query language.Queryrepresents an entire query that contains several part: a filter condition that filters out irrelevant data, a group by column name indicating how to group the data into buckets, and an aggregation that describes how data within a single bucket is aggregated together.Conditionhas four cases and represents either a direct equality condition (e.g., the value in the column"section"must be equal toValue::String("A1")), or the negation of a different condition or combining two conditions together using AND or OR.Aggregationis eitherCount,Sum, orAverage. In addition, it also contains the column name to aggregate over, e.g.,Aggregation::Average("grade")indicates that the query wants to average the “grades”.
-
solution.rs: This is where you will provide your solution. Specifically, you will implement three functions:filter_dataset(): you must write correct code that looks at the rows in the givendataset, checks whether they meet thefiltercondition, and return a newDatasetthat only contains matching rows.group_by_dataset(): your function must take a given dataset and the name of the column to group by. It must then build subsets of the datasets for each value of that column. For example, grouping the dataset fromproject_3_client_server_analytics/grades.csvbysectionmust result in two datasets. The first contains all rows with section “A1” and the second contains all rows with section “B1”.aggregate_dataset(): your function takes several groups of datasets, and aggregates each group, e.g. by computing the count or average of some column inside each group separately.
Example
We will break this down with an example. Say the query is the following:
#![allow(unused)] fn main() { let query = Query::new( Condition::Equal(String::from("grade"), Value::Integer(90)) // filter condition String::from("section"), // group by Aggregation::Count(String::from("name")), // aggregation ); }
This query indicates that we want to find the count of students in each section that have a grade equal to 90.
Assuming we start with the dataset in project_3_client_server_analytics/grades.csv. Then the input dataset will be:
name section grade
Alice A1 80
Bob A1 90
Carol B1 85
Sophie A1 100
Corinn B1 90
After performing the filter only, we end up with:
name section grade
Bob A1 90
Corinn B1 90
After performing the group by, the result becomes:
HashMap containing {
"A1": [{Bob, A1, 90}],
"B1": [{Corinn, B1, 90}]
}
Note that if the dataset was different, there could have been more than one row in a group.
Finally, after performing the aggregation, we end up with the final result:
HashMap containing {
"A1": 1,
"B1": 1
}
Your tasks
You should implement each of the three functions in solution.rs. All students should work on filter_dataset() together, then student 1 should implement group_by_dataset and student 2 should implement aggregate_dataset.
For simplicity, only implement the case where the filter condition is a direct Condition::Equals. When you are happy with that implementation, move forward and implement the remaining cases.
Hint: You will notice that in order to figure out whether a Condition::Not or And or Or is satisfied or not, you will need to determine whether one or more nested conditions are satisfied. Consider creating a new helper function that looks at one row and a given condition and returns either true or false based on whether the row
meets the condition. You can then re-use that function, e.g., by calling it recursively, to find out whether a row meets nested conditions.
Hint: Avoid duplicating code in general in this project, if you find yourself writing duplicate code, ask yourself whether you can turn it into a helper function that you can reuse in different parts of your code.
Hint: You will be graded on how clean your code is and on its quality. This means that you will receive higher grades for clean code with little code duplication, clean indentation and clear variable names. It also means we will give you higher grades if you use move, clone, and refs in reasonable ways. E.g., it is better
to avoid needless clones when they are un-needed, as they slow the program down!
While working on your code, you can tests each function separately using the provided tests.
cargo test filter
cargo test group_by
cargo test aggregate
Continue working on your function until you pass all of its tests.
Hint: the filter tests have separate cases for Equals, Not, And, and Or conditions. If you only implemented one of these cases, run the tests anyway, and check whether the one tests that corresponds to that case succeeds or not.
Lastly, we also provide a complete end-to-end tests that tests whether your code can execute an entire query including all of its filters, group by, and aggregation. Make sure your code passes this test after you combine your solutions for all three functions.
cargo test albums
Git and Submission
We will not make any specific requests about how you organize your code and parts using Git. Use your experience so far to guide you. We will look at your Git commit history to ensure that (1) each student contributed their parts, and (2) the students were able to merge and combine their solutions effectively.
When you are ready to submit your code, make sure it is on a branch called analytics_lib and submit it via Gradescope.
Part 2: Build the Client and Server
Your task for part 2 is to build out the client and server code to enable performing data analytics using the library from part 1.
When you are done with this part, you will have implemented the following components:
- analytics_lib: this is what you implement in part 1, and is a library for executing queries over datasets.
- server: this is a server that receives queries from clients, runs them on the clients behalf, and returns the resulting dataset to the client.
- client: a client that issues queries to the server and then receives and prints the output dataset.
This part is based on remote procedure calls (RPC). This is a technology that allows a client to invoke a remote function on a server. At a high level, it works like this:
- The programmers who built the server define a public interface, e.g., by publishing it to GitHub. This interface defines one or more functions that clients are allowed to invoke remotely.
- The server programmers implement that interface in their code by implementing the bodies of these functions.
- The server programmers run their code on some publicly accessible machine, e.g., on the cloud (like on Amazon AWS or Google Cloud).
- The client programmers download the public interface and add it to their code.
- The client programmers write some code that connects to the server and calls whatever functions they want, passing any parameters they need and receiving the output. They can then run their code as they desire!
In reality, the server and client programmers would need to implement some authentication mechanism to avoid other unauthorized clients or hackers from abusing the server. We will not worry about this in this project. Read more about RPCs here.
Code Structure
Make sure you sync your GitHub fork with the course repo to retrieve the stencil code for project 3. If you look inside the stencil, you will find the following folders/components:
analytics_lib/: this is what you implemented in part 1.interface/: this contains the public RPC interface.server/: this contains the server code.client/: this contains the client code.
You will have to modify the following files. The instructions will explain how to do this modification.
interface/src/lib.rs: to add RPC functions.analytics_lib/src/dataset.rs: you will need to makeDatasetand other structs serializable and deserializable, to enable sending them between client and server.server/src/{lib,solution}.rs: you will need to implement the server logic for each RPC function.client/src/solutions.rs: you will need to implement the client logic for calling server RPC functions and handle the parameters and returned data.client/src/bonus.rs: this is optional for bonus credit.
Step 0: Getting Started
All students should do the following together. This step is important. Follow these instructions carefully and slowly.
First, sync your code with the course GitHub repo. Make sure you branch off analytics_lib from part 1. Do not modify analytics_lib during this part!.
Second, open the [path to repo]/project_3_client_server_analytics folder using VSCode. Make sure you use open folder, and not open a file. Also note that we are asking you to open the entire project_3_client_server_analytics folder, not the analytics_lib, server, client or other sub folders. This will help you modify code in the different components as you need to.
Third, let’s look at the code to understand the RPC structure.
The RPC interface: using VSCode, navigate to interface/src/lib.rs and look at the code. You should see something similar to the below screenshot.
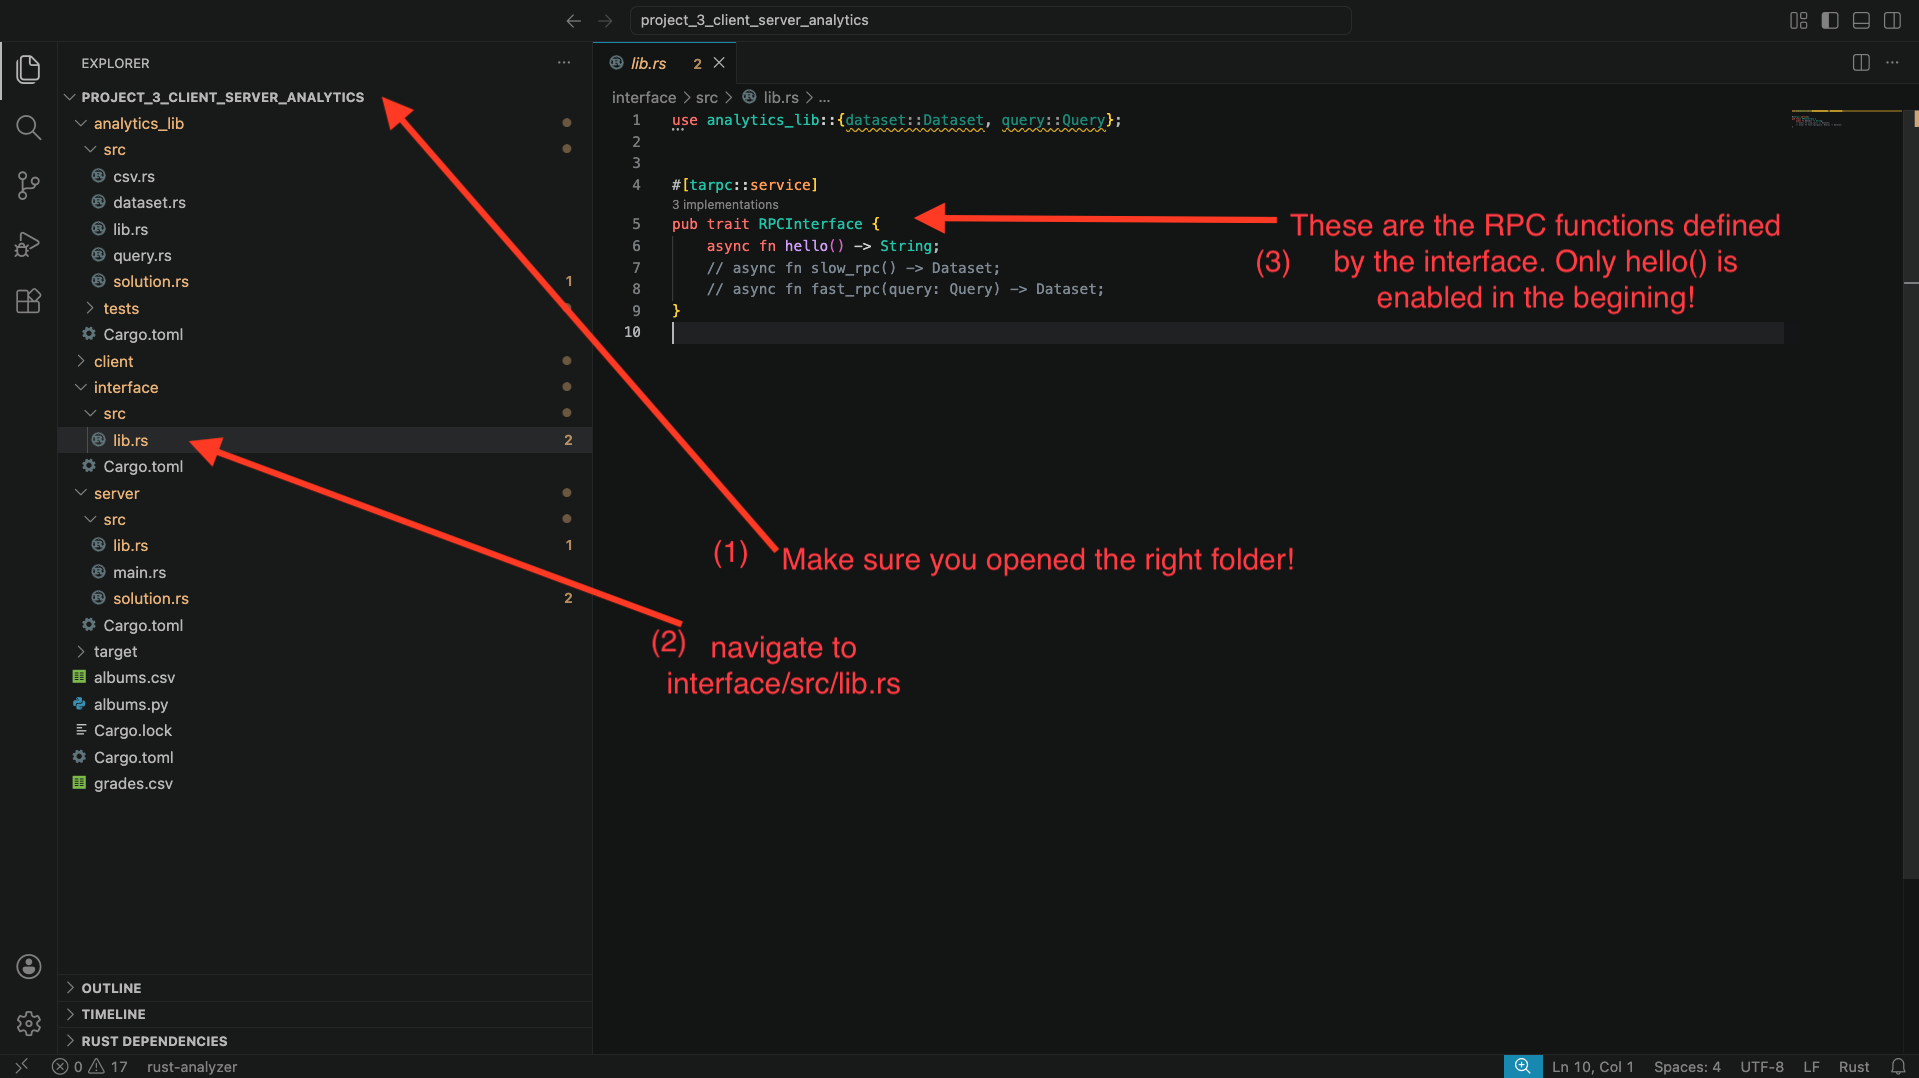
You will see that only the function hello() is enabled, with two other functions commented out.
The server code: navigate to server/src/lib.rs. You will also here the implementation of each RPC function from the interface. Specifically, you will find this around line 24. Again, you will see the implementation for hello(), but the other two functions are commented out. The body of the hello function simply calls solution::hello(). Navigate to server/src/solution.rs to find what that function does: it simply prints a hello message to the screen and returns the string “hello”.
The client code: now, navigate to client/src/solution.rs. Look at function run_hello(..):
- This function takes an
rpc_client: &RPCInterfaceClientparameter that the stencil code provides. This variable is the connector between the client and server. - The function calls
rpc_client.hello(..). This call ends up invoking thehello()function remotely in the server. Note that the function requires a context parameter, and that the code doesawaitandunwrap()on the result. This is because RPC invocations are async (so we must await them) and return a Result<_, _>, in case there was an error connecting to the server (so we must unwrap them!). - The function then prints whatever the server returned.
Great: we have all the ingredients to be able to invoke the hello() RPC function between client and server. Let’s try to do that:
- Open a terminal, navigate to
[path to repo]/project_3_client_server_analytics/server, and then runcargo run -- grades, wait for the program to compile and start running. - Open a second terminal, navigate to
[path to repo]/project_3_client_server_analytics/client, and then runcargo run --bin main -- hello.

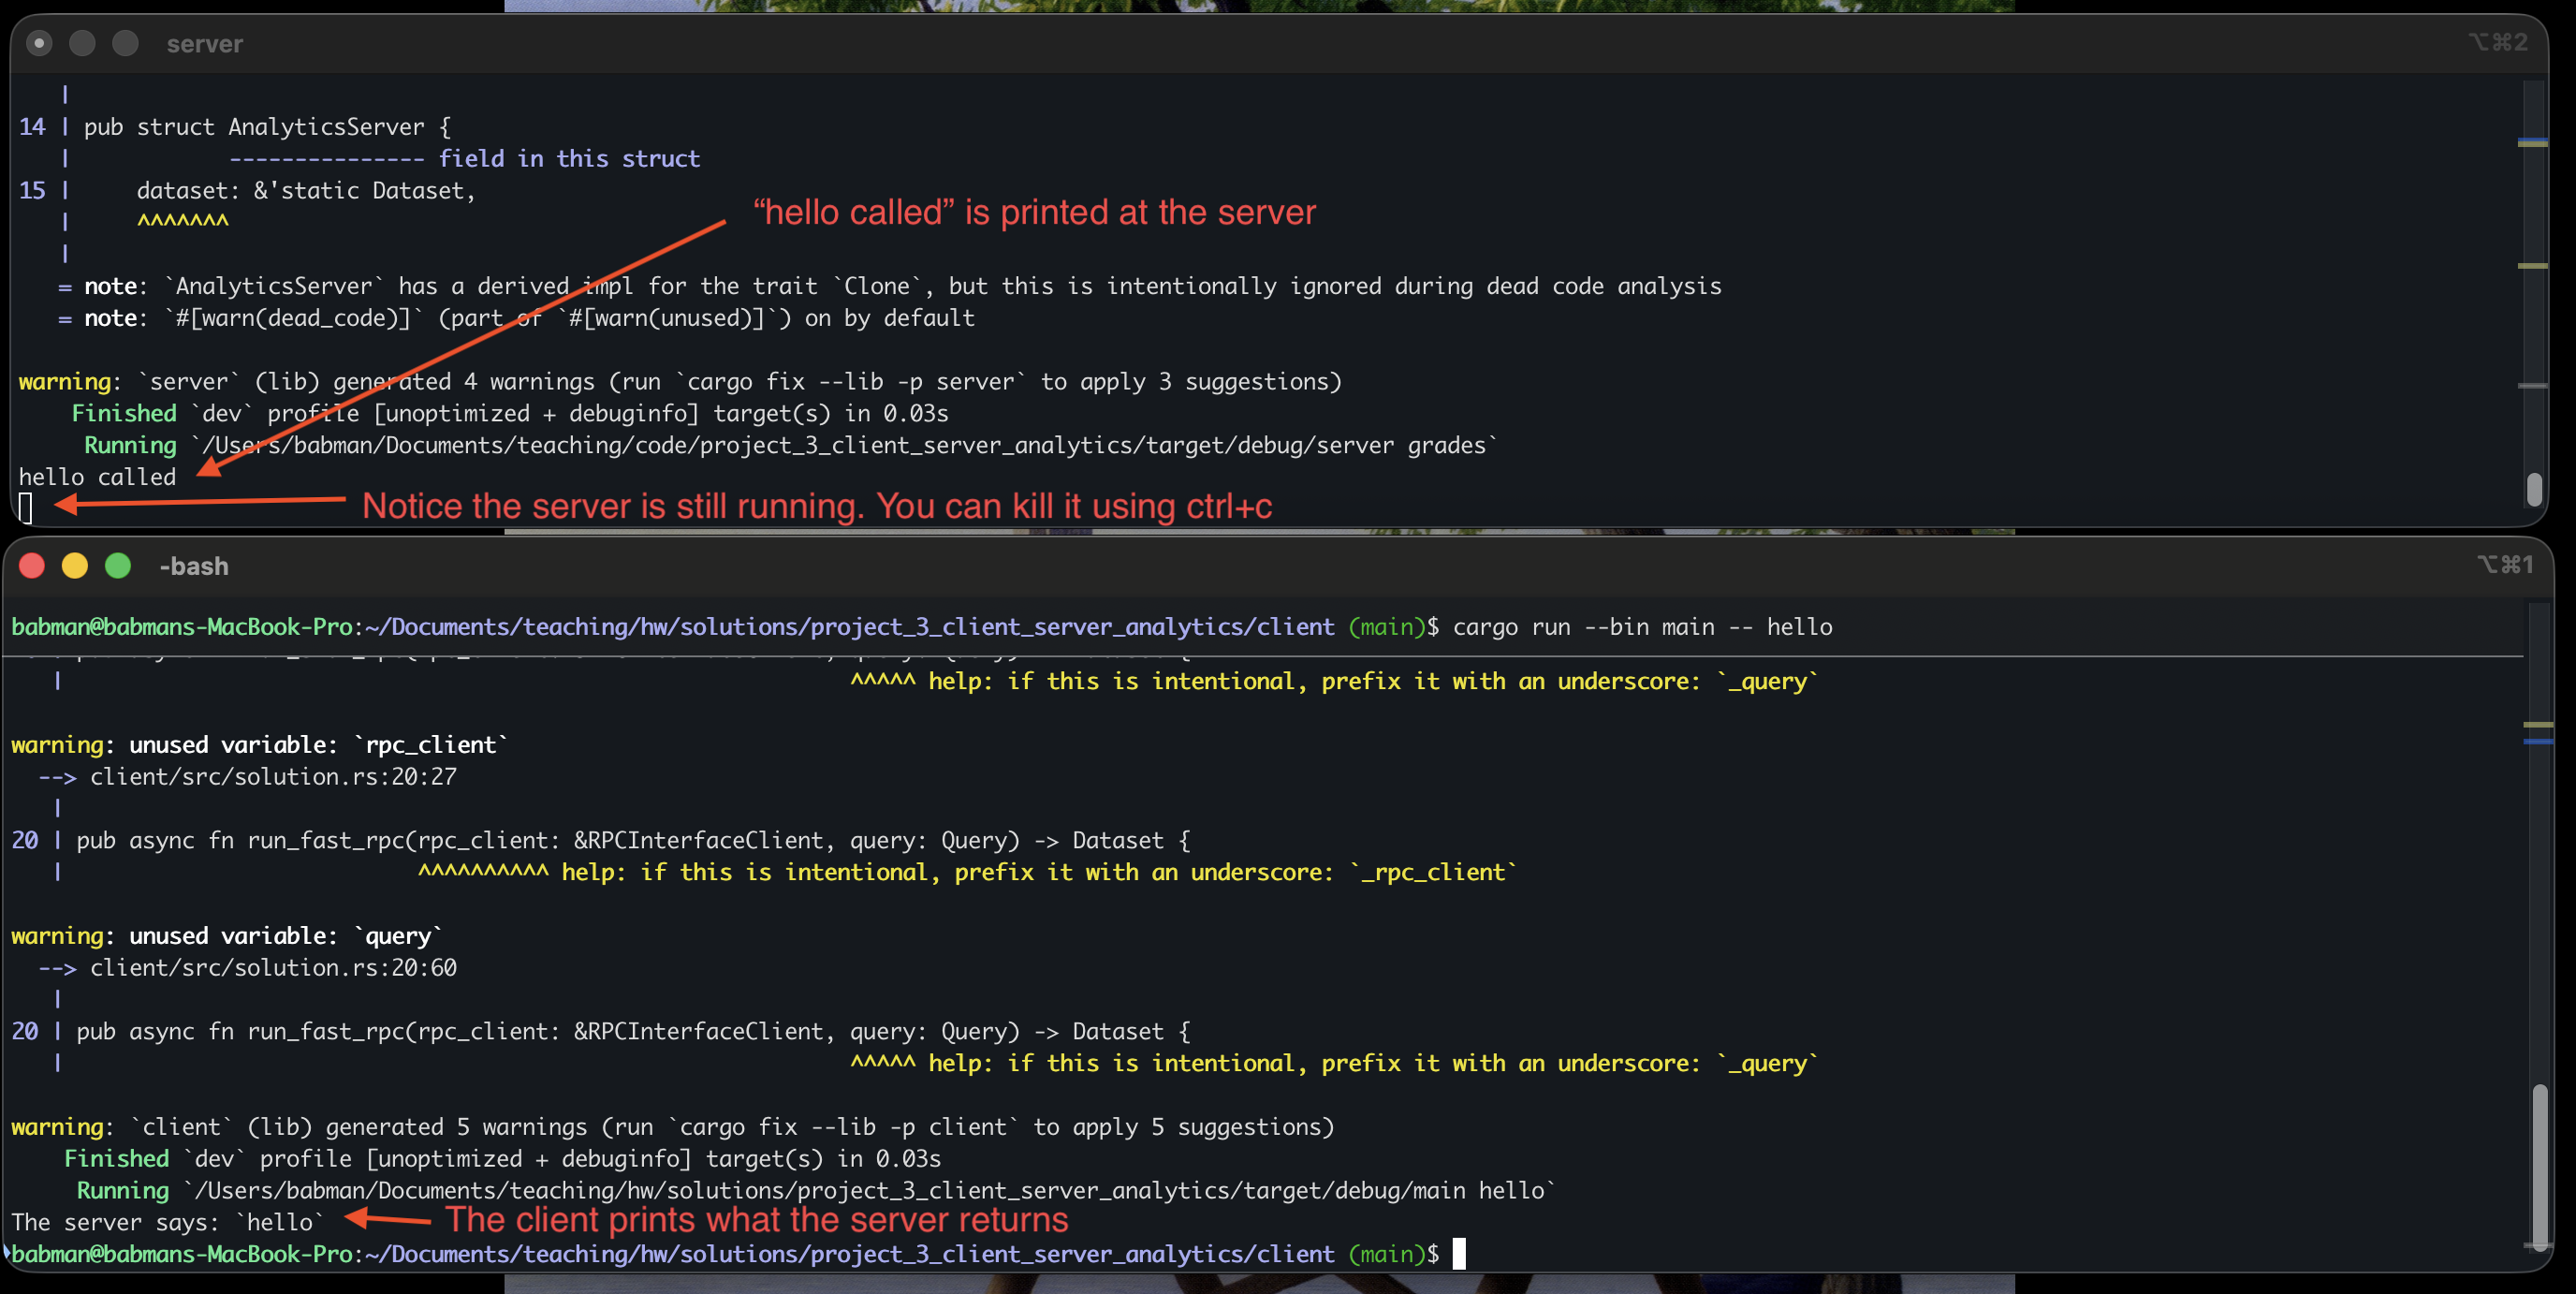
You should see a similar output to what’s in the above screenshot. Note that we you do this, the client completes and exists but the server continue to run. You can run the client again and it will connect to the same server and work correctly! Alternatively, you can kill the server (using ctrl+c) and run it and the client again.
Step 1: slow_rpc
All students should implement slow_rpc together as follows.
interface implementation: First, navigate to interface/src/lib.rs, and uncomment the definition of the slow_rpc function.
When you do this, you should notice several compiler error in VSCode. The errors will complain about the Dataset type. Specifically, they will complain about it not implementing Serialize and Deserialize.
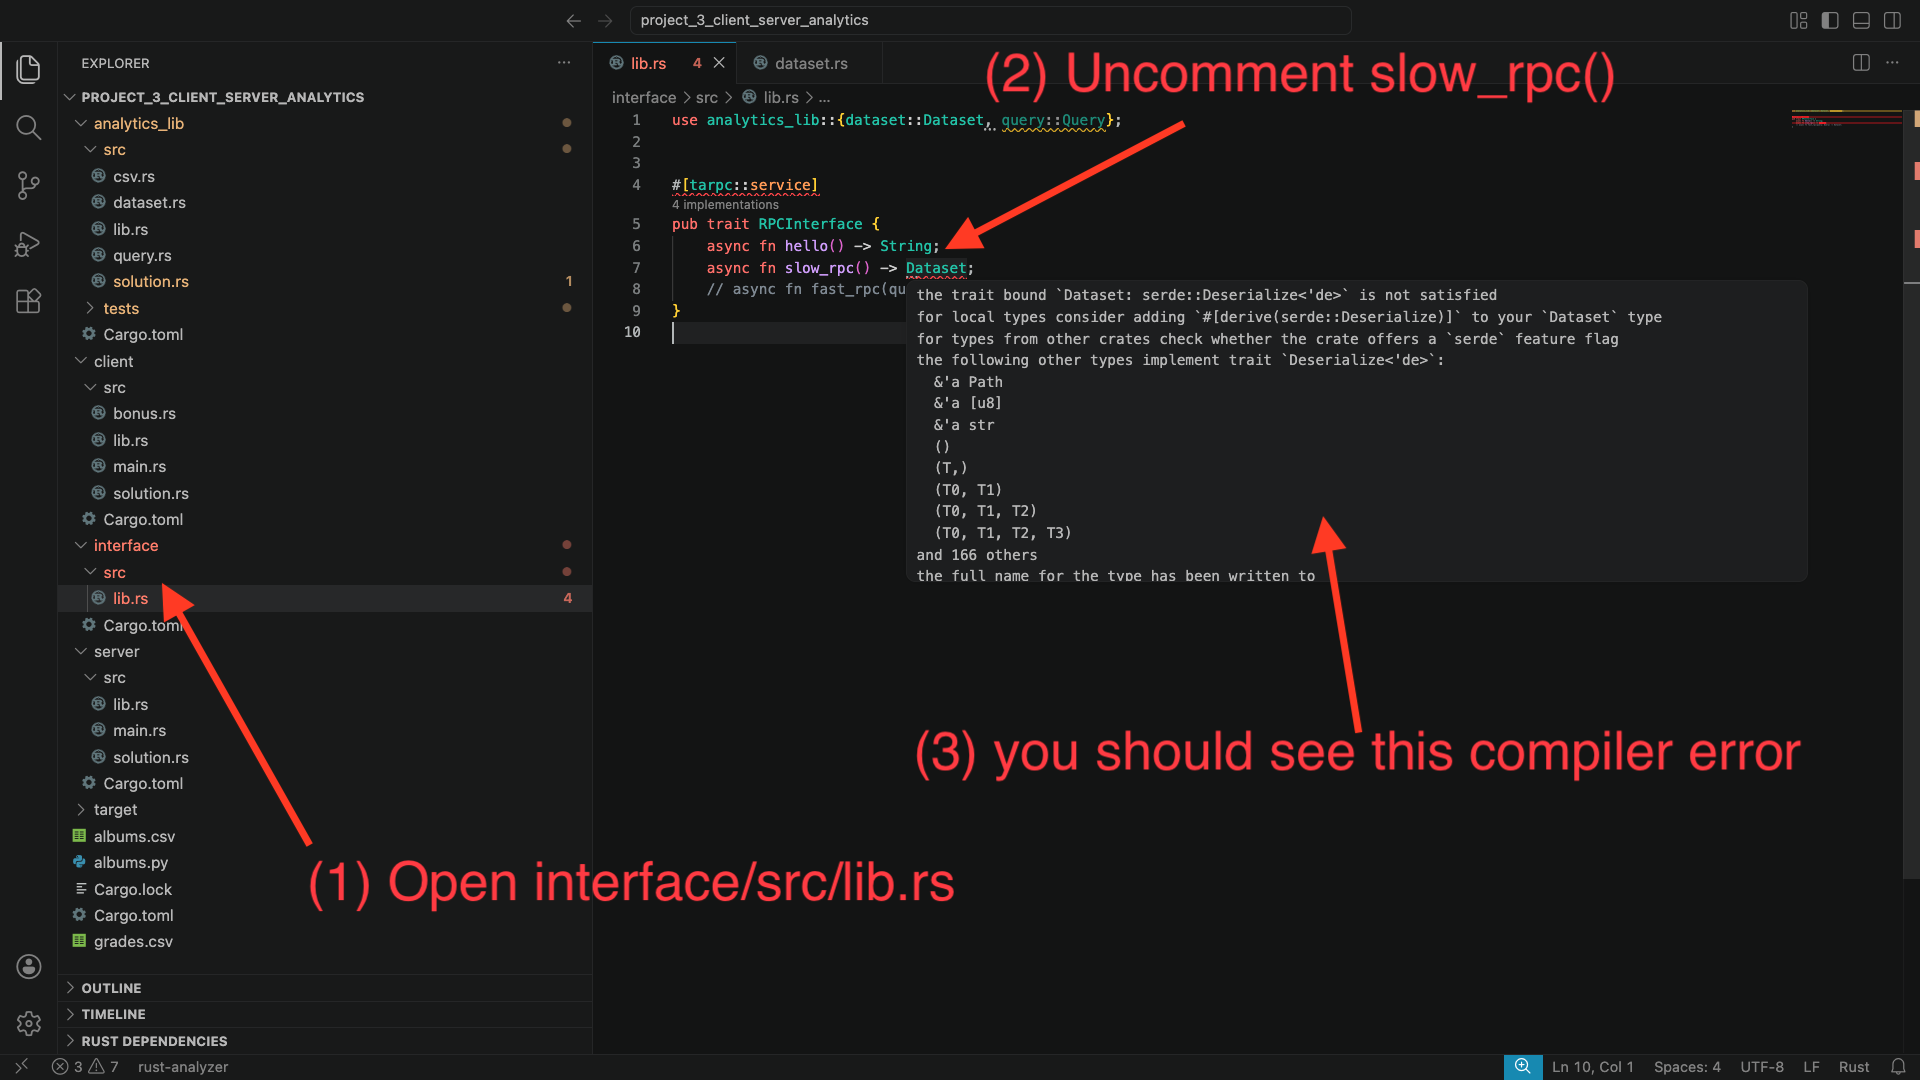
Let’s fix these errors: to do so, we will need to make Dataset implement the Serialize and Deserialize traits. A trait is a way to declare that some type (in this case Dataset) implements some important and reusable functionality (in this case, that it can be serialized and deserialized to bytes for sending between the client and server).
We will see traits in more details later. You can read more about them here
Alright, so how do we make Dataset implement these traits? Fortunately, we can simply ask Rust to derive them for us automatically!
Navigate to analytics_lib/src/dataset.rs. Add the following line to the top of the file use serde::{Deserialize, Serialize};. Then, add #[derive(Serialize, Deserialize)] on top of the definition of Dataset.
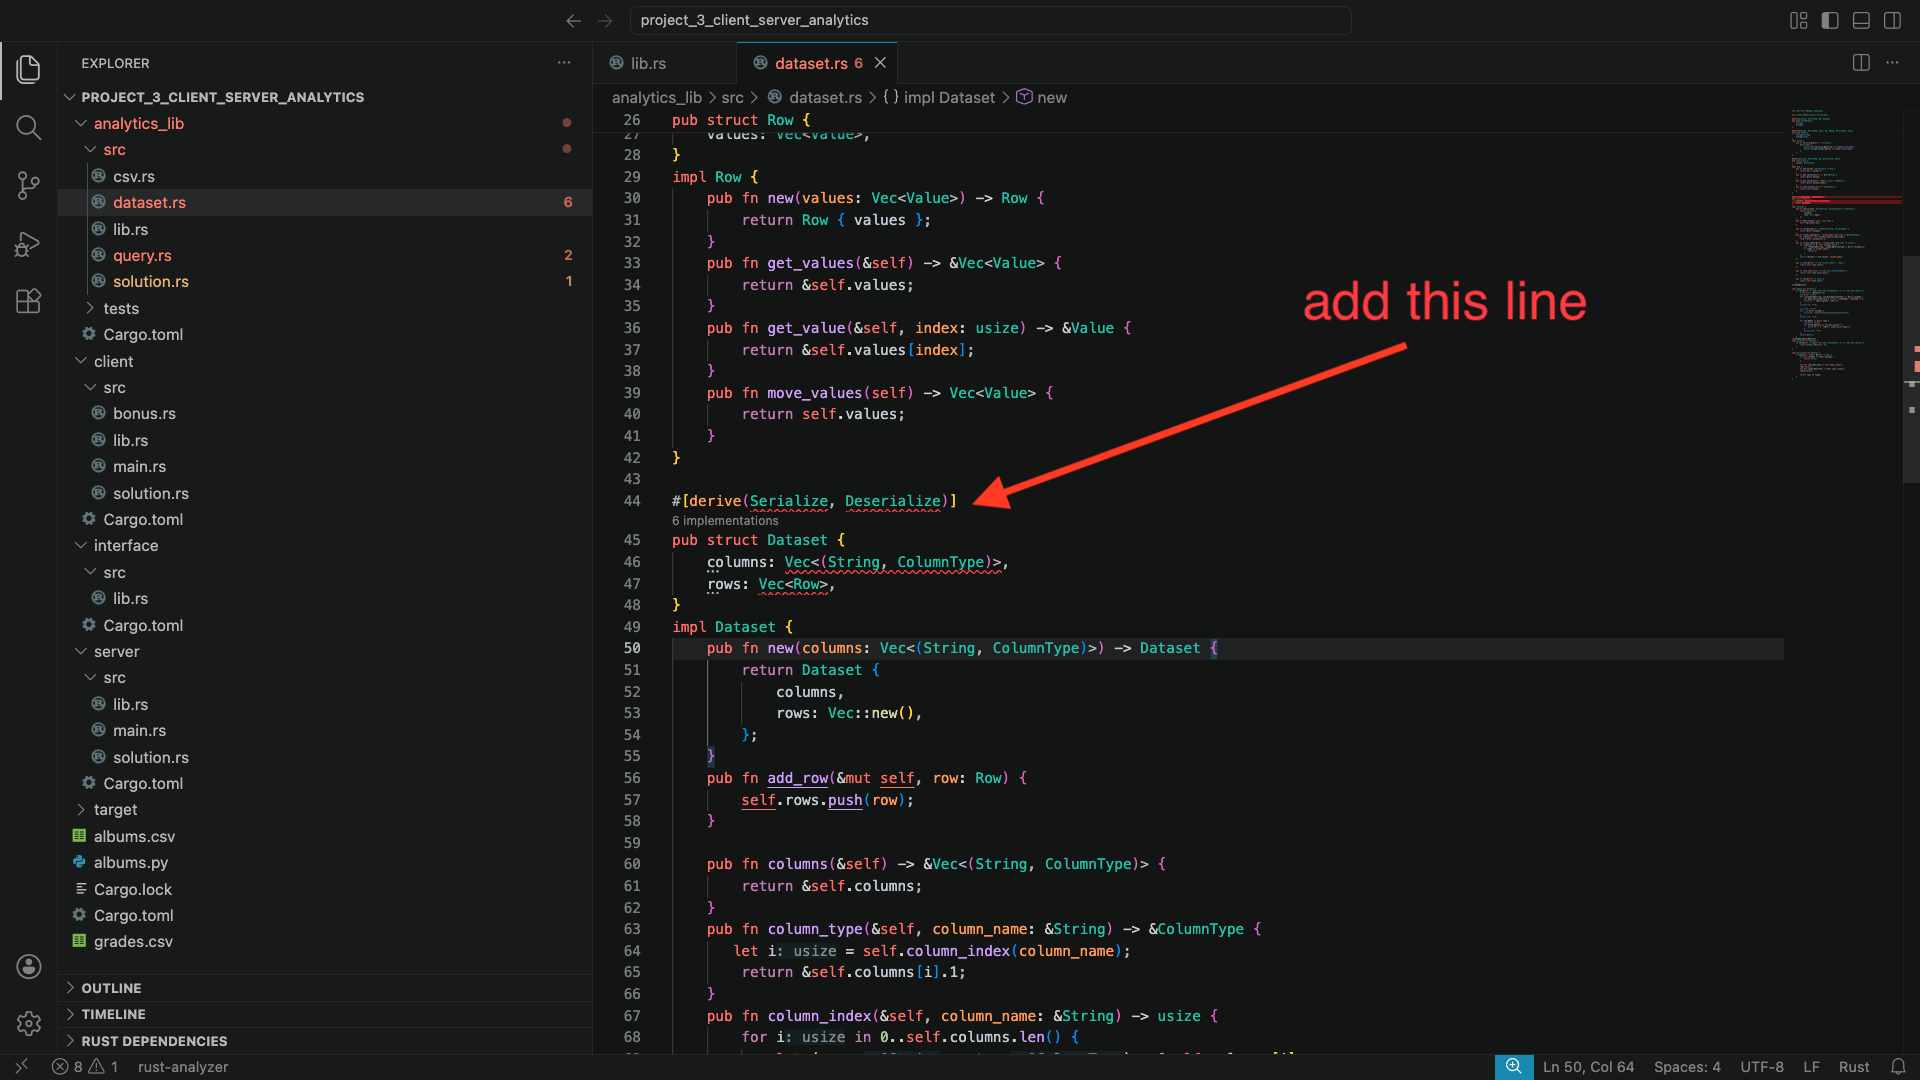
You will notice that Rust is unable to derive these traits automatically. This is because Dataset contains Row and other types in it that do not implement these traits. Scroll up in this file, find where these types are defined, and derive Serialize and Deserialize for them as well. Follow the compiler errors to find which types are missing these traits!
When you are done, go back to interface/src/lib.rs, and check to see if the compiler errors are gone.
Server implementation: Next, go to server/src/lib.rs. You will notice a compiler error in the implementation of AnalyticsServer. Specifically, Rust will complain about missing the implementation of slow_rpc(). This is an easy fix, as I gave you the code there, just commented out. Uncomment it and the compiler error will go away.
Then, go to server/src/solution.rs. You will see that slow_rpc() does not do anything. You must implement this function. Simply make it return the dataset – notice how with slow_rpc the server is not given any particular query to execute!
You may run into a compiler error due to a type mismatch: the input dataset is a reference. Try to clone the input dataset, but the compiler will complain that Dataset does not implement Clone. It turns out, Clone is also a trait! We know how to implement traits now: we can derive them! Go back to the Dataset struct and add Clone to its #[derive(...)].
Client implementation: Finally, go to client/src/solution.rs.
Read the code of run_hello() and the comments inside run_slow_rpc(), they should give you an idea of how you can call rpc_client.slow_rpc(...). Note that this call requires a context – mimic what run_hello() does.
If you call rpc_client.slow_rpc(...) correctly. You will get back a Dataset. Start by returning it directly.
Now, run the server in one terminal using cargo run -- grades as in step 0. Then, in a separate terminal, navigate to the client directory and run cargo run --bin main -- grades slow_rpc.
Look at the output: you will see that the entirety of the dataset is printed: the query is not run!
Change the client’s implementation of run_slow_rpc(...) so it computes the query on the dataset it receives from the server using the code you wrote for part1.
Hint: look for compute_query_on_dataset(...).
If your implementation is accurate, the client should print out the correct query output as in the screenshot below.
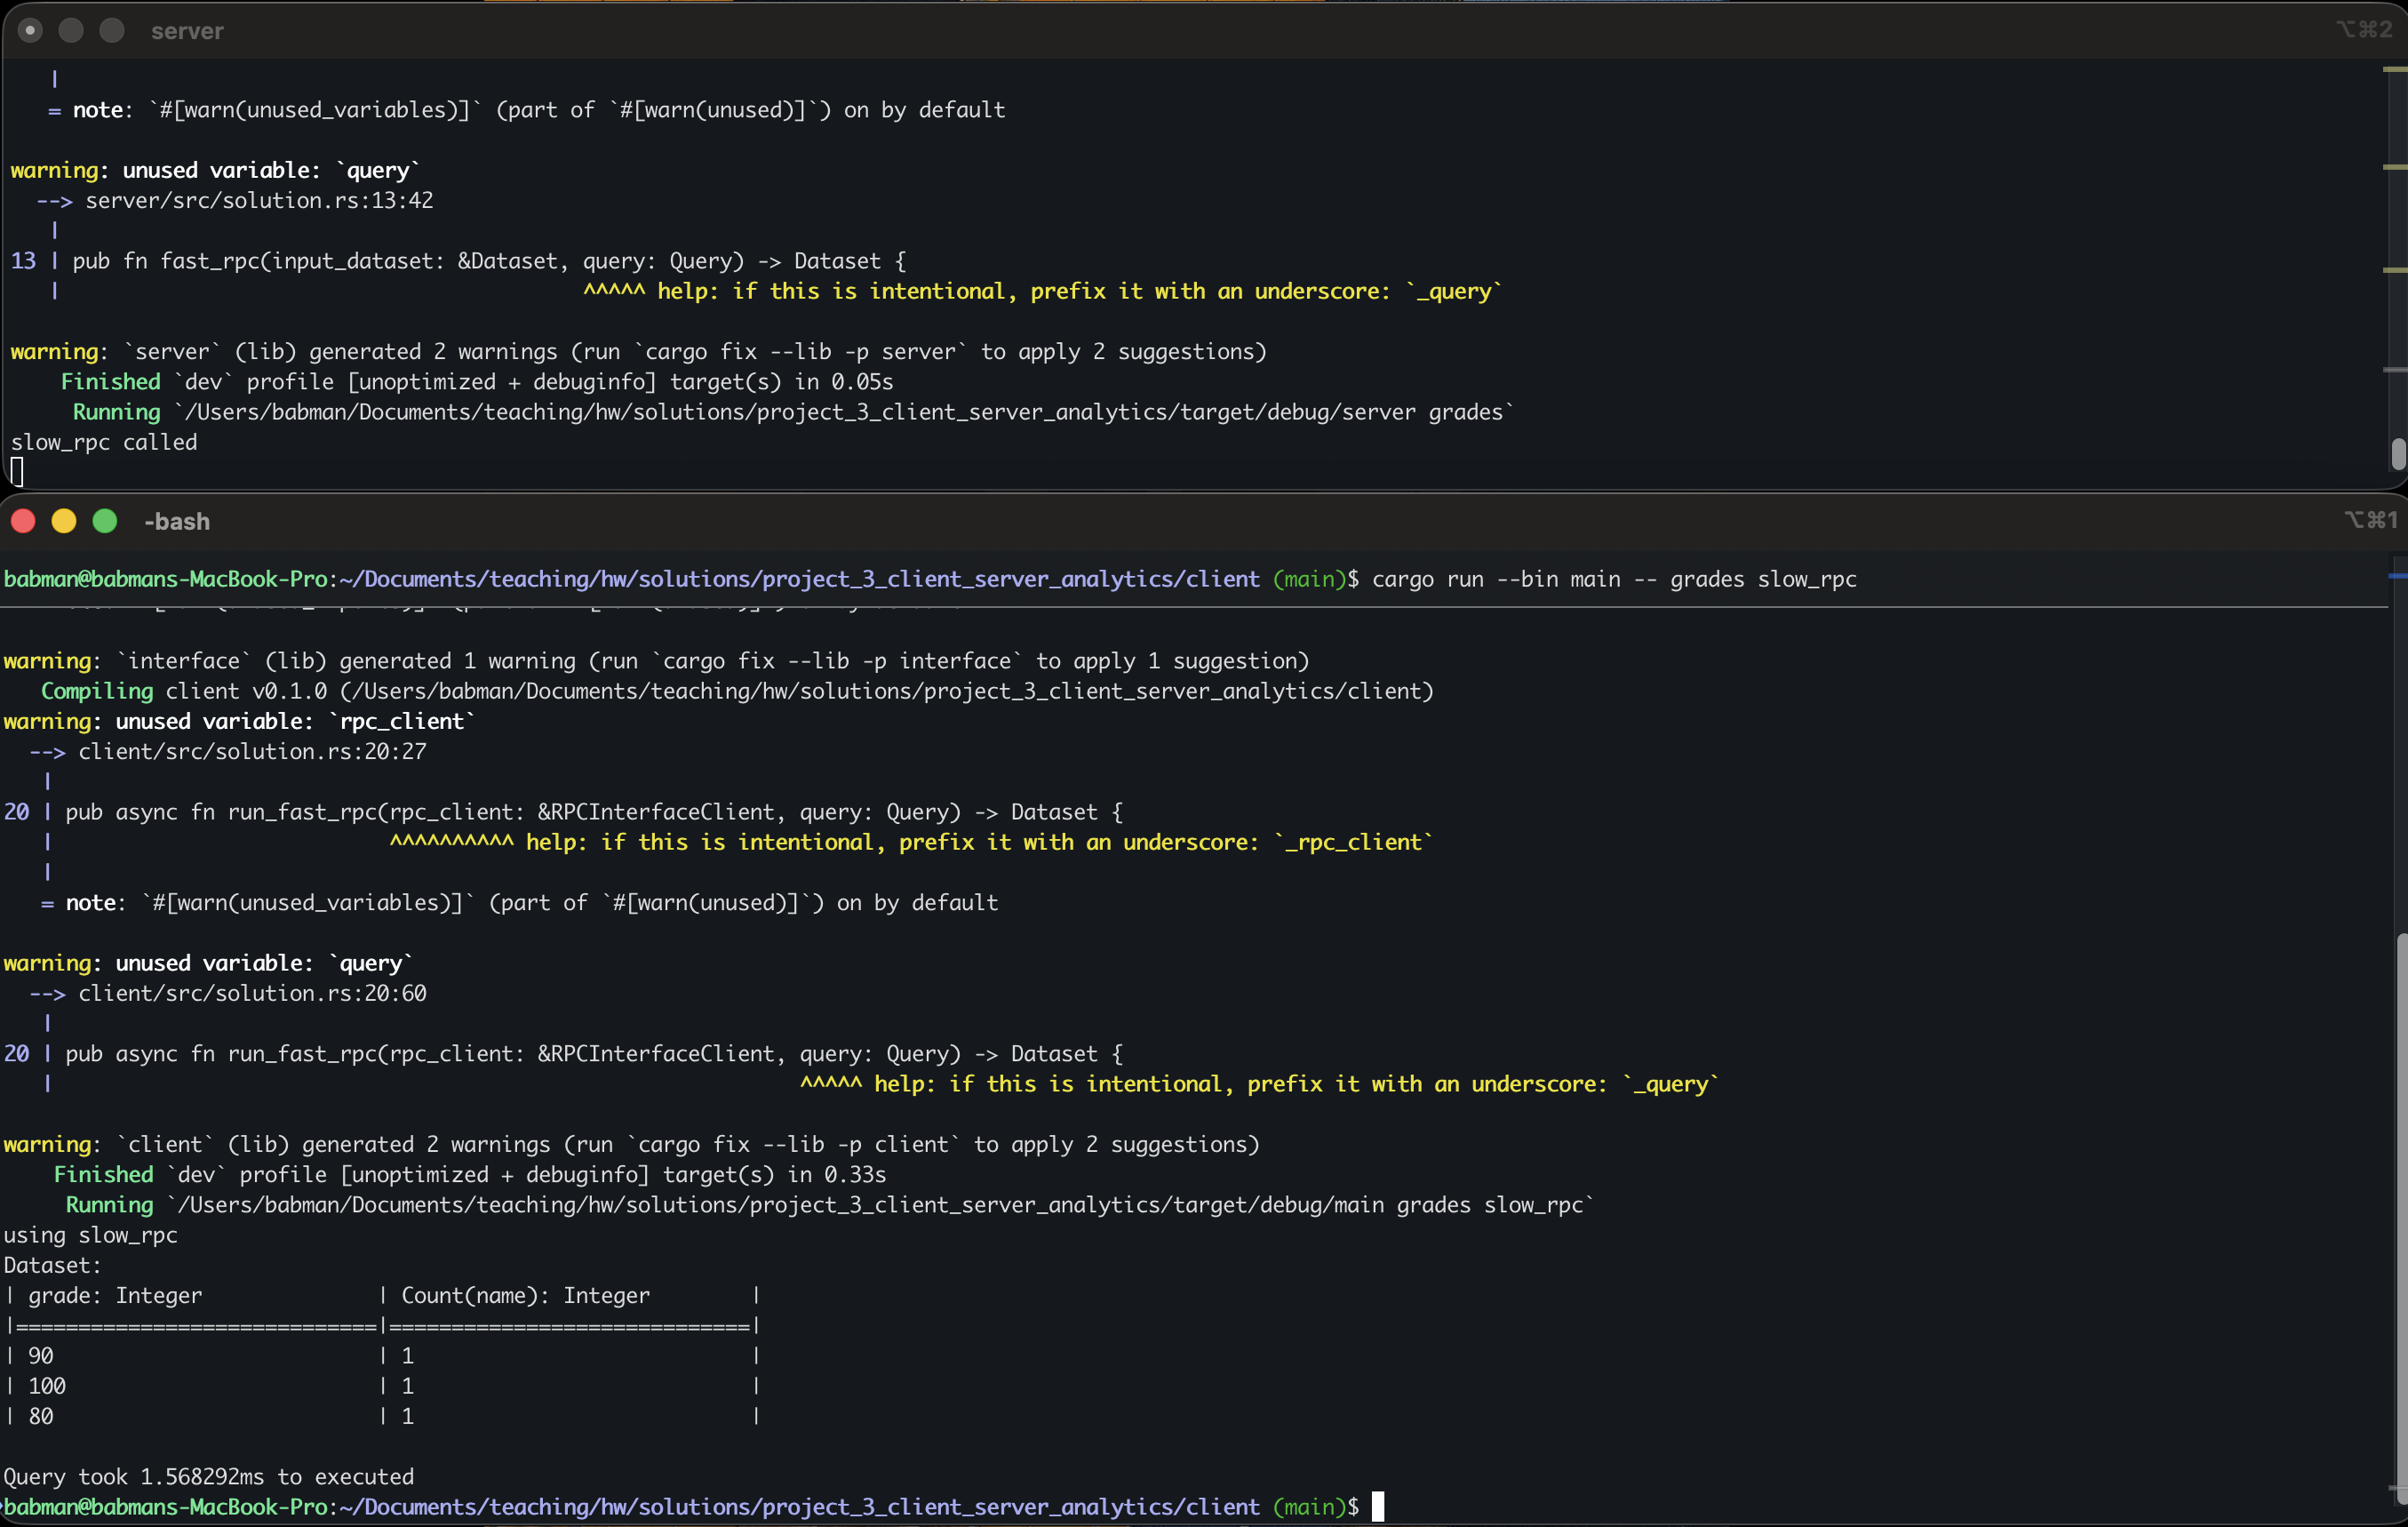
Step 2: fast_rpc
All students should start by uncommenting fast_rpc in interface/src/lib.rs and fixing any trait related problems.
Student 1 should then implement the server side fast_rpc(...) code:
- Uncomment the
fast_rpccode inserver/src/lib.rs - Implement the
fast_rpc(...)function inserver/src/solution.rs
Hint: notice that fast_rpc takes the query as a parameter, so, the query can be computed over the dataset at the server, and the server should only return the final result.
Student 2 should implement the client side run_fast_rpc(...) function in client/src/solution.rs.
Hint: the client does not need to run the query again – the server already computes it and returns its result!
When both students are done with the implementation, they should combine their code and test it by:
- running the server using
cargo run -- gradesin one terminal. - running the client using
cargo run --bin main -- grades fast_rpcin a different terminal.
The final output should be identical to slow_rpc.
Step 3: Experiment!
All students should run the following experiment using the albums dataset.
Run the server in a separate terminal using cargo run -- albums.
Next, run the albums query with the client using slow_rpc. Write down how much time it took.
Finally, run the same query with fast_rpc, and write down how much time it took.
Which one is faster? Why?!
Do the same thing but for grades. Which one is faster? Why?
Step 4: Bonus part.
This is an optional part for bonus credit. You will not receive bonus credit for this part unless you have also completed all the previous steps.
Feel free to complete the bonus part in client/src/bonus.rs for extra credit. You will need to implement parse_query_from_string(...). The stencil gives this code a user provided query as a string, and your code must parse it into a Query object.
Here are some example queries, use these to deduce what the query language looks like.
FILTER section == "A1" GROUP BY grade COUNT name
FILTER (section == "A1" OR section == "B1") GROUP BY section AVERAGE grade
FILTER (!(band == "Meshuggah") AND !(band == "Vildhjarta")) GROUP BY album AVERAGE rating
The first two are for the grades dataset, the last one is for the albums dataset.
You can test your code by first running the server in one terminal for the corresponding dataset. Then, in a different terminal, navigate to the client folder and run cargo run --bin bonus. Then, enter your query to test as a single line and hit enter. If successful, you will see the output, and the client will ask you to enter a new query if you would like. When you are done, type “exit” and hit enter to stop the client (or use ctrl+c).
Submission
Combine all your code and push it to a branch called rpc. Student 1 should submit using Gradescope.
Make sure you add your teammates to your Gradescope submission.
Mini Project 4: Tic Tac Toe!
In this homework, you will:
- Build an agent that plays regular 3x3 Tic Tac Toe.
- Build an agent that plays 5x5 Tic Tac Toe with random walls.
- Improve your agent as much as you can and participate in the class’s Tic Tac Toe tournament!
Code Organization
Synchronize your fork with our course’s repo. You will find the stencil here.
The code has the following directories and layout:
tic_tac_toe_stencilcontains the stencil for the Tic Tac Toe game. The most important file in the stencil (and one you should familiarize yourself with well) is board.rs which contains two type definitions:CellandBoard. You should specifically look at:- The four cases of
Cell:Emptyrepresents an empty cell where players may place an X or O,Wallrepresents a blocked cell where no players can place anything (this is only relevant for part 2), andXandOrepresent a cell where a player has put anxoroalready. board.moves()returns all available moves in that board, i.e., the locations of all empty cells.board.game_over()returns true if the board is complete and false if it is still on going.board.score()returns the score of the given board: 1 indicates thatXhas 3Xs in a row, 0 indicates a draw, and-1indicates thatOhas 3Os in a row.board.apply_move(location, player)applies a move by the given player at the given location. For example,board.apply_move((0, 0), Player::X)puts anXat the top left most corner. Hint: does this function take the board (i.e. self) by copy, move, or ref? What does that mean about the board?board.get_cells()returns all the cells in the board as a 2D vec. E.g.,board.get_cells()[1][1]returns theCellin the middle of the board, which for example you can then analyze using amatchstatement.
- The four cases of
- agents.rs contains a variety of test agents that we provide to you. Take a look at them for inspiration.
tic_tac_toe_3x3contains the stencil and tests for part 1, you should provide your solution intic_tac_toe_3x3/src/solution/agent.rs.tic_tac_toe_5x5contains the stencil and tests for part 2, you should provide your solution intic_tac_toe_3x3/src/solution/agent.rs.
We won’t tell you how to split the work between your teams or how to use git. We will check your git commit history to make sure all members of your team made equal contributions.
Make sure your submission for part 1 is on a branch called tictactoe3. For part 2, your submission should be on a branch called tictactoe5. Your tournament submission should be on a branch called tournament.
Part 1: 3x3 Regular Tic Tac Toe
We will start with the 3x3 classic tic tac toe game.
Execute the following command, which will allow you to test out the stencil and play a game against our random agent (an agent that makes moves randomly).
cd tic_tac_toe_3x3
cargo run --release -- --x manual --o random
This will allow you to play an interactive game of tic tac toe by typing in the cell you would like to make a move in. Play a couple of rounds to refresh your memory of the game and its rules.
You can also play as the O player:
cargo run --release -- --x random --o manual
You can find a listing of all available agents by running:
cargo run --release -- --help
You will notice that one of the available agents is solution. This represents your solution agent. Try running it in a game against the random agent:
cargo run --release -- --x solution --o random
You will notice that the game crashes with an not implemented error. Your task is to implement this agent! Your implementation should go in tic_tac_toe_3x3/src/solution/agent.rs.
(regular) tic tac toe is a solved game, there’s a well known strategy (you can find it online!) that ensures you never lose – you will in the worst case draw regardless of whether you are X or O. However, we do not want you to implement this strategy. This strategy only works for regular tic tac toe. It does not work for other games, including the 5x5 variant of tic tac toe you will work on in part 2.
Instead, we want you to implement a general solution/strategy which you will be able to reuse with some tweaks for part 2. This strategy is based on the min-max algorithm – a general algorithm that can play any two player game optimally, provided the state of the game is public (no fog of ware)!
Min Max
Min Max explores all the possible moves that each players can make.
This exploration takes the form of a tree. The starting root of the tree is the current state of the board. Min max finds the next level of possibilities in the tree by applying each possible move to the root independently. It then repeats this process for every new board, until no more moves are available.
When the algorithm reaches a terminal game state (i.e. a board with no more moves or a board with 3 consecutive Xs or Os), it assigns a score to the board based on who won. In this implementation, we assign a score of 1 when X wins, -1 when O wins, and 0 for draw.
The algorithm then propagates the score back up the tree all the way to the root. When the algorithm is going up moves made by player X, it selects the move that yields the maximum score, when the move is made by player O, it selects the move with the minimum score.
For more exploration of the algorithm, as well as implementations of it in other languages, check these resources out:
- https://www.geeksforgeeks.org/minimax-algorithm-in-game-theory-set-1-introduction/
- https://www.youtube.com/watch?v=5y2a0Zhgq0U
Feel free to follow this high-level implementation plan:
- Check whether the game is over by calling
board.game_over(), if it is, return the score and zero move. - If the game is not over, get all the possible/available moves using
board.moves(). - Apply each move to the board, then recursively call the solution function on that modified board, this will give you the score associated with that move. Find the move with the score that is best for the current player.
- Hint: when you apply the move to the board, you will change the board, consider cloning it to keep the original board in case you need it later.
- Hint: when you recursively call the solution function, think about whose turn it is then.
- Hint: your agent has a time limit. This limit is generous for 3x3 tic tac toe. However, consider optimizing your code a little – see if you can find a way to get rid of needless clones.
Testing Your Solution
Play a couple of rounds against your agent. Importantly, you must never be able to defeat it. If you did, then the agent has a bug that you need to fix.
cd tic_tac_toe_3x3
# Your solution is X, you are O
cargo run --release -- --x solution --o manual
# Your solution is O, you are X
cargo run --release -- --x manual --o solution
After that, consider testing your agent using the provided tests. Start by testing it against the first move agent:
cd tic_tac_toe_3x3
cargo test --release --test first
The tests will sometimes run your solution as player X and sometimes as player O. A common bug students face is that they write their solution assuming they are player X (thus, always trying to maximize the score). Remember to look at the player argument the stencil provides to your solution to decide whether to maximize or minimize in order to avoid this bug.
A correct solution should pass all these tests. If it does not, the error message will show you the game history including every move your agent took. Look at it and see if you can use that information to detect and fix bugs in your solution.
You should also test your agent against the remaining tests we provide:
cd tic_tac_toe_3x3
cargo test --release
To get full credit for this part, you solution must pass all the tests. Additionally, it must never lose to our super secret and all powerful testing agent which we have not provided to you. (The super secret agent itself also uses min max!)
Part 2: 5x5 Tic Tac Toe with Random Walls
For this part, you will work on https://github.com/rust4ds/ds210-sp26-a1-code/tree/main/project_4_tic_tac_toe/tic_tac_toe_5x5, which is the stencil for a variant of 5x5 tic tac toe game with random walls.
The purpose of the game is to get more consecutive sequences X’s or O’s than your opponent. Each 3 consecutive X’s increase the X player score by 1, and similarly for the O player. The player with the higher score wins. The sequence can be over a row, column, or diagonal.
As in the previous part, we will not tell you how to split the work between the team members, but we will check your commit history and we expect all team members to contribute equally.
Step 0 - Getting Started
We expect your solution to be on a branch called tictactoe5. It is a good idea to branch of your part 1 branch (tictactoe3) so that you
can build on top of your part 1 solution without modifying your part 1 submission.
After you branch out, you should also synchronize and merge with the main branch of our repo to have out latest changes.
Now, start by observing how this new game variant works.
First, run two random agents against each other:
cd tic_tac_toe_5x5
cargo run --release -- --x random --o random --layout 5
Observe the following:
- The game is not over when you get 3 Xs (or Os) in a row. Instead, it continue until all cells are occupied.
- The player with the most number of 3 symbols in a row wins.
- Having 4 consecutive Xs (e.g., in a row, for example, X X X X W) increases the score by 2 (one for each of X X X X W and X X X X W).
Second, play a few games against the random agent.
cargo run --release -- --x manual --o random --layout 5
When you find yourself consistently winning, try a few games against our test agent!
cargo run --release -- --x manual --o test --layout 5
In general, you can run the stencil code with different agents and for different board layouts!
cargo run --release -- --x <agent> --o <agent> --layout <layout>
agent can be any of first, random, test, manual, and solution.
layout can either be 3x3, or a number between 0 and 10. The first is a premade
layout that is identical to a regular 3x3 tic tac toe. The later correspond to a layout
with as many walls as the provided number, which are randomly placed over the board.
Step 1 - Naive Solution
Start by copying over your 3x3 solution to tic_tac_toe_5x5/src/solution/agent.rs. Your solution should be compatible with 5x5 if you implemented in a general enough way.
If your solution makes any hardcoded uses of the dimensions of the board or its state, you may need to modify that to make it compatible with the 5x5 bigger board.
Your solution should work OK for the 3x3 layout. Try it out.
cargo run --release -- --x solution --o random --layout 3x3
In fact, your solution should pass all of our 3x3 tests!
cargo test --release --test threebythree
What about other layouts? We can try:
cargo test --release
Depending on how fast your computer is, you may see one of these outcomes:
- You have a fast computer and all tests pass.
- Your computer is on the slow side, and some tests do not pass because your agent exceeds the time limit.
Notice that we run these tests in release mode, where the Rust compiler optimizes the program as much as possible. However, our tests and tournament will run your program without release mode –
because we want you to get experience manually optimizing your program both in terms of implementation and algorithms!
To mimic our test and tournament setup, run the tests without --release!
cargo test ---test threebythree
cargo test
For most of you, the naive 3x3 solution should pass the threebythree tests but time out and forfeit on the remaining tests. We will need to optimize the solution in the next steps to make it work!
Important: Calibrating the time limit on your computer
If your naive solution passes the threebythree tests without --release and without needing to adjust anything in the code, you can skip over to the next step.
For folks with slow computers: your solution may not even pass threebythree, in which case, you should increase the time limit. By default, this limit is set to 2 seconds (2000 milliseconds).
Try increasing it to 3, 4, 5, … You can increase the time limit by changing line 6 in tic_tac_toe_5x5/tests/threebythree.rs. Choose the smallest number that allows your tests to pass.
After you find the time limit that is appropriate to your computer, make sure you update the time limit consistently in all the other test files under tic_tac_toe_5x5/tests/ and in tic_tac_toe_5x5/src/main.rs.
About the tests and tournament setup: we have dedicated a fast machine to run your code for the tests and tournament, which will give you a little wiggle room. Your machine may be slower, the above approach to increasing the time limit acts as a calibration. As long as your submission passes all the tests within the calibrated time limit, you will be good to go for our tests and tournament.
Step 2 - Limit Exploration Depth and Implement a Heuristic
Modify your implementation to only explore possibilities up to a fixed depth. Try to set the depth to be the biggest possible value with which your implementation still succeeds within the time limit. Depending on how optimized your code is (e.g., whether it clones the board or is clone free), this depth limit will likely be somewhere between 3 and 6. Exploring 4 levels deep (i.e. two moves by X and two moves by O) within the time limit should be sufficient to pass the tests, but you may want to optimize your code so you can explore more levels/depth for the tournament.
You can find an example of depth-limiting your min-max algorithm in different languages here.
Specifically, note how the minimax helper function in any of the languages in that link takes a current depth and a target or maximum depth as parameters, and it compares whether the target
depth was reached before doing any minimizing or maximizing.
Hint: you should create a new helper function that tracks the depth in a similar way, and when the maximum target depth is reached, it should stop exploring deeper moves, and instead rely on a heuristic function (see below) to assign a predicted score for the board and return it.
Heuristic function: After exhausting the maximum depth or number of levels, your modified implementation needs to assign the board an approximate score, even when it is not game over. To do that we use a heuristic function (sometimes called an evaluation function).
Add a heuristic function to tic_tac_toe_5x5/src/solution/agent.rs to assign scores to incomplete boards.
Hint 1: The heuristic function signature should be fn heruistic(board: &Board) -> i32.
Hint 2: board.score() is a good starting heuristic. This will not tell you exactly what the final score of following this path will be, but it tells you whether the current state favors one player more than the other.
Try to understand what that function does. This should get you to pass most, if not all, of our tests.
You should test your modified agent on the full board, not the 3x3 layout. You can do that using this command:
cargo run -- --x solution --o first --layout 5
cargo test
Step 3 - Make your Heuristic more Intelligent
Play the game a few times and try to develop a strategy for how to evaluate the potential on the board, beyond just the current score. For example, having 2 consecutive symbols in a row may be more valuable than having none.
You can also consider whether the symbols are placed near empty cells (giving the player a chance to expand) vs near occupied cells (walls or other player cells) or near the edge of the board!
Code your heuristic up and ensure it passes all the provided tests. Your agent plus intelligent heuristic should perform better than the version of the agent that uses the board score as a heuristic. In fact, we will tests your agent against that solution and we expect you to consistently beat it to receive full grade.
You can test this by playing against the agent. You can also modify files under tic_tac_toe_5x5/src/ (e.g., main.rs, args.rs) so that it can run different versions of your solution against each other (e.g., consider saving old versions using a new file/new struct with a different name).
Ensure that you’re agent is functional when it’s used for the O player as well. The provided tests contains cases that test this, but test it manually as well just to be sure. We will play your agent as player X and player O during the tournament (more on this later).
Submission
When you are happy with your solution, make sure you have pushed it to a branch called tictactoe5 and submit via Gradescope.
You will also need to submit a team name that you will use for our tournament. The team name must start with a letter, and can only contain English letters, digits, and underscores – no spaces, no special symbols.
If you want to also use your part 2 submission for the first run of our tournament, branch off to a new branch called tournament and push your code there.
For full grade for part 2 your solution needs to pass all the tests without --release within the time limit on our auto grader machine. It will also need to consistently beat our naive solution (that matches step 2 above).
Part 3: Tournament
After part 2 is due, we will run a tournament daily at mid night where we play all your solutions against each other. The team with most wins will lead the board, and we will break ties separately.
You will be able to check the scores online – we will post the link to Piazza.
You can look at the results and games your agent performed and use that info to improve your agent. You can submit your improvements to the next tournament by pushing your code to a branch called tournament.
We will continue to run the tournament daily until May 1st, pulling in your most recent code from GitHub automatically. Our last run will be on 11:59 PM on May 1st. The results from that tournament will be our final standings! This is not cumulative – the standings reset between each run. So the team with the best agent at the end wins!
The tournament will also contain two agents created by the professor. One is a medium-difficulty and the second is an intelligent agent that the professor spent around half a day designing.
For full grade for the tournament your solution to rank higher than the medium professor agent.
Bonus Credit: All teams that additionally beat the harder professor agent will receive a 10% bonus for this project. Furthermore, the top three teams will receive an additional 5%, 10%, and 15% (for a total of 25%) provided they also beat the hard professor agent.
How to improve your solutions
There is almost an unlimited number of ways you can improve your solutions. Be creative. Here are some ideas:
- Make your heuristic smarter:
- Encode a smarter strategy for evaluating how good a board is.
- Consider using different heuristic functions for different stages of the game (e.g., in the beginning vs the end game!).
- If you are really ambitious, you could even generate and save many (thousands) of games by running your naive agents against each other, and use machine learning to learn a better heuristic. Try this at your own risk.
- Optimize your code to explore more depth within the time limit:
- Avoid clones and recomputing vectors or heuristics if you can.
- Consider implementing alpha beta pruning.
- Your agent receives the time limit as a parameter, consider exploring as deep as possible until the time limit is dangerously close, and returning the best move you found.
- Similarly, consider the effects of the game state on the maximum depth you can support.
- Redesign your solution so it does not use recursion: plain iteration is faster than recursion. Consider using a queue to perform a breadth first search traversal.
- Consider using parallelism or multi-threading to explore the search space quicker.