Overview
This course builds on DS110 (Python for Data Science) by expanding on programming language, systems, and algorithmic concepts introduced in the prior course. The course begins by introducing shell commands, using command windows and git version control. These are practical skills that are essential a practicing data scientist.
You will then explore the different types of programming languages and be introduced to important systems level concepts such as computer architecture, compilers and file systems. It is vital to conceptualize how programs work at the machine level.
The bulk of the course is spent learning Rust, a modern, high-performance and more secure programming language. Rust is a systems programming language that is designed to be safe, fast, and memory efficient. It is a great language to learn because it is a low-level language that is still easy to read and write. More and more performant data science libraries and tools are written in Rust for these reasons.
You will be expected to read relevant parts of the Rust Language Book before each lecture, where we will then present the material in more depth. You will then have the opportunity to practice what you just learned with in-class activities. There will be approximately seven homeworks, two midterms, and a final exam.
Learning any new programming language is significant time and effort investment and it is vital to continually practice what you learn throughout the entire semester.
Prerequisites: CDS 110 or equivalent
B1 Course Staff
Section B1 Instructor: Thomas Gardos
Email: tgardos@bu.edu
Office hours: 2-3pm Tuesdays and Thursdays @ CCDS 1623, and by appointment.
If you want to meet but cannot make office hours, send a private note on Piazza with at least 2 suggestions for times that you are available, and we will find a time to meet.
B1 TAs
See Piazza resource page for office hours and contact information.
- Gabriel Maayan
- Zachary Gentile
B1 CAs
See Piazza resource page for office hours and contact information.
- Emir Tali
- Matthew Morris
- Kesar Narayan
- Lingjie Su
Lectures and Discussions
B1 Lecture: Tuesdays, Thursdays 11:00am-12:15pm (SHA 110)
Section B Discussions (Fridays, 50 min):
- B2: Fri 12:20pm – 1:10pm, IEC B10 (888 Commonwealth Ave.)
- B3: Tue 1:25pm – 2:15pm, CGS 313 (871 Commonwealth Ave.)
- B4: Tue 2:30pm – 3:20pm, CDS 164 (665 Commonwealth Ave.)
- B5: Tue 3:35pm – 4:25pm, CDS 164 (665 Commonwealth Ave.)
Note: There are two sections of this course, they cover similar material
but the discussion sections and grading portals are different. These are not interchangeable, you must attend the lecture and discussion sessions for your section!
Course Websites
Links shared via email.
-
Piazza
- Lecture Recordings
- Announcements and additional information
- Questions and discussions
-
Course Notes:
- Syllabus (this document)
- Interactive lecture notes
-
Gradescope
- Homework, project, project proposal submissions
- Gradebook
-
GitHub Classroom: URL TBD
Course Content Overview
For a complete list of modules and topics that will be kept up-to-date as we go through the term, see B1 Lecture Schedule (TTH).
Course Format
Lectures will involve extensive hands-on practice. Each class includes:
- Interactive presentations of new concepts
- Small-group exercises and problem-solving activities
- Discussion and Q&A
Because of this active format, regular attendance and participation is important and counts for a significant portion of your grade (15%).
Discussions will review lecture material, provide homework support, and will adapt over the semester to the needs of the class. We will not take attendance but our TAs make this a great resource!
Pre-work will be assigned before most lectures to prepare you for in-class activities. These typically include readings plus a short ungraded quiz. We will also periodically ask for feedback and reflections on the course between lectures.
Homeworks will be assigned roughly weekly at first, and there will be longer two-week assignments later, reflecting the growing complexity of the material.
Exams Two midterms and a cumulative final exam covering theory and short hand-coding problems (which we will practice in class!)
The course emphasizes learning through practice, with opportunities for corrections and growth after receiving feedback on assignments and exams.
Course Policies
Grading Calculations
Your grade will be determined as:
- 15% homeworks (~9 assignments)
- 20% midterm 1
- 20% midterm 2
- 25% final exam
- 15% in-class activities and attendance polls
- 5% pre-work and surveys
We will use the standard map from numeric grades to letter grades
(>=93 is A, >=90 is A-, etc).
For the midterm and final, we may add a fixed number of "free" points to
everyone uniformly to effectively curve the exam at our discretion - this will
never result in a lower grade for anyone.
We will use gradescope to track grades over the course of the semester, which you can verify at any time and use to compute your current grade in the course for yourself.
Homeworks
Homework assignments will be submitted by uploading them to GitHub Classroom. We will use Rust tests and GitHub Actions to automatically test your code. We'll also inspect for evidence of good git version control practices. You will get more instructions on homeworks in class and on Piazza.
You are expected to complete homeworks yourself and not have AI do it for you. Per the AI policy below, you are allowed to use AI to help you understand concepts, debug your code, or generate ideas. You should understand that this may may help or impede your learning depending on how you use it.
If you use AI for an assignment, you must cite what you used and how you used it (for brainstorming, autocomplete, generating comments, fixing specific bugs, etc.). You must understand the solution well enough to explain it during a small group or discussion in class. You should be able to explain your code to a peer in a way that is easy to understand.
Your professor and TAs/CAs are happy to help you write and debug your own code during office hours, but we will not help you understand or debug code that is generated by AI.
For more information see the CDS policy on GenAI.
Exams
The final will be during exam week, date and location TBD. The two midterms will be in class during normal lecture time.
If you have a valid conflict with a test date, you must tell me as soon as you are aware, and with a minimum of one week notice (unless there are extenuating circumstances) so we can arrange a make-up test.
If you need accommodations for exams, schedule them with the Testing Center as soon as exam dates are firm. See below for more about accommodations.
Deadlines and late work
Homeworks will be due on the date specified in gradescope and github classroom.
If your work is up to 48-hours late, you can still qualify for up to 80% credit for the assignment. After 48 hours, late work will not be accepted unless you have made prior arrangements due to extraordinary circumstances.
Because of our autograding system, it is possible to get partial credit for homework submitted on time, and then 80% credit for remaining work submitted up to 48 hours late.
Collaboration
You are free to discuss problems and approaches with other students but must do your own writeup. If a significant portion of your solution is derived from someone else's work (your classmate, a website, a book, etc), you must cite that source in your writeup. You will not be penalized for using outside sources as long as you cite them appropriately.
You must also understand your solution well enough to be able to explain it if asked.
Academic honesty
You must adhere to BU's Academic Conduct Code at all times. Please be sure to read it here. In particular: cheating on an exam, passing off another student's work as your own, or plagiarism of writing or code are grounds for a grade reduction in the course and referral to BU's Academic Conduct Committee. If you have any questions about the policy, please send me a private Piazza note immediately, before taking an action that might be a violation.
AI use policy
You are allowed to use GenAI (e.g., ChatGPT, GitHub Copilot, etc) to help you understand concepts, debug your code, or generate ideas. You should understand that this may may help or impede your learning depending on how you use it.
If you use GenAI for an assignment, you must cite what you used and how you used it (for brainstorming, autocomplete, generating comments, fixing specific bugs, etc.). You must understand the solution well enough to explain it during a small group or discussion in class.
Your professor and TAs/CAs are happy to help you write and debug your own code during office hours, but we will not help you understand or debug code that generated by AI.
For more information see the CDS policy on GenAI.
Attendance and participation
Since a large component of your learning will come from in-class activities and discussions, attendance and participation are essential and account for 15% of your grade.
Attendance will be taken in lecture through Piazza polls which will open at various points during the lecture. Understanding that illness and conflicts arise, up to 4 absences are considered excused and will not affect your attendance grade.
In most lectures, there will be time for small-group exercises. To receive participation credit on these occasions, you must submit a group assignment on Gradescope. These submissions will not be graded for accuracy, just for good-faith effort.
Occasionally, I may ask for volunteers, or I may call randomly upon students or groups to answer questions or present problems during class.
Absences
This course follows BU's policy on religious observance. Otherwise, it is generally expected that students attend lectures and discussion sections. If you cannot attend classes for a while, please let me know as soon as possible. If you miss a lecture, please review the lecture notes and lecture recording. If I cannot teach in person, I will send a Piazza announcement with instructions.
Accommodations
If you need accommodations, let me know as soon as possible. You have the right to have your needs met, and the sooner you let me know, the sooner I can make arrangements to support you.
This course follows all BU policies regarding accommodations for students with documented disabilities. If you are a student with a disability or believe you might have a disability that requires accommodations, please contact the Office for Disability Services (ODS) at (617) 353-3658 or access@bu.edu to coordinate accommodation requests.
If you require accommodations for exams, please schedule that at the BU testing center as soon as the exam date is set.
Re-grading
You have the right to request a re-grade of any homework or test. All regrade requests must be submitted using the Gradescope interface. If you request a re-grade for a portion of an assignment, then we may review the entire assignment, not just the part in question. This may potentially result in a lower grade.
Corrections
You are welcome to submit corrections on midterms. This is an opportunity to take the feedback you have received, reflect on it, and then demonstrate growth.
We will provide solutions as part of the midterm grading process, so simply resubmitting the solution will earn you no credit.
Instead, what we are looking for is a personal reflection written in your own words that addresses the following:
- A clear explanation of the mistake
- What misconception(s) led to it
- An explanation of the correction
- What you now understand that you didn't before
After receiving grades back, you will have one week to submit corrections. You can only submit corrections on a good faith attempt at the initial submission (not to make up for a missed assignment).
Satisfying this criteria completely for any particular problem will earn you back 50% of the points you originally lost (no partial credit).
The Rust Language Book
The primary reference will be the Rust Language Book and these course notes.
T-TH B1 Lecture Schedule
Note: Schedule may updated. Check back regularly.
Note: Homeworks will be distributed via Gradescope and GitHub Classroom. We'll also post notices on Piazza.
Lecture Schedule
| Date | Lecture | Readings/Homework |
|---|---|---|
| Week 1 | --- | --- |
| Jan 20 | Lecture 1: Course Overview, Why Rust | |
| Jan 22 | Lecture 2: Hello Shell | |
| Week 2 | --- | --- |
| Jan 27 | Lecture 3: Hello Git | |
| Jan 29 | Lecture 4: Hello Rust | |
| Week 3 | --- | --- |
| Feb 3 | Lecture 5: Programming Languages, Guessing Game Part 1 | |
| Feb 5 | Lecture 6: Complete Guessing Game Part 1 and start Vars and Types | |
| Week 4 | --- | --- |
| Feb 10 | Lecture 7: Vars and Types, | |
| Feb 12 | Lecture 8: Finish Vars and Types, Cond Expressions | |
| Week 5 | --- | --- |
| Feb 17 | No Class -- Monday Schedule | |
| Feb 19 | Lecture 9: Finish Functions, Loops Arrays | |
| Week 6 | --- | --- |
| Feb 24 | ❄️☃️ No Class -- Snow Day ☃️❄️ | |
| Feb 26 | Lecture 10: Tuples, Enum and Match | |
| Week 7 | --- | --- |
| Mar 3 | Lecture 11: Midterm 1 Review | |
| Mar 5 | 🧐📚 Midterm 1 📚🧐 | |
| 🏖️🏄🌴 | Spring Break | 🏖️🏄🌴 |
| Mar 7-15 | No Classes | |
| Week 8 | --- | --- |
| 🍀Mar 17🍀 | Lecture 12: Ownership and Borrowing, Strings and Vecs | |
| Mar 19 | Lecture 13: Slices, Structs, Method Syntax, Methods Revisited | |
| Week 9 | --- | --- |
| Mar 24 | Lecture 14: Generics, Option and Result | |
| Mar 26 | Lecture 15: Closures, Iterators | |
| Week 10 | --- | --- |
| Mar 31 | Lecture 16: Iters Closures,Modules | |
| Apr 2 | Lecture 17: Modules, Crates, Rust Projects, Tests | |
| Week 11 | --- | --- |
| Apr 7 | Lecture 19 -- Midterm 2 Review | |
| Apr 9 | 🧐📚 Midterm 2 📚🧐 | |
| Week 12 | --- | --- |
| Apr 14 | Lecture 18: Custom Traits, Lifetimes | |
| Apr 16 | Lecture 20: Complexity Analysis, Hash Maps (only) | |
| Week 13 | --- | --- |
| Apr 21 | Lecture 21: Hashing Functions, Hash Sets | |
| Apr 23 | Lecture 22: linked lists, Stacks, Queues, Entry API and Collections Deep Dive | |
| Week 14 | --- | --- |
| Apr 28 | Lecture 23: Entry API and Collections Deep Dive Continued | |
| Apr 30 | Final Review -- 🎉 Last Day of Classes 🎉 | |
| Week 15 | --- | --- |
| May 5 (Tuesday) | 🧐📚 Final Exam 📚🧐 12:00 pm - 2:00 pm SHA 110 |
Knowledge Checks
This page covers the material up to Midterm 1.
The intent of this page is to give you progressively more difficult challenges that you should master as the course progresses. You should attempt these with no notes, references or AI assistance, as you won't have those on the quizzes.
Don't move to the next challenge in each section until you have mastered the previous one.
If a section is marked with a prerequisite section, completed that first!
Knowledge checks are updated to cover up to Midterm 1.
Shell Commands
Prerequisite: None
In zsh or bash shell...
How do you print the current working directory in bash or zsh?
How do you switch into a different directory?
How do you list contents of a directory?
How do you list detailed contents of a directory, including file permissions?
What do the first 10 letters represent in the detailed file listings?
drwxr-xr-x@ 33 tgardos  staff   1056 Feb  3 09:49 book
-rw-r--r--@  1 tgardos  staff   1438 Jan 21 14:59 book.toml
What does tgardos and staff represent in the detailed file listings?
drwxr-xr-x@ 33 tgardos  staff   1056 Feb  3 09:49 book
-rw-r--r--@  1 tgardos  staff   1438 Jan 21 14:59 book.toml
How do you list hidden files and directories in a directory?
What naming convention renders a file hidden?
What do the special characters . and .. represent in file paths?
How do you recall previous commands at the command line?
Hint: You can see previous commands with one keypress.
How do you list the most recently used commands?
Hint: This will print out a list of the most recent commands you issued.
Git Commands
Prerequisite: Shell Commands
How do you clone a repository?
After you clone a repo, are you in the local repo or do you have to switch to it?
How do you list the branches in a repository?
How do you switch to a different branch?
How do you create a new branch?
How do you check whether you have modified or untracked files in a git repository?
How do you stage changes in your repository?
Hint: You are adding them to the staging area.
How do you commit changes to your repository along with a commit message in one step?
How do you merge a branch into the main branch?
How do you push changes to a remote repository?
How do you pull changes from a remote repository?
Working with a remote repository
What is the sequence of git and shell commands to:
- clone a repository, use the placeholder
<repository_url>, - make a topic branch called
hotfix - edit a file called
main.rs(just use the placeholder<edit main.rs>), - then all the remaining steps to stage the changes, commit the changes, push the changes to GitHub,
- use the placeholder
<create a pull request, approve and merge the pull request>, and - get the changes into the local repository's main branch
- delete the topic branch
Creating and working with a local repository
Show the sequence for:
- creating a directory called
my_rust_project - switch into the directory
- initialize as a git repository
- create a branch called
hotfix - editing a file called
main.rs(just use the placeholder<edit main.rs>) - staging the changes
- commit the changes with a commit message
- switch to the main branch and merge the hotfix branch into it
- deleting the hotfix branch
Rust Command Line Tools
Prerequisite: Shell Commands
How do you create a new Rust project?
How do you build a Rust project?
How do you run a Rust program?
How do you check if your project uses idiomatic Rust?
How do you correct common formatting issues in your Rust project?
Create and run a Rust projec using Cargo commands
Show the command sequence for:
- Creating a new Rust project called
my_rust_project - Switch into the project directory
- Build the project (and verify no compiler errors)
- Run the project
Select all statements that are true about Cargo commands:
-
cargo runcompiles and runs your program. -
cargo checkverifies compilation quickly without producing a runnable binary. -
cargo build --releaseplaces optimized output undertarget/release. -
cargo newcan only be used inside an existing Cargo project.
Basic Rust Syntax
Hello World in Rust
From memory, write a main function in Rust that prints "Hey world! I got this!".
Variables and Mutability
Variable Declaration in Rust
From memory, write a main function with variable declarations in Rust that prints the following:
- declares a variable called
nof typei32and assigns it the value5 - declares a variable called
xof typef32and assigns it the value3.14 - declares a variable called
resultof typef64and assigns it the valuen * x - Prints the string "5 * 3.14 = 15.7", and would update correctly for any other values
of
nandx
Create a program that:
- creates a u8 variable n with value 77
- creates an f32 variable x with value 1.25
- prints both numbers
- multiplies them and puts the results in an f64 variable result
- prints the result
Example output:
77
1.25
77 * 1.25 = 96.25
Mutable Variables
Write a main function with a mutable variable declaration in Rust that prints the following:
- declares a mutable variable called
nof typei32and assigns it the value5 - prints the value of
n - increments the value of
nto10 - prints the value of
n
Variable Shadowing and Scopes
From memory, write a main function that initializes a variable y to 42, then start a scope block with a variable y initialized to 3.14 and print that variable, then end the scope block and print y again.
Find the bug and fix it
fn main() {
    let x : i16 = 13;
    let y : i32 = -17;

    // won't work without the conversion
    println!("{}", x * y);
}
Find the bug and fix it
fn main() {
    let x:f32 = 4.0;
    let z:f64 = 1.25;

    println!("{:.1}", x * z);
}
Create a program that:
- Creates an unsigned int x with value 19 and a signed int y with value -5
- Prints both numbers in binary format (use {:08b} for 8-bit display)
- Performs bitwise AND (&) and prints the result in binary
- Performs bitwise OR (|) and prints the result in binary
- Performs bitwise NOT (!) on both numbers and prints the results
Show what the expected output would be as well.
String and string slice
Create a program that:
- Creates a
Strings1with value "Hello, " - Creates a string slice
s2with value "World!" - Creates a String
s3that is the concatenation ofs1ands2 - Prints the value of
s3
Show what the expected output would be as well.
Note: There is actually a subtlety here that we purposely avoided but you can try out yourself by making
s1a string slice and see what happens. It has to to do with ownership and borrowing which we cover later.
Indexing into a string and Chars
Create a program that:
- Creates a string slice
swith value "Hello, World!" - Prints the first character of
s - Prints the last character of
s - Prints the third character of
s
Create a program that:
- Creates an integer variable
xwith value 10 - Creates a boolean variable
is_positivewith valuex > 0 - Prints the value of
is_positive - Creates a boolean variable
is_negativewith valuex < 0 - Prints the value of
is_negative - Creates a boolean variable
is_zerowith valuex == 0 - Prints the value of
is_zero
Conditional Expressions
Predict the exact output of this Rust program.
fn main() {
    let n = 4;
    if n % 2 == 0 {
        println!("even");
    } else {
        println!("odd");
    }
    println!("{}", n + 1);
}
Write a main function that:
- creates a variable
thresholdwith value 5 - creates a variable
valinitialized to 10 - then using print statements, if
valis less than threshold, print "val is less than threshold" - otherwise, print "val is greater than or equal to threshold"
- test it again with
val= 3
fn main() {

}
Conditional Expressions with a return value
Challenge: Ticket Pricing Based on Age
Write a program that uses a conditional expression with a Stringreturn value to calculate ticket prices:
- Age < 5: free ("Free")
- Age between 5 and 17: child ticket ($10)
- Age between 18 and 64: adult ticket ($20)
- Age 65 or older: senior ticket ($12)
Print a message indicating the person's age and their ticket price.
fn main() {

}
Functions
Write a function say_hello that takes a name and prints "Hello, {name}!".
Write a function say_hello_format that takes a name and returns a string "Hello, {name}!".
Write a function calculate_area that takes a length and width as f64 and returns the area of a rectangle as f64. Call the function from main and print the result.
Loops and Arrays
Select all statements that are true about loop constructs in Rust:
-
foris commonly used to iterate over collections like arrays. -
whileis useful when iteration depends on a changing condition. -
matchcan replace all loops in Rust. -
loopis an unconditional loop that can be exited withbreak.
Write a main function that prints all the multiples of n for numbers from 1 to m.
You can initialize n to 5 and m to 10.
In a main function, write a for loop to print the numbers from 12 to 0, skipped by 3.
Finding prime numbers
Write a main function that takes a starting and ending number and prints all the prime numbers in the range inclusive of starting and ending range.
Hint: This is a an example of a short algorithm. Recall a number is prime if it is greater than 1 and has no divisors other than 1 and itself. There's no point in checking for divisors greater than the square root of the number because if there is a divisor greater than the square root, then there was also a divisor less than the square root so we would have already determined that the number is not prime. You can calcuate square root of floating point number with the
sqrtmethod of thef64type as inx.sqrt().
Ticket Pricing Based on Age in a Loop
Loop over an array of ages and print the ticket price for each age
Write a program that uses a loop to calculate the ticket price for each age in the array [3, 10, 30, 70]:
- Age < 5: free ("Free")
- Age between 5 and 17: child ticket ($10)
- Age between 18 and 64: adult ticket ($20)
- Age 65 or older: senior ticket ($12)
Print a message indicating the person's age and their ticket price.
While Loop
Write a main loop that initializes a variable num to 10 and decrements it by 1 until it reaches 0. Print the value of num in each iteration.
Predict the exact output of this Rust program.
fn main() {
let mut x = 1;
let result = loop {
    if x % 3 == 0 {
        x = x+1;
        continue;
    }
    println!("X is {}", x);
    x = x + 1;
    if x==9 {
        break x*2;
    }
};

println!("Result is {}", result);
}
Predict the exact output of this Rust program.
    fn main() {
    let mut x = 1;
    'outer_loop: loop {
        'inner_loop: loop {
            x = x + 1;
            if x % 5 != 0 {
                continue 'outer_loop;
            }
            if x > 15 {
                break 'outer_loop;
            }
        }
    };
    println!("Managed to escape! :-) with x {}", x);
}
Predict the exact output of this Rust program.
fn main() {
    let mut x = 1;
    'outer_loop: loop {
        println!("Hi outer loop");
        'inner_loop: loop {
            println!("Hi inner loop");
            x = x + 1;
            if x % 2 != 0 {
                break 'inner_loop;
            }
            println!("In the middle");
            if x >= 4 {
                break 'outer_loop;
            }
            println!("X is {}", x);
        }
        println!("In the end");
    };
    println!("Managed to escape! :-) with x {}", x);
}
Tuples
Tuples
In a main function, create a tuple with the values 1, 2, and 3 and debug print it as a single entity. Show what the expected output would be as well.
Accessing Tuple Elements
Create a tuple with the values 1, 2, and 3 and access the second element.
For let tuple = (10, 20, 30);, the first element is accessed as tuple.___ and
the third element is accessed as tuple.___.
Returning a Tuple from a Function
Write a function find_min_max_average that takes and array of 5 i32 values
and returns a tuple of (min, max, average) of the values as datatype (i32, i32, f64).
Hint: take note that you are producing a floating point average from an integer sum and length, so think about what you have to do there.
Write a main function that tests the function by initializing and array to be
[37, 42, 56, 12, 9], passing it to the function and then printing the results,
without debug printing -- either destructuring the tuple or indexing into the
tuple.
Enums and Match
Basic Enum and Exhaustive Match
Define an enum Direction with variants North, East, South, and West.
Write a function abbrev(dir: Direction) -> &'static str that uses match to return:
"N"forNorth"E"forEast"S"forSouth"W"forWest
Don't worry about the
'staticlabel for now. Just know that this function will return a static string slice.
Write a main function that calls abbrev with Direction::East and prints the result.
Match with Wildcard Arm
Define an enum Status with variants Pending, InProgress, Completed, and Failed.
Write a function is_finished(status: Status) -> bool using match such that:
Completedreturnstrue- all other variants return
false
Write a main function that tests the function with Status::Completed and Status::Pending.
Enum Variant with Data
Define an enum DivisionResult with variants:
Ok(u32, u32)for quotient and remainderDivisionByZero
Write a function divide_with_remainder(x: u32, y: u32) -> DivisionResult.
- If
y == 0, returnDivisionByZero - Otherwise return
Ok(x / y, x % y)
In main, call the function with 10 and 3, then use match to print either:
quotient=<q>, remainder=<r>- or
cannot divide by zero
Struct-Like Enum Variant
Define this enum:
#![allow(unused)]
fn main() {
enum Message {
    Quit,
    Move { x: i32, y: i32 },
    Write(String),
}
}
The main difference between this enum and the previous one is that this one has a variant with a struct-like data type, in this case Move { x: i32, y: i32 }
with the curly braces. It works like the previous enum variant with a tuple,
but now we can give each field a name. You would initialize it like let msg = Message::Move { x: 4, y: -2 };.
Write a function describe(msg: Message) that uses match to print:
QuitMove to (x, y)forMove { x, y }Write: <text>forWrite(text)
In main, call describe with Message::Move { x: 4, y: -2 }.
Single-Branch Matching with if let
Define an enum:
#![allow(unused)]
fn main() {
enum Direction {
    North,
    East,
    South,
    West,
}
}
In main, create let dir = Direction::West; and use if let with an else branch to print:
Going Westwhen the value isWestNot Westotherwise
Select all statements that are true about match in Rust:
-
matchmust be exhaustive over possible cases. -
The wildcard arm (
_) can stand in for any remaining unmatched variants. -
The wildcard arm can only appear as the first arm in a
match. -
If you do not cover all variants (or use
_), the code will fail to compile.
Select all statements that are true about if let:
-
if letis convenient when you only care about one specific pattern. -
if letcan be paired withelsefor a fallback branch. -
if letrequires==for pattern matching comparisons. -
if letcan reduce verbosity compared to a fullmatchwith many ignored arms.
Select all statements that are true about pattern matching syntax in Rust:
-
In
if let, a single=is used with a pattern. -
==tests value equality and is not the pattern-matching operator. -
if let Some(x) == valueis valid Rust pattern matching syntax. -
In a
match, each arm uses a pattern followed by=>.
In a match expression, the wildcard pattern ___ is commonly used as a
catch-all for remaining cases.
In if let pattern matching, Rust uses the ___ operator for matching (not
the equality operator).
Ownership in Rust
Prerequisite: Complete Basic Rust Syntax
System Concepts
Language Properties
Rust language has:
- static data types
- dynamic data types
Python language has:
- static data types
- dynamic data types
Rust language memory management is:
- manual
- garbage collected
- ownership-based
Python language memory management is:
- manual
- garbage collected
- ownership-based
Select all that are true about Rust language:
- it is object-oriented
- is imperative
- is functional
- is declarative/logic
Numeric Representation
Indicate which base the following number systems are in:
The decimal number system is base ________.
The binary number system is base ________.
The octal number system is base ________.
The hexadecimal number system is base ________.
Convert the following numbers to decimal:
The binary number 0b0110_0101 is equivalent to the decimal number ________.
The binary number 0b1000_1010 (as i8) is equivalent to the decimal number ________.
The hexadecimal number 0x1A is equivalent to the decimal number ________.
The octal number 0o15 is equivalent to the decimal number ________.
Knowledge Checks -- Part 2
This page covers the material from Midterm 1 through Midterm 2.
The intent of this page is to give you practice questions like you will see on the midterm. You should attempt these with no notes, references or AI assistance, as you won't have those on the midterm.
Knowledge checks are updated to cover material from Midterm 1 to Midterm 2.
- Ownership and Borrowing
- Strings and Vecs
- Slices
- Structs
- Methods
- Generics
- Option and Result
- Closures
- Iterators
- Iterators and Closures Combined
- Modules and Crates
- Tests
Reference Material (Also Provided in the Midterm)
Do you want to make a case for adding more reference material? Post on Piazza and I'll consider it.
Iterator Methods and Adapters
next(&mut self) -> Option<Self::Item>Get the next element of an iterator (Noneif there isn't one)collect<B>(self) -> B-> Transforms the iterator into a collection of typeBtake(n: usize) -> Take<Self>-> Take first N elements of an iterator and turn them into an iteratorskip(n: usize) -> Skip<Self>-> Skip first N elements of an iterator and turn them into an iteratorcycle() -> Cycle<Self>-> Turn a finite iterator into an infinite one that repeats itselffor_each(|x| ...) -> ()-> Apply a closure to each element in the iteratorfilter(|x| ...) -> Filter<Self, P>-> Create new iterator from old one for elements where closure is truemap(|x| ...) -> Map<Self, F>-> Create new iterator by applying closure to input iteratorany(|x| ...) -> bool-> Returntrueif closure is true for any element of the iteratorfold(init: B, |acc, x| ...) -> B-> Initialize accumulator toinit, execute closure on each elementreduce(|acc, x| ...) -> Option<Self::Item>-> Similar to fold but the initial value is the first elementzip(other_iter) -> Zip<Self, U>-> Zip two iterators together into pairs of(a, b)enumerate() -> Enumerate<Self>-> Create iterator of(index, element)pairspartition(|x| ...) -> (B, B)-> Split iterator into two collections based on predicatesum() -> S-> Sum all elements (works on numeric iterators)count() -> usize-> Count the number of elements in the iteratorcopied() -> Copied<Self>-> Create iterator of owned copies from an iterator of references
String and &str Methods
s.len() -> usize-> Number of bytes in the strings.contains("sub") -> bool->trueif string contains the substrings.to_uppercase() -> String-> Returns a newStringin uppercases.to_lowercase() -> String-> Returns a newStringin lowercases.push('c') -> ()-> Append a single character (mutatesString)s.push_str("text") -> ()-> Append a string slice (mutatesString)s.chars() -> Chars<'_>-> Iterator over the characters of the strings.split_whitespace() -> SplitWhitespace<'_>-> Iterator of substrings split by whitespaces.parse::<T>() -> Result<T, T::Err>-> Parse the string into typeTs.is_empty() -> bool->trueif the string has length 0
Vec Methods
v.push(val) -> ()-> Append element to the endv.pop() -> Option<T>-> Remove and return last elementv.get(i: usize) -> Option<&T>-> Safe bounds-checked accessv.len() -> usize-> Number of elementsv.is_empty() -> bool->trueif the vector has no elementsv.iter() -> Iter<'_, T>-> Iterator of immutable references&Tv.iter_mut() -> IterMut<'_, T>-> Iterator of mutable references&mut Tv.into_iter() -> IntoIter<T>-> Consuming iterator of owned valuesTv.sort_by(|a, b| ...) -> ()-> Sort in place using a comparison closure (closure returnsOrdering)
Option Methods
opt.unwrap() -> T-> Extract the value or panic ifNoneopt.unwrap_or(default: T) -> T-> Extract the value or returndefault(eager)opt.unwrap_or_else(|| ...) -> T-> Extract the value or compute default via closure (lazy)opt.map(|x| ...) -> Option<U>-> Transform the inner value;NonestaysNoneopt.is_some() -> bool->trueifSomeopt.is_none() -> bool->trueifNone
Other Useful Methods
val.clone() -> T-> Create a deep copy of the valuea.cmp(&b) -> std::cmp::Ordering-> Compare two values(x as f64).sqrt() -> f64-> Square root of a floating-point numberformat!("...", args) -> String-> Likeprintln!but returns aStringinstead of printing{:?}-> Debug format specifier (inprintln!/format!){:.2}-> Display with 2 decimal places
Test Assertion Macros
assert!(expr) -> ()-> Pass ifexpristrueassert_eq!(a, b) -> ()-> Pass ifa == b; shows both values on failureassert_ne!(a, b) -> ()-> Pass ifa != b; shows both values on failure- Assert macros can take an optional custom failure message, e.g.,
assert_eq!(a, b, "{} is not equal to {}", a, b).
Ownership and Borrowing
Prerequisite: Complete Part 1
What are the three ownership rules in Rust?
This program has a bug and does not compile. Explain why and how to fix it.
fn main() {
    let s1 = String::from("hello");
    let s2 = s1;
    println!("{}", s1);
}
Select all types that implement the Copy trait (i.e., are copied rather than moved on assignment):
-
A.
i32 -
B.
String -
C.
bool -
D.
f64 -
E.
Vec<i32>
Fix this program so it compiles and prints both strings.
fn main() {
    let s1 = String::from("hello");
    let s2 = s1;
    println!("{} {}", s1, s2);
}
What is the difference between an immutable reference (&T) and a mutable reference (&mut T) in Rust? How many of each can you have at the same time?
This program has a bug and does not compile. Explain why and how to fix it.
fn main() {
    let mut s = String::from("hello");
    let r1 = &s;
    s.push_str(" world");
    println!("{}", r1);
    println!("{}", s);
}
Write a function first_word_len that takes an immutable reference to a string slice and returns the length of the first word (characters before the first space). If there is no space, return the length of the entire string.
Call the function from main with "hello world" and print the result.
This program has a bug and does not compile. Explain why and how to fix it.
fn take_ownership(s: String) {
    println!("{}", s);
}

fn main() {
    let s = String::from("hello");
    take_ownership(s);
    println!("{}", s);
}
Select all statements that are true about Rust's borrowing rules:
- A. You can have multiple immutable references at the same time.
- B. You can have multiple mutable references at the same time.
- C. You can have one mutable reference and one immutable reference at the same time.
-
D. A mutable reference requires the variable itself to be declared
mut.
What is the output of this program?
fn main() {
    let s1 = String::from("hello");
    let s2 = String::from("ds210!");
    {
        let s2 = String::from("world");
        println!("{} {}", s1, s2);
    }
    println!("{} {}", s1, s2);
}
Predict the output of this program.
fn append_suffix(mut s: String, suffix: &str) -> String {
    s.push_str(suffix);
    s
}

fn main() {
    let s1 = String::from("hello");
    let s2 = append_suffix(s1, ", world");
    println!("{}", s2);
}
Predict the output of this program.
fn main() {
    let mut v = vec![1, 2, 3];
    let r1 = &v;
    let r2 = &v;
    println!("{:?} {:?}", r1, r2);
    v.push(4);
    println!("{:?}", v);
}
When a String is assigned to another variable, ownership is ___ . To create a deep copy of a String, you call the ___ method.
Fix this program so it compiles. Do NOT use .clone().
fn print_length(s: String) {
    println!("Length: {}", s.len());
}

fn main() {
    let s = String::from("hello");
    print_length(s);
    println!("{}", s);
}
Strings and Vecs
Prerequisite: Ownership and Borrowing
Create a Vec<i32> containing [1, 2, 3, 4, 5] using the vec! macro. Then push the value 6 onto it. Print the vector using debug formatting.
What is the difference between v[2] and v.get(2) when accessing elements of a Vec?
This program has a bug and does not compile. Explain why and how to fix it.
fn main() {
    let mut v = vec![1, 2, 3];
    let first = &v[0];
    v.push(4);
    println!("{}", first);
}
Write a function sum_vec that takes an immutable reference to a Vec<i32> and returns the sum of all elements as i32.
Call it from main with vec![10, 20, 30] and print the result.
What is the difference between String and &str in Rust?
Select all statements that are true about stack and heap memory:
- A. Values with a known, fixed size at compile time are stored on the stack.
-
B.
Stringdata is stored entirely on the stack. -
C.
Vec<T>stores its elements on the heap. - D. Stack allocation is generally faster than heap allocation.
-
E. An
i32variable is stored on the heap.
What is the output of this program?
fn main() {
    let mut v = vec![10, 20, 30];
    let last = v.pop();
    println!("{:?}", last);
    println!("{:?}", v);
}
What is the output of this program?
fn main() {
    let v = vec![10, 20, 30];
    println!("{:?}", v.get(1));
    println!("{:?}", v.get(5));
}
Write a program that creates a Vec<i32> with values [1, 2, 3, 4, 5], doubles every element in place, and prints the result.
Create a String with value "Hello, World!". Use string methods to:
- Print its length
- Check if it contains
"World" - Convert it to uppercase and print the result
What is the difference between Vec::new() and Vec::with_capacity(10)? Why would you prefer one over the other?
Slices
Prerequisite: Ownership and Borrowing
What is a slice in Rust, and how does it differ from owning the data?
Initialize an array to be [10, 20, 30, 40, 50]. Create a slice containing elements [20, 30, 40] and print it with debug formatting.
Given let arr = [1, 2, 3, 4, 5];:
&arr[0..3]gives___.&arr[2..]gives___.&arr[..2]gives___.&arr[..]gives___.
This program has a bug and does not compile. Explain why and how to fix it and what the output would be once fixed.
fn main() {
    let mut arr = [1, 2, 3, 4, 5];
    let slice = &arr[1..3];
    slice[0] = 99;
    println!("{:?}", slice);
}
Write a function double_slice that takes a mutable slice &mut [i32] and doubles every element in it.
Call it from main with [1, 2, 3, 4] and print the array after the call.
Select all statements that are true about string slices (&str):
-
A.
&strcan reference a string literal stored in the program's read-only memory. -
B.
&strcan reference a portion of aStringon the heap. -
C.
&strowns the string data it points to. -
D. A string literal
"hello"has type&str.
Write a function sum_slice(data: &[i32]) -> i32 that returns the sum of all elements in a slice. Test it from main by passing a slice of indices 1, 2 and 3 of an array [10, 20, 30, 40, 50].
Given let s = String::from("Hello, World!");, create a string slice of just "World" and print it. Reminder: for this string, bytes line up with characters.
Given let s = "Hello, 👋👋👋 World!";, create a new String substring that contains only the UTF-8 characters from positions 7 to 15. Print it.
Why is it generally preferred to accept &[T] (a slice) rather than &Vec<T> as a function parameter?
A slice is internally represented as two values: a ___ to the first element and a ___. Unlike a Vec, a slice does not have a capacity field.
Structs
Prerequisite: Ownership and Borrowing
Define a struct Student with fields name (String), age (u32), and gpa (f64). In main, create a Student and print each field.
Define a tuple struct Color with three u8 fields (for red, green, blue). Create an instance initialized to values 128, 111, 154, and print each component.
What is the output of this program?
struct Point {
    x: i32,
    y: i32,
}

fn main() {
    let p = Point { x: 10, y: 20 };
    let Point { x, y } = p;
    println!("x={}, y={}", x, y);
}
Select all statements that are true about structs and tuple structs:
- A. Named struct fields are accessed with dot notation and the field name.
- B. Tuple struct fields are accessed with dot notation and a numeric index.
- C. You can omit fields when creating a named struct instance.
- D. Tuple structs provide type safety over plain tuples with the same field types.
Define an enum Shape with variants:
Circlewith anf64fieldradiusRectanglewith anf64fieldwidthand anf64fieldheight
Write a function area(shape: &Shape) -> f64 that returns the area.
Write a main function that creates a circle with radius 5.0 and rectangle with width 4.0 and height 3.0, and prints the area of each.
Hint: You can access the value of using std::f64::consts::PI.
This program has a bug and does not compile. Explain why and how to fix it.
Hint: Think about ownership rules.
#[derive(Clone)]
struct Book {
    title: String,
    pages: u32,
}

fn main() {
    let b1 = Book { title: String::from("Rust"), pages: 300 };
    let b2 = b1;
    println!("{}", b1.title);
}
Define a struct Temperature with a field celsius: f64. Write a function to_fahrenheit(temp: &Temperature) -> f64 that converts Celsius to Fahrenheit using the formula F = C * 9/5 + 32. Test it in main.
Methods
Prerequisite: Structs
Implement the following code:
- Define a struct
Rectanglewithwidthandheight(bothf64). - Implement a constructor
newthat takeswidthandheightand returns a newRectangle. - Implement a method
areathat returns the area. - Write a
mainthat creates a rectangle, using the constructor method, of width 10.0 and height 5.0 and prints its area.
Explain the difference between &self, &mut self, and self as method parameters.
Define a struct Counter with a field count: i32. Implement three methods:
new-- associated function returning a Counter with count 0increment-- adds 1 to countvalue-- returns the current count (as ani32)
Test it in main by creating a counter, incrementing it three times, and printing the result.
This program has a bug and does not compile. Explain why and how to fix it.
struct Ticket {
    event: String,
}

impl Ticket {
    fn redeem(self) {
        println!("Redeemed: {}", self.event);
    }
}

fn main() {
    let t = Ticket { event: String::from("Concert") };
    t.redeem();
    t.redeem();
}
Select all statements that are true about methods and associated functions:
-
A. Methods take
self,&self, or&mut selfas their first parameter. -
B. You can have associated functions, like constructors, that do not have a
selfparameter. -
C. Methods are called with dot syntax:
instance.method(). -
D. Associated functions of a struct that has not been instantiated are called with dot syntax:
instance.function().
Can you have more than one impl block for the same struct? Why might this be useful?
Define a struct StringBuilder with a field content of type String. Implement methods:
new() -> StringBuilder-- creates an empty builderadd(&mut self, text: &str)-- appends text to contentbuild(&self) -> String-- returns a clone of the content
Use it in main to by creating a builder, adding the strings "Hello, " and "World!" to it, and then building and printing the string.
Define a struct BankAccount with fields owner: String and balance: f64. Implement:
new(owner: &str, initial: f64) -> BankAccountdeposit(&mut self, amount: f64)-- adds amount if positivewithdraw(&mut self, amount: f64) -> bool-- subtracts amount if sufficient funds, returns whether successfuldisplay(&self)-- prints owner and balance
Write a main that creates an account owned by "Alice" with an initial balance of 100.0, deposits 50.0, withdraws 30.0, printes whether the withdrawal was successful, and displays the account information.
Fill in the blanks:
A method that needs to read but not modify the struct takes ___ as its first parameter. A method that needs to modify the struct takes ___.
Generics
Prerequisite: Methods
Write a generic function largest that takes a slice &[T] and returns a reference to the largest element. Use appropriate trait bounds for the operation you expect to perform on the elements.
Test it from main with [3, 7, 2, 9, 4] and ["apple", "banana", "cherry"].
Define a generic struct Pair<T> with two fields first and second of type T. Implement a method new and a method larger that returns a reference to the larger value (require PartialOrd).
What is monomorphization, and why does Rust use it for generics?
Fill in the blanks:
To use > and < operators on a generic type T, you need the trait bound T: ___.
To use println!("{}", value) on a generic type T, you need the trait bound T: ___.
This program has a bug and does not compile. Explain why and how to fix it.
fn print_larger<T>(a: T, b: T) {
    if a > b {
        println!("{}", a);
    } else {
        println!("{}", b);
    }
}

fn main() {
    print_larger(10, 20);
}
Define a generic struct KeyValue<K, V> with fields key: K and value: V. Implement a new method. Create instances with ("age", 25) and ("scores", [90, 85, 92]) in main.
Print the key and value of each instance.
Select all statements that are true about generics in Rust:
- A. Monomorphization means the compiler generates separate code for each concrete type used.
- B. Generics have a runtime performance cost due to dynamic dispatch.
-
C. You can write specialized
implblocks that only apply to specific concrete types. -
D. Multiple trait bounds are combined with
+, e.g.T: Display + PartialOrd.
Option and Result
Prerequisite: Generics
What is Option<T> in Rust and what are its two variants?
Write a function safe_divide(a: f64, b: f64) -> Option<f64> that returns None if b is 0, otherwise returns Some(a / b). In main, call it and use match to print the result or an error message.
What is the output of this program?
fn main() {
    let a: Option<i32> = Some(42);
    let b: Option<i32> = None;

    println!("{}", a.unwrap_or(0));
    println!("{}", b.unwrap_or(0));
}
What is Result<T, E> in Rust and how does it differ from Option<T>?
Write a function parse_age(input: &str) -> Result<u32, String> that parses a string to a u32. Return Err with a message if the string is not a valid number or if the number is greater than 150. Call parse_age from main with the strings "25", "200", and "abc" to print the result.
Hint: Use the parse method as in input.parse::<u32>() which returns a Result<u32, ParseIntError>.
Select all statements that are true about Option and Result:
-
A. Calling
.unwrap()onNonewill cause a panic at runtime. -
B.
.unwrap_or(default)evaluates the default eagerly (even if the value isSome). -
C.
.unwrap_or_else(|| expr)evaluates the closure lazily (only if the value isNone). -
D.
Option<T>andResult<T, E>are special compiler primitives, not regular enums.
In a main function, declare let maybe_name: Option<&str> = Some("Alice"); and then use if let to print the name if it exists, or print "No name" otherwise.
What is the output of this program?
fn main() {
    let some_num: Option<i32> = Some(5);
    let none_num: Option<i32> = None;

    let doubled = some_num.map(|x| x * 2);
    let doubled_none = none_num.map(|x| x * 2);

    println!("{:?}", doubled);
    println!("{:?}", doubled_none);
}
What is the output of this program?
fn main() {
    let results = vec!["42", "not_a_number", "7"];
    for s in results {
        match s.parse::<i32>() {
            Ok(n) => println!("Parsed: {}", n),
            Err(e) => println!("Error: {}", e),
        }
    }
}
Write a function find_first_even(numbers: &[i32]) -> Option<i32> that returns the first even number in a slice, or None if there are no even numbers. Test it with [1, 3, 4, 5, 6] and [1, 3, 5].
Write a function average(numbers: &[f64]) -> Result<f64, String> that returns the average of the slice. Return an Err if the slice is empty. Write main demonstrating both the success and error cases using match.
Closures
Prerequisite: Option and Result
What is a closure in Rust, and how does its syntax differ from a regular function?
What is the output of this program?
fn main() {
    let factor = 3;
    let multiply = |x| x * factor;
    println!("{}", multiply(5));
    println!("{}", multiply(10));
}
This program has a bug and does not compile. Explain why and how to fix it.
fn main() {
    let identity = |x| x;
    let s = identity("hello");
    let n = identity(42);
}
Write a closure that captures a mutable variable count and increments it each time it is called. Call it three times and print the final count.
What is the difference between .unwrap_or(default) and .unwrap_or_else(|| expr) in terms of evaluation?
Select all statements that are true about closures vs regular functions:
- A. Closures can capture variables from their enclosing scope.
- B. Regular functions can capture variables from their enclosing scope.
- C. Closures always require type annotations on their parameters.
- D. Closure parameter/return types are inferred from the first use and then fixed.
Write a function apply_twice that takes an i32 value and a closure that maps i32 -> i32, and returns the result of applying the closure twice. Test it by calling it from main with a closure that doubles a number (e.g., 3 becomes 6), and then calling apply_twice with that closure and the number 3 (so 3 becomes 12).
Hint: Use the Fn trait bound to specify the closure type as in Fn(i32) -> i32.
Create a vector of strings ["banana", "apple", "cherry"] and sort it by string length (shortest first) using a closure with .sort_by. Print the result.
What does the move keyword do when placed before a closure? When is it needed?
Iterators
Prerequisite: Closures
What method does the Iterator trait require you to implement, and what does it return?
What are the outputs of Programs 1 and 2?
Hint: They are not the same.
// Program 1
fn main() {
    let v = vec![1, 2, 3, 4, 5];
    let _mapped = v.iter().map(|x| {
        println!("processing {}", x);
        x * 2
    });
    println!("done");
}
// Program 2
fn main() {
    let v = vec![1, 2, 3, 4, 5];
    let double_v: Vec<_> = v.iter().map(|x| {
        println!("processing {}", x);
        x * 2
    }).collect();
    println!("done");
}
Using iterator methods, take a Vec<i32> of [1, 2, 3, 4, 5, 6, 7, 8, 9, 10], filter to keep only even numbers, square each one, and collect into a Vec<i32>. Print the result.
Select all statements that are true about ranges as iterators:
-
A.
1..5produces values 1, 2, 3, 4. -
B.
1..=5produces values 1, 2, 3, 4, 5. -
C.
1.0..5.0is a valid iterator over floating-point numbers. -
D.
'a'..'z'is a valid range over characters.
Implement a custom iterator Countdown that counts down from a given starting number to 1.
Define the struct and implement the Iterator trait for it. In main, create a Countdown starting from 5 and use a for loop to print each value.
Select all statements that are true about iterator adapters and consumers:
-
A.
.map()and.filter()are adapters that return new iterators. -
B.
.collect()and.fold()are consumers that produce a final value. - C. Adapters execute eagerly as soon as they are called.
-
D. You must consume an iterator (e.g., with
.collect()) for adapters to execute.
What is the output of this program?
fn main() {
    let v = vec![10, 20, 30];
    let mut iter = v.iter();
    println!("{:?}", iter.next());
    println!("{:?}", iter.next());
    println!("{:?}", iter.next());
    println!("{:?}", iter.next());
}
What is the output of this program?
fn main() {
    let first_five: Vec<i32> = (1..).filter(|x| x % 3 == 0).take(5).collect();
    println!("{:?}", first_five);
}
Use .enumerate() to print each element of ["a", "b", "c"] with its index, like:
0: a
1: b
2: c
What is the difference between .iter(), .iter_mut(), and .into_iter() on a Vec<T>?
Use a range and .collect() to create a Vec<u32> containing [1, 2, 3, 4, 5]. Then use .collect() again to create a String from the characters ['H', 'i', '!'].
Iterators and Closures Combined
Prerequisite: Iterators
In a main function, use .fold() to compute the sum of squares of numbers from 1 to 5. Print the result.
What is the difference between .fold() and .reduce() on an iterator?
What is the output of this program?
fn main() {
    let has_negative = [3, -1, 4, 1, 5].iter().any(|x| *x < 0);
    let all_positive = [3, 1, 4, 1, 5].iter().any(|x| *x < 0);
    println!("{}", has_negative);
    println!("{}", all_positive);
}
Given two vectors v1 = vec![1.0, 2.0, 3.0] and v2 = vec![4.0, 5.0, 6.0], use .zip(), .map(), and .sum() to compute their dot product (sum of element-wise products). Print the result.
Write a function is_prime(n: u32) -> bool using the .any() iterator method. A number is prime if it is greater than 1 and no number from 2 to its square root divides it evenly.
Test it in main by printing whether 7, 10, and 13 are prime.
What is the output of this program?
fn main() {
    let result: Vec<String> = (1..=5)
        .filter(|x| x % 2 == 1)
        .map(|x| format!("#{}", x))
        .collect();
    println!("{:?}", result);
}
What is the output of this program?
fn main() {
    let max = vec![3, 7, 2, 9, 4]
        .into_iter()
        .reduce(|a, b| if a > b { a } else { b });
    println!("{:?}", max);

    let empty: Vec<i32> = vec![];
    let result = empty.into_iter().reduce(|a, b| a + b);
    println!("{:?}", result);
}
Use .for_each() to print each number from 1 to 5, each on its own line.
Write a program that takes a string "the quick brown fox jumps over the lazy dog" and uses iterator methods to count the number of words that have more than 3 characters. Print the count.
What is the output of this program?
fn main() {
    let sum: i32 = (1..=10)
        .filter(|x| x % 3 == 0)
        .map(|x| x * x)
        .sum();
    println!("{}", sum);
}
Use .partition() to split the numbers 1 through 10 into two vectors: one with even numbers, one with odd numbers. Print both.
Modules and Crates
Prerequisite: None
In Rust, are items inside a module public or private by default? How do you make an item public?
This program has a bug and does not compile. Explain why and how to fix it.
mod math {
    fn add(a: i32, b: i32) -> i32 {
        a + b
    }
}

fn main() {
    println!("{}", math::add(3, 4));
}
Create a nested module structure: shapes::circle with a public function area(radius: f64) -> f64. Call it from main using the full path and also with a use statement so you can call circle::area(5.0) instead of the full path.
Hint: Use the std::f64::consts::PI constant.
This program has a bug and does not compile. Explain why and how to fix it.
mod account {
    pub struct BankAccount {
        pub owner: String,
        balance: f64,
    }
}

fn main() {
    let acct = account::BankAccount {
        owner: String::from("Alice"),
        balance: 100.0,
    };
}
Select all statements that are true about crates in Rust:
-
A. A binary crate compiles to an executable and has a
main()function. -
B. A library crate compiles to reusable code and does not have a
main()function. -
C. External crates are added as dependencies in
Cargo.toml. - D. A package can contain at most one binary crate.
Fill in the blanks:
To refer to the parent module from within a nested module, use the keyword ___.
To refer to the crate root in an absolute path, use the keyword ___.
Given a module with several public functions, use a single use statement with curly braces to import multiple items. Write a module math with pub fn add, pub fn subtract, and pub fn multiply, then import all three with one use statement and call each function from main.
Predict the output of this program.
fn greet() -> &'static str {
    "hello from root"
}

mod inner {
    pub fn call_parent() -> &'static str {
        super::greet()
    }
    fn greet() -> &'static str {
        "hello from inner"
    }
}

fn main() {
    println!("{}", inner::call_parent());
}
Create a module geometry with a struct Circle where its field radius is private. Provide:
- A public constructor
new(radius: f64) -> Circle - A public method
area(&self) -> f64
Create a main function that creates a Circle with radius 5.0, prints the area.
How do you add an external crate (e.g., rand) as a dependency to your Rust project? Name two ways.
Fill in the blanks:
In semantic versioning (major.minor.patch), a ___ version change indicates new backwards-compatible features. A ___ version change indicates backwards-compatible bug fixes. A ___ version change indicates backwards-incompatible changes.
Predict the output of this program.
fn secret() -> &'static str {
    "found me in root"
}

mod outer {
    mod inner {
        pub fn secret() -> &'static str {
            "found me in inner"
        }
    }

    pub fn reveal() -> &'static str {
        inner::secret()
    }

    fn secret() -> &'static str {
        "found me in outer"
    }
}

fn main() {
    println!("{}", outer::reveal());
}
Tests
Prerequisite: Modules and Crates
What attribute do you place above a function to mark it as a test function in Rust? How do you run tests?
Write a function is_even(n: i32) -> bool and a test module with tests for even and odd numbers using assert! and assert_eq!.
Select all statements that are true about test assertion macros:
-
A.
assert!(expr)passes ifexprevaluates totrue. -
B.
assert_eq!(a, b)passes ifa == b. -
C.
assert_ne!(a, b)passes ifa == b. - D. All assertion macros can take an optional custom failure message.
Write a function clamp(value: i32, min: i32, max: i32) -> i32 that returns:
minifvalue < minmaxifvalue > maxvalueotherwise
Write a comprehensive test module covering normal case, when value is below min or above max and when min equals max.
fn clamp(value: i32, min: i32, max: i32) -> i32 {
    // implement this

}

#[cfg(test)]
mod tests {
    use super::*;

    // test when value is within range

    // test when value is below min

    // test when value is above max

    // test when min equals max

}
What are documentation tests in Rust? How does cargo test handle them?
Select all statements that are true about organizing tests in Rust:
- A. Unit tests typically live in the same file as the code they test.
-
B. The
#[cfg(test)]attribute ensures test code is only compiled duringcargo test. -
C.
use super::*;inside a test module imports all items from the parent module. -
D. Tests must always be in a separate
tests/directory.
Write a function remove_negatives(v: &[i32]) -> Vec<i32> that returns a new vector with only the non-negative numbers. Write at least three tests: empty input, all negative input, and mixed input.
Final Exam Question Bank
This file contains the question bank for the final exam.
There are 5 types of questions, which are worth the following points:
- select all that are true = 2 points
- short answer = 2 points
- predict the output = 3 points
- short coding challenge = 4 points
- long coding challenge = 8 points
Final Exam Format
The final exam will be organized into five parts:
- Part 1: 8 points, 4 questions, 2 points each -- select all that are true
- Part 2: 8 points, 4 questions, 2 points each -- short answer questions
- Part 3: 12 points, 4 questions, 3 points each -- predict the output and explain why
- Part 4: 8 points, 2 questions, 4 points each -- short coding challenges
- Part 5: 16 points, 2 questions, 8 points each -- longer coding challenges
The final exam will be worth 52 points and the questions will be sampled from this question bank.
You'll have 2 hours (120 minutes) to complete the exam.
The exam is closed notes, no electronic devices, but you will be given the following final_exam_reference_material.md at the exam.
Select All That Are True (mcq_multi)
Select all statements that are true about ownership and moves in Rust:
-
A. Assigning a
Stringto another variable moves ownership; the original variable is no longer valid. -
B. Passing a
&String(a shared reference) to a function moves ownership of theStringinto the function. -
C. Assigning an
i32to another variable moves ownership; the original variable is no longer valid. - D. A value is dropped when its owner goes out of scope.
Select all statements that are true about borrowing rules at a single point in a program:
-
A. You can have any number of immutable references (
&T) simultaneously. -
B. You can have one mutable reference (
&mut T) and one immutable reference simultaneously. - C. You can have at most one mutable reference at a time.
-
D. A mutable reference
&mut Tgives you read-only access to the value it points at.
Select all statements that are true about traits in Rust:
- A. A trait defines a set of method signatures (and optionally default implementations) that types can implement.
- B. You can implement a trait you did not define on a type you did not define.
- C. A single type can implement multiple traits.
- D. A trait method can have a default implementation that implementors may override.
Select all statements that are true about #[derive(...)] in Rust:
-
A.
#[derive(Debug)]lets you print a value with{:?}. -
B. To derive
Copy, the type must also derive (or implement)Clone. -
C. You can derive
Copyon a struct that has aStringfield. -
D. To use a struct as a
HashMapkey, the struct typically needs to deriveEqandHash.
Select all statements that are true about lifetimes in Rust:
- A. Lifetimes describe how long references are valid and are checked at compile time.
- B. Lifetime annotations change how long a value lives at runtime.
-
C. A function signature like
fn longest<'a>(x: &'a str, y: &'a str) -> &'a strsays the returned reference is valid for at least as long as both inputs. - D. Every function that takes a reference parameter must include an explicit lifetime annotation written out by the programmer.
Select all statements that are true about generics in Rust:
-
A.
fn largest<T: PartialOrd>(list: &[T]) -> &Tworks for any typeTthat can be ordered. - B. Generics are resolved at runtime through dynamic dispatch by default.
-
C. A trait bound like
T: Clone + Debugmeans thatTmust implement at least one ofCloneorDebug. - D. Generic functions always rely on runtime type information (RTTI) to decide which type-specific code to execute.
Select all statements that are true about iterators in Rust:
-
A. Calling
.map(...)on an iterator does the work immediately. -
B. Iterator adaptors like
filter,map, andtakeare lazy — no work happens until a consuming method runs. -
C.
.collect()is a consuming method that drives the iterator to completion. -
D.
.sum()is a consuming method that returns the total of all elements.
Select all statements that are true about closures in Rust:
- A. A closure can capture variables from its enclosing scope by reference, by mutable reference, or by move.
-
B. The
movekeyword forces the closure to take ownership of captured variables. -
C. A closure and a regular
fnfunction have exactly the same type in Rust. -
D. Closures are commonly passed to iterator methods such as
map,filter, andfold.
Select all statements that are true about Option<T> and Result<T, E>:
-
A.
Option<T>represents a value that may or may not be present. -
B.
Result<T, E>represents either a success value of typeTor an error of typeE. -
C. Calling
.unwrap()onNonereturns the default value of typeTrather than panicking. -
D.
matchcannot be used to destructureOptionorResultvalues.
Select all statements that are true about HashMap<K, V>:
-
A. Keys must implement
EqandHash. - B. Iteration order is guaranteed to match insertion order.
-
C. Average
insert,get, andremoveare O(1). -
D. Calling
inserton an existing key replaces the old value and returnsSome(old_value).
Select all statements that are true about BTreeMap<K, V>:
-
A. Keys must implement
Ord. - B. Iteration visits entries in insertion order.
-
C.
insert,get, andremoveare O(1) average-case, just likeHashMap. -
D.
first_key_value()returns the entry that was inserted first in time.
Select all statements that are true about HashSet<T>:
-
A. A
HashSetstores unique values — inserting an existing value has no effect on set membership. -
B.
insertreturnstrueif the value was newly inserted andfalseif it was already present. -
C.
HashSetiteration is guaranteed to visit elements in the order they were inserted. -
D.
HashSetkeeps its elements in sorted order.
Select all statements that are true about BinaryHeap<T> in Rust:
-
A. By default,
BinaryHeap<T>is a max-heap:pop()returns the largest element. -
B. Elements only need to implement
PartialOrd, so aBinaryHeap<f64>compiles and works as-is. -
C. Iterating with
.iter()returns elements in sorted order. -
D.
BinaryHeap::peek()removes and returns the largest element.
Select all statements that are true about stacks and queues in Rust:
-
A. A
Vec<T>can be used as a stack viapush/pop, with both operations running in amortized O(1). - B. Stacks are LIFO (last-in, first-out) and queues are FIFO (first-in, first-out).
-
C.
VecDeque<T>supports efficientpush_backandpop_front, making it a natural FIFO queue. -
D.
Vec::remove(0)is an O(1) operation.
Select all statements that are true about the (average-case) complexity of common operations:
-
A. Inserting at the front of a
Vec<T>withvec.insert(0, x)is O(1). -
B.
HashMap::getis O(1) on average. -
C.
BTreeMap::getis O(1) on average, just likeHashMap::get. -
D. Looking up an element by value in an unsorted
Vec<T>with.contains(&x)is O(log n).
Select all statements that are true about the Entry API on HashMap and BTreeMap:
-
A.
map.entry(key).or_insert(default)insertsdefaultonly if the key is absent, and returns a mutable reference to the value. -
B.
map.entry(key).or_insert(default)always overwrites the existing value when the key is already present. -
C. The
EntryAPI is available only onHashMap;BTreeMapdoes not provide anentrymethod. -
D. Internally,
map.entry(key).or_insert(v)performs two separate lookups (one to check for the key, one to insert), so it is slower than a manualget+insert.
Short Answer (short_answer)
Why does Rust have an ownership system? Name one problem it prevents at compile time that languages like C or Python handle differently.
What is a trait in Rust? Give one concrete example of a standard-library trait and describe what it lets you do.
What does a lifetime annotation like 'a in fn longest<'a>(x: &'a str, y: &'a str) -> &'a str tell the Rust compiler?
Why are generics useful in Rust? Give one example.
What does it mean that iterator adaptors in Rust are "lazy"? Give an example of an adaptor and an example of a consumer.
How does a closure in Rust differ from a regular fn function?
What is the difference between Option<T> and Result<T, E>, and when would you reach for each?
What is the role of the hash function when using a HashMap<K, V>, and why must keys implement Eq as well as Hash?
When would you choose BTreeMap<K, V> over HashMap<K, V>? Name one specific advantage.
Give one concrete use case where a HashSet<T> is a better choice than a Vec<T>, and briefly explain why.
What is BinaryHeap<T> useful for? Describe one typical use case and the order in which pop() returns elements.
Explain the difference between a stack and a queue. Which Rust standard-library type is a good fit for each?
Describe the difference between O(1), O(n), and O(log n) time complexity in plain language. Give one Rust collection operation for each.
What problem does the Entry API on HashMap / BTreeMap solve, compared with using contains_key followed by insert?
Name three commonly derived traits in Rust and briefly describe what #[derive(...)] gives you for each.
Give one reason why Vec<T> is usually preferred over LinkedList<T> in Rust, even when you need to frequently grow a collection.
Predict the Output (predict_output)
What is the output of this program?
fn main() {
    let x = 5;
    let y = x;
    let x = x + 1;
    println!("{} {}", x, y);
}
What is the output of this program?
fn double<T: std::ops::Add<Output = T> + Copy>(x: T) -> T {
    x + x
}

fn main() {
    println!("{} {}", double(3), double(2.5));
}
What is the output of this program?
fn main() {
    let a: Option<i32> = Some(7);
    let b: Option<i32> = None;
    println!("{} {}", a.unwrap_or(0), b.unwrap_or(0));
}
What is the output of this program?
fn main() {
    let total: i32 = (1..=5)
        .filter(|x| x % 2 == 1)
        .map(|x| x * x)
        .sum();
    println!("{}", total);
}
What is the output of this program?
fn main() {
    let names = vec!["Alice", "Bob", "Carol"];
    let scores = vec![90, 85, 95];
    for (i, (n, s)) in names.iter().zip(scores.iter()).enumerate() {
        println!("{}: {} = {}", i, n, s);
    }
}
What is the output of this program?
fn main() {
    let greeting = String::from("Hello");
    let say = move || println!("{}, world!", greeting);
    say();
    say();
}
What is the output of this program?
#[derive(Debug)]
struct Point {
    x: i32,
    y: i32,
}

fn main() {
    let p = Point { x: 1, y: 2 };
    println!("{:?}", p);
}
What is the output of this program?
use std::collections::HashMap;

fn main() {
    let mut map: HashMap<&str, i32> = HashMap::new();
    map.insert("a", 1);
    let prev = map.insert("a", 2);
    println!("{:?} {:?}", prev, map.get("a"));
}
What is the output of this program?
use std::collections::HashMap;

fn main() {
    let mut counts: HashMap<char, i32> = HashMap::new();
    for c in "banana".chars() {
        *counts.entry(c).or_insert(0) += 1;
    }
    let mut items: Vec<(char, i32)> = counts.into_iter().collect();
    items.sort();
    println!("{:?}", items);
}
What is the output of this program?
use std::collections::HashSet;

fn main() {
    let mut seen: HashSet<i32> = HashSet::new();
    println!("{}", seen.insert(1));
    println!("{}", seen.insert(2));
    println!("{}", seen.insert(1));
}
What is the output of this program?
use std::collections::BTreeMap;

fn main() {
    let mut scores: BTreeMap<&str, i32> = BTreeMap::new();
    scores.insert("carol", 95);
    scores.insert("alice", 90);
    scores.insert("bob", 85);
    for (name, score) in &scores {
        println!("{} {}", name, score);
    }
}
What is the output of this program?
use std::collections::BinaryHeap;

fn main() {
    let mut heap: BinaryHeap<i32> = BinaryHeap::new();
    for x in [3, 1, 4, 1, 5, 9, 2] {
        heap.push(x);
    }
    while let Some(top) = heap.pop() {
        print!("{} ", top);
    }
    println!();
}
What is the output of this program?
use std::collections::VecDeque;

fn main() {
    let mut q: VecDeque<i32> = VecDeque::new();
    q.push_back(1);
    q.push_back(2);
    q.push_front(0);
    q.push_back(3);
    while let Some(x) = q.pop_front() {
        print!("{} ", x);
    }
    println!();
}
What is the output of this program?
fn classify(x: i32) -> &'static str {
    match x {
        n if n < 0 => "negative",
        0 => "zero",
        1..=9 => "single digit",
        _ => "big",
    }
}

fn main() {
    for x in [-1, 0, 7, 42] {
        println!("{}: {}", x, classify(x));
    }
}
What is the output of this program?
fn longest<'a>(x: &'a str, y: &'a str) -> &'a str {
    if x.len() >= y.len() { x } else { y }
}

fn main() {
    let s1 = String::from("hello");
    let s2 = String::from("ds210");
    let result = longest(&s1, &s2);
    println!("{}", result);
}
What is the output of this program?
struct Rectangle {
    width: u32,
    height: u32,
}

impl Rectangle {
    fn area(&self) -> u32 {
        self.width * self.height
    }
}

fn main() {
    let r = Rectangle { width: 3, height: 4 };
    println!("{}", r.area());
}
Short Coding Challenges (coding + short tag)
Write a function char_count(s: &str) -> HashMap<char, usize> that returns a map from each character in s to the number of times it appears.
Call it in main with "rust" and print the resulting map with {:?}.
In main, start with let nums = vec![1, 2, 2, 3, 1, 4, 3, 5]; and use a HashSet<i32> to count how many distinct values appear. Print the count.
In main, build a BTreeMap<&str, i32> from the pairs ("banana", 3), ("apple", 5), ("cherry", 2), and then iterate and print each name score pair on its own line.
In main, use a BinaryHeap<i32> to find and print the three largest values in vec![4, 10, 2, 8, 15, 7, 1], in descending order, separated by spaces.
In main, use VecDeque<i32> as a FIFO queue. Enqueue the numbers 1 through 5 (in order), then dequeue them all and print each dequeued value on its own line.
In main, use iterator methods to compute and print the sum of squares of the even numbers in 1..=10.
In main, given vec![3, 1, 4, 1, 5, 9, 2, 6, 5], use .partition(...) to split the values into two Vec<i32>s: those less than 5 and those greater than or equal to 5. Then print the lengths of the two resulting vectors.
Given let fruits = vec!["apple", "banana", "apple", "cherry", "banana", "apple"];, in main build a HashMap<&str, i32> using the entry API that inserts each key and increments the count for each key and print how many times "apple" appears.
Write a function first_long<'a>(words: &'a [&'a str], min_len: usize) -> Option<&'a str> that returns the first word in words whose length is at least min_len, or None if there isn't one.
Call it from main with &["hi", "ok", "rust", "hello"] and min_len = 4, and print the result using {:?}.
Write a generic function largest<T: PartialOrd + Copy>(list: &[T]) -> T that returns the largest element of the slice. Assume the slice is non-empty.
Call it from main once with &[10, 3, 7, 25, 4] and once with &[1.5_f64, 2.5, 0.5] and print both results.
In main, start with let mut scores = vec![("alice", 85), ("bob", 92), ("carol", 78)]; and use sort_by with a closure to sort the vector by score in descending order. Print the resulting vector with {:?}.
Long Coding Challenges (coding + long tag)
Write a program that:
- counts word frequencies in a sentence and
- prints the three most frequent words, along with their counts, in descending order of frequency.
Use the sentence "the quick brown fox jumps over the lazy dog the fox runs fast over the hill". Split on whitespace to get words (do not worry about punctuation or case). Break ties by alphabetical order of the word.
Expected output:
the 4
fox 2
over 2
Write a program that prints, in sorted order, the values that appear in both input vectors:
#![allow(unused)]
fn main() {
let a = vec![1, 2, 3, 4, 5, 6];
let b = vec![4, 5, 6, 7, 8, 9];
}
Use HashSet for the membership checks, then sort the resulting common values before printing them (one per line).
Expected output:
4
5
6
Build a small "grade book"
- Given
let entries = vec![("carol", 72), ("alice", 95), ("bob", 58), ("alice", 88), ("bob", 80)];, - insert each pair into a
BTreeMap<&str, Vec<i32>>keyed by name, with the list of that student's scores as the value. - Then iterate the map (which will give names in alphabetical order)
- and print each student's name followed by their average score, formatted to one decimal place.
Hint: To print 1 decimal place, use {:.1} in the println! macro.
Expected output:
alice 91.5
bob 69.0
carol 72.0
Write:
- a function
kth_largest(nums: &[i32], k: usize) -> Option<i32>that returns thek-th largest value in the slice (1-indexed). - If
kis zero or larger than the slice length, returnNone. - Use a
BinaryHeapto find the answer - Call the function from
mainwith&[7, 2, 9, 4, 11, 3]andk = 3 - Print the result with
{:?}.
Expected output:
Some(7)
Write a function is_balanced(s: &str) -> bool that returns true if every opening bracket in s is matched by a closing bracket of the same type in the correct order. Support (), [], and {}. Ignore any other characters.
Use a Vec<char> as a stack. Call the function from main on each of these inputs and print the result on its own line:
#![allow(unused)]
fn main() {
let cases = ["()[]{}", "([{}])", "(]", "((()"];
}
Expected output:
true
true
false
false
Implement the following:
- Write a function
moving_avg(values: &[f64], window: usize) -> Vec<f64>that computes the rolling average over a sliding window of sizewindow. - Use a
VecDeque<f64>to track the window. - Only emit an average once the window is fully populated, so the output length is
values.len() - window + 1(or empty ifvalues.len() < window).**
Call the function from main with values = &[1.0, 2.0, 3.0, 4.0, 5.0] and window = 3, and print each result on its own line, formatted to one decimal place.
Expected output:
2.0
3.0
4.0
Implement the following article and tweet structs and trait:
- Define a trait
Summarywith a single methodsummary(&self) -> String. - Define two structs:
Tweet { user: String, text: String }andArticle { title: String, body: String }. - Implement
Summaryfor the two structs.- The tweet summary should be
"@user: text", and - the article summary should be
"title — first 20 chars of body"- (use
.chars().take(20).collect::<String>()to get the first 20 characters)
- (use
- The tweet summary should be
- In
main, create:- A
Tweetwith user"alice"and text"hello rust!" - An
Articlewith title"DS210"and body"Rust is a systems language." - Call the
summarymethod for each and print the result.
- A
Hint: Use the format! macro to create the summary strings.
Expected output:
@alice: hello rust!
DS210 — Rust is a systems language.
Given the slice of (city, temp_f) pairs:
#![allow(unused)]
fn main() {
let readings = vec![
    ("Boston", 48.0_f64), ("Phoenix", 102.5),
    ("Denver", 77.0), ("Miami", 88.0), ("Anchorage", 36.0),
];
}
Write a program that:
- prints every city whose temperature is above 75°F,
- with its temperature converted to Celsius (formula:
(f - 32.0) * 5.0 / 9.0), - one per line.
- with its temperature converted to Celsius (formula:
- Sort the output alphabetically by city.
- Use iterator methods (
filter,map,collect,sort_by_key, ...) rather than explicit loops.
Each printed line should look like Phoenix 39.2 (temperature formatted to one decimal place).
Define a struct Rectangle { width: u32, height: u32 } with three methods:
area(&self) -> u32perimeter(&self) -> u32can_hold(&self, other: &Rectangle) -> bool— returnstrueifselfis strictly larger thanotherin both dimensions
In main, create let a = Rectangle { width: 10, height: 5 }; and let b = Rectangle { width: 4, height: 3 };. Print a.area(), a.perimeter(), and a.can_hold(&b) each on their own line.
Implement the following:
- You are given
let scores = vec![("alice", 90), ("bob", 75), ("alice", 82), ("carol", 88), ("bob", 91), ("alice", 79)]; - Using the
EntryAPI on aHashMap<&str, (i32, i32)>(where the value is(total_points, count)), - compute each student's average.
- Then print a line for each student in alphabetical order, formatted
name avgwith the average rounded to one decimal place.
Expected output:
alice 83.7
bob 83.0
carol 88.0
Reference Material
Iterator Methods and Adapters
next(&mut self) -> Option<Self::Item>Get the next element of an iterator (Noneif there isn't one)collect<B>(self) -> B-> Transforms the iterator into a collection of typeBtake(n: usize) -> Take<Self>-> Take first N elements of an iterator and turn them into an iteratorskip(n: usize) -> Skip<Self>-> Skip first N elements of an iterator and turn them into an iteratorcycle() -> Cycle<Self>-> Turn a finite iterator into an infinite one that repeats itselffor_each(|x| ...) -> ()-> Apply a closure to each element in the iteratorfilter(|x| ...) -> Filter<Self, P>-> Create new iterator from old one for elements where closure is truemap(|x| ...) -> Map<Self, F>-> Create new iterator by applying closure to input iteratorany(|x| ...) -> bool-> Returntrueif closure is true for any element of the iteratorfold(init: B, |acc, x| ...) -> B-> Initialize accumulator toinit, execute closure on each elementreduce(|acc, x| ...) -> Option<Self::Item>-> Similar to fold but the initial value is the first elementzip(other_iter) -> Zip<Self, U>-> Zip two iterators together into pairs of(a, b)enumerate() -> Enumerate<Self>-> Create iterator of(index, element)pairspartition(|x| ...) -> (B, B)-> Split iterator into two collections based on predicatesum() -> S-> Sum all elements (works on numeric iterators)count() -> usize-> Count the number of elements in the iteratorcopied() -> Copied<Self>-> Create iterator of owned copies from an iterator of referencesfind(|x| ...) -> Option<Self::Item>-> Return the first element for which the closure is true (Noneif none)
String and &str Methods
s.len() -> usize-> Number of bytes in the strings.contains("sub") -> bool->trueif string contains the substrings.to_uppercase() -> String-> Returns a newStringin uppercases.to_lowercase() -> String-> Returns a newStringin lowercases.push('c') -> ()-> Append a single character (mutatesString)s.push_str("text") -> ()-> Append a string slice (mutatesString)s.chars() -> Chars<'_>-> Iterator over the characters of the strings.split_whitespace() -> SplitWhitespace<'_>-> Iterator of substrings split by whitespaces.parse::<T>() -> Result<T, T::Err>-> Parse the string into typeTs.is_empty() -> bool->trueif the string has length 0
Vec Methods
v.push(val) -> ()-> Append element to the endv.pop() -> Option<T>-> Remove and return last elementv.get(i: usize) -> Option<&T>-> Safe bounds-checked accessv.len() -> usize-> Number of elementsv.is_empty() -> bool->trueif the vector has no elementsv.iter() -> Iter<'_, T>-> Iterator of immutable references&Tv.iter_mut() -> IterMut<'_, T>-> Iterator of mutable references&mut Tv.into_iter() -> IntoIter<T>-> Consuming iterator of owned valuesTv.sort() -> ()-> Sort in place in ascending order (requiresT: Ord)v.sort_by(|a, b| ...) -> ()-> Sort in place using a comparison closure (closure returnsOrdering)v.sort_by_key(|x| ...) -> ()-> Sort in place using a key functionv.contains(&x) -> bool->trueif the vector containsx(O(n) linear scan)v.to_vec() -> Vec<T>-> Copy a slice&[T]into a newVec<T>(requiresT: Clone)
Option Methods
opt.unwrap() -> T-> Extract the value or panic ifNoneopt.unwrap_or(default: T) -> T-> Extract the value or returndefault(eager)opt.unwrap_or_else(|| ...) -> T-> Extract the value or compute default via closure (lazy)opt.map(|x| ...) -> Option<U>-> Transform the inner value;NonestaysNoneopt.is_some() -> bool->trueifSomeopt.is_none() -> bool->trueifNone
Other Useful Methods
val.clone() -> T-> Create a deep copy of the valuea.cmp(&b) -> std::cmp::Ordering-> Compare two values; returnsOrdering::Less,Equal, orGreaterordering.then(other: Ordering) -> Ordering-> Useotheras a tiebreaker whenorderingisEqual(e.g.a.cmp(&b).then(x.cmp(&y)))val.into() -> U-> Convertvalinto typeUvia theInto/Fromtrait (e.g."text".into()produces aString)(x as f64).sqrt() -> f64-> Square root of a floating-point numberformat!("...", args) -> String-> Likeprintln!but returns aStringinstead of printingprint!("...", args)-> Likeprintln!but does not append a newline{:?}-> Debug format specifier (inprintln!/format!){:.2}-> Display with 2 decimal places
Test Assertion Macros
assert!(expr) -> ()-> Pass ifexpristrueassert_eq!(a, b) -> ()-> Pass ifa == b; shows both values on failureassert_ne!(a, b) -> ()-> Pass ifa != b; shows both values on failure- Assert macros can take an optional custom failure message, e.g.,
assert_eq!(a, b, "{} is not equal to {}", a, b).
HashMap Methods
Basic Operations:
new(): Creates an empty HashMap.insert(key, value) -> Option<V>: Adds a key-value pair to the map. If the map did not have the key thenNoneis returned, if the map did have the key the old value is returned asSome(V).remove(key) -> Option<V>: Removes a key-value pair from the map. If the map did not have the key thenNoneis returned, if the map did have the key the value is returned asSome(V).get(key) -> Option<&V>: Returns a reference to the value in the map, if any, that is equal to the given key. ReturnsNoneif the key is not present.contains_key(key) -> bool: Checks if the map contains a specific key. Returnstrueif present,falseotherwise.len() -> usize: Returns the number of key-value pairs in the map.is_empty() -> bool: Checks if the map contains no key-value pairs.clear(): Removes all key-value pairs from the map.drain(): Clears the map and returns all key-value pairs as an iterator.
Entry API:
entry(key).or_insert(value): Returns a mutable reference to the value in the map, if any, that is equal to the given key. If the key is not present, inserts the given value and returns a mutable reference to the new value.entry(key).or_insert_with(|| ...): Likeor_insert, but the default value is computed lazily from a closure (useful when construction is expensive, e.g.or_insert_with(Vec::new)).
Iterators and Views:
iter(): Returns an immutable iterator over the key-value pairs in the map.iter_mut(): Returns a mutable iterator over the key-value pairs in the map.into_iter(): Returns a consuming iterator of owned(key, value)pairs (moves the map).keys(): Returns an iterator over the keys in the map.values(): Returns an iterator over the values in the map.values_mut(): Returns a mutable iterator over the values in the map.
Indexing:
map[&key]: Returns a reference to the value forkey. Panics if the key is absent. Usegetfor a non-panicking alternative.
HashSet Methods
Basic Operations:
new(): Creates an empty HashSet.insert(value): Adds a value to the set. Returns true if the value was not present, false otherwise.remove(value): Removes a value from the set. Returns true if the value was present, false otherwise.contains(value): Checks if the set contains a specific value. Returns true if present, false otherwise.len(): Returns the number of elements in the set.is_empty(): Checks if the set contains no elements.clear(): Removes all elements from the set.drain(): Returns an iterator that removes all elements and yields them. The set becomes empty after this operation.
Entry API:
entry(value).or_insert(value): Returns a mutable reference to the value in the set, if any, that is equal to the given value. If the value is not present, inserts the given value and returns a mutable reference to the new value.
Set Operations:
union(&self, other: &HashSet<T>): Returns an iterator over the elements that are in self or other (or both).intersection(&self, other: &HashSet<T>): Returns an iterator over the elements that are in both self and other.difference(&self, other: &HashSet<T>): Returns an iterator over the elements that are in self but not in other.symmetric_difference(&self, other: &HashSet<T>): Returns an iterator over the elements that are in self or other, but not in both.is_subset(&self, other: &HashSet<T>): Checks if self is a subset of other.is_superset(&self, other: &HashSet<T>): Checks if self is a superset of other.is_disjoint(&self, other: &HashSet<T>): Checks if self has no elements in common with other.
Iterators and Views:
iter(): Returns an immutable iterator over the elements in the set.get(value): Returns a reference to the value in the set, if any, that is equal to the given value.
BTreeMap Methods
Basic Operations:
new(): Creates an empty BTreeMap.insert(key, value) -> Option<V>: Adds a key-value pair to the map. If the map did not have the key thenNoneis returned, if the map did have the key the old value is returned asSome(V).remove(key) -> Option<V>: Removes a key-value pair from the map. If the map did not have the key thenNoneis returned, if the map did have the key the value is returned asSome(V).get(key) -> Option<&V>: Returns a reference to the value in the map, if any, that is equal to the given key. ReturnsNoneif the key is not present.contains_key(key) -> bool: Checks if the map contains a specific key. Returnstrueif present,falseotherwise.len() -> usize: Returns the number of key-value pairs in the map.is_empty() -> bool: Checks if the map contains no key-value pairs.clear(): Removes all key-value pairs from the map.drain(): Clears the map and returns all key-value pairs as an iterator.
Entry API:
entry(key).or_insert(value): Returns a mutable reference to the value in the map, if any, that is equal to the given key. If the key is not present, inserts the given value and returns a mutable reference to the new value.entry(key).or_insert_with(|| ...): Likeor_insert, but the default value is computed lazily from a closure (e.g.or_insert_with(Vec::new)).
Iterators and Views:
iter(): Returns an immutable iterator over the key-value pairs in the map.iter_mut(): Returns a mutable iterator over the key-value pairs in the map.into_iter(): Returns a consuming iterator of owned(key, value)pairs (moves the map).keys(): Returns an iterator over the keys in the map.values(): Returns an iterator over the values in the map.values_mut(): Returns a mutable iterator over the values in the map.range(start..end): Returns an iterator over the key-value pairs in the map in the range[start, end).first_key_value(): Returns the first key-value pair in the map.last_key_value(): Returns the last key-value pair in the map.range(start..end): Returns an iterator over the key-value pairs in the map in the range[start, end).first_key_value(): Returns the first key-value pair in the map.last_key_value(): Returns the last key-value pair in the map.next(): Returns the next key-value pair in the map.next_back(): Returns the next key-value pair in the map in reverse order.
Indexing:
map[&key]: Returns a reference to the value forkey. Panics if the key is absent. Usegetfor a non-panicking alternative.
BTreeSet Methods
Basic Operations:
new(): Creates an empty BTreeSet.insert(value): Adds a value to the set. Returns true if the value was not present, false otherwise.remove(value): Removes a value from the set. Returns true if the value was present, false otherwise.contains(value): Checks if the set contains a specific value. Returns true if present, false otherwise.len(): Returns the number of elements in the set.is_empty(): Checks if the set contains no elements.clear(): Removes all elements from the set.drain(): Returns an iterator that removes all elements and yields them. The set becomes empty after this operation.
Entry API:
entry(value).or_insert(value): Returns a mutable reference to the value in the set, if any, that is equal to the given value. If the value is not present, inserts the given value and returns a mutable reference to the new value.
Set Operations:
union(&self, other: &BTreeSet<T>): Returns an iterator over the elements that are in self or other (or both).intersection(&self, other: &BTreeSet<T>): Returns an iterator over the elements that are in both self and other.difference(&self, other: &BTreeSet<T>): Returns an iterator over the elements that are in self but not in other.symmetric_difference(&self, other: &BTreeSet<T>): Returns an iterator over the elements that are in self or other, but not in both.is_subset(&self, other: &BTreeSet<T>): Checks if self is a subset of other.is_superset(&self, other: &BTreeSet<T>): Checks if self is a superset of other.is_disjoint(&self, other: &BTreeSet<T>): Checks if self has no elements in common with other.
Iterators and Views:
iter(): Returns an immutable iterator over the elements in the set.get(value): Returns a reference to the value in the set, if any, that is equal to the given value.range(start..end): Returns an iterator over the elements in the set in the range[start, end).first(): Returns the first element in the set.last(): Returns the last element in the set.next(): Returns the next element in the set.next_back(): Returns the next element in the set in reverse order.
BinaryHeap Methods (Max-Heap)
std::collections::BinaryHeap is a max-heap priority queue. Use std::cmp::Reverse to get a min-heap.
new(): Creates an emptyBinaryHeap.from(vals): Creates aBinaryHeapfrom an array or vector.from_iter(iter): Creates aBinaryHeapfrom an iterator.push(value) -> (): Inserts a value into the heap.pop() -> Option<T>: Removes and returns the largest element, orNoneif empty.peek() -> Option<&T>: Returns a reference to the largest element without removing it.len() -> usize: Number of elements.is_empty() -> bool:trueif the heap has no elements.iter(): Returns an iterator over the elements in arbitrary order (not sorted).into_sorted_vec() -> Vec<T>: Consumes the heap and returns aVecsorted in ascending order.
VecDeque Methods (Double-Ended Queue)
std::collections::VecDeque is a double-ended queue (ring buffer). Commonly used as a FIFO queue via push_back / pop_front.
new(): Creates an emptyVecDeque.push_back(value) -> (): Appends an element to the back.push_front(value) -> (): Prepends an element to the front.pop_back() -> Option<T>: Removes and returns the back element.pop_front() -> Option<T>: Removes and returns the front element.front() -> Option<&T>: Reference to the front element.back() -> Option<&T>: Reference to the back element.len() -> usize: Number of elements.is_empty() -> bool:trueif empty.iter(): Iterator from front to back.
LinkedList Methods
std::collections::LinkedList is a doubly-linked list.
new(): Creates an emptyLinkedList.push_back(value) -> (): Appends an element to the back.push_front(value) -> (): Prepends an element to the front.pop_back() -> Option<T>: Removes and returns the back element.pop_front() -> Option<T>: Removes and returns the front element.front() -> Option<&T>: Reference to the front element.back() -> Option<&T>: Reference to the back element.len() -> usize: Number of elements.is_empty() -> bool:trueif empty.iter(): Iterator from front to back.
Common Derivable Traits
Add with #[derive(...)] on a struct or enum:
Debug: Enables formatting with{:?}inprintln!/format!.Clone: Provides.clone()to produce a deep copy.Copy: Value is copied (bitwise) on assignment instead of moved. RequiresClone. Only valid for types whose fields are allCopy(e.g., noString, noVec<T>).PartialEq: Enables==and!=.Eq: Marker trait for total equality (noNaN-like values). RequiresPartialEq. Needed (withHash) forHashMap/HashSetkeys.PartialOrd: Enables<,<=,>,>=viapartial_cmp.Ord: Total ordering viacmp. RequiresEqandPartialOrd. Needed forBTreeMap/BTreeSetkeys andBinaryHeapelements.Hash: Enables use as aHashMap/HashSetkey. Typically combined withEq.Default: ProvidesT::default()that returns a default value.
Example:
#![allow(unused)]
fn main() {
#[derive(Debug, Clone, PartialEq, Eq, Hash)]
struct Point { x: i32, y: i32 }
}
DS210 Course Overview
About This Module
This module introduces DS-210: Programming for Data Science, covering course logistics, academic policies, grading structure, and foundational concepts needed for the course.
Overview
This course builds on DS110 (Python for Data Science). That, or an equivalent is a prerequisite.
We will cover
- shell commands
- git version control
- programming languages
- computing systems concepts
And then spend the bulk of the course learning Rust, a modern, high-performance and more secure programming language.
Time permitting we dive into some common data structures and data science related libraries.
New Last Semester
We've made some significant changes to the course based on observations and course evaluations.
Question: What have you heard about the course? Is it easy? Hard?
Changes include:
- Moving course notes from Jupyter notebooks to Rust
mdbook- This is the same format used by the Rust language book
- Addition of in-class group activites for almost every lecture where you
can reinforce what you learned and practice for exams
- Less lecture content, slowing down the pace
- Homeworks that progressively build on the lecture material and better match exam questions (e.g. 10-15 line code solutions)
- Elimination of course final project and bigger emphasis on in-class activities and participation.
Teaching Staff and Contact Information
See B1 Course Staff.
Course Logistics
Course Websites
See welcome email for Piazza and Gradescope URLs.
-
Piazza:
- Lecture Notes
- Announcements and additional information
- Questions and discussions
-
Gradescope:
- Homework
- Gradebook
-
GitHub Classroom: URL TBD
Course objectives
This course teaches systems programming and data structures through Rust, emphasizing safety, speed, and concurrency. By the end, you will:
- Master key data structures and algorithms for CS and data science
- Understand memory management, ownership, and performance optimization
- Apply computational thinking to real problems
- Develop Rust skills that transfer to other languages
Why are we learning Rust?
- Learning a second programming language builds CS fundamentals and teaches you to acquire new languages throughout your career
- Systems programming knowledge helps you understand software-hardware interaction and write efficient, low-level code
We're using Rust specifically because:
- Memory safety without garbage collection lets you see how data structures work in memory (without C/C++ headaches)
- Strong type system catches errors at compile time, helping you write correct code upfront
- Growing adoption in data science and scientific computing across major companies and agencies
More shortly.
Course Timeline and Milestones
- Part 1: Foundations (command line, git) & Rust Basics (Weeks 1-3)
- Part 2: Core Rust Concepts & Data Structures (Weeks 4-5)
- Midterm 1 (~Week 5)
- Part 3: Advanced Rust & Algorithms (Weeks 6-10)
- Midterm 2 (~Week 10)
- Part 4: Data Structures and Algorithms (~Weeks 11-12)
- Part 5: Data Science & Rust in Practice (~Weeks 13-14)
- Final exam during exam week
Course Format
Lectures will involve hands-on practice. Each class includes:
- Interactive presentations of new concepts
- Small-group exercises and problem-solving activities
Because of this active format, regular attendance and participation is important and counts for a significant portion of your grade (15%).
Discussions will review and reinforce lecture material through and provide further opportunities for hands-on practice.
Pre-work will be assigned before most lectures to prepare you for in-class activities. These typically include readings plus a short ungraded quiz. The quizz questions will reappear in the lecture for participation credit.
Homeworks will be assigned roughly weekly before the midterm, and then longer two-week assigments after the deadline, reflecting the growing complexity of the material.
Exams 2 midterms and a cumulative final exam covering theory and short hand-coding problems (which we will practice in class!)
The course emphasizes learning through practice, with opportunities for corrections and growth after receiving feedback on assignments and exams.
More course policies
Let's switch to the syllabus to cover:
- grading calculations
- homeworks
- deadlines and late work
- collaboration
- academic honesty
- AI use policy discussed after class activity
- attendance and participation
- regrading
- corrections
In-class Activity
AI use discussion (20 min)
Think-pair-share style, each ~6-7 minutes, with wrap-up.
See Gradescope assignment. Forms teams of 3.
Round 1: Learning Impact
"How might GenAI tools help your learning in this course? How might they get in the way?"
Round 2: Values & Fairness
"What expectations do you have for how other students in this course will or won't use GenAI? What expectations do you have for the teaching team so we can assess your learning fairly given easy access to these tools?"
Round 3: Real Decisions
"Picture yourself stuck on a challenging Rust problem at 11pm with the midnight deadline looming. What options do you have? What would help you make decisions you'd feel good about? What would you do differently for the next homework?"
AI use policy
You are allowed to use GenAI (e.g., ChatGPT, GitHub Copilot, etc) to help you understand concepts, debug your code, or generate ideas.
You should understand that this may may help or impede your learning depending on how you use it.
If you use GenAI for an assignment, you must cite what you used and how you used it (for brainstorming, autocomplete, generating comments, fixing specific bugs, etc.).
You must understand the solution well enough to explain it during a small group or discussion in class.
Your professor and TAs/CAs are happy to help you write and debug your own code during office hours, but we will not help you understand or debug code that is generated by AI.
For more information see the CDS policy on GenAI.
How to Do Well in the Course
- All the usual advice about attending lectures and discussions, engaging, etc..
Insiders tips on how to do well in this particular course:
- Do the pre-work/pre-reading before lecture so you are seeing the concepts for a second time in the lecture.
- Actively engage in the pre-reading... try executing the code and making changes
- Do as much Rust coding as you can.. preferably 15-30 minutes per day
- Learning a programming language is like learning a human language, or learning and instrument or training for a sport... you need to practice regularly to get good at it.
- Exams are paper and pencil, so you need to write code quickly from memory.
- Use in-class activities and homework to practice for the exams... try to do as much of it as possible without autocomplete and AI assistance.
Intro surveys
Please fill out the intro survey posted on Gradescope.
Why Rust?
Why Systems Programming Languages Matter
Importance of Systems Languages:
- Essential for building operating systems, databases, and infrastructure
- Provide fine-grained control over system resources
- Enable optimization for performance-critical applications
- Foundation for higher-level languages and frameworks
Performance Advantages:
- Generally compiled languages like Rust are needed to scale to large, efficient deployments
- Can be 10x to 100x faster than equivalent Python code
- Better memory management and resource utilization
- Reduced runtime overhead compared to interpreted languages
Data Science and ML Libraries Written in Rust
- Polars - data processing and analysis library
- tiktoken - tokenization library for OpenAI models
- uv - package manager for Python
- Burn - A PyTorch like alterntive in Rust
- Candle - A minimalist ML framework for Rust
- ...
Memory Safety: A Critical Advantage
What is Memory Safety?
Memory safety prevents common programming errors that can lead to security vulnerabilities:
- Buffer overflows
- Use-after-free errors
- Memory leaks
- Null pointer dereferences
Industry Recognition:
Major technology companies and government agencies are actively moving to memory-safe languages:
- Google, Microsoft, Meta have efforts underway to move infrastructure code from C/C++ to Rust
- ...
White House Press Release

DARPA TRACTOR Program

CISA Recommendation
 CISA -- The case for memory safe roadmaps
CISA -- Cybersecurity and Infrastructure Security Agency
CISA -- The case for memory safe roadmaps
CISA -- Cybersecurity and Infrastructure Security Agency
Programming Paradigms: Interpreted vs. Compiled
Interpreted Languages (e.g., Python):
Advantages:
- Interactive development environment
- Quick iteration and testing
- Rich ecosystem for data science (Jupyter, numpy, pandas)
- Easy to learn and prototype with
Compiled Languages (e.g., Rust):
Advantages:
- Superior performance and efficiency
- Early error detection at compile time
- Optimized machine code generation
- Better for production systems
Development Process:
- Write a program
- Compile it (catch errors early)
- Run and debug optimized code
- Deploy efficient executables
Technical Coding Interviews
And finally...
If you are considering technical coding interviews, they sometimes ask you to solve problems in a language other than python.
Many of the in-class activities and early homework questions will be Leetcode/HackerRank style challenges.
This is good practice!
Hello Shell!
About This Module
This module introduces you to the command-line interface and essential shell commands that form the foundation of systems programming and software development. You'll learn to navigate the file system, manipulate files, and use the terminal effectively for Rust development.
Prework & Reading
- Review this module.
- Review In Class Activity Part 1: Access/Install Terminal Shell and follow instructions to install and use the terminal shell.
Pre-lecture Reflections
Before class, consider these questions:
- What advantages might a command-line interface offer over graphical interfaces? What types of tasks seem well-suited for command-line automation?
- How does the terminal relate to the development workflow you've seen in other programming courses?
Learning Objectives
By the end of this module, you should be able to:
- Create, copy, move, and delete files and directories at the command line
- Understand file permissions and ownership concepts
- Use pipes and redirection for basic text processing
- Set up an organized directory structure for programming projects
- Feel comfortable working in the terminal environment
Why the Command Line Matters
For Programming and Data Science:
# Quick file operations
ls *.rs                    # Find all Rust files
grep "TODO" src/*.rs       # Search for TODO comments across files
wc -l data/*.csv          # Count lines in all CSV files
Advantages over GUI:
- Speed: Much faster for repetitive tasks
- Precision: Exact control over file operations
- Automation: Commands can be scripted and repeated
- Remote work: Essential for server management
- Development workflow: Many programming tools use command-line interfaces
File Systems
File System Structure Essentials
A lot of DS and AI infrastructure runs on Linux/Unix type filesystems, including MacOS.
Root Directory (/):
The slash character represents the root of the entire file system.
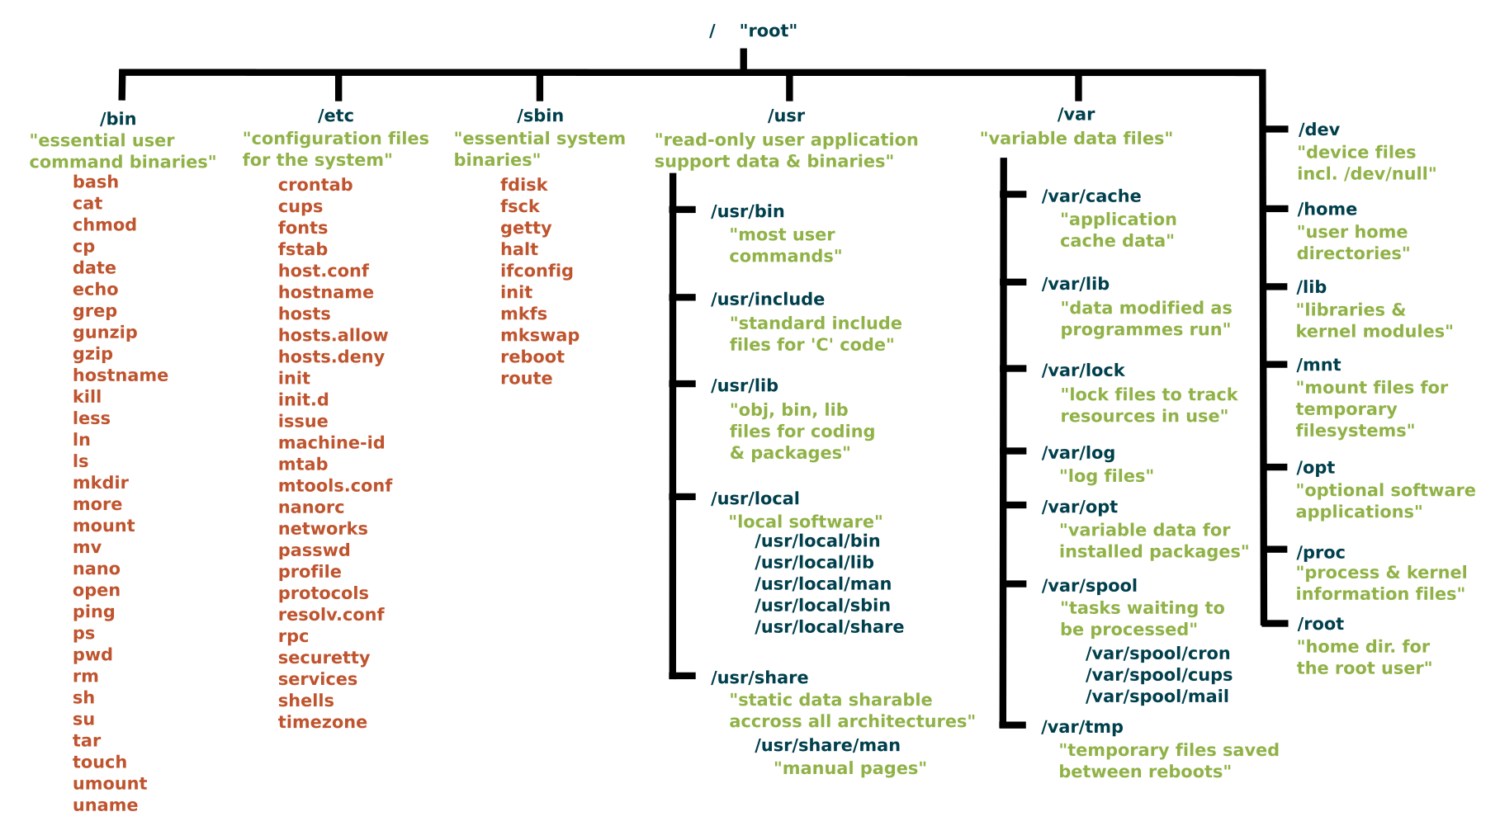
Directory Conventions
/: The slash character by itself is the root of the filesystem/bin: A place containing programs that you can run/boot: A place containing the kernel and other pieces that allow your computer to start/dev: A place containing special files representing all your devices/etc: A place with lots of configuration information (i.e. login and password data)/home: All user's home directories/lib: A place for all system libraries/mnt: A place to mount external file systems/opt: A place to install user software/proc: Lots of information about your computer and what is running on it/sbin: Similar to bin but for the superuser/usr: Honestly a mishmash of things and rather overlapping with other directories/tmp: A place for temporary files that will be wiped out on a reboot/var: A place where many programs write files to maintain state
Key Directories You'll Use:
/                          # Root of entire system
├── home/                  # User home directories
│   └── username/          # Your personal space
├── usr/                   # User programs and libraries
│   ├── bin/              # User programs (like cargo, rustc)
│   └── local/            # Locally installed software
└── tmp/                  # Temporary files
Navigation Shortcuts:
~= Your home directory.= Current directory..= Parent directory/= Root directory
To explore further
You can read more about the Unix filesystem at https://en.wikipedia.org/wiki/Unix_filesystem.
The Linux shell
It is an environment for finding files, executing programs, manipulating (create, edit, delete) files and easily stitching multiple commands together to do something more complex.
Windows and MacOS has command shells, but Windows is not fully compatible, however MacOS command shell is.
Windows Subystem for Linux is fully compatible.
In Class Activity Part 1: Access/Install Terminal Shell
Directions for MacOS Users and Windows Users.
macOS Users:
Your Mac already has a terminal! Here's how to access it:
-
Open Terminal:
- Press
Cmd + Spaceto open Spotlight - Type "Terminal" and press Enter
- Or: Applications → Utilities → Terminal
- Press
-
Check Your Shell:
echo $SHELL # Modern Macs use zsh, older ones use bash -
Optional: Install Better Tools:
Install Homebrew (package manager for macOS)
/bin/bash -c "$(curl -fsSL https://raw.githubusercontent.com/Homebrew/install/HEAD/install.sh)"
Install useful tools
brew install tree # Visual directory structure
brew install ripgrep # Fast text search
Windows Users:
Windows has several terminal options. For this exercise we recommend Option 1, Git bash.
When you have more time, you might want to explore Windows Subsystem for Linux so you can have a full, compliant linux system accessible on Windows.
PowerShell aliases some commands to be Linux-like, but they are fairly quirky.
We recommend Git Bash or WSL:
-
Option A: Git Bash (Easier)
- Download Git for Windows from git-scm.com
- During installation, select "Use Git and optional Unix tools from the Command Prompt"
- Open "Git Bash" from Start menu
- This gives you Unix-like commands on Windows
-
Option B: Windows Subsystem for Linux (WSL)
# Run PowerShell as Administrator, then: wsl --install # Restart your computer # Open "Ubuntu" from Start menu -
Option C: PowerShell (Built-in)
- Press
Win + Xand select "PowerShell" - Note: Commands differ from Unix (use
dirinstead ofls, etc.) - Not recommended for the in-class activities.
- Press
Verify Your Setup (Both Platforms)
pwd              # Should show your current directory
ls               # Should list files (macOS/Linux) or use 'dir' (PowerShell)
which ls         # Should show path to ls command (if available)
echo "Hello!"    # Should print Hello!
Essential Commands for Daily Use
Navigation and Exploration:
pwd                        # Show current directory path
ls                        # List files in current directory
ls -al                    # List files with details and hidden files
cd directory_name         # Change to directory
cd ..                     # Go up one directory
cd ~                      # Go to home directory
Creating and Organizing:
mkdir project_name        # Create directory
mkdir -p path/to/dir      # Create nested directories
touch filename.txt        # Create empty file
cp file.txt backup.txt    # Copy file
mv old_name new_name      # Rename/move file
rm filename               # Delete file
rm -r directory_name      # Delete directory and contents
rm -rf directory_name     # Delete dir and contents without confirmation
Viewing File Contents:
cat filename.txt          # Display entire file
head filename.txt         # Show first 10 lines
tail filename.txt         # Show last 10 lines
less filename.txt         # View file page by page (press q to quit)
File Permissions Made Simple
Understanding ls -l Output:
-rw-r--r-- 1 user group 1024 Jan 15 10:30 filename.txt
drwxr-xr-x 2 user group 4096 Jan 15 10:25 dirname
Permission Breakdown:
- First character:
-(file) ord(directory) - Next 9 characters in groups of 3:
- Owner permissions (rwx): read, write, execute
- Group permissions (r-x): read, no write, execute
- Others permissions (r--): read only
We will see these kinds of permissions again in Rust programming!
Common Permission Patterns:
644orrw-r--r--: Files you can edit, others can read755orrwxr-xr-x: Programs you can run, others can read/run600orrw-------: Private files only you can access
Pipes and Redirection Basics
Saving Output to Files:
ls > file_list.txt        # Save directory listing to file
echo "Hello World" > notes.txt  # Overwrite file contents
echo "It is me" >> notes.text   # Append to file content
Combining Commands with Pipes:
ls | grep ".txt"          # List only .txt files
cat file.txt | head -5    # Show first 5 lines of file
ls -l | wc -l            # Count number of files in directory
Practical Examples:
# Find large files
ls -la | sort -k5 -nr | head -10

# Count total lines in all text files
cat *.txt | wc -l

# Search for pattern and save results
grep "error" log.txt > errors.txt
Setting Up for Programming
Creating Project Structure:
# Create organized development directory
# The '-p' means make intermediate directories as required
mkdir -p ~/projects/rust_projects
mkdir -p ~/projects/data_science
mkdir -p ~/projects/tools

# Navigate to project area
cd ~/projects/rust_projects

# Create specific project
mkdir my_first_rust_project
cd my_first_rust_project
Text Editors in the Shell
- It is often useful to edit files in the shell.
- The two most common text editors in the shell are
nanoandvim.nanois a simple text editor that is easy to use and has a minimal learning curve.vimis a more powerful text editor that is more difficult to learn but has a more powerful feature set.
See for example vim-hero.com for a tutorial on vim.
It is very helpful to learn minimal editing skills in one of these.
Customizing Your Shell Profile (Optional)
Understanding Shell Configuration Files:
Your shell reads a configuration file when it starts up. This is where you can add aliases, modify your PATH, and customize your environment.
Common Configuration Files:
- macOS (zsh):
~/.zshrc - macOS (bash):
~/.bash_profileor~/.bashrc - Linux (bash):
~/.bashrc - Windows Git Bash:
~/.bash_profile
Finding Your Configuration File:
It's in your Home directory.
# Check which shell you're using (MacOS/Linus)
echo $SHELL

# macOS with zsh
echo $HOME/.zshrc

# macOS/Linux with bash
echo $HOME/.bash_profile
echo $HOME/.bashrc
Adding Useful Aliases:
# Edit your shell configuration file (choose the right one for your system)
nano ~/.zshrc        # macOS zsh
nano ~/.bash_profile # macOS bash or Git Bash
nano ~/.bashrc       # Linux bash

# Add these helpful aliases:
alias ll='ls -la'
alias ..='cd ..'
alias ...='cd ../..'
alias projects='cd ~/projects'
alias rust-projects='cd ~/projects/rust_projects'
alias grep='grep --color=auto'
alias tree='tree -C'

# Custom functions
# This will make a directory specified as the argument and change into it
mkcd() {
    mkdir -p "$1" && cd "$1"
}
Modifying Your PATH:
# Add to your shell configuration file
export PATH="$HOME/bin:$PATH"
export PATH="$HOME/.cargo/bin:$PATH"    # For Rust tools (we'll add this later)

# For development tools
export PATH="/usr/local/bin:$PATH"
Applying Changes:
# Method 1: Reload your shell configuration
source ~/.zshrc        # For zsh
source ~/.bash_profile # For bash

# Method 2: Start a new terminal session
# Method 3: Run the command directly
exec $SHELL
Useful Environment Variables:
# Add to your shell configuration file
export EDITOR=nano           # Set default text editor
export HISTSIZE=10000       # Remember more commands
export HISTFILESIZE=20000   # Store more history

# Color support for ls
export CLICOLOR=1           # macOS
export LS_COLORS='di=34:ln=35:so=32:pi=33:ex=31:bd=34:cd=34:su=0:sg=0:tw=34:ow=34' # Linux
Shell Configuration with Git Branch Name
A useful shell configuration is modify the shell command prompt to show your current working directory and your git branch name if you are in a git project.
Bash Configuration
If you are using bash, follow the instructions for bash posted at DS549 Shell Configuraiton.
Zsh Configuration
If you are using zsh, which is the default shell on MacOS, you can paste the following
lines into your ~/.zshrc file to configure the shell prompt to show your current working directory and your git branch name if you are in a git project.
Perhaps the easiest way to edit if you have VS Code installed is to run the following command in the terminal:
code ~/.zshrc
Then copy and paste the following lines into the file:
# 1. Load the vcs_info module
autoload -Uz vcs_info

# 2. Configure vcs_info
# Enable check-for-changes (so it knows if files are modified)
zstyle ':vcs_info:*' check-for-changes true
zstyle ':vcs_info:*' unstagedstr '!'   # Display ! if there are unstaged changes
zstyle ':vcs_info:*' stagedstr '+'     # Display + if there are staged changes

# Set the format of the output
# %b = branch name
# %u = unstagedstr (from above)
# %c = stagedstr (from above)
zstyle ':vcs_info:git:*' formats '(%b%u%c)'
zstyle ':vcs_info:git:*' actionformats '(%b|%a%u%c)' # Used during rebase/merge

# 3. Use the precmd hook
# This function runs automatically before every prompt display
precmd() {
    vcs_info
}

# 4. Set the prompt
# We use ${vcs_info_msg_0_} to grab the info generated by the function above
setopt PROMPT_SUBST
PROMPT='%(?.%F{green}√.%F{red}?%?)%f %B%F{240}%1~%f%b %F{red}${vcs_info_msg_0_}%f %# '
Make sure to delete any other lines that set the PROMPT variable that are not
part of the above script.
Shell scripts
A way to write simple programs using the linux commands and some control flow elements. Good for small things. Never write anything complicated using shell.
Shell Script File
Shell script files typically use the extension *.sh, e.g. script.sh.
Shell script files start with a shebang line, #!/bin/bash.
#!/bin/bash

echo "Hello world!"
To execute shell script you can use the command:
source script.sh
Hint: You can use the
nanotext editor to edit simple files like this.
In-Class Activity: Shell Challenge
Prerequisite: You should have completed Part I above to have access to a Linux or MacOS style shell.
Part 2: Scavenger Hunt
Complete the steps using only the command line!
You can use echo to write to the file, or text editor nano.
Feel free to reference the cheat sheet below and the notes above.
-
Create a directory called
treasure_huntin your course projects folder. -
In that directory create a file called
command_line_scavenger_hunt.txtthat contains the following:- Your name / group members
-
Run these lines and record the output into that
.txtfile:
whoami                    # What's your username?
hostname                  # What's your computer's name?
pwd                      # Where do you start?
echo $HOME               # What's your home directory path?
-
Inside that directory, create a text file named
clue_1.txtwith the content "The treasure is hidden in plain sight" -
Create a subdirectory called
secret_chamber -
In the
secret_chamberdirectory, create a file calledclue_2.txtwith the content "Look for a hidden file" -
Create a hidden file in the
secret_chamberdirectory called.treasure_map.txtwith the content "Congratulations. You found the treasure" -
When you're done, change to the parent directory of
treasure_huntand run the commandzip -r treasure_hunt.zip treasure_hunt.- Or if you are on Git Bash, you may have to use the command
tar.exe -a -c -f treasure_hunt.zip treasure_hunt
- Or if you are on Git Bash, you may have to use the command
-
Upload
treasure_hunt.zipto gradescope - next time we will introduce git and github and use that platform going forward. -
Optional: For Bragging Rights Create a shell script that does all of the above commands and upload that to Gradescope as well.
Command Line Cheat Sheet
Basic Navigation & Listing
Mac/Linux (Bash/Zsh):
# Navigate directories
cd ~                    # Go to home directory
cd /path/to/directory   # Go to specific directory
pwd                     # Show current directory

# List files and directories
ls                      # List files
ls -la                  # List all files (including hidden) with details
ls -lh                  # List with human-readable file sizes
ls -t                   # List sorted by modification time
Windows (PowerShell/Command Prompt):
# Navigate directories
cd ~                    # Go to home directory (PowerShell)
cd %USERPROFILE%        # Go to home directory (Command Prompt)
cd C:\path\to\directory # Go to specific directory
pwd                     # Show current directory (PowerShell)
cd                      # Show current directory (Command Prompt)

# List files and directories
ls                      # List files (PowerShell)
dir                     # List files (Command Prompt)
dir /a                  # List all files including hidden
Get-ChildItem -Force    # List all files including hidden (PowerShell)
Finding Files
Mac/Linux:
# Find files by name
find /home -name "*.pdf"           # Find all PDF files in /home
find . -type f -name "*.log"       # Find log files in current directory
find /usr -type l                  # Find symbolic links

# Find files by other criteria
find . -type f -size +1M           # Find files larger than 1MB
find . -mtime -7                   # Find files modified in last 7 days
find . -maxdepth 3 -type d         # Find directories up to 3 levels deep
Windows:
# PowerShell - Find files by name
Get-ChildItem -Path C:\Users -Filter "*.pdf" -Recurse
Get-ChildItem -Path . -Filter "*.log" -Recurse
dir *.pdf /s                       # Command Prompt - recursive search

# Find files by other criteria
Get-ChildItem -Recurse | Where-Object {$_.Length -gt 1MB}  # Files > 1MB
Get-ChildItem -Recurse | Where-Object {$_.LastWriteTime -gt (Get-Date).AddDays(-7)}  # Last 7 days
Counting & Statistics
Mac/Linux:
# Count files
find . -name "*.pdf" | wc -l       # Count PDF files
ls -1 | wc -l                      # Count items in current directory

# File and directory sizes
du -sh ~/Documents                 # Total size of Documents directory
du -h --max-depth=1 /usr | sort -rh  # Size of subdirectories, largest first
ls -lah                            # List files with sizes
Windows:
# Count files (PowerShell)
(Get-ChildItem -Filter "*.pdf" -Recurse).Count
(Get-ChildItem).Count              # Count items in current directory

# File and directory sizes
Get-ChildItem -Recurse | Measure-Object -Property Length -Sum  # Total size
dir | sort length -desc            # Sort by size (Command Prompt)
Text Processing & Search
Mac/Linux:
# Search within files
grep -r "error" /var/log           # Search for "error" recursively
grep -c "hello" file.txt           # Count occurrences of "hello"
grep -n "pattern" file.txt         # Show line numbers with matches

# Count lines, words, characters
wc -l file.txt                     # Count lines
wc -w file.txt                     # Count words
cat file.txt | grep "the" | wc -l  # Count lines containing "the"
Windows:
# Search within files (PowerShell)
Select-String -Path "C:\logs\*" -Pattern "error" -Recurse
(Select-String -Path "file.txt" -Pattern "hello").Count
Get-Content file.txt | Select-String -Pattern "the" | Measure-Object

# Command Prompt
findstr /s "error" C:\logs\*       # Search for "error" recursively
find /c "the" file.txt             # Count occurrences of "the"
System Information
Mac/Linux:
# System stats
df -h                              # Disk space usage
free -h                            # Memory usage (Linux)
system_profiler SPHardwareDataType # Hardware info (Mac)
uptime                             # System uptime
who                                # Currently logged in users

# Process information
ps aux                             # List all processes
ps aux | grep chrome               # Find processes containing "chrome"
ps aux | wc -l                     # Count total processes
Windows:
# System stats (PowerShell)
Get-WmiObject -Class Win32_LogicalDisk | Select-Object Size,FreeSpace
Get-WmiObject -Class Win32_ComputerSystem | Select-Object TotalPhysicalMemory
(Get-Date) - (Get-CimInstance Win32_OperatingSystem).LastBootUpTime  # Uptime
Get-LocalUser                      # User accounts

# Process information
Get-Process                        # List all processes
Get-Process | Where-Object {$_.Name -like "*chrome*"}  # Find chrome processes
(Get-Process).Count                # Count total processes

# Command Prompt alternatives
wmic logicaldisk get size,freespace  # Disk space
tasklist                           # List processes
tasklist | find "chrome"           # Find chrome processes
File Permissions & Properties
Mac/Linux:
# File permissions and details
ls -l filename                     # Detailed file information
stat filename                     # Comprehensive file statistics
file filename                     # Determine file type

# Find files by permissions
find . -type f -readable           # Find readable files
find . -type f ! -executable       # Find non-executable files
Windows:
# File details (PowerShell)
Get-ItemProperty filename          # Detailed file information
Get-Acl filename                   # File permissions
dir filename                       # Basic file info (Command Prompt)

# File attributes
Get-ChildItem | Where-Object {$_.Attributes -match "ReadOnly"}  # Read-only files
Network & Hardware
Mac/Linux:
# Network information
ip addr show                       # Show network interfaces (Linux)
ifconfig                          # Network interfaces (Mac/older Linux)
networksetup -listallhardwareports # Network interfaces (Mac)
cat /proc/cpuinfo                 # CPU information (Linux)
system_profiler SPHardwareDataType # Hardware info (Mac)
Windows:
# Network information (PowerShell)
Get-NetAdapter                     # Network interfaces
ipconfig                          # IP configuration (Command Prompt)
Get-WmiObject Win32_Processor      # CPU information
Get-ComputerInfo                   # Comprehensive system info
Platform-Specific Tips
Mac/Linux Users:
- Your home directory is
~or$HOME - Hidden files start with a dot (.)
- Use
man commandfor detailed help - Try
which commandto find where a command is located
Windows Users:
- Your home directory is
%USERPROFILE%(Command Prompt) or$env:USERPROFILE(PowerShell) - Hidden files have the hidden attribute (use
dir /ahto see them) - Use
Get-Help commandin PowerShell orhelp commandin Command Prompt for detailed help - Try
where commandto find where a command is located
Universal Tips:
- Use Tab completion to avoid typing long paths
- Most shells support command history (up arrow or Ctrl+R)
- Combine commands with pipes (
|) to chain operations - Search online for "[command name] [your OS]" for specific examples
Potential Exam Questions
-
What command would you use to create a directory structure
~/projects/rust/assignment_01in a single command?- a)
mkdir ~/projects/rust/assignment_01 - b)
mkdir -p ~/projects/rust/assignment_01 - c)
touch ~/projects/rust/assignment_01 - d)
cd ~/projects/rust/assignment_01
- a)
-
In the permission string
-rw-r--r--, what can the file owner do?- a) Read only
- b) Read and write only
- c) Read, write, and execute
- d) Execute only
-
Write a command pipeline that lists all files in the current directory, filters for
.txtfiles, and counts how many there are.
Hello Git!
About This Module
This module introduces version control concepts and Git fundamentals for individual development workflow. You'll learn to track changes, create repositories, and use GitHub for backup and sharing. This foundation prepares you for collaborative programming and professional development practices.
Prework
Read or at least skim through Chapter 1: Getting Started, Chapter 2, 2.1-2.5 and Section 3.1. Don't worry if you don't fully understand the concepts, we'll cover them in class.
If you're on Windows, install git from
https://git-scm.com/downloads.
You probably already did this to use git-bash for the Shell class activity.
MacOS comes pre-installed with git.
From your Home or projects directory in a terminal or cmd, run the command:
git clone https://github.com/cdsds210/simple-repo.git
If it is the first time, it may ask you to login or authenticate with GitHub.
Ultimately, you want to cache your GitHub credentials locally on your computer so you don't have to login every time. We suggest you do this with the GitHub CLI.
Some other resources you might find helpful:
- GitHub's Git Handbook - Core concepts overview
- Git Commands Cheat Sheet
Pre-lecture Reflections
Before class, consider these questions:
-
Snapshots vs. Differences Most version control systems store information as a list of file-based changes (deltas). How does Git store data differently, and how does it handle files that haven't changed between commits?
-
The Three States Git files reside in one of three main states: modified, staged, and committed. Describe what each state represents in the workflow. Specifically, what is the purpose of the "staging area" (or index) before a commit is finalized?
-
Local vs. Centralized Operations In a Centralized Version Control System (CVCS), operations often rely on a connection to a central server. How does Git’s nature as a Distributed Version Control System (DVCS) differ regarding offline work and speed?
-
Integrity and Identity Git generates a 40-character string (SHA-1 hash) for every commit and file. Why does Git do this, and what does it prevent from happening to your project's history without you knowing?
Learning Objectives
By the end of this module, you should be able to:
- Understand why version control is critical for programming
- Configure Git for first-time use
- Create repositories and make meaningful commits
- Connect local repositories to GitHub
- Use the basic Git workflow for individual projects
- Recover from common Git mistakes
You may want to follow along with the git commands in your own environment during the lecture.
Why Version Control Matters
The Problem Without Git:
my_project.rs
my_project_backup.rs
my_project_final.rs
my_project_final_REALLY_FINAL.rs
my_project_broken_trying_to_fix.rs
my_project_working_maybe.rs
The Solution With Git:
git log --oneline
a1b2c3d Fix input validation bug
e4f5g6h Add error handling for file operations
h7i8j9k Implement basic calculator functions
k1l2m3n Initial project setup
Key Benefits:
- Never lose work: Complete history of all changes
- Fearless experimentation: Try new ideas without breaking working code
- Clear progress tracking: See exactly what changed and when
- Professional workflow: Essential skill for any programming job
- Backup and sharing: Store code safely in the cloud
Core Git Concepts
Repository (Repo): A folder tracked by Git, containing your project and its complete history.
Commit: A snapshot of your project at a specific moment, with a message explaining what changed.
The Three States:
- Working Directory: Files you're currently editing
- Staging Area: Changes prepared for next commit
- Repository: Committed snapshots stored permanently
The Basic Workflow:
Edit files → Stage changes → Commit snapshot
     (add)      (commit)
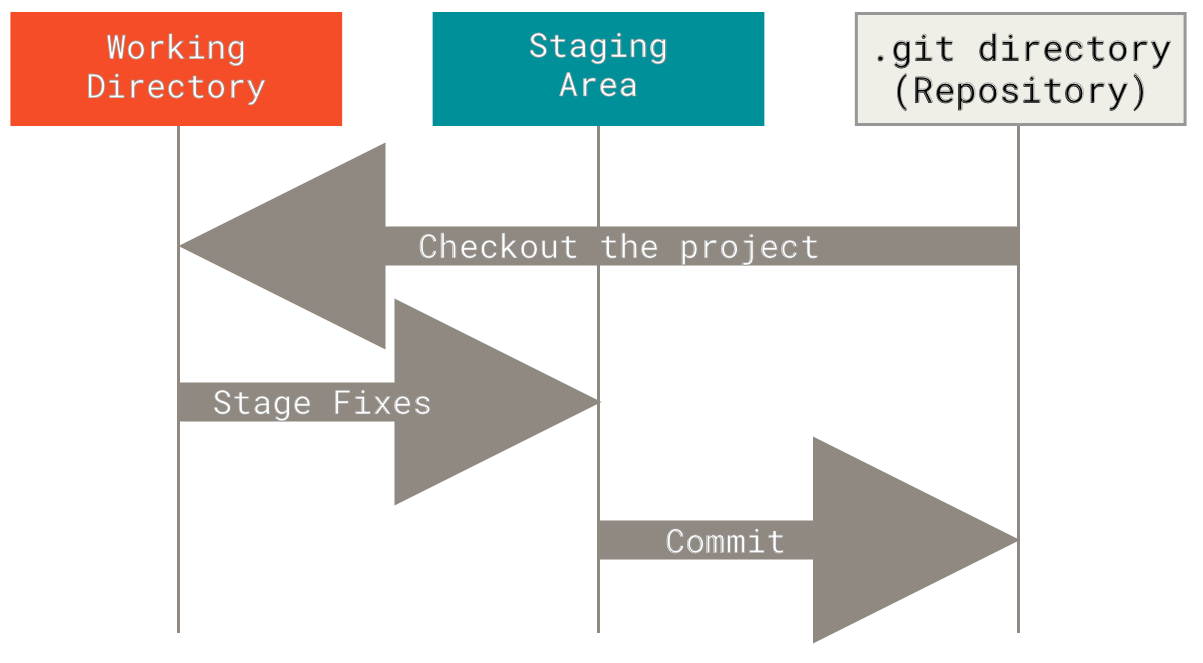
Push: Uploads your local commits to a remote repository (like GitHub). Takes your local changes and shares them with others.
Local commits → Push → Remote repository
Pull: Downloads commits from a remote repository and merges them into your current branch. Gets the latest changes from others.
Remote repository → Pull → Local repository (updated)
Merge: Combines changes from different branches. Takes commits from one branch and integrates them into another branch.
Feature branch + Main branch → Merge → Combined history
Pull Request (PR): A request to merge your changes into another branch, typically used for code review. You "request" that someone "pull" your changes into the main codebase.
Your branch → Pull Request → Review → Merge into main branch
Git Branching
Lightweight Branching:
Git's key strength is efficient branching and merging:
- Main branch: Usually called
main(ormasterin older repos) - Feature branches: Created for new features or bug fixes
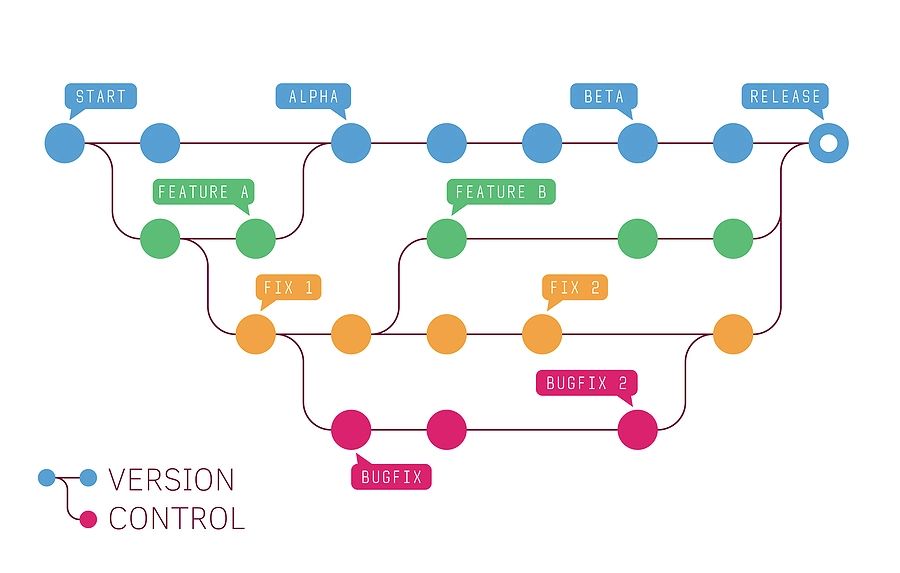
Branching Benefits:
- Isolate experimental work
- Enable parallel development
- Facilitate code review process
- Support different release versions
Essential Git Commands
Here are some more of those useful shell commands!
One-Time Setup
# Configure your identity (use your real name and email)
git config --global user.name "Your Full Name"
git config --global user.email "your.email@example.com"
If you don't want to publish your email in all your commits on GitHub, then highly recommended to get a "no-reply" email address from GitHub. Here are directions.
# Set default branch name
git config --global init.defaultBranch main
Note: The community has moved away from
masteras the default branch name, but it may still be default in some installations.
# Verify configuration
git config list  # local configuration
git config list --global # global configuration
Starting a New Project
# Create project directory
mkdir my_rust_project
cd my_rust_project

# Initialize Git repository
git init

# Check status
git status
Daily Git Workflow (without GithHub)
# Create a descriptive branch name for the change you want to make
git checkout -b topic_branch

# Check what's changed
git status                    # See current state
git diff                      # See specific changes

# make edits to, for example filename.rs

# Stage changes for commit
git add filename.rs          # Add specific file
git add .                    # Add all changes in current directory

# Create commit with a comment
git commit -m "Add calculator function"

# View history
git log                      # Full commit history
git log --oneline           # Compact view

# View branches
git branch

# Switch back to main
git checkout main

# Merge topic branch back into main
git merge topic_branch

# Delete the topic branch when finished
git branch -d topic_branch
Writing Good Commit Messages
The Golden Rule: Your commit message should complete this sentence: "If applied, this commit will [your message here]"
Good Examples:
git commit -m "Add input validation for calculator"
git commit -m "Fix division by zero error"
git commit -m "Refactor string parsing for clarity"
git commit -m "Add tests for edge cases"
Bad Examples:
git commit -m "stuff"           # Too vague
git commit -m "fixed it"        # What did you fix?
git commit -m "more changes"    # Not helpful
git commit -m "asdfjkl"        # Meaningless
Commit Message Guidelines:
- Start with a verb: Add, Fix, Update, Remove, Refactor
- Be specific: What exactly did you change?
- Keep it under 50 characters for the first line
- Use present tense: "Add function" not "Added function"
Working with GitHub
Why GitHub?
- Remote backup: Your code is safe in the cloud
- Easy sharing: Share projects with instructors and peers
- Portfolio building: Showcase your work to employers
- Collaboration: Essential for team projects
Connecting to GitHub:
# Create repository on GitHub first (via web interface)
# Then connect your local repository:

git remote add origin https://github.com/yourusername/repository-name.git
git branch -M main
git push -u origin main
Note: The above instructions are provided to you by GitHub when you create an empty repository.
Git Remote Server (GitHub) Related Command
# Check remote connection
git remote -v

# Clone existing repository
git clone https://github.com/username/repository.git
cd repository

# Pull any changes from GitHub
git pull

# Push your commits to GitHub
git push
Daily GitHub Workflow
# Create a descriptive branch name for the change you want to make
git checkout -b topic_branch

# Check what's changed
git status                    # See current state
git diff                      # See specific changes

# make edits to, for example filename.rs

# Stage changes for commit
git add filename.rs          # Add specific file
git add .                    # Add all changes in current directory

# Create commit with a comment
git commit -m "Add calculator function"

# View history
git log                      # Full commit history
git log --oneline           # Compact view

# View branches
git branch

# Run local validation tests on changes

# Push to GitHub
git push origin topic_branch

# Create a Pull Request on GitHub

# Repeat above to make any changes from PR review comments

# When done, merge PR to main on GitHub

git checkout main

git pull

# Delete the topic branch when finished
git branch -d topic_branch
Git for Homework
Recommended Workflow:
Updated Jan 27, 2026 to reflect workflow with GitHub Classroom.
# Clone assignment from GitHub classroom.
git clone <repo-URL>

# Create and checkout a new development branch
git branch q1
git checkout q1

# Alternatively, you can combine these steps into one:
git checkout -b q1 # create and checkout a new branch called q1

# Work and commit frequently
# ... write some code for example in src/main.rs...
git add src/main.rs
git commit -m "Implement basic data structure"

# ... write more code ...
git add src/main.rs
git commit -m "Add error handling"

# Push your commits to GitHub
git push -u origin q1

# As practice, we want you to create a pull request on GitHub, then merge
# that pull request into the main branh on github.

# So now you have commits merged to main on GitHub that is not reflected locally

git checkout main  # switch to main branch
git pull  # pull down all your remote changes

# Now you are ready to checkout a new development branch
Best Practices for This Course:
- Commit early and often: We expect to see a minimum of 3-5 commits per assignment
- One logical change per commit: Each commit should make sense on its own
- Meaningful progression: Your commit history should tell the story of your solution
- Clean final version: Make sure your final commit has working, clean code
Common Git Scenarios
"I made a mistake in my last commit message"
git commit --amend -m "Corrected commit message"
"I forgot to add a file to my last commit"
git add forgotten_file.rs
git commit --amend --no-edit
"I want to undo changes I haven't committed yet"
git checkout -- filename.rs    # Undo changes to specific file
git reset --hard HEAD          # Undo ALL uncommitted changes (CAREFUL!)
"I want to see what changed in a specific commit"
git show commit_hash           # Show specific commit
git log --patch               # Show all commits with changes
Understanding .gitignore
What NOT to Track: Some files should never be committed to Git:
# Rust build artifacts
/target/

# IDE files
.vscode/settings.json
.idea/
*.swp

# OS files
.DS_Store
Thumbs.db

# Personal notes
notes.txt
TODO.md
Creating .gitignore:
# Create .gitignore file
touch .gitignore
# Edit with your preferred editor to add patterns above

# Commit the .gitignore file
git add .gitignore
git commit -m "Add .gitignore for Rust project"
Resources for learning more and practicing
- A gamified tutorial for the basics: https://ohmygit.org/
- Interactive online Git tutorial that goes a bit deper: https://learngitbranching.js.org/
- Another good tutorial (examples in ruby): https://gitimmersion.com/
- Pro Git book (free online): https://git-scm.com/book/en/v2
You'll be using another learning app for HW1.ß
GitHub Collaboration Challenge
Form teams of three people.
Follow these instructions with your teammates to practice creating a GitHub repository, branching, pull requests (PRs), review, and merging. Work in groups of three—each person will create and review a pull request.
1. Create and clone the repository (≈3 min)
- Choose one teammate to act as the repository lead.
- They should log in to GitHub, click the “+” menu in the upper‑right and select New repository.
- Call the repository "github-class-challenge", optionally add a description, make the visibility public, check “Add a README,” and
- click Create repository.
- Go to Settings/Collaborators and add your teammates as developers with write access.
- Each team member needs a local copy of the repository. On the repo’s main page, click Code, copy the HTTPS URL, open a terminal, navigate to the folder where you want the project, and run:
git clone <repo‑URL>
Cloning creates a full local copy of all files and history.
2. Create your own topic branch (≈2 min)
A topic branch lets you make changes without affecting the default main branch. GitHub recommends using a topic branch when making a pull request.
On your local machine:
git checkout -b <your‑first‑name>-topic
git push -u origin <your‑first‑name>-topic  # creates the branch on GitHub
Pick a branch name based on your first name (for example alex-topic).
3. Add a personal file, commit and push (≈5 min)
-
In your cloned repository (on your topic branch), create a new text file named after yourself—e.g.,
alex.txt. Write a few sentences about yourself (major, hometown, a fun fact). -
Stage and commit the file:
git add alex.txt
git commit -m "Add personal bio"
Good commit messages explain what changed.
-
Push your commit to GitHub:
git push
4. Create a pull request (PR) for your teammates to review (≈3 min)
- On GitHub, click Pull requests → New pull request.
- Set the base branch to
mainand the compare branch to your topic branch. - Provide a clear title (e.g. “Add Alex’s bio”) and a short description of what you added. Creating a pull request lets your collaborators review and discuss your changes before merging them.
- Request reviews from your two teammates.
5. Review your teammates’ pull requests (≈4 min)
- Open each of your teammates’ PRs.
- On the Conversation or Files changed tab, leave at least one constructive comment (ask a question or suggest something you’d like them to add). You can comment on a specific line or leave a general comment.
- Submit your review with the Comment option. Pull request reviews can be comments, approvals, or requests for changes; you’re only commenting at this stage.
6. Address feedback by making another commit (≈3 min)
-
Read the comments on your PR. Edit your text file locally in response to the feedback.
-
Stage, commit, and push the changes:
git add alex.txt
git commit -m "Address feedback"
git push
Any new commits you push will automatically update the open pull request.
-
Reply to the reviewer’s comment in the PR, explaining how you addressed their feedback.
7. Approve and merge pull requests (≈3 min)
- After each PR author has addressed the comments, revisit the PRs you reviewed.
- Click Review changes → Approve to approve the updated PR.
- Once a PR has at least one approval, a teammate other than the author should merge it.
-In the PR, scroll to the bottom and click Merge pull request, then Confirm merge. - Delete the topic branch when prompted; keeping the branch list tidy is good practice.
Each student should merge one of the other students’ PRs so everyone practices.
8. Capture a snapshot for submission (≈3 min)
- One teammate downloads a snapshot of the final repository. On the repo’s main page, click Code → Download ZIP. GitHub generates a snapshot of the current branch or commit.
- Open the Commits page (click the “n commits” link) and take a screenshot showing the commit history.
- Go to Pull requests → Closed, and capture a screenshot showing the three closed PRs and their approval status. You can also use the Activity view to see a detailed history of pushes, merges, and branch changes.
- Upload the ZIP file and screenshots to Gradescope.
Tips
- Use descriptive commit messages and branch names.
- Each commit is a snapshot; keep commits focused on a single change.
- Be polite and constructive in your feedback.
- Delete merged branches to keep your repository clean.
This exercise walks you through the entire GitHub flow—creating a repository, branching, committing, creating a PR, reviewing, addressing feedback, merging, and capturing a snapshot. Completing these steps will help you collaborate effectively on future projects.
Potential Exam Questions
-
What is the correct sequence for making your first commit in a new project?
- a)
git add .,git init,git commit -m "message" - b)
git init,git add .,git commit -m "message" - c)
git commit -m "message",git add .,git init - d)
git init,git commit -m "message",git add .
- a)
-
Which commit message follows best practices?
- a) "stuff"
- b) "Fixed the bug that was causing problems"
- c) "Fix division by zero error in calculator"
- d) "changes to main.rs"
-
Write the command sequence to create a new Git repository, add a file called
main.rs, commit it with message "Add main program", and push to GitHub remote named 'origin'.
Hello Rust!
About This Module
This module provides your first hands-on experience with Rust programming. You'll write actual programs, understand basic syntax, and see how Rust's compilation process works. We'll focus on building confidence through practical programming while comparing key concepts to Python.
Prework
Prework Readings
Review this module.
Read the following Rust basics:
- The Rust Programming Language - Chapter 1.2: Hello, World!
- The Rust Programming Language - Chapter 1.3: Hello, Cargo!
Optionally browse:
Pre-lecture Reflections
Before class, consider these questions:
- How does compiling code differ from running Python scripts directly?
- What might be the advantages of catching errors before your program runs?
- How does Rust's
println!macro compare to Python'sprint()function? - Why might explicit type declarations help prevent bugs?
- What challenges might you face transitioning from Python's flexibility to Rust's strictness?
Topics
- Installing Rust
- Compiled vs Interpretted Languages
- Write and compile our first simple program
Installing Rust
Before we can write Rust programs, we need to install Rust on your system.
From https://www.rust-lang.org/tools/install:
On MacOS:
# Install Rust via rustup
curl --proto '=https' --tlsv1.2 -sSf https://sh.rustup.rs | sh
Question: can you interpret the shell command above?
On Windows:
Download and run rustup-init.exe (64-bit).
It will ask you some questions.
Download Visual Studio Community Edition Installer.
Open up Visual Studio Community Edition Installer and install the C++ core
desktop features.
Verify Installation
From MacOS terminal or Windows CMD or PowerShell
rustc --version    # Should show Rust compiler version
cargo --version    # Should show Cargo package manager version
rustup --version   # Should show Rustup toolchain installer version
Troubleshooting Installation:
# Update Rust if already installed
rustup update

# Check which toolchain is active
rustup show

# Reinstall if needed (a last resort!!)
rustup self uninstall
# Then reinstall following installation steps above
Write and compile simple Rust program
Generally you would create a project directory for all your projects and then a subdirectory for each project.
Follow along now if you have Rust installed, or try at your first opportunity later.
$ mkdir ~/projects
$ cd ~/projects
$ mkdir hello_world
$ cd hello_world
All Rust source files have the extension .rs.
Create and edit a file called main.rs.
For example with the nano editor on MacOS
# From MacoS terminal
nano main.rs
or notepad on Windows
# From Windows CMD or PowerShell
notepad main.rs
and add the following code:
fn main() {
    println!("Hello, world!");
}
Note: Since our course notes are in
mdbook, code cells like above can be executed right from the notes!In many cases we make the code cell editable right on the web page!
If you created that file on the command line, then you compile and run the program with the following commands:
$ rustc main.rs # compile with rustc which creates an executable
If it compiled correctly, you should have a new file in your directory
For example on MacOS or Linux you might see:
hello_world  % ls -l
total 880
-rwxr-xr-x  1 tgardos  staff  446280 Sep 10 21:03 main
-rw-r--r--  1 tgardos  staff      45 Sep 10 21:02 main.rs
Question: What is the new file? What do you observe about the file properties?
On Windows you'll see main.exe.
$ ./main           # run the executable
Hello, world!
Compiled (e.g. Rust) vs. Interpreted (e.g. Python)
Python: One Step (Interpreted)
python hello.py
- Python reads your code line by line and executes it immediately
- No separate compilation step needed
Rust: Two Steps (Compiled)
# Step 1: Compile (translate to machine code)
rustc hello.rs

# Step 2: Run the executable
./hello
rustcis your compilerrustctranslates your entire program to machine code- Then you run the executable (why
./?)
The main() function
fn main() { ... }
is how you define a function in Rust.
The function name main is reserved and is the entry point of the program.
The println!() Macro
Let's look at the single line of code in the main function:
println!("Hello, world!");Rust convention is to indent with 4 spaces -- never use tabs!!
println!is a macro which is indicated by the!suffix.- Macros are functions that are expanded at compile time.
- The string
"Hello, world!"is passed as an argument to the macro.
The line ends with a ; which is the end of the statement.
More Printing Tricks
Let's look at a program that prints in a bunch of different ways.
// A bunch of the output routines
fn main() {
    let x = 9;
    let y = 16;

    print!("Hello, DS210!\n");       // Need to include the newline character
    println!("Hello, DS210!\n");     // The newline character here is redundant

    println!("{} plus {} is {}", x, y, x+y);  // print with formatting placeholders
    //println!("{x} plus {y} is {x+y}");      // error: cannot use `x+y` in a format string
    println!("{x} plus {y} is {}\n", x+y);      // but you can put variable names in the format string
}
More on println!
- first parameter is a format string
{}are replaced by the following parameters
print! is similar to println! but does not add a newline at the end.
To dig deeper on formatting strings:
fmtmodule- Format strings syntax
Input Routines
Here's a fancier program. You don't have to worry about the details, but
paste it into a file name.rs, run rustc name.rs and then ./name.
// And some input routines
// So this is for demo purposes
use std::io;
use std::io::Write;

fn main() {
    let mut user_input = String::new();
    print!("What's your name? ");
    io::stdout().flush().expect("Error flushing");  // flush the output and print error if it fails
    let _ =io::stdin().read_line(&mut user_input);  // read the input and store it in user_input
    println!("Hello, {}!", user_input.trim());
}
Project manager: cargo
Rust comes with a very helpful project and package manager: cargo
-
create a project:
cargo new PROJECT-NAME- creates a new directory with the project name and initializes git
- you can rename branch name from
mastertomainby runninggit branch -m master main
-
main file will be
PROJECT-NAME/src/main.rs -
cd PROJECT-NAMEto go into the project directory -
to run:
cargo run- compiles and runs the program
-
to just build:
cargo build
Cargo example
~ % cd ~/projects

projects % cargo new cargo-hello
    Creating binary (application) `cargo-hello` package
note: see more `Cargo.toml` keys and their definitions at https://doc.rust-lang.org/cargo/reference/manifest.html

projects % cd cargo-hello

cargo-hello % tree
.
├── Cargo.toml
└── src
    └── main.rs

2 directories, 2 files

cargo-hello % cargo run
   Compiling cargo-hello v0.1.0 (/Users/tgardos/projects/cargo-hello)
    Finished `dev` profile [unoptimized + debuginfo] target(s) in 0.21s
     Running `target/debug/cargo-hello`
Hello, world!

% tree -L 3
.
├── Cargo.lock
├── Cargo.toml
├── src
│   └── main.rs
└── target
    ├── CACHEDIR.TAG
    └── debug
        ├── build
        ├── cargo-hello
        ├── cargo-hello.d
        ├── deps
        ├── examples
        └── incremental

8 directories, 6 files
Cargo --release
By default, cargo makes a slower debug build that has extra
debugging information.
We'll see more about that later.
Add --release to create a "fully optimized" version:
- longer compilation
- faster execution
- some runtime checks not included (e.g., integer overflow)
- debuging information not included
- the executable in a different folder
cargo-hello (master) % cargo build --release
  Compiling cargo-hello v0.1.0 (/Users/tgardos/projects/cargo-hello)
   Finished `release` profile [optimized] target(s) in 0.38s
(.venv) √ cargo-hello (master) % tree -L 2
.
├── Cargo.lock
├── Cargo.toml
├── src
│   └── main.rs
└── target
   ├── CACHEDIR.TAG
   ├── debug
   └── release

5 directories, 4 files
Cargo check
If you just want to check if your current version compiles: cargo check
- Much faster for big projects
Hello Rust Activity
-
Get in groups of 3+
-
Place the lines of code in order in two parts on the page: your shell, and your code file
main.rsto make a reasonable sequence and functional code.
git branch -m master main

    println!("Hello, world!");

cargo run

git push -u origin main

cargo new hello_world

nano src/main.rs

cd hello_world

fn main() {

git add src/main.rs

ls -la

git commit -m "Initial commit"

}
Solution
# From the shell
cargo new hello_world
cd hello_world
git branch -m master main
ls -la
nano src/main.rs
// From the code file
fn main() {
    println!("Hello, world!");
}
// save and exit the editor
# From the shell
cargo run
git add src/main.rs
git commit -m "Initial commit"
git push -u origin main
Overview of Programming languages
Learning Objectives
- Programming languages
- Describe the differences between a high level and low level programming language
- Describe the differences between an interpreted and compiled language
- Describe the differences between a static and dynamically typed language
- Know that there are different programming paradigms such as imperative and functional
- Describe the different memory management techniques
- Be able to identify the the properties of a particular language such as rust.
Various Language Levels
-
Native code
- usually compiled output of a high-level language, directly executable on target processor
-
Assembler
- low-level but human readable language that targets processor
- pros: as fine control as in native code
- cons: not portable
-
High level languages
- various levels of closeness to the architecture: from C to Prolog
- efficiency:
- varies
- could optimize better
- pros:
- very portable
- easier to build large projects
- cons:
- some languages are resource–inefficient
Assembly Language Examples
  ARM                          X86
. text                       section .text
.global _start                 global _start
_start:                      section .data
   mov r0, #1                msg db  'Hello, world!',0xa
   ldr r1, =message          len equ 0xe
   ldr r2, =len              section .text
   mov r7, #4                _start:
   swi 0                     mov edx,len ;message length
   mov r7, #1                mov ecx,msg ;message to write
                             mov ebx,1   ;file descriptor (stdout)
.data.                       mov eax,4   ;system call number (sys_write)
message:                     int 0x80    ;call kernel
   .asciz "hello world!\n"   mov ebx,0   ;process' exit code
len = .-message.             mov eax,1   ;system call number (sys_exit)
                             int 0x80    ;call kernel - this interrupt won't return
Interpreted vs. compiled
Interpreted:
- An application (interpreter) reads commands one by one and executes them.
- One step process to run an application:
python hello.py
("Fully") Compiled:
- Translated to native code by compiler
- Usually more efficient
- Two steps to execute:
- Compile (Rust:
rustc hello.rs) - Run (Rust:
./hello)
- Compile (Rust:
Compiled to Intermediate Representation (IR):
- Example: Java
- Portable intermediate format
- Needs another application, Java virtual machine, that knows how to interpret it
- Example: Python
- Under some circumstances Python bytecode is created and cached in
__pycache__ - Python bytecode is platform independent and executed by the Python Virtual Machine
- Under some circumstances Python bytecode is created and cached in
Just-in-Time (JIT) compilation is an interesting wrinkle in that it can take interpreted and intermediate format languages and compile them down to machine code.
Type checking: static vs. dynamic
Dynamic (e.g., Python):
- checks if an object can be used for specific operation during runtime
- pros:
- don't have to specify the type of object
- procedures can work for various types
- faster or no compilation
- cons:
- slower at runtime
- problems are detected late
Consider the following python code.
def add(x,y):
    return x + y

print(add(2,2))
print(add("a","b"))
print(add(2,"b"))
    4
    ab

    ---------------------------------------------------------------------------

    TypeError                                 Traceback (most recent call last)

    Cell In[1], line 6
          4 print(add(2,2))
          5 print(add("a","b"))
    ----> 6 print(add(2,"b"))


    Cell In[1], line 2, in add(x, y)
          1 def add(x,y):
    ----> 2     return x + y


    TypeError: unsupported operand type(s) for +: 'int' and 'str'
There is optional typing specification, but it is not enforced, e.g. accepting ints.
import typing
def add(x:str, y:str) -> str:
    return x + y
print(add(2,2))    # doesn't complain about getting integer types
print(add("ab", "cd"))
#print(add(2,"n"))
    4
    abcd
- You can use packages such as
pyrightormypyas a type checker before running your programs - Supported by VSCode python extension
Type checking: static vs. dynamic
Static (e.g, C++, Rust, OCaml, Java):
- checks if types of objects are as specified
- pros:
- faster at runtime
- type mismatch detected early
- cons:
- often need to be explicit with the type
- making procedures generic may be difficult
- potentially slower compilation
C++:
int add(int x, int y) {
    return x + y;
}
Rust:
#![allow(unused)]
fn main() {
fn add(x:i32, y:i32) -> i32 {
    x + y
}
}
Type checking: static vs. dynamic
Note: some languages are smart and you don't have to always specify types (e.g., OCaml, Rust)
Rust:
#![allow(unused)]
fn main() {
let x : i32 = 7;
let y = 3;    // Implied to be default integer type
let z = x * y;  // Type of result derived from types of operands
}
In Class Poll
Various programming paradigms
Programming languages aren’t just “a language” — they also tend to encourage (or make easy) certain styles of programming. These styles are called programming paradigms. Most real languages are multi-paradigm, meaning you can mix and match several styles depending on the problem.
- Imperative
- Functional
- Object-oriented
- Declarative / programming in logic
Imperative
im·per·a·tive (adjective) -- give an authoritive command
In an imperative style, you tell the computer how to do something step-by-step: update variables, run loops, and execute statements in a particular order. This is often the most “direct” way to map your mental model onto code.
Rust support? Yes — Rust is very comfortable as an imperative language. You can write straightforward step-by-step code, while still benefiting from Rust’s emphasis on safety and clarity.
# Python -- Imperative
def factorial(N):
    ret = 1
    for i in range(N):
        ret = ret * i
    return ret
Functional
In a functional style, you try to treat computation as evaluating functions rather than executing commands. The focus is on:
- functions as values (you can pass them around)
- avoiding mutable state when possible
- composing small pieces into larger computations
Rust support? Partially, yes. Rust is not a “pure” functional language, but it supports many functional ideas (like emphasizing immutability and using functions/closures to transform data) and you’ll often see Rust code written in a functional-ish style when that makes things clearer.
; Scheme, a dialect of lisp -- functional

(define (factorial n) (cond ((= n 0) 1)
                            (t (* n (factorial (- n 1))))))
Object Oriented
In an object-oriented style, you organize code around “objects” that bundle data (state) together with behavior (methods). Common OO ideas include encapsulation (hiding internal details) and polymorphism (treating different kinds of things through a shared interface).
Rust support? Rust is not a classic “class-based OO” language, but it supports many OO design ideas. You can bundle data and behavior together and you can program to interfaces (in Rust, this is done with a mechanism called traits). Rust intentionally avoids some traditional OO features like inheritance-based class hierarchies.
// C++ -- Object oriented pattern
class Factorial {
   private:
     int64 value;
   public:
     int64 factorial(int input) {
        int64 temp = 1;
        for(int i=1; i<=input; i++) {
            temp = temp * i;
        }
        value = temp
     }
     int64 get_factorial() {
        return value;
     }
}
Declarative/Logic
In a declarative style, you describe what you want, and a system figures out how to produce it. Logic programming (like Prolog) is a classic example: you write facts and rules, and the language runtime searches for values that satisfy them.
Rust support? Rust is not a logic/declarative programming language in that sense. However, you can still write declarative-looking Rust when you chain together high-level operations, and in practice Rust often integrates with declarative systems (for example, querying data with SQL through libraries).
% Prolog -- declaritive / programming in logic
factorial(0,1).      % Base case
factorial(N,M) :-
    N>0,             % Ensure N is greater than 0
    N1 is N-1,       % Decrement N
    factorial(N1, M1),  % Recursive call
    M is N * M1.     % Calculate factorial
Memory management: manual vs. garbage collection
At least 3 kinds:
- Manual (e.g. C, C++)
- Garbage collection (e.g. Java, Python)
- Ownership-based (e.g. Rust)
Manual
- Need to explicitly ask for memory and return it
- pros:
- more efficient
- better in real–time applications
- cons:
- more work for the programmer
- more prone to errors
- major vector for attacks/hacking
Example below in C++.
Garbage collection
- Memory freed automatically
- pros:
- less work for the programmer
- more difficult to make mistakes
- cons:
- less efficient
- can lead to sudden slowdowns
Ownership-Based
- Keeps track of memory object ownership
- Allows borrowing, references without borrowing, move ownership
- When object goes out of scope, Rust automatically deallocates
- Managed deterministically at compile-time, not run-time like garbage collection
We'll dive deeper into Rust ownership later.
Rust Language (Recap)
-
high–level (but lower level than Python)
-
imperative (but has functional and object-oriented features)
-
compiled
-
static type checking
-
ownership-based memory management
Most important difference between Python and Rust?
How do we denote blocks of code?
- Python: indentation
- Rust:
{...}
| Language | formatting | scoping |
|---|---|---|
| Python | indentation | indentation |
| Rust | indentation | braces, {} |
Example in Rust
#![allow(unused)]
fn main() {
fn hi() {
    println!("Hello!");
    println!("How are you?");
}
}
Don't be afraid of braces!!! You'll encounter them in C, C++, Java, Javascript, PHP, Rust, ...
Memory Structure of an Executable Program
It's very helpful to have conceptual understanding of how memory is structured in executable programs.
The figure below illustrates a typical structure, where some low starting memory address is at the bottom and then memory addresses increase as you go up in the figure.
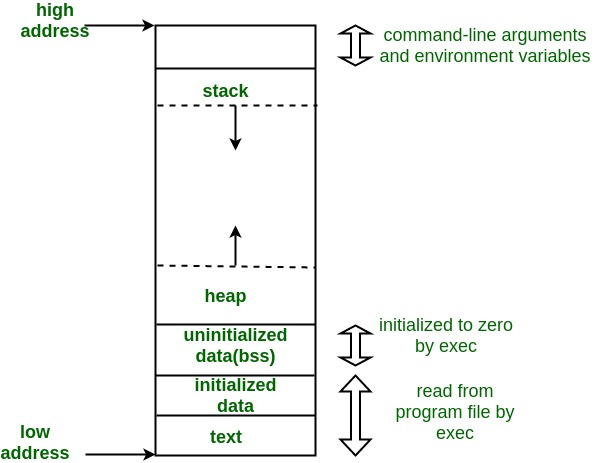
Here's a short description of each section starting from the bottom:
- text -- the code, e.g. program instructions
- initialized data -- explicitly initialized global/static variables
- uninitialized data (bss) -- uninitialized global/static variables, generally auto-initialied to zero. BSS -- Block Started by Symbol
- heap -- dynamically allocated memory. grows as structures are allocated
- stack -- used for local variables and function calls
In Class Poll
Example of unsafe programming in C
Let's take a look at the problem with the following C program which asks you to guess a string and hints whether your guess was lexically less or greater.
- Copy the code into a file
unsafe.c - Compile with a local C compiler, for example,
cc unsafe.c - Execute program, e.g.
./a.out
Try with the following length guesses:
- guesses of string length <= 20
- guesses of string length > 20
- guesses of string length >> 20
Pay attention to the printout of
secretString!
Lecture Note: Switch to code
#include <signal.h>
#include <stdio.h>
#include <string.h>
#include <stdlib.h>
int main(){
    char loop_bool[20];
    char secretString[20];
    char givenString[20];
    char x;
    int i, ret;

    memset(&loop_bool, 0, 20);
    for (i=0;i<19;i++) {
      x = 'a' + random() % 26;
      secretString[i] = x;
    }
    printf("secretString: %s\n", secretString);
    while (!loop_bool[0]) {
        gets(givenString);
        ret = strncmp(secretString, givenString, 20);
        if (0 == ret) {
            printf("SUCCESS!\n");
	    break;
	}else if (ret < 0){
	    printf("LESS!\n");
	} else {
	    printf("MORE!\n");
        }
        printf("secretString: %s\n", secretString);
    }
    printf("secretString: %s\n", secretString);
    printf("givenString: %s\n", givenString);
    return 0;
}
A Brief Aside -- The people behind the languages
Who are these people?
- Guido Van Rossum
- Graydon Hoare
- Bjarne Stroustrup
- James Gosling
- Brendan Eich
- Brian Kernighan and Dennis Ritchie
Who are these people?
- Guido Van Rossum -- Python
- Graydon Hoare -- Rust
- Bjarne Stroustrup -- C++
- James Gosling -- Java
- Brendan Eich -- Javascript
- Brian Kernighan and Dennis Ritchie -- C
Recap
- Programming languages vary along several axes: compiled vs. interpreted, static vs. dynamic type checking, and memory management strategy.
- Programming paradigms are “styles” of programming; many languages (including Rust) are multi-paradigm (imperative + some functional and OO design ideas, but not logic-programming).
- Memory management is a major practical difference between languages: manual (C/C++), garbage-collected (Python/Java), and ownership-based (Rust).
- Rust aims for performance and safety without a garbage collector; Python aims for simplicity and flexibility, often trading away low-level control/performance.
- A program’s memory is commonly organized into text, data, heap, and stack, and understanding this helps explain performance and safety issues.
- “Unsafe” C examples (like unchecked input) highlight how memory bugs can become security vulnerabilities.
- Languages come from real design communities—knowing some of the key people helps connect languages to their goals and trade-offs.
Guessing Game Part 1
Building a very small Rust application.
Guessing Game Part 1
We're going to build on "Hello Rust" to write a small guessing game program.
You're not expected to understand all the details of all the code, but rather start getting familiar with the language and with building applications.
Let's eat the cake 🍰 and then we'll learn the recipe👨🍳.
Tip: Follow along in your terminal or PowerShell window.
Learning objectives:
By the end of this module you should be able to:
- Use basic
cargocommands to create projects and compile rust code - Add external dependencies (crates) to a project
- Recognize some useful syntax like Rust's
Resulttype with.expect() - Recognize and fix some common Rust compilation errors
Keep Practicing with the Terminal
- This is Part 1 where we use the terminal
- In Part 2 (Discussion Sections), you will get more practice using VSCode which integrates
- code editor
- terminal window
- compiler hints
- AI assistance
Although we'll preview some VSCode use today too.
Guessing game demo
Compiling review and reference
Option 1: Compile directly
- put the content in file
hello.rs - command line:
- navigate to this folder
rustc hello.rs- run
./helloorhello.exe
Option 2: Use Cargo
- create a project:
cargo new PROJECT-NAME - main file will be
PROJECT-NAME/src/main.rs - to build and run:
cargo run - the machine code will be in :
./target/debug/PROJECT-NAME
Different ways to run Cargo
cargo runcompiles, runs, and saves the binary/executable in/target/debugcargo buildcompiles but does not runcargo checkchecks if it compiles (fastest)cargo run --releasecreates (slowly) "fully optimized" binary in/target/release
Back to the guessing game
In MacOS terminal or Windows PowerShell, go to the folder you created to hold all your projects:
cd ~/projects
Let's use cargo to create a project:
cargo new guessing-game
cd guessing-game

# check what the default branch name is
git branch

# if default branch is called `master`, rename it to `main`
git branch -m master main
Replace the contents of src/main.rs with:
use std::io;

fn main() {
    println!("Guess the number!");
    println!("Please input your guess.");

    let mut guess = String::new();

    // This is all technically one line of code
    io::stdin()
      .read_line(&mut guess)
      .expect("Failed to read line");

    println!("You guessed: {}", guess);
}
And then:
cargo run
Question: Program doesn't do much? How can we improve it?
More on variables
Let's take a look at this variable assignment:
#![allow(unused)]
fn main() {
    let mut guess = String::new();
}
As we saw in the earlier module, we assign a variable with let as in
#![allow(unused)]
fn main() {
let count = 5;
}
But by default Rust variables are immutable.
Definition:
im·mu·ta·ble
adjective
unchanging over time or unable to be changed
"an immutable fact"
Try executing the following code cell.
fn main() {
  let count = 5;
  count = 7;
}
Rust compiler errors are pretty descriptive!
error[E0384]: cannot assign twice to immutable variable `count`
 --> src/main.rs:4:1
  |
3 | let count = 5;
  |     ----- first assignment to `count`
4 | count = 7;
  | ^^^^^^^^^ cannot assign twice to immutable variable
  |
help: consider making this binding mutable
  |
3 | let mut count = 5;
  |     +++

For more information about this error, try `rustc --explain E0384`.
error: could not compile `playground` (bin "playground") due to 1 previous error
It often even tells you how to correct the error with the mut keyword to make
the variable mutable.
#![allow(unused)]
fn main() {
let mut count = 5;
count = 7;
}
Question: Why might it be helpful to have variables be immutable by default?
.expect() - a tricky concept
We'll go into all of this more later, but:
read_line()returns aResulttype which has two variants -OkandErrOkmeans the operation succeeded, and returns the successful valueErrmeans something went wrong, and it returns the string you passed to.expect()
More in a few future module.
More on macros!
- A macro is code that writes other code for you / expands BEFORE it compiles.
- They end with ! like println!, vec!, or panic!
For example, println!("Hello"); roughly expands into
#![allow(unused)]
fn main() {
use std::io::{self, Write};
io::stdout().write_all(b"Hello\n").unwrap();
}
while println!("Name: {}, Age: {}", name, age); expands into
#![allow(unused)]
fn main() {
use std::io::{self, Write};
io::stdout().write_fmt(format_args!("Name: {}, Age: {}\n", name, age)).unwrap();
}
Rust Crates
In Rust, the collection files in a project form a "crate".
You can have:
- binary or application crate, that you can execute directly, or a
- library crate, which you can use in your application
Rust makes it super easy to publish and use crates.
See crates.io.
Using crates: generate a random number
We want to add a random number, so we need a way of generating them.
Rust doesn't have a random number generator in its standard library
so we will use a crate called rand.
We can do that with the command:
cargo add rand
which will produce an output like...
Output
% cargo add rand
    Updating crates.io index
      Adding rand v0.9.2 to dependencies
             Features:
             + alloc
             + os_rng
             + small_rng
             + std
             + std_rng
             + thread_rng
             - log
             - nightly
             - serde
             - simd_support
             - unbiased
    Updating crates.io index
     Locking 17 packages to latest Rust 1.85.1 compatible versions
      Adding cfg-if v1.0.3
      Adding getrandom v0.3.3
      Adding libc v0.2.175
      Adding ppv-lite86 v0.2.21
      Adding proc-macro2 v1.0.101
      Adding quote v1.0.40
      Adding r-efi v5.3.0
      Adding rand v0.9.2
      Adding rand_chacha v0.9.0
      Adding rand_core v0.9.3
      Adding syn v2.0.106
      Adding unicode-ident v1.0.19
      Adding wasi v0.14.5+wasi-0.2.4
      Adding wasip2 v1.0.0+wasi-0.2.4
      Adding wit-bindgen v0.45.1
      Adding zerocopy v0.8.27
      Adding zerocopy-derive v0.8.27
Take a look at Cargo.toml now.
cat Cargo.toml
[package]
name = "guessing-game-part1"
version = "0.1.0"
edition = "2024"

[dependencies]
rand = "=0.8.5"
Note that the version number is captured.
Also take a look at Cargo.lock.
It's kind of like pip freeze or conda env export in that it
fully specifies your environment down to the package versions.
Generate Random Number
So now that we've specified that we will use the rand
crate, we add to our main.rs:
#![allow(unused)]
fn main() {
use rand::Rng;
}
after the use std::io, and add right after fn main() {
#![allow(unused)]
fn main() {
let secret_number = rand::rng().random_range(1..=100);
println!("The secret number is: {secret_number}");
}
Run your program. Whaddayathink so far?
Let's Check Guess
Obviously, we better compare the guess to the "secret number".
Add the following code to the end of your main function.
#![allow(unused)]
fn main() {
    if guess == secret_number {
        println!("You win!");
    } else {
        println!("You lose!");
    }
}
And run your program again. 🤔 What happened?
Let's Check Guess Again
Obviously, we better compare the guess to the "secret number".
Add the following code to the end of your main function.
#![allow(unused)]
fn main() {
    let guess: i32 = guess.trim().parse().expect("Please type a number!");

    if guess == secret_number {
        println!("You win!");
    } else {
        println!("You lose!");
    }
}
And run your program again. 🤔
In-Class Activity: Compiler Error Hints!
This activity is designed to teaching you to to not fear compiler errors and to show you that Rust's error messages are actually quite helpful once you learn to read them!
Please do NOT use VSCode yet! Open your files in nano, TextEdit / Notepad or another plain text editor.
Instructions
The code asks the user for a series of integers, one at a time, then counts the number, sum and average.
But there are four syntax errors in the code.
Working in pairs, fix the syntax errors based on the compiler error messages.
Put a comment (using double slashes, e.g. // comment) either on the line
before or at the end of the stating what you changed to fix the error.
Paste the corrected code into Gradescope.
I'll give you a 2 minute warning to wrap up in gradescope and then we'll review the errors.
Again Please do NOT use VSCode yet! It ruins the fun
Setup Instructions
Go to your projects folder and create a new Rust project.
cd ~/projects    # or whatever your main projects folder is called

cargo new compiler-errors

cd compiler-errors

cargo add rand

# quick test of the default project
cargo run
You should see "Hello World!" without any errors.
Starter Code (src/main.rs)
Replace the code in main.rs with the following code.
use std::io::{self, Write};

fn main() {
    println!("Enter integers, one per line. Empty line to finish.")

    let nums: Vec<i32> = Vec::new()

    loop {
        print!("> ");
        io::stdout().flush().unwrap();

        let mut input = String::new();
        if io::stdin().read_line(&mut input).is_err() { return; }

        let trimmed = input.trim();

        if trimmed.is_empty():
          break;

        match trimmed.parse::<i32>() {
            Ok(n) => nums.push(n),
            Err(_) => println!("Please enter a valid integer."),
        }
    }

    if nums.is_empty() {
        println!("No numbers entered.");
    } else {
        let sum: i32 = nums.iter().sum();
        let avg = sum as f64 / nums.len() as f64;
        println!("Count = {nums.len()}, Sum = {sum}, Average = {avg:.2}");
    }
}
- Compile the code
- Read the compiler output, starting from the top
- Fix the error
- Repeat...
List of Errors
What did you find?
- error 1:
- error 2:
- error 3:
- error 4:
Recap
- Variables in Rust are immutable by default - we need to explicitly mark them as
mutto make them mutable - The
letkeyword is used for variable declaration and initialization in Rust - Rust has strong error handling with
Resulttypes that haveOkandErrvariants - The
.expect()method is used to handle potential errors by unwrapping theResultor panicking with a message - Basic I/O in Rust uses the
std::iomodule for reading from stdin and writing to stdout
Topics
- Numbering Systems
- The Von Neumann Architecture
- Memory Hierarchy and Memory Concepts
- Trends, Sizes and Costs
Numbering Systems
- Decimal (0-9) e.g. 1724
- Binary (0-1) e.g. 0b011000 (24 decimal)
- Octal (0-7) e.g. 0o131 (89 decimal)
- Hexadecimal (0-9, A-F) e.g 0x13F (319 decimal)
Converting between numbering systems
For any base b to decimal. Assume number C with digits
Between octal and binary
Every octal digit corresponds to exactly 3 binary digits and the reverse. For example 0o34 = 0b011_100. Traverse numbers right to left and prepend with 0s if necessary.
Between hexadecimal and binary
Every hexadecimal digit corresponds to exactly 4 binary digits and the reverse. For example 0x3A = 0b0011_1010. Traverse numbers right to left and prepend with 0s if necessary.
Between decimal and binary (or any base b)
More complicated. Divide repeatedly by 2 (or the base b) and keep the remainder as the next most significant binary digit. Stop when the division returns 0.
i = 0
while D > 0:
  C[i] = D % 2 # modulo operator -- or substitute 2 for any base b
  D = D // 2 # floor division -- or substitute 2 for any base b
  i += 1
What about between decimal and octal/hexadecimal
You can use the same logic as for binary or convert to binary and then use the binary to octal/hexadecimal simple conversions
The Von Neuman Architecture
Named after the First Draft of a Report on the EDVAC written by mathematician John von Neuman in 1945.
Most processor architectures are still based on this same model.

Key Components
- Central Processing Unit (CPU):
- The CPU is the core processing unit responsible for executing instructions and performing computations. It consists of:
- Control Unit (CU):
- Directs the operations of the CPU by interpreting instructions and coordinating data flow between the components.
- Controls the flow of data between the input, memory, and output devices.
- Arithmetic/Logic Unit (ALU):
- Performs arithmetic operations (e.g., addition, subtraction) and logical operations (e.g., AND, OR, NOT).
- Acts as the computational engine of the CPU.
- Memory Unit:
- Stores data and instructions needed for processing.
- The memory serves as temporary storage for instructions being executed and intermediate data.
- It communicates with both the CPU and input/output devices.
- Input Device:
- Provides data or instructions to the CPU.
- Examples include keyboards, mice, and sensors.
- Data flows from the input device into the CPU for processing.
- Output Device:
- Displays or transmits the results of computations performed by the CPU.
- Examples include monitors, printers, and actuators.
Also known as the stored program architecture
Both data and program stored in memory and it's just convention which parts of memory contain instructions and which ones contain variables.
Two very special registers in the processor: Program Counter (PC) and Stack Pointer (SP)
PC: Points to the next instruction. Auto-increments by one when instruction is executed with the exception of branch and jmp instructions that explicitly modify it. Branch instructions used in loops and conditional statements. Jmp instructions used in function calls.
SP: Points to beginning of state (parameters, local variables, return address, old stackpointer etc) for current function call.
Intruction Decoding
Use the Program Counter to fetch the next instruction. After fetching you have to decode it, and subsequently to execute it.
Decoding instructions requires that you split the instruction number to the opcode (telling you what to do) and the operands (telling what data to operate one)
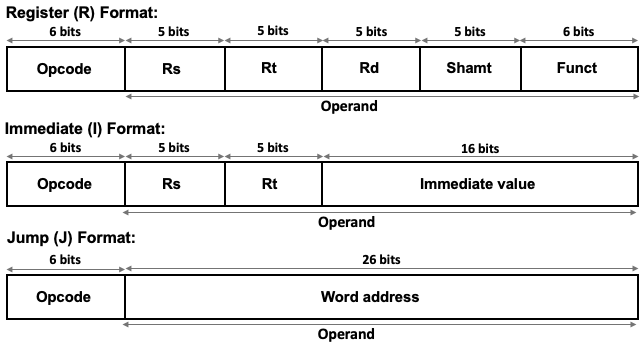
Example from MIPS (Microprocessor without Interlocked Pipeline Stages) Intruction Set Architecture (ISA). MIPS is RISC (Reduced Instruction Set Computer).
The time cost of operations
Assume for example a processor clocked at 2 GHz, e.g. .
- Executing an instruction ~ 0.5 ns (1 clock cycle)
- Getting a value (4 bytes) from L1 cache ~1 ns
- Branch mispredict ~3 ns
- Getting a value from L2 cache ~4 ns
- Send 1Kbyte of data over 1Gbps network (just send not arrive) ~ 16 ns
- Get a value from main memory ~100 ns
- Read 1MB from main memory sequentially ~1000 ns
- Compress 1Kbyte (in L1 cache) with zippy ~2000 ns
- Read 1MB from SSD ~49,000 µs
- Send a ping pong packet inside a datacenter ~500,000 ns
- Read 1Mbyte from HDD ~825,000 ns
- Do an HDD seek ~2,000,000 ns
- Send a packet from US to Europe and back ~150,000,000 ns
https://samwho.dev/numbers/
The memory hierarchy and memory concepts
We've talked about different kinds of memory. It's helpful to think of it in terms of a hierarchy.
- As indicated above, registers are closest to the processor and fastest.
- As you move farther away, the size gets larger but access gets slower

The following figure from Hennesy and Patterson is also very informative.
 From Hennesy and Patterson, Computer Architecture: A Quantitative Approach_.
When the CPU tries to read from a memory location it
- First checks if that memory location is copied to L1 cache
- if it is, then the value is returned
- if it is not...
- Then checks if the memory location is copied to L2 cache
- if it is, then the value is copied to L1 cache and returned
- if it is not...
- Then checks if the memory location is copied to L3 cache
- if it is, then the value is copied to L2, then L1 and returned
- if it is not...
- Go to main memory
- fetch a cache line size of data, typically 64 bytes (why?)
More on Caches
- Each cache line size of memory can be mapped to one of cache slots in each cache
- we say such a cache is -way
- if all slots are occupied, then we evict the Least Recently Used (LRU) slots

Direct mapped versus 2-way cache mapping. Wikipedia: CPU cache
We can see the cache configuration on a Linux system with the getconf command.
Here's the output from the MOC.
$ getconf -a | grep CACHE
LEVEL1_ICACHE_SIZE                 32768  (32KB)
LEVEL1_ICACHE_ASSOC                8
LEVEL1_ICACHE_LINESIZE             64

LEVEL1_DCACHE_SIZE                 32768  (32KB)
LEVEL1_DCACHE_ASSOC                8
LEVEL1_DCACHE_LINESIZE             64

LEVEL2_CACHE_SIZE                  1048576 (1MB)
LEVEL2_CACHE_ASSOC                 16
LEVEL2_CACHE_LINESIZE              64

LEVEL3_CACHE_SIZE                  23068672 (22MB)
LEVEL3_CACHE_ASSOC                 11
LEVEL3_CACHE_LINESIZE              64

LEVEL4_CACHE_SIZE                  0
LEVEL4_CACHE_ASSOC                 0
LEVEL4_CACHE_LINESIZE              0
How many way associative are they?
Why is 32kb not 32,000? When is K 1,000?
An 8-way associative cache with 32 KB of size and 64-byte blocks divides the cache into 64 sets, each with 8 cache lines. Memory addresses are mapped to specific sets.
Benefits of 8-Way Associativity:
- Reduces Conflict Misses:
- Associativity allows multiple blocks to map to the same set, reducing the likelihood of eviction due to conflicts.
- Balances Complexity and Performance:
- Higher associativity generally improves hit rates but increases lookup complexity. An 8-way cache strikes a good balance for most applications.
Cache Use Examples
Example from this blog post.
Contiguous read loop

// cache1.cpp

#include <time.h>
#include <stdio.h>
#include <stdlib.h>

/*
 * Contiguous access loop
 *
 * Example from https://mecha-mind.medium.com/demystifying-cpu-caches-with-examples-810534628d71
 *
 * compile with `clang cache.cpp -o cache`
 * run with `./cache`
 */

int main(int argc, char* argv[]) {
    const int length = 512 * 1024 * 1024;   // 512M
    const int cache_line_size = 16;  // size in terms of ints (4 bytes) so 16 * 4 = 64 bytes
    const int m = length/cache_line_size;  // 512M / 32 = 32M

    printf("Looping %d M times\n", m/(1024*1024));

    int *arr = (int*)malloc(length * sizeof(int)); // 512M length array

    clock_t start = clock();
    for (int i = 0; i < m; i++)   // loop 32M times with contiguous access
        arr[i]++;
    clock_t stop = clock();

    double duration = ((double)(stop - start)) / CLOCKS_PER_SEC * 1000;

    printf("Duration: %f ms\n", duration);

    free(arr);
    return 0;
}
When running on Apple M2 Pro.
% clang cache1.cpp -o cache1
% ./cache1
Looping 32 M times
Duration: 54.166000 ms
Now let's modify the loop to jump by intervals of cache_line_size
Noncontiguous Read Loop

// cache2.cpp

    for (int i = 0; i < m*cache_line_size; i+=cache_line_size) // non-contiguous access
        arr[i]++;
    clock_t stop = clock();
% ./cache2
Looping 32 M times
Duration: 266.715000 ms
About 5X slower. What happened?
Noncontiguous with 2x cache line jump
We loop half the amount of times!!
    for (int i = 0; i < m*cache_line_size; i+=2*cache_line_size) {
        arr[i]++;
        arr[i+cache_line_size]++;
    }
When running on Apple M2 Pro.
% ./cache3
Looping 16 M times
Duration: 255.551000 ms
Caches on multi-processor systems
For multi-processor systems (which are now standard), memory hierarchy looks something like this:
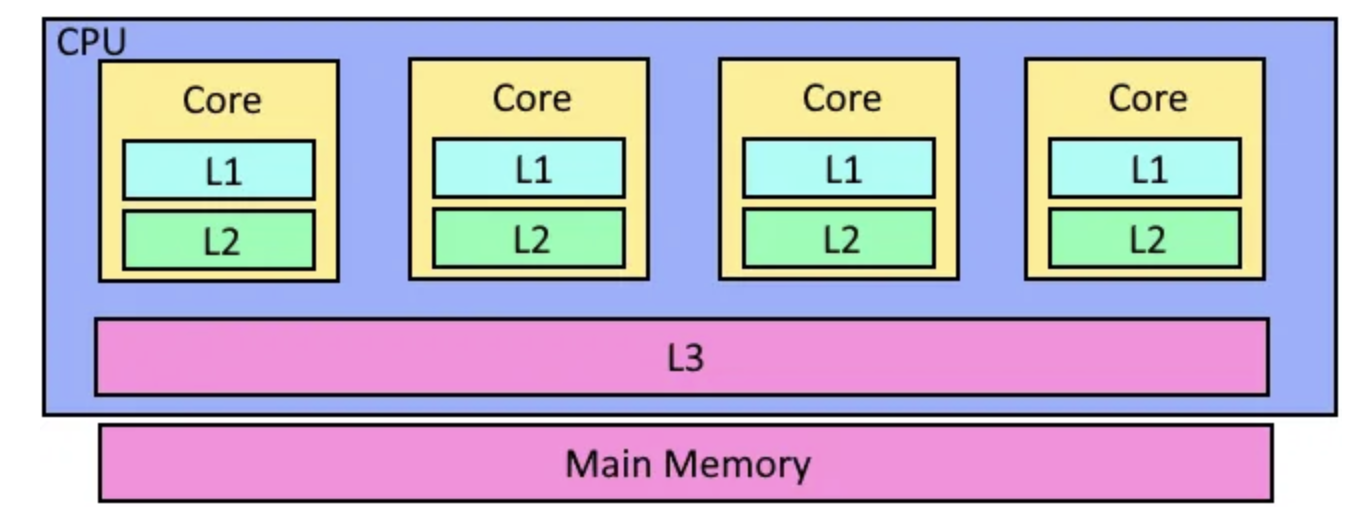
In other words, each core has it's own L1 and L2 cache, but the L3 cache and of course main memory is shared.
Virtual Memory, Page Tables and TLBs
- The addressable memory address range is much larger than available physical memory
- Every program thinks it can access every possible memory address.
- And there has to exist some security to prevent one program from modifying the memory occupied by another.
- The mechanism for that is virtual memory, paging and address translation

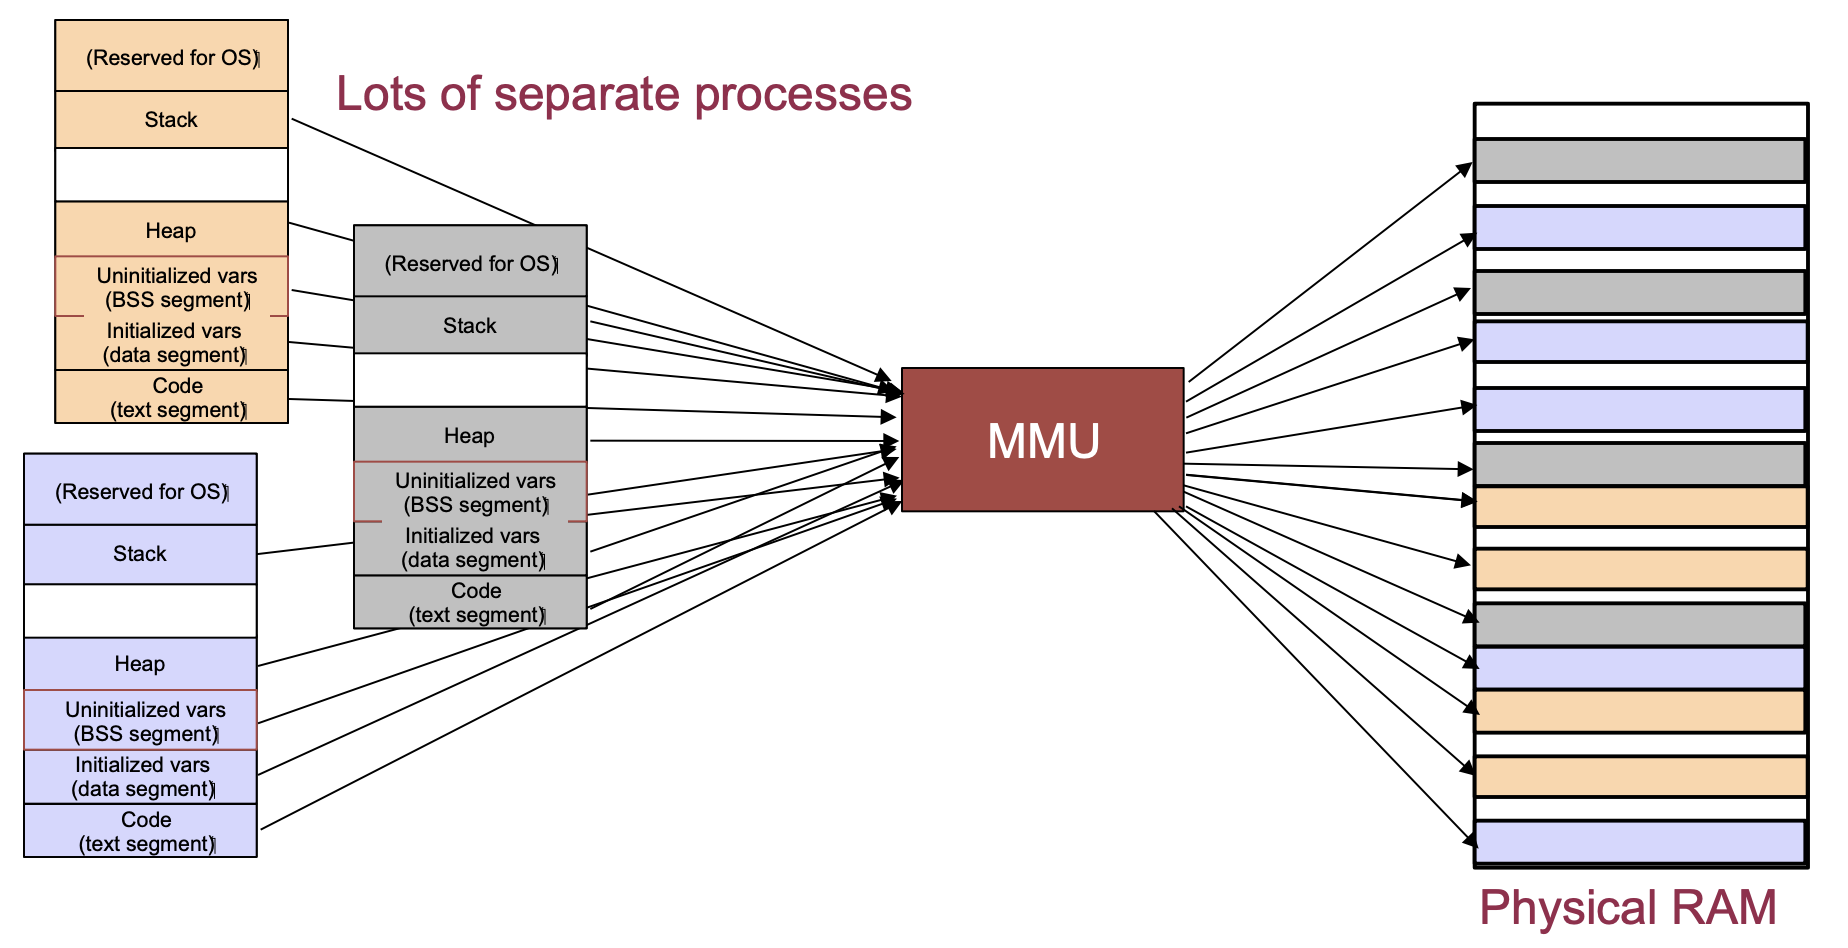 From University of Illinois CS 241 lecture notes.
Page sizes are typically 4KB, 2MB or 1GB depending on the operating system.
If you access a memory address that is not paged into memory, there is a page fault while a page is possible evicted and a the memory is loaded from storage into memory.
Trends, Sizes and Costs
We'll finish by looking at some representative costs, sizes and computing "laws."
Costs
- Server GPU: \500-$1000
- DRAM: \0.05-$.01/Gbyte
- Disk: \0.02-$0.14/Gbyte
Sizes
For a typical server
2 X 2Ghz Intel/ADM processors
32-128Gbytes of memory
10-100 Tbytes of storage
10Gbps Network card
1-2 KWatts of power
For a typical datacenter
100K - 1M sercers
1+ MWatt of power
1-10 Pbbs of internal bandwidth, 1-10 Tbps of Internet facing bandwidth
1-10 Exabytes of storage
Trends
Computers grow fast so we have written some rules of thumb about them
- Kryder's Law -- Storage density doubles every 12 months
- Nielsen's Law -- Consumer Bandwidth doubles every 20 months
- Moore's Law -- CPU capacity doubles every 18 months
- Metcalfe's Law -- The value of a Network increases with the square of its members
- Bell's Law -- Every 10 years the computing paradigm changes
In Class Poll
Guessing Game Part 2: VSCode & Completing the Game
Learning objectives
By the end of class today you should be able to:
- Use VSCode with rust-analyzer and the integrated terminal for Rust development
- Start using loops and conditional logic in Rust
- Use
matchexpressions andOrderingfor comparisons - Keep your code tidy and readable with
clippy, comments, and doc strings
Why VSCode for Rust?
- Rust Analyzer: Real-time error checking, autocomplete, type hints
- Integrated terminal: No more switching windows
- Git integration: Visual diffs, staging, commits
Setting up VSCode for Rust
You'll need to have
- Installed VSCode
- Installed Rust
- Installed the rust-analyzer extension
Opening our project
To make sure we're all at the same starting point, we'll recreate the project.
From MacOS terminal or Windows PowerShell (not git-bash):
# change to your projects folder
cd ~/projects

cargo new guessing_game

cd guessing_game

# check what the default branch name is
git branch

# if default branch is called `master`, rename it to `main`
git branch -m master main

# Add the `rand` crate to the project
cargo add rand

# start VS Code in the current directory
code .
or use File → Open Folder from VSCode and open ~/projects/guessing_game.
VSCode Features Demo
Side Panel
- Explorer
- single click and double click filenames
- split editor views
- Search,
- Source Control,
- Run and Debug,
- Extensions
- You should have
rust-analyzer, notrust!
- You should have
Integrated Terminal
View → Terminal,Terminal → New- You can have multiple terminals
- Same commands as before:
cargo run,cargo check
Rust Analyzer in Action
What you'll see:
- Red squiggles - Compiler errors
- Yellow squiggles - Warnings
- Hover tooltips - Type information
- Autocomplete - As you type suggestions
- Format on save - Automatic code formatting
Let's see it in action!
Completing Our Guessing Game
Restore Guessing Game
Replace the content in main.rs with the following:
use std::io;
use rand::Rng;

fn main() {
    let secret_number = rand::rng().random_range(1..=100);
    //println!("The secret number is: {secret_number}");

    println!("Guess the number between 1 and 100!");
    println!("Please input your guess.");

    let mut guess = String::new();

    io::stdin()
        .read_line(&mut guess)
        .expect("Failed to read line");

    println!("You guessed: {}", guess);

}
Running from VSCode
You have different ways to run the program:
cargo runfrom terminal- Click the little
Runthat decorates abovefn main() {
VSCode Git Integration
Visual Git Features:
- Source Control panel - See changed files
- Diff view - Side-by-side comparisons
- Stage changes - Click the + button
- Commit - Write message and commit
Still use terminal for:
git status- Quick overviewgit log --oneline- Commit historygit push/git pull- Syncing
Create Git Commit
Let's use the visual interface to make our initi commit.
You can always do this via the integrated terminal instead.
Click the Source Control icon on the left panel.
Click + to stage each file or stage all changes.
Write the commit message: "Initial commit" and click Commit
Now you can see on the left pane that we have one commit.
Making it a real game:
- Remove the secret reveal - no cheating!
- Add a loop - keep playing until correct
- Compare numbers - too high? too low?
- Handle invalid input - what if they type "banana"?
But before we proceed, create a topic branch by
- clicking on
mainin the bottom left - Select
Create new branch... - Give it a name like
compare
Step 1: Comparing Numbers
First, we need to convert the guess to a number and compare:
#![allow(unused)]
fn main() {
// add at top of file after other `use` statements
use std::cmp::Ordering;

// Add this after reading input:
let guess: u32 = guess.trim().parse().expect("Please enter a number!");

match guess.cmp(&secret_number) {
    Ordering::Less => println!("Too small!"),
    Ordering::Greater => println!("Too big!"),
    Ordering::Equal => println!("You win!"),
}
}
Now run the program to make sure it works.
If it does, then commit the changes to your topic branch.
Note how you can see the changes in the Source Control panel.
Merge Topic Branch
If you had a remote repo setup like on GitHub, you would then:
- push your topic branch to the remote
git push origin branch_name - ask someone to review and possible make changes and push those to the remote
But for now, we are just working locally.
git checkout main
# or use VSCode to switch to main

# merge changes from topic branch into main
git merge compare # replace 'compare' with your branch name

# delete your topic branch
git branch -d compare
Step 2: Adding the Loop
Now, we want to wrap the input/comparison in a loop.
But first create a new topic branch, e.g. loop
#![allow(unused)]
fn main() {
loop {
    println!("Please input your guess.");

    // ... input code ...

    match guess.cmp(&secret_number) {
        Ordering::Less => println!("Too small!"),
        Ordering::Greater => println!("Too big!"),
        Ordering::Equal => {
            println!("You win!");
            break;  // Exit the loop
        }
    }
}
}
You can indent multiple lines of code by selecting all the lines and then pressing TAB.
Try the code and if it works, commit, checkout main, merge topic branch and then delete topic branch.
Step 3: Handling Invalid Input
Run the program again and then try typing a word instead of a number.
Not great behavior, right?
Replace .expect() with proper error handling, but first create a topic branch.
#![allow(unused)]
fn main() {
let guess: u32 = match guess.trim().parse() {
    Ok(num) => num,
    Err(_) => {
        println!("Please enter a valid number!");
        continue;  // Skip to next loop iteration
    }
};
}
Replace the relevant code, run and debug and do the git steps again.
You should end up on the main branch with all the changes merged and 4 commits.
Final Complete Game
use std::io;
use rand::Rng;
use std::cmp::Ordering;

fn main() {
    let secret_number = rand::rng().random_range(1..=100);
    //println!("The secret number is: {secret_number}");

    println!("Guess the number between 1 and 100!");

    loop {
        println!("Please input your guess.");

        let mut guess = String::new();

        io::stdin()
            .read_line(&mut guess)
            .expect("Failed to read line");

        println!("You guessed: {}", guess);

        let guess: u32 = match guess.trim().parse() {
            Ok(num) => num,
            Err(_) => {
                println!("Please enter a valid number!");
                continue;  // Skip to next loop iteration
            }
        };

        match guess.cmp(&secret_number) {
            Ordering::Less => println!("Too small!"),
            Ordering::Greater => println!("Too big!"),
            Ordering::Equal => {
                println!("You win!");
                break;  // exit the loop
            }
        }
    }

}
Comments & Documentation Best Practices
What would happen if you came back to this program in a month?
Inline Comments (//)
- Explain why, not what the code does
- Bad:
// Create a random number - Good:
// Generate secret between 1-100 for balanced difficulty - If it's not clear what the code does you should edit the code!
Doc Comments (///)
- Document meaningful chunks of code like functions, structs, modules
- Show up in
cargo docand IDE tooltips
/// Prompts user for a guess and validates input
/// Returns the parsed number or continues loop on invalid input
fn get_user_guess() -> u32 {
    // implementation...
}
You can try putting a doc comment right before
fn main() {
The Better Comments extension
See it on VS Code marketplace
- Color-codes different types of comments in VSCode - let's paste it into
main.rsand see
// TODO: Add input validation here
// ! FIXME: This will panic on negative numbers
// ? Why does this work differently on Windows?
// * Important: This function assumes sorted input
Wrap-up
What we've accomplished so far:
- Can now use shell, git, and rust all in one place (VSCode)
- We built a complete, functional game from scratch
- Started learning key Rust concepts: loops, matching, error handling
- We've practiced using GitHub Classroom - you'll use it for HW2!
Variables and Types in Rust
About This Module
This module covers Rust's type system and variable handling, including immutability by default, variable shadowing, numeric types, boolean operations, characters, and strings. Understanding these fundamentals is essential for all Rust programming.
Prework
Prework Readings
Read the following sections from "The Rust Programming Language" book:
Pre-lecture Reflections
Before class, consider these questions:
- Why might immutable variables by default be beneficial for programming?
- What is the difference between variable shadowing and mutability?
- How do strongly typed languages like Rust prevent certain classes of bugs?
- What are the trade-offs between different integer sizes?
- Why might string handling be more complex than it initially appears?
Learning Objectives
By the end of this module, you should be able to:
- Understand Rust's immutability-by-default principle
- Use mutable variables when necessary
- Apply variable shadowing appropriately
- Choose appropriate numeric types for different use cases
- Work with boolean and bitwise operations
- Handle characters and strings properly in Rust
- Understand type conversion and casting in Rust
Variables are by default immutable!
Take a look at the following code.
Note: we'll use a red border to indicate that the code is expected to fail compilation.
#![allow(unused)]
fn main() {
let x = 3;
x = x + 1; // <== error here
}
Run it and you should get the following error.
   Compiling playground v0.0.1 (/playground)
error[E0384]: cannot assign twice to immutable variable `x`
 --> src/main.rs:4:1
  |
3 | let x = 3;
  |     - first assignment to `x`
4 | x = x + 1; // <== error here
  | ^^^^^^^^^ cannot assign twice to immutable variable
  |
help: consider making this binding mutable
  |
3 | let mut x = 3;
  |     +++

For more information about this error, try `rustc --explain E0384`.
error: could not compile `playground` (bin "playground") due to 1 previous error
The Rust compiler errors are quite helpful!
Use mut to make them mutable
#![allow(unused)] fn main() { // mutable variable let mut x = 3; x = x + 1; println!("x = {}", x); }
Assigning a different type to a mutable variable
What happens if you try to assign a different type to a mutable variable?
#![allow(unused)] fn main() { // mutable variable let mut x = 3; x = x + 1; println!("x = {}", x); x = 9.5; // what happens here?? println!("x = {}", x); }
Again, the Rust compiler error message is quite helpful!
Variable Shadowing
You can create a new variable with the same name as a previous variable!
fn main() { let solution = "4"; // This is a string // Create a new variable with same name and convert string to integer let solution : i32 = solution.parse() .expect("Not a number!"); // Create a third variable with the same name! let solution = solution * (solution - 1) / 2; println!("solution = {}",solution); // Create a fourth variable with the same name! let solution = "This is a string"; println!("solution = {}", solution); }
In this example, you can't get back to the original variable, although it stays in memory until it goes of out scope.
Question: why would you want to do this?
Question: Can you use
mutand avoid variable shadowing? Try it above.
Variable Shadowing and Scopes
Rust automatically deallocates variables when they go out of scope, such as when a program ends.
You can also use a block (bounded by {}) to limit the scope of a variable.
#![allow(unused)] fn main() { let x = 1; { // start of block scope let x = 2; // shadows outer x println!("{}", x); // prints `2` } // end of block scope println!("{}", x); // prints `1` again — outer `x` visible }
Preview: Getting and Setting References
When we talk about allocating memory for certain datatypes like String or Vec,
we will need to be able to get and set references to the memory. We can do this with the & and &mut operators.
a: &T // immutable reference
a: &mut T // mutable reference- This also impacts how we manage ownership of the memory.
- We will cover this in more detail later in the course.
Basic Types: unsigned integers
unsigned integers: u8, u16, u32, u64, u128
usizeis the default unsigned integer size for your architecture
The number, e.g. 8, represents the number of bits in the type and the maximum value.
- So unsigned integers range from to .
| Unsigned Integer | Unsigned 8 bit binary |
|---|---|
| 0 | 00000000 |
| 1 | 00000001 |
| 2 | 00000010 |
| 3 | 00000011 |
Here's how you convert from binary to decimal.
Question: What is `01011` in decimal?
in decimal.
Basic Types: unsigned integers - min and max values
Rust lets us print the minimum and maximum values of each type.
#![allow(unused)] fn main() { println!("U8 min is {} max is {}", u8::MIN, u8::MAX); println!("U16 min is {} max is {}", u16::MIN, u16::MAX); println!("U32 min is {} max is {}", u32::MIN, u32::MAX); println!("U64 min is {} max is {}", u64::MIN, u64::MAX); println!("U128 min is {} max is {}", u128::MIN, u128::MAX); println!("USIZE min is {} max is {}", usize::MIN, usize::MAX); }
Verify u8::MAX on your own.
Question: What is the
usizeon your machine?
Basic Types: signed integers
Similarly, there are these signed integer types.
signed integers: i8, i16, i32 (default), i64, i128,
isize is the default signed integer size for your architecture
- from to
Unsigned integers - min and max values
#![allow(unused)] fn main() { println!("I8 min is {} max is {}", i8::MIN, i8::MAX); println!("I16 min is {} max is {}", i16::MIN, i16::MAX); println!("I32 min is {} max is {}", i32::MIN, i32::MAX); println!("I64 min is {} max is {}", i64::MIN, i64::MAX); println!("I128 min is {} max is {}", i128::MIN, i128::MAX); println!("ISIZE min is {} max is {}", isize::MIN, isize::MAX); }
Signed integer representation
Signed integers are stored in two's complement format.
- if the number is positive, the first bit is 0
- if the number is negative, the first bit is 1
| Signed Integer | Signed 8 bit binary |
|---|---|
| 0 | 00000000 |
| 1 | 00000001 |
| 2 | 00000010 |
| 3 | 00000011 |
| -1 | 11111111 |
| -2 | 11111110 |
| -3 | 11111101 |
Here's how you convert from binary to decimal.
If the first bit is 0, the number is positive. If the first bit is 1, the number is negative.
To convert a negative number to decimal:
- take the sign of the first bit,
- flip all the bits and add 1 (only for negative numbers!)
Question: Try that for -1
Converting between signed and unsigned integers
If you need to convert, use the as operator:
#![allow(unused)] fn main() { let x: i8 = -1; let y: u8 = x as u8; println!("{}", y); }
Question: Can you explain the answer?
Why do we need ginormous i128 and u128?
They are useful for cryptography.
Don't use datatype sizes larger than you need.
Larger than architecture default generally takes more time.
i64 math operations might be twice as slow as i32 math.
Number literals
Rust lets us write number literals in a few different ways.
| Number literals | Example |
|---|---|
| Decimal (base 10) | 98_222 |
| Hex (base 16) | 0xff |
| Octal (base 8) | 0o77 |
| Binary (base 2) | 0b1111_0000 |
| Byte (u8 only) | b'A' |
#![allow(unused)] fn main() { let s1 = 2_55; let s2 = 0xff; let s3 = 0o3_77; let s4 = 0b1111_1111; // print in decimal format println!("{} {} {} {}", s1, s2, s3, s4); // print in different bases println!("{} 0x{:X} 0o{:o} 0b{:b}", s1, s2, s3, s4); }
You can also be explicit about the type you want to convert to.
#![allow(unused)] fn main() { let t1 = 0b1111_1111_u8 as i8; println!("t1 = {}", t1); }
Conversion between hexadecimal, octal and decimal
The conversion formula for binary, octal and hexadecimal to decimal is:
Binary to decimal:
Octal to decimal:
e.g. `0o155` is
in decimal.
Hexadecimal to decimal:
e.g. `0x6D` is
in decimal.
Be careful with math on ints
fn main() { let x : i16 = 13; let y : i32 = -17; // won't work without the conversion println!("{}", x * y); // will not work //println!("{}", (x as i32)* y); // this will work }
Basic Types: floats
There are two kinds: f32 and f64
What do these mean?
- This is the number of bits used in each type
- more complicated representation than ints (see wikipedia)
- There is talk about adding f128 to the language but it is not as useful as u128/i128.
fn main() { let x = 4.0; println!("x is of type {}", std::any::type_name_of_val(&x)); let z = 1.25; println!("z is of type {}", std::any::type_name_of_val(&z)); println!("{:.1}", x * z); }
Question: Try changing the type of
xtof32and see what happens:let x:f32 = 4.0;
Floats gotchas
Be careful with mixing f32 and f64 types.
You can't mix them without converting.
fn main() { let x:f32 = 4.0; println!("x is of type {}", std::any::type_name_of_val(&x)); let z:f64 = 1.25; println!("z is of type {}", std::any::type_name_of_val(&z)); println!("{:.1}", x * z); //println!("{:.1}", (x as f64) * z); // this will work }
Floats: min and max values
Rust lets us print the minimum and maximum values of each type.
#![allow(unused)] fn main() { println!("F32 min is {} max is {}", f32::MIN, f32::MAX); println!("F32 min is {:e} max is {:e}\n", f32::MIN, f32::MAX); println!("F64 min is {:e} max is {:e}", f64::MIN, f64::MAX); }
Exercise -- Integers and Floats
Create a program that:
- creates a
u8variablenwith value 77 - creates an
f32variablexwith value 1.25 - prints both numbers
- multiplies them and puts the results in an
f64variableresult - prints the result
Example output:
77
1.25
77 * 1.25 = 96.25
Get your code working here (or in your own editors) and then paste the result in Gradescope.
fn main() { }
More Basic Types
Let's look at:
- Booleans
- Characters
- Strings
Logical operators and bool
booluses one byte of memory
Question: Why is
boolone byte when all we need is one bit?
We can do logical operations on booleans.
#![allow(unused)] fn main() { let x = true; println!("x uses {} bits", std::mem::size_of_val(&x) * 8); let y: bool = false; println!("y uses {} bits\n", std::mem::size_of_val(&y) * 8); println!("{}", x && y); // logical and println!("{}", x || y); // logical or println!("{}", !y); // logical not }
Bitwise operators
There are also bitwise operators that look similar to logical operators but work on integers:
#![allow(unused)] fn main() { let x = 10; let y = 7; println!("{x:04b} & {y:04b} = {:04b}", x & y); // bitwise and println!("{x:04b} | {y:04b} = {:04b}", x | y); // bitwise or println!("!{y:04b} = {:04b} or {0}", !y); // bitwise not }
Bitwise 'not' and signed integers
#![allow(unused)] fn main() { let y = 7; println!("!{y:04b} = {:04b} or {0}", !y); // bitwise not }
What's going on with that last line?
y is I32, so let's display all 32 bits.
#![allow(unused)] fn main() { let y = 7; println!("{:032b}", y); }
So when we do !y we get the bitwise negation of y.
#![allow(unused)] fn main() { let y = 7; println!("{:032b}", !y); }
It's still interpreted as a signed integer.
#![allow(unused)] fn main() { let y = 7; println!("{}", !y); }
Bitwise Operators on Booleans?
It's a little sloppy but it works.
#![allow(unused)] fn main() { let x = true; println!("x is of type {}", std::any::type_name_of_val(&x)); println!("x uses {} bits", std::mem::size_of_val(&x) * 8); let y: bool = false; println!("y uses {} bits\n", std::mem::size_of_val(&y) * 8); // x and (not y) println!("{}", x & y); // bitwise and println!("{}", x | y); // bitwise or println!("{}", x ^ y); // bitwise xor }
Exercise -- Bitwise Operators on Integers
Create a program that:
- Creates an unsigned int
xwith value 12 and a signed intywith value -5 - Prints both numbers in binary format (use {:08b} for 8-bit display)
- Performs bitwise AND (&) and prints the result in binary
- Performs bitwise OR (|) and prints the result in binary
- Performs bitwise NOT (!) on both numbers and prints the results
Example output:
12: 00001100
-5: 11111011
12 & -5: 00001000
12 | -5: 11111111
!12: 11110011
!-5: 00000100
Edit your code here or in your own editor and then paste the result in Gradescope.
fn main() { }
Characters
chardefined via single quote, uses four bytes of memory (Unicode scalar value)- For a complete list of UTF-8 characters check https://www.fileformat.info/info/charset/UTF-8/list.htm
Note that on Mac, you can insert an emoji by typing
Control-Command-Spaceand then typing the emoji name, e.g. 😜.
On Windows, you can insert an emoji by typing
Windows-Key + .orWindows-Key + ;and then typing the emoji name, e.g. 😜.
#![allow(unused)] fn main() { let x: char = 'a'; println!("x is of type {}", std::any::type_name_of_val(&x)); println!("x uses {} bits", std::mem::size_of_val(&x) * 8); let y = '🚦'; println!("y is of type {}", std::any::type_name_of_val(&y)); println!("y uses {} bits", std::mem::size_of_val(&y) * 8); let z = '🦕'; println!("z is of type {}", std::any::type_name_of_val(&z)); println!("z uses {} bits", std::mem::size_of_val(&z) * 8); println!("{} {} {}", x, y, z); }
Strings and String Slices (&str)
In Rust, strings are not primitive types, but rather complex types built on top of other types.
String slices are immutable references to string data.
-
Stringis a growable, heap-allocated data structure -
&stris an immutable reference to a string slice -
Stringis a wrapper aroundVec<u8>(More onVeclater) -
&stris a wrapper around&[u8] -
string slice defined via double quotes (not so basic actually!)
String and string slice examples
fn main() { let s1 = "Hello! How are you, 🦕?"; // type is immutable borrowed reference to a string slice: `&str` let s2 : &str = "Καλημέρα από την Βοστώνη και την DS210"; // here we make the type explicit println!("{}", s1); println!("{}\n", s2); }
String and string slice examples
We have to explicitly convert a string slice to a string.
fn main() { // This doesn't work. You can't do String = &str let s3: String = "Does this work?"; // <== error here let s3: String = "Does this work?".to_string(); println!("{}", s3); }
Comment out the error lines and run the code to see what happens.
String and string slice examples
We can't index directly into a string slice, because it is a complex data structure.
Different characters can take up different numbers of bytes in UTF-8.
fn main() { let s1 = "Hello! How are you, 🦕?"; // type is immutable borrowed reference to a string slice: `&str` let s2 : &str = "Καλημέρα από την Βοστώνη και την DS210"; // here we make the type explicit let s3: String = "Does this work?".to_string(); let s4: String = String::from("How about this?"); println!("{}\n", s4); let s5: &str = &s3; println!("str reference to a String reference: {}\n", s5); // This won't work. You can't index directly into a string slice. Why??? println!("{}", s1[3]); // <== error here println!("{}", s2[3]); // <== error here // But you can index this way. println!("4th character of s1: {}", s1.chars().nth(3).unwrap()); println!("4th character of s2: {}", s2.chars().nth(3).unwrap()); println!("3rd character of s4: {}", s4.chars().nth(2).unwrap()); }
Comment out the error lines and run the code to see what happens.
Exercise -- String Slices
Create a program that:
- Creates a string slice containing your name
- Converts it to a String
- Gets the third character of your name using the
.chars().nth()method - Prints both the full name and the third character
Example output if your name is "Alice":
Alice
i
fn main() { }
Solution
fn main() { let name = "Alice"; let name_string = name.to_string(); println!("Full name: {}", name_string); println!("3rd character: {}", name_string.chars().nth(2).unwrap()); }
Recap
- Variables are by default immutable
- Use
mutto make them mutable - Variable shadowing is a way to reuse the same name for a new variable
- Booleans are one byte of memory
- Bitwise operators work on integers
- Characters are four bytes of memory
- Strings are complex data structures
- String slices are immutable references to string data
Conditional Expressions and Flow Control in Rust
About This Module
This module covers Rust's conditional expressions, including if statements, if expressions,
and the unique ways Rust handles control flow. Understanding these concepts is fundamental
for writing effective Rust programs and leveraging Rust's expression-based syntax.
Prework
Prework Readings
Read the following sections from "The Rust Programming Language" book:
Pre-lecture Reflections
Before class, consider these questions:
- What is the difference between statements and expressions in programming?
- How might expression-based syntax improve code readability and safety?
- What are the advantages of mandatory braces in conditional statements?
- How do different languages handle ternary operations?
- What role does type consistency play in conditional expressions?
Learning Objectives
By the end of this module, you should be able to:
- Use
ifstatements for conditional execution - Leverage
ifexpressions to assign values conditionally - Understand Rust's expression-based syntax
- Apply proper type consistency in conditional expressions
- Write clean, readable conditional code following Rust conventions
- Understand the differences between Rust and other languages' conditional syntax
An Aside -- Approach to Learning New Languages
Systematic Language Learning Framework:
When learning any new programming language, consider these key areas:
- Data Types: What types of variables and data structures are available?
- Functions: What is the syntax for defining and calling functions?
- Build System: How do you compile and run code?
- Control Flow: Syntax for conditionals, loops, and branching
- Code Organization: How to structure programs (structs, modules, etc.)
- Language-Specific Features: Unique aspects of the language
- Additional Considerations: I/O, external libraries, ecosystem
Basic if Statements
Syntax:
if condition {
DO-SOMETHING-HERE
} else {
DO-SOMETHING-ELSE-HERE
}elsepart optional- Compared to many C-like languages:
- no parentheses around
conditionneeded! - the braces mandatory
- no parentheses around
Example of if
Simple if statement.
fn main() { let x = 7; if x <= 15 { println!("x is not greater than 15"); } }
- parentheses optional around
condition-- try it with! - no semicolon after the
ifbraces
fn main() { let threshold = 5; if x <= threshold { println!("x is at most {}",threshold); } else { println!("x is greater than {}", threshold); } }
Using conditional expressions as values
In Python:
result = 100 if (x == 7) else 200
C++:
result = (x == 7) ? 100 : 200
Rust:
fn main() { let x = 4; let result = if x == 7 {100} else {200}; println!("{}",result); }
fn main() { // won't work: same type needed let x = 4; println!("{}",if x == 7 {100} else {1.2}); }
- blocks can be more complicated
- last expression counts (no semicolon after)
- But please don't write this just because you can
#![allow(unused)] fn main() { let x = 4; let z = if x == 4 { let t = x * x; t + 1 } else { x + 1 }; println!("{}",z); }
Write this instead:
#![allow(unused)] fn main() { let x = 4; let z; if x == 4 { z = x*x+1 } else { z = x+1}; println!("{}", z) }
Obscure Code Competition Winner
A winner of the most obscure code competition (https://www.ioccc.org/)
What does this program do?
#include <stdio.h>
#define N(a) "%"#a"$hhn"
#define O(a,b) "%10$"#a"d"N(b)
#define U "%10$.*37$d"
#define G(a) "%"#a"$s"
#define H(a,b) G(a)G(b)
#define T(a) a a
#define s(a) T(a)T(a)
#define A(a) s(a)T(a)a
#define n(a) A(a)a
#define D(a) n(a)A(a)
#define C(a) D(a)a
#define R C(C(N(12)G(12)))
#define o(a,b,c) C(H(a,a))D(G(a))C(H(b,b)G(b))n(G(b))O(32,c)R
#define SS O(78,55)R "\n\033[2J\n%26$s";
#define E(a,b,c,d) H(a,b)G(c)O(253,11)R G(11)O(255,11)R H(11,d)N(d)O(253,35)R
#define S(a,b) O(254,11)H(a,b)N(68)R G(68)O(255,68)N(12)H(12,68)G(67)N(67)
char* fmt = O(10,39)N(40)N(41)N(42)N(43)N(66)N(69)N(24)O(22,65)O(5,70)O(8,44)N(
45)N(46)N (47)N(48)N( 49)N( 50)N( 51)N(52)N(53 )O( 28,
54)O(5, 55) O(2, 56)O(3,57)O( 4,58 )O(13, 73)O(4,
71 )N( 72)O (20,59 )N(60)N(61)N( 62)N (63)N (64)R R
E(1,2, 3,13 )E(4, 5,6,13)E(7,8,9 ,13)E(1,4 ,7,13)E
(2,5,8, 13)E( 3,6,9,13)E(1,5, 9,13)E(3 ,5,7,13
)E(14,15, 16,23) E(17,18,19,23)E( 20, 21, 22,23)E
(14,17,20,23)E(15, 18,21,23)E(16,19, 22 ,23)E( 14, 18,
22,23)E(16,18,20, 23)R U O(255 ,38)R G ( 38)O( 255,36)
R H(13,23)O(255, 11)R H(11,36) O(254 ,36) R G( 36 ) O(
255,36)R S(1,14 )S(2,15)S(3, 16)S(4, 17 )S (5, 18)S(6,
19)S(7,20)S(8, 21)S(9 ,22)H(13,23 )H(36, 67 )N(11)R
G(11)""O(255, 25 )R s(C(G(11) ))n (G( 11) )G(
11)N(54)R C( "aa") s(A( G(25)))T (G(25))N (69)R o
(14,1,26)o( 15, 2, 27)o (16,3,28 )o( 17,4, 29)o(18
,5,30)o(19 ,6,31)o( 20,7,32)o (21,8,33)o (22 ,9,
34)n(C(U) )N( 68)R H( 36,13)G(23) N(11)R C(D( G(11)))
D(G(11))G(68)N(68)R G(68)O(49,35)R H(13,23)G(67)N(11)R C(H(11,11)G(
11))A(G(11))C(H(36,36)G(36))s(G(36))O(32,58)R C(D(G(36)))A(G(36))SS
#define arg d+6,d+8,d+10,d+12,d+14,d+16,d+18,d+20,d+22,0,d+46,d+52,d+48,d+24,d\
+26,d+28,d+30,d+32,d+34,d+36,d+38,d+40,d+50,(scanf(d+126,d+4),d+(6\
-2)+18*(1-d[2]%2)+d[4]*2),d,d+66,d+68,d+70, d+78,d+80,d+82,d+90,d+\
92,d+94,d+97,d+54,d[2],d+2,d+71,d+77,d+83,d+89,d+95,d+72,d+73,d+74\
,d+75,d+76,d+84,d+85,d+86,d+87,d+88,d+100,d+101,d+96,d+102,d+99,d+\
67,d+69,d+79,d+81,d+91,d+93,d+98,d+103,d+58,d+60,d+98,d+126,d+127,\
d+128,d+129
char d[538] = {1,0,10,0,10};
int main() {
while(*d) printf(fmt, arg);
}
Best Practices
Formatting and Style:
- Use consistent indentation (4 spaces)
- Keep conditions readable - use parentheses for clarity when needed
- Prefer early returns in functions to reduce nesting
- Use
else iffor multiple conditions rather than nestedif
Example of Good Style:
fn classify_temperature(temp: f64) -> &'static str { if temp > 30.0 { "Hot" } else if temp > 20.0 { "Warm" } else if temp > 10.0 { "Cool" } else { "Cold" } } fn main() { println!("{}", classify_temperature(35.0)); println!("{}", classify_temperature(25.0)); println!("{}", classify_temperature(15.0)); println!("{}", classify_temperature(5.0)); }
Exercise
Write a function that takes a number and returns a string that says whether it is positive, negative, or zero.
Example output:
10 is positive
-5 is negative
0 is zero
// Your code here
Solution
fn main() { let number = 10; if number > 0 { println!("{} is positive", number); } else if number < 0 { println!("{} is negative", number); } else { println!("{} is zero", number); } }
Functions in Rust
About This Module
This module covers Rust function syntax, return values, parameters, and the unit type. Functions are fundamental building blocks in Rust programming, and understanding their syntax and behavior is essential for writing well-structured Rust programs.
Prework
Prework Readings
Read the following sections from "The Rust Programming Language" book:
- Chapter 3.3: Functions
- Chapter 4.1: What Is Ownership? - Introduction only
Pre-lecture Reflections
Before class, consider these questions:
- How do functions help organize and structure code?
- What are the benefits of explicit type annotations in function signatures?
- How do return values differ from side effects in functions?
- What is the difference between expressions and statements in function bodies?
- How might Rust's approach to functions differ from other languages you know?
Learning Objectives
By the end of this module, you should be able to:
- Define functions with proper Rust syntax
- Understand parameter types and return type annotations
- Use both explicit
returnstatements and implicit returns - Work with functions that return no value (unit type)
- Apply best practices for function design and readability
- Understand the difference between expressions and statements in function bodies
Function Syntax
Syntax:
fn function_name(argname_1:type_1,argname_2:type_2) -> type_ret {
DO-SOMETHING-HERE-AND-RETURN-A-VALUE
}- No need to write "return x * y"
- Last expression is returned
- No semicolon after the last expression
fn multiply(x:i32, y:i32) -> i32 { // note: no need to write "return x * y" x * y } fn main() { println!("{}", multiply(10,20)) }
Exercise: Try putting a semicolon after the last expression. What happens?
Functions returns
- But if you add a return then you need a semicolon
- unless it is the last statement in the function
- Recommend using returns and add semicolons everywhere.
- It's easier to read.
fn and(p:bool, q:bool, r:bool) -> bool { if !p { println!("p is false"); return false; } if !q { println!("q is false"); return false; } println!("r is {}", r); r // return r without the semicolon also works here } fn main() { println!("{}", and(true,false,true)) }
Functions: returning no value
How: skip the type of returned value part
fn say_hello(who:&str) { println!("Hello, {}!",who); } fn main() { say_hello("world"); say_hello("Boston"); say_hello("DS210"); }
Nothing returned equivalent to the unit type, ()
fn say_good_night(who:&str) -> () { println!("Good night {}",who); } fn main() { say_good_night("room"); say_good_night("moon"); let z = say_good_night("cow jumping over the moon"); println!("The function returned {:?}", z) }
Unit Type Characteristics:
- Empty tuple:
() - Zero size: Takes no memory
- Default return: When no value is explicitly returned
- Side effects only: Functions that only perform actions (printing, file I/O, etc.)
Parameter Handling
Multiple Parameters:
#![allow(unused)] fn main() { fn calculate_area(length: f64, width: f64) -> f64 { length * width } fn greet_person(first_name: &str, last_name: &str, age: u32) { println!("Hello, {} {}! You are {} years old.", first_name, last_name, age); } }
Parameter Types:
- Ownership: Parameters can take ownership (
String) - References: Parameters can borrow (
&str,&i32) - Primitive types: Copied by default (
i32,bool,f64)
Function Design Principles
Single Responsibility:
// Good: Single purpose fn calculate_tax(price: f64, tax_rate: f64) -> f64 { price * tax_rate } // Good: Clear separation of concerns fn format_currency(amount: f64) -> String { format!("${:.2}", amount) } fn display_total(subtotal: f64, tax_rate: f64) { let tax = calculate_tax(subtotal, tax_rate); let total = subtotal + tax; println!("Total: {}", format_currency(total)); } fn main() { display_total(100.0, 0.08); }
Pure Functions vs. Side Effects:
#![allow(unused)] fn main() { // Pure function: No side effects, deterministic fn add(x: i32, y: i32) -> i32 { x + y } // Function with side effects: Prints to console fn add_and_print(x: i32, y: i32) -> i32 { let result = x + y; println!("{} + {} = {}", x, y, result); result } }
Common Patterns
Validation Functions:
#![allow(unused)] fn main() { fn is_valid_age(age: i32) -> bool { age >= 0 && age <= 150 } fn is_valid_email(email: &str) -> bool { email.contains('@') && email.contains('.') } }
Conversion Functions:
#![allow(unused)] fn main() { fn celsius_to_fahrenheit(celsius: f64) -> f64 { celsius * 9.0 / 5.0 + 32.0 } fn fahrenheit_to_celsius(fahrenheit: f64) -> f64 { (fahrenheit - 32.0) * 5.0 / 9.0 } }
Helper Functions:
#![allow(unused)] fn main() { fn get_absolute_value(x: i32) -> i32 { if x < 0 { -x } else { x } } fn max_of_three(a: i32, b: i32, c: i32) -> i32 { if a >= b && a >= c { a } else if b >= c { b } else { c } } }
Function Naming Conventions
Rust Naming Guidelines:
- snake_case: For function names
- Descriptive names: Clear indication of purpose
- Verb phrases: For functions that perform actions
- Predicate functions: Start with
is_,has_,can_
Examples:
#![allow(unused)] fn main() { fn calculate_distance(x1: f64, y1: f64, x2: f64, y2: f64) -> f64 { /* ... */ } fn is_prime(n: u32) -> bool { /* ... */ } fn has_permission(user: &str, resource: &str) -> bool { /* ... */ } fn can_access(user_level: u32, required_level: u32) -> bool { /* ... */ } }
Exercise
Write a function called greet_user that takes a name and a time of day (morning, afternoon, evening) as parameters and returns an appropriate greeting string.
The function should:
- Take two parameters:
name: &strandtime: &str - Return a
Stringwith a customized greeting - Follow Rust naming conventions
- Use proper parameter types
- Include error handling for invalid times
Example output:
Good evening, Dumbledore!
Hint: You can format the string using the format! macro, which uses the same syntax as println!.
// Returns a String
format!("Good morning, {}!", name)// Your code here
Solution
fn greet_user(name: &str, time: &str) -> String { if time != "morning" && time != "afternoon" && time != "evening" { return format!("Invalid time: {}", time); } format!("Good {}, {}!", time, name) } fn main() { println!("{}", greet_user("Dumbledore", "evening")); }
Loops and Arrays in Rust
About This Module
This module covers Rust's loop constructs (for, while, loop) and array data structures.
Understanding loops and arrays is essential for processing collections of data and implementing
algorithms in Rust.
Prework
Prework Readings
Read the following sections from "The Rust Programming Language" book:
- Chapter 3.5: Control Flow - Focus on loops
- Chapter 4.1: What Is Ownership? - Arrays and ownership
- Chapter 8.1: Storing Lists of Values with Vectors - Introduction only
Pre-lecture Reflections
Before class, consider these questions:
- What are the different types of loops and when would you use each?
- How do arrays differ from more flexible data structures like vectors?
- What are the advantages of fixed-size arrays?
- How do ranges work in iteration and what are their bounds?
- When might you need labeled breaks and continues in nested loops?
Learning Objectives
By the end of this module, you should be able to:
- Use
forloops with ranges and collections - Work with
whileloops for conditional iteration - Understand
loopfor infinite loops with explicit breaks - Create and manipulate arrays in Rust
- Use
breakandcontinuestatements effectively - Apply loop labels for complex control flow
- Understand array properties and limitations
For Loops and Ranges
Loops: for
Usage: loop over a range or collection
A range is (start..end), e.g. (1..5), where the index will vary as
Unless you use the notation (start..=end), in which case the index will vary as
#![allow(unused)] fn main() { // parentheses on the range are optional unless calling a method e.g. `.rev()` // on the range for i in 1..5 { println!("{}",i); } }
#![allow(unused)] fn main() { // inclusive range for i in 1..=5 { println!("{}",i); } }
#![allow(unused)] fn main() { // reverse order. we need parentheses! for i in (1..5).rev() { println!("{}",i) } }
#![allow(unused)] fn main() { // every other element for i in (1..5).step_by(2) { println!("{}",i); } }
#![allow(unused)] fn main() { println!("And now for the reverse"); for i in (1..5).step_by(2).rev() { println!("{}",i) } }
#![allow(unused)] fn main() { println!("But...."); for i in (1..5).rev().step_by(2) { println!("{}",i); } }
Arrays and for over an array
- Arrays in Rust are of fixed length (we'll learn about more flexible
Veclater) - All elements of the same type
- You can not add or remove elements from an array (but you can change its value)
- Python does not have arrays natively.
What's the closest thing in native python?
#![allow(unused)] fn main() { // simplest definition // compiler guessing element type to be i32 // indexing starts at 0 let mut arr = [1,7,2,5,2]; arr[1] = 13; println!("{} {}",arr[0],arr[1]); }
#![allow(unused)] fn main() { let mut arr = [1,7,2,5,2]; // array supports sorting arr.sort(); // loop over the array for x in arr { println!("{}",x); } }
#![allow(unused)] fn main() { // create array of given length // and fill it with a specific value let arr2 = [15;3]; for x in arr2 { print!("{} ",x); // notice print! instead of println! } }
#![allow(unused)] fn main() { // with type definition and shorthand to repeat values let arr3 : [u8;3] = [15;3]; for x in arr3 { print!("{} ",x); } println!(); println!("arr3[2] is {}", arr3[2]); }
#![allow(unused)] fn main() { let arr3 : [u8;3] = [15;3]; // get the length println!("{}",arr3.len()) }
Loops: while
#![allow(unused)] fn main() { let mut number = 3; while number != 0 { println!("{number}!"); number -= 1; } println!("LIFT OFF!!!"); }
Infinite loop: loop
loop {
// DO SOMETHING HERE
}Need to use break to jump out of the loop!
#![allow(unused)] fn main() { let mut x = 1; loop { if (x + 1) * (x + 1) >= 250 {break;} x += 1; } println!("{}",x) }
loopcan return a value!breakcan act likereturn
#![allow(unused)] fn main() { let mut x = 1; let y = loop { if x * x >= 250 {break x - 1;} x += 1; }; println!("{}",y) }
continueto skip the rest of the loop body and start the next iteration
#![allow(unused)] fn main() { // loop keyword similar to while (True) in Python // break and continue keywords behave as you would expect let mut x = 1; let result = loop { // you can capture a return value if x == 5 { x = x+1; continue; // skip the rest of this loop body and start the next iteration } println!("X is {}", x); x = x + 1; if x==10 { break x*2; // break with a return value } }; println!("Result is {}", result); }
Advanced break and continue
- work in all loops
break: terminate the execution- can return a value in
loop
- can return a value in
continue: terminate this iteration and jump to the next one- in
while, the condition will be checked - in
for, there may be no next iteration breakandcontinuecan use labels
- in
#![allow(unused)] fn main() { for i in 1..=10 { if i % 3 != 0 {continue;} println!("{}",i); }; }
You can also label loops to target with continue and break.
#![allow(unused)] fn main() { let mut x = 1; 'outer_loop: loop { println!("Hi outer loop"); 'inner_loop: loop { println!("Hi inner loop"); x = x + 1; if x % 3 != 0 { continue 'outer_loop; // skip the rest of the outer loop body and start the next iteration } println!("In the middle"); if x >= 10 { break 'outer_loop; // break the outer loop } println!("X is {}", x); } println!("In the end"); }; println!("Managed to escape! :-) with x {}", x); }
#![allow(unused)] fn main() { let mut x = 1; 'outer_loop: loop { println!("Hi outer loop"); 'inner_loop: loop { println!("Hi inner loop"); x = x + 1; if x % 3 != 0 { break 'inner_loop; // break the inner loop, continue the outer loop } println!("In the middle"); if x >= 10 { break 'outer_loop; // break the outer loop } println!("X is {}", x); } println!("In the end"); }; println!("Managed to escape! :-) with x {}", x); }
#![allow(unused)] fn main() { let x = 'outer_loop: loop { loop { break 'outer_loop 1234;} }; println!("{}",x); }
Loop Selection Guidelines
When to Use Each Loop Type:
For Loops:
- Known range: Iterating over ranges or collections
- Collection processing: Working with arrays, vectors, etc.
- Counter-based iteration: When you need an index
While Loops:
- Condition-based: Continue until some condition changes
- Unknown iteration count: Don't know how many times to loop
- Input validation: Keep asking until valid input
Loop (Infinite):
- Event loops: Server applications, game loops
- Breaking on complex conditions: When simple while condition isn't sufficient
- Returning values: When loop needs to compute and return a result
Exercise
Here's an exam question from a previous semester. Analyze the code without any assistance to practice your skills for the next exam.
You are given the following Rust code
let mut x = 1;
'outer_loop: loop {
'inner_loop: loop {
x = x + 1;
if x % 4 != 0 {
continue 'outer_loop;
}
if x > 11 {
break 'outer_loop;
}
}
};
println!("Managed to escape! :-) with x {}", x);What is the value of x printed by the println! statement at the end?
Explain your answer.
Solution
The value is 12. The first if statement in the inner loop moves the program counter back to the top of the outer loop for any value of x that is not divisible by 4. So we can reach the second if statement that can break out of the loop only for multiples of 4. The first such multiple that is greater than 11 is 12, hence we will exit both loops and print the final statement when x is 12.
#![allow(unused)] fn main() { let mut x = 1; 'outer_loop: loop { 'inner_loop: loop { x = x + 1; if x % 4 != 0 { continue 'outer_loop; } if x > 11 { break 'outer_loop; } } }; println!("Managed to escape! :-) with x {}", x); }
Tuples in Rust
About This Module
This module covers Rust's tuple data structure, which allows grouping multiple values of different types into a single compound value. Tuples are fundamental for returning multiple values from functions and organizing related data.
Prework
Prework Readings
Read the following sections from "The Rust Programming Language" book:
- Chapter 3.2: Data Types - Focus on tuples subsection
- Chapter 6: Enums and Pattern Matching - Overview only
- Chapter 18.3: Pattern Syntax - Introduction only
Pre-lecture Reflections
Before class, consider these questions:
- What advantages do tuples provide over separate variables?
- How might tuples be useful for function return values?
- What are the trade-offs between tuples and structs?
- How does pattern matching with tuples improve code readability?
- When would you choose tuples versus arrays for grouping data?
Learning Objectives
By the end of this module, you should be able to:
- Create and use tuples with different data types
- Access tuple elements using indexing and destructuring
- Apply pattern matching with tuples
- Use tuples for multiple return values from functions
- Understand when to use tuples versus other data structures
- Work with nested tuples and complex tuple patterns
What Are Tuples?
A general-purpose data structure that can hold multiple values of different types.
- Syntax:
(value_1,value_2,value_3) - Type:
(type_1,type_2,type_3)
#![allow(unused)] fn main() { let mut tuple = (1,1.1); let mut tuple2: (i32,f64) = (1,1.1); // type annotation is optional in this case println!("tuple: {:?}, tuple2: {:?}", tuple, tuple2); }
#![allow(unused)] fn main() { let another = ("abc","def","ghi"); println!("another: {:?}", another); }
#![allow(unused)] fn main() { let yet_another: (u8,u32) = (255,4_000_000_000); println!("yet_another: {:?}", yet_another); }
Aside: Debug formatting
Look carefully at the variable formatting:
fn main() { let student = ("Alice", 88.5, 92.0, 85.5); println!("student: {:?}", student); // ^^ }
Rust uses the {:?} format specifier to print the variable in a debug format.
We'll talk more about what this means, but for now, just know that's often a good tool to use when debugging.
Accessing Tuple Elements
There are two ways to access tuple elements:
1. Accessing elements via index (0 based)
#![allow(unused)] fn main() { let mut tuple = (1,1.1); println!("({}, {})", tuple.0, tuple.1); tuple.0 = 2; println!("({}, {})",tuple.0,tuple.1); println!("Tuple is {:?}", tuple); }
2. Pattern matching and deconstructing
fn main() { let tuple = (1,1.1); let (a, b) = tuple; println!("a = {}, b = {}",a,b); }
Best Practices
When to Use Tuples:
- Small, related data: 2-4 related values
- Temporary grouping: Short-lived data combinations
- Function returns: Multiple return values
- Pattern matching: When destructuring is useful
When to Avoid Tuples:
- Many elements: More than 4-5 elements becomes unwieldy
- Complex data: When you need named fields for clarity
- Long-term storage: When data structure will evolve
Style Guidelines:
// Good: Clear, concise
let (width, height) = get_dimensions();
// Good: Descriptive destructuring
let (min_temp, max_temp, avg_temp) = analyze_temperatures(&data);
// Avoid: Too many elements
// let config = (true, false, 42, 3.14, "test", 100, false); // Hard to read
// Avoid: Unclear meaning
// let data = (42, 13); // What do these numbers represent?In-Class Exercise
Exercise: Student Grade Tracker
Create a program that tracks student information and calculates grade statistics. Work through the following steps:
-
Create a tuple
student1to store a student's name (String) and three test scores (f64, f64, f64) -
Calculate the average of the three test scores and create a new tuple,
student_grade, that includes the student's name and average grade -
Use field indexing to print the student's name and average from
student_grade
fn main() { // Step 1: Create a student tuple (name, score1, score2, score3) let student1 = ... // Step 2: Calculate the average of the three test scores and create a new // tuple, `student_grade`, that includes the student's name and average // grade ... let student_grade = ... // Step 3: Use field indexing to print the student's name and average }
Expected Output:
Student: Alice, Average: 88.7
Solution
fn main() { // Step 1: Create a student tuple (name, score1, score2, score3) let student1 = ("Alice", 88.5, 92.0, 85.5); // Step 2: Deconstruct the tuple into separate variables let (student_name, score1, score2, score3) = student1; let average = (score1 + score2 + score3) / 3.0; let student_grade = (student_name, average); // Step 3: Use field indexing to print the student's name and average println!("Student: {}, Average: {:.1}", student_grade.0, student_grade.1); }
Recap
- Tuples are a general-purpose data structure that can hold multiple values of different types
- We can access tuple elements via index or by pattern matching and deconstructing
- Pattern matching is a powerful tool for working with tuples
- Tuples are often used for multiple return values from functions
Enums and Pattern Matching in Rust
About This Module
This module introduces Rust's enum (enumeration) types and pattern matching with match
and if let. Enums allow you to define custom types by enumerating possible variants,
and pattern matching provides powerful control flow based on enum values.
Prework
Prework Readings
Read the following sections from "The Rust Programming Language" book:
- Chapter 6.1: Defining an Enum
- Chapter 6.2: The match Control Flow Construct
- Chapter 6.3: Concise Control Flow with if let
Pre-lecture Reflections
Before class, consider these questions:
- How do enums help make code more expressive and type-safe?
- What advantages does pattern matching provide over traditional if-else chains?
- How might enums be useful for error handling in programs?
- What is the difference between enums in Rust and in other languages you know?
- When would you use
matchversusif letfor pattern matching?
Learning Objectives
By the end of this module, you should be able to:
- Define custom enum types with variants
- Create instances of enum variants
- Use
matchexpressions for exhaustive pattern matching - Apply
if letfor simplified pattern matching - Store data in enum variants
- Understand memory layout of enums
- Use the
#[derive(Debug)]attribute for enum display
Enums
enum is short for "enumeration" and allows you to define a type by enumerating
its possible variants.
The type you define can only take on one of the variants you have defined.
Allows you to encode meaning along with data.
Pattern matching using match and if let allows you to run different code depending on the value of the enum.
Python doesn't have native support for
enum, but it does have anenummodule that let's do something similar by subclassing anEnumclass.
Basic Enums
Let's start with a simple example:
// define the enum and its variants enum Direction { North, // <---- enum _variant_ East, South, West, SouthWest, } fn main() { // create instances of the enum variants let dir_1 = Direction::North; // dir is inferred to be of type Direction let dir_2: Direction = Direction::South; // dir_2 is explicitly of type Direction }
The enum declaration is defining our new type, so now a type called Direction is in scope,
similar to i32, f64, bool, etc., but it instances can only be one of the variants we have defined.
The let declarations are creating instances of the Direction type.
Aside: Rust Naming Conventions
Rust has a set of naming conventions that are used to make the code more readable and consistent.
You should follow these conventions when naming your enums, variants, functions, and other items in your code.
| Item | Convention |
|---|---|
| Crates | snake_case (but prefer single word) |
| Modules | snake_case |
| Types (e.g. enums) | UpperCamelCase |
| Traits | UpperCamelCase |
| Enum variants | UpperCamelCase |
| Functions | snake_case |
| Methods | snake_case |
| General constructors | new or with_more_details |
| Conversion constructors | from_some_other_type |
| Local variables | snake_case |
| Static variables | SCREAMING_SNAKE_CASE |
| Constant variables | SCREAMING_SNAKE_CASE |
| Type parameters | concise UpperCamelCase, usually single uppercase letter: T |
| Lifetimes | short, lowercase: 'a |
Using "use" as a shortcut
You can bring the variants into scope using use statements.
// define the enum and its variants enum Direction { North, East, South, West, SouthWest, } // Bring the variant `East` into scope use Direction::East; fn main() { // we didn't have to specify "Direction::" let dir_3 = East; }
Using "use" as a shortcut
You can bring multiple variants into scope using use statements.
// define the enum and its variants enum Direction { North, East, South, West, SouthWest, } // Bringing two options into the current scope use Direction::{East,West}; fn main() { let dir_4 = West; }
Using "use" as a shortcut
You can bring all the variants into scope using use statements.
enum Direction { North, East, South, West, } // Bringing all options in use Direction::*; fn main() { let dir_5 = South; }
Question: Why might we not always want to bring all the variants into scope?
Name clashes
use <enum_name>::*; will bring all the variants into scope, but if you have a variable with the same name as a variant, it will clash.
Uncomment the use Prohibited::*; line to see the error.
enum Prohibited { MyVar, YourVar, } // what happens if we bring all the variants into scope? // use Prohibited::*; fn main() { let MyVar = "my string"; let another_var = Prohibited::MyVar; println!("{MyVar}"); }
Aside: Quick Recap on Member Access
Different data structures have different ways of accessing their members.
fn main() { // Accessing an element of an array let arr = [1, 2, 3]; println!("{}", arr[0]); // Accessing an element of a tuple let tuple = (1, 2, 3); println!("{}", tuple.0); let (a, b, c) = tuple; println!("{}, {}, {}", a, b, c); // Accessing a variant of an enum enum Direction { North, East, South, West, } let dir = Direction::East; }
Using enums as parameters
We can also define a function that takes our new type as an argument.
enum Direction { North, East, South, West, } fn turn(dir: Direction) { return; } // this function doesn't do anything fn main() { let dir = Direction::East; turn(dir); }
Control Flow with match
Enums: Control Flow with match
The match statement is used to control flow based on the value of an enum.
enum Direction { North, East, South, West, } fn main() { let dir = Direction::East; // print the direction match dir { Direction::North => println!("N"), Direction::South => println!("S"), Direction::West => { // can do more than one thing println!("Go west!"); println!("W") } Direction::East => println!("E"), }; }
Take a close look at the match syntax.
Covering all variants with match
match is exhaustive, so we must cover all the variants.
// Won't compile enum Direction { North, East, South, West, } fn main() { let dir_2: Direction = Direction::South; // won't work match dir_2 { Direction::North => println!("N"), Direction::South => println!("S"), // East and West not covered }; }
But there is a way to match anything left.
Covering all variants with match
There's a special pattern, _, that matches anything.
enum Direction { North, East, South, West, } fn main() { let dir_2: Direction = Direction::North; match dir_2 { Direction::North => println!("N"), Direction::South => println!("S"), // match anything left _ => (), // covers all the other variants but doesn't do anything } }
Covering all variants with match
WARNING!!
The _ pattern has to be the last pattern in the match statement.
enum Direction { North, East, South, West, } fn main() { let dir_2: Direction = Direction::North; match dir_2 { _ => println!("anything else"), // will never get here!! Direction::North => println!("N"), Direction::South => println!("S"), } }
Recap of match
- Type of a switch statement like in C/C++ (Python doesn't have an equivalent)
- Must be exhaustive though there is a way to specify default (
_ =>)
Putting Data in an Enum Variant
- Each variant can come with additional information
- Let's put a few things together with an example
#[derive(Debug)] // allows us to print the enum by having Rust automatically // implement a Debug trait (more later) enum DivisionResult { Ok(f32), // This variant has an associated value of type f32 DivisionByZero, } // Return a DivisionResult that handles the case where the division is by zero. fn divide(x:f32, y:f32) -> DivisionResult { if y == 0.0 { return DivisionResult::DivisionByZero; } else { return DivisionResult::Ok(x / y); // Prove a value with the variant } } fn show_result(result: DivisionResult) { match result { DivisionResult::Ok(result) => println!("the result is {}",result), DivisionResult::DivisionByZero => println!("noooooo!!!!"), } } fn main() { let (a,b) = (9.0,3.0); // this is just short hand for let a = 9.0; let b = 3.0; println!("Dividing 9 by 3:"); show_result(divide(a,b)); println!("Dividing 6 by 0:"); show_result(divide(6.0,0.0)); // we can also call `divide`, store the result and print it let z = divide(5.0, 4.0); println!("The result of 5.0 / 4.0 is {:?}", z); }
Variants with multiple values
We can have more than one associated value in a variant.
enum DivisionResultWithRemainder { Ok(u32,u32), // Store the result of the integer division and the remainder DivisionByZero, } fn divide_with_remainder(x:u32, y:u32) -> DivisionResultWithRemainder { if y == 0 { DivisionResultWithRemainder::DivisionByZero } else { // Return the integer division and the remainder DivisionResultWithRemainder::Ok(x / y, x % y) } } fn main() { let (a,b) = (9,4); println!("Dividing 9 by 4:"); match divide_with_remainder(a,b) { DivisionResultWithRemainder::Ok(result,remainder) => { println!("the result is {} with a remainder of {}",result,remainder); } DivisionResultWithRemainder::DivisionByZero => println!("noooooo!!!!"), }; }
Getting the value out of an enum variant
We can use match to get the value out of an enum variant.
#[derive(Debug)] enum Message { Quit, Move { x: i32, y: i32 }, Write(String), ChangeColor(i32, i32, i32), } fn main() { let msg = Message::Write(String::from("Hello, world!")); // Extract values using match match msg { Message::Quit => println!("Quit message"), Message::Move { x, y } => println!("Move to ({}, {})", x, y), Message::Write(text) => println!("Write: {}", text), Message::ChangeColor(r, g, b) => println!("Color: RGB({}, {}, {})", r, g, b), } // Using if let for single variant extraction let msg2 = Message::Move { x: 10, y: 20 }; if let Message::Move { x, y } = msg2 { println!("Extracted coordinates: x={}, y={}", x, y); } }
A Note on the Memory Size of Enums
The size of the enum is related to the size of its largest variant, not the sum of the sizes.
Also stores a discriminant (tag) to identify which variant is stored.
use std::mem; enum SuperSimpleEnum { First, Second, Third } enum SimpleEnum { A, // No data B(i32), // Contains an i32 (4 bytes) C(i32, i32), // Contains two i32s (8 bytes) D(i64) // Contains an i64 (8 bytes) } fn main() { println!("Size of SuperSimpleEnum: {} bytes\n", mem::size_of::<SuperSimpleEnum>()); println!("Size of SimpleEnum: {} bytes\n", mem::size_of::<SimpleEnum>()); println!("Size of i32: {} bytes", mem::size_of::<i32>()); println!("Size of (i32, i32): {} bytes", mem::size_of::<(i32, i32)>()); println!("Size of (i64): {} bytes", mem::size_of::<(i64)>()); }
For variant C, it's possible that the compiler is aligning each i32 on an 8-byte boundary,
so the total size is 16 bytes. Common for modern 64-bit machines.
More on memory size of enums
use std::mem::size_of; enum Message { Quit, ChangeColor(u8, u8, u8), Move { x: i32, y: i32 }, Write(String), } enum Status { Pending, InProgress, Completed, Failed, } fn main() { // General case (on a 64-bit machine) println!("Size of Message: {} bytes", size_of::<Message>()); // C-like enum println!("Size of Status: {} bytes", size_of::<Status>()); // Prints 1 // References are addresses which are 64-bit (8 bytes) println!("Size of &i32: {} bytes", size_of::<&i32>()); // Prints 8 }
Displaying enums
By default Rust doesn't know how to display a new enum type.
Here we try to debug print the Direction enum.
// won't compile enum Direction { North, East, South, West, } fn main() { let dir = Direction::North; println!("{:?}",dir); }
Displaying enums (#[derive(Debug)])
Adding the #[derive(Debug)] attribute to the enum definition allows Rust to automatically implement the Debug trait.
#[derive(Debug)] enum Direction { North, East, South, West, } use Direction::*; fn main() { let dir = Direction::North; println!("{:?}",dir); }
match as expression
The result of a match can be used as an expression.
Each branch (arm) returns a value.
#[derive(Debug)] enum Direction { North, East, South, West, } use Direction::*; fn main() { // swap east and west let mut dir_4 = North; println!("{:?}", dir_4); dir_4 = match dir_4 { East => West, West => { println!("Switching West to East"); East } // variable mathching anything else _ => West, }; println!("{:?}", dir_4); }
Simplifying matching
Consider the following example (in which we want to use just one branch):
#[derive(Debug)] enum DivisionResult { Ok(u32,u32), DivisionByZero, } fn divide(x:u32, y:u32) -> DivisionResult { if y == 0 { DivisionResult::DivisionByZero } else { DivisionResult::Ok(x / y, x % y) } } fn main() { match divide(8,3) { DivisionResult::Ok(result,remainder) => println!("{} (remainder {})",result,remainder), _ => (), // <--- how to avoid this? }; }
This is a common enough pattern that Rust provides a shortcut for it.
Simplified matching with if let
if let allows for matching just one branch (arm)
#[derive(Debug)] enum DivisionResult { Ok(u32,u32), DivisionByZero, } fn divide(x:u32, y:u32) -> DivisionResult { if y == 0 { DivisionResult::DivisionByZero } else { DivisionResult::Ok(x / y, x % y) } } fn main() { if let DivisionResult::Ok(result,reminder) = divide(8,7) { println!("{} (remainder {})",result,reminder); }; }
Simplified matching with if let
Caution!
The single = is both an assignment and a pattern matching operator.
#[derive(Debug)] enum Direction { North, East, South, West, } use Direction::*; fn main() { let dir = North; if let North = dir { println!("North"); } }
if let with else
You can use else to match anything else.
#[derive(Debug)] enum Direction { North, East, South, West, } use Direction::*; fn main() { let dir = North; if let West = dir { println!("North"); } else { println!("Something else"); }; }
Enum variant goes on the left side
Caution!
You don't get a compile error, you get different behavior!
#[derive(Debug)] enum Direction { North, East, South, West, } use Direction::*; fn main() { let dir = North; // But it is important to have the enum // on the left hand side // if let West = dir { if let dir = West { println!("West"); } else { println!("Something else"); }; }
Single = for pattern matching
Remember to use the single = for pattern matching, not the double == for equality.
#[derive(Debug)] enum Direction { North, East, South, West, } use Direction::*; fn main() { let dir = North; // Don't do this. if let North == dir { println!("North"); } }
Best Practices
When to Use Enums:
- State representation: Modeling different states of a system
- Error handling: Representing success/failure with associated data
- Variant data: When you need a type that can be one of several things
- API design: Making invalid states unrepresentable
Design Guidelines:
- Use descriptive names: Make variants self-documenting
- Leverage associated data: Store relevant information with variants
- Prefer exhaustive matching: Avoid catch-all patterns when possible
- Use
if letfor single variant: When you only care about one case
In-Class Activity: "Traffic Light State Machine"
Activity Overview
Work in snall teams to create a simple traffic light system using enums and pattern matching.
Activity Instructions
You're given a TrafficLight enum shown below that has variants for Red, Yellow, and Green and associated data for the seconds remaining till the next light.
Task:
- Create a function
next_lightthat takes aTrafficLightand returns the next state in the sequence: Red → Green(30) → Yellow(5) → Red(45) with the seconds remaining till the next light. - Create a function
get_light_colorthat takes a reference to aTrafficLight(&TrafficLight) and returns a string slice representation (&str) of the current light state - Create a function
get_time_remainingthat takes a reference to aTrafficLight(&TrafficLight) and returns the time remaining till the next light as au32 - Create a
mainfunction that:- initializes a variable of type
TrafficLighttoGreen(30), then - prints the light color and
- the time remaining till the next light.
- calls
next_lightto get the next light state. - Repeat this process 3 times.
- initializes a variable of type
You're output should look something like this:
--------------------------------
Light color is: Green
Time remaining: 30
--------------------------------
Light color is: Yellow
Time remaining: 5
--------------------------------
Light color is: Red
Time remaining: 45
Submit your code to Gradescope.
Here is the enum definition:
#![allow(unused_variables)] #![allow(dead_code)] #[derive(Debug)] enum TrafficLight { Red(u32), // seconds remaining Yellow(u32), // seconds remaining Green(u32), // seconds remaining } // Your code here
Solution
#[derive(Debug)] enum TrafficLight { Red(u32), // seconds remaining Yellow(u32), // seconds remaining Green(u32), // seconds remaining } fn next_light(light: &TrafficLight) -> TrafficLight { match light { TrafficLight::Red(seconds) => TrafficLight::Green(30), TrafficLight::Green(seconds) => TrafficLight::Yellow(5), TrafficLight::Yellow(seconds) => TrafficLight::Red(45), } } fn get_light_color(light: &TrafficLight) -> &str { match light { TrafficLight::Red(_) => "Red", TrafficLight::Yellow(_) => "Yellow", TrafficLight::Green(_) => "Green", } } fn get_time_remaining(light: &TrafficLight) -> u32 { match light { TrafficLight::Red(seconds) => *seconds, TrafficLight::Yellow(seconds) => *seconds, TrafficLight::Green(seconds) => *seconds, } } fn main() { let mut light = TrafficLight::Green(30); for _ in 0..3 { println!("--------------------------------"); println!("Light color is: {}", get_light_color(&light)); println!("Time remaining: {}", get_time_remaining(&light)); light = next_light(&light); } }
Discussion Points
- How do we get the value out of the enum variants?
- How do we match on the enum variants?
Midterm 1 Review
Table of Contents:
- Reminders about the exam
- Development Tools
- Shell/Terminal Commands
- Git Commands
- Cargo Commands
- Quick Questions: Tools
- Rust Core Concepts
- Variables and Types
- String vs &str
- Quick Questions: Rust basics
- Functions
- Loops and Arrays
- Enums and Pattern Matching
- Midterm Strategy
Reminders about the exam
- No notes
- No electronic devices
- Bring a pencil!
Development Tools
Shell/Terminal Commands
For the midterm, you should recognize and recall:
pwd- where am I?ls- what's here?ls -la- more info and hidden filesmkdir folder_name- make a foldercd folder_name- move into a foldercd ..- move up to a parent foldercd ~- return to the home directoryrm filename- delete a file
You DON'T need to: Memorize complex command flags or advanced shell scripting
Git Commands
For the midterm, you should recognize and recall:
git clone- get a repository, pasting in the HTTPS or SSH linkgit status- see what's changedgit log- see the commit historygit branch- list all branchesgit checkout branch_name- switch to a different branchgit checkout -b new_branch- create a branch callednew_branchand switch to itgit add .- stage all recent changesgit commit -m "my commit message"- create a commit with staged changesgit push- send what's on my machine to GitHubgit pull- get changes from GitHub to my machinegit merge branch_name- merge branchbranch_nameinto the current branch
You DON'T need to: revert, reset, resolving merge conflicts, pull requests
Cargo Commands
For the midterm, you should recognize and recall:
cargo new project_name- create projectcargo run- compile and runcargo run --release- compile and run with optimizations (slower to compile, faster to run)cargo build- just compile without runningcargo check- just check for errors without compilingcargo test- run tests
You DON'T need to know: Cargo.toml syntax, how Cargo.lock works, advanced cargo features
Quick Questions: Tools
Question 1
Which command shows your current location on your machine?
Question 2
What's the correct order for the basic Git workflow?
- A) add → commit → push
- B) commit → add → push
- C) push → add → commit
- D) add → push → commit
Question 3
Which cargo command compiles your code without running it?
Rust Core Concepts
Compilers vs Interpreters
Key Concepts
- Compiled languages (like Rust): Code is transformed into machine code before running
- Interpreted languages (like Python): Code is executed line-by-line at runtime
- The compiler checks your code for errors and translates it into machine code
- The machine code is directly executed by your computer - it isn't Rust anymore!
- A compiler error means your code failed to translate into machine code
- A runtime error means your machine code crashed while running
Rust prevents runtime errors by being strict at compile time!
Variables and Types
Key Concepts
- Defining variables:
let x = 5; - Mutability: Variables are immutable by default, use
let mutto allow them to change - Shadowing:
let x = x + 1;creates a newxvalue withoutmutand lets you change types - Basic types:
i32,f64,bool,char,&str,String - Rough variable sizes: Eg.
i32takes up 32-bits of space and its largest positive value is about half ofu32's largest value - Type annotations: Rust infers types (
let x = 5) or you can specify them (let x: i32 = 5) - Tuples: Creating (
let x = (2,"hi")), accessing (let y = x.0 + 1), destructuring (let (a,b) = x) - Arrays: Creating (
let x = [1,2,3]), accessing (let y = x[1]) - Accessing and indexing elements of arrays, tuples and enums.
What's Not Important
- Calculating exact variable sizes and max values
- Complex string manipulation details
String vs &str
Quick explanation
String= a string = owned text data (like a text file you own)&str= a "string slice = borrowed text data (like looking at someone else's text)- A string literal like
"hello"is a&str(you don't own it, it's baked into your program) - To convert from an &str to a String, use
"hello".to_string()orString::from("hello") - To convert from a String to an &str, use
&my_string(to create a "reference")
Don't stress! You can do most things with either one, and we won't make you do anything crazy with these.
Quick Questions: Rust basics
Question 4
What happens with this code?
#![allow(unused)] fn main() { let x = 5; x = 10; println!("{}", x); }
- A) Prints 5
- B) Prints 10
- C) Compiler error
- D) Runtime error
Question 5
What's the type of x after this code?
#![allow(unused)] fn main() { let x = 5; let x = x as f64; let x = x > 3.0; }
- A)
i32 - B)
f64 - C)
bool - D) Compiler error
Question 6
How do you access the second element of tuple t = (1, 2, 3)?
- A)
t[1] - B)
t.1 - C)
t.2 - D)
t(2)
Functions
Key Concepts
- Function signature:
fn name(param1: type1, param2: type2) -> return_type, returned value must matchreturn_type - Expressions and statements: Expressions reduce to values (no semicolon), statements take actions (end with semicolon)
- Returning with return or an expression: Ending a function with
return x;andxare equivalent - {} blocks are scopes and expressions: They reduce to the value of the last expression inside them
- Unit type: Functions without a return type return
() - Best practices: Keep functions small and single-purpose, name them with verbs
What's Not Important
- Ownership/borrowing mechanics (we'll cover this after the midterm)
- Advanced function patterns
Quick Questions: Functions
Question 7
What is the value of mystery(x)?
#![allow(unused)] fn main() { fn mystery(x: i32) -> i32 { x + 5; } let x = 1; mystery(x) }
- A) 6
- B)
i32 - C)
() - D) Compiler error
Question 8
Which is a correct function signature for a function that takes two integers and returns their sum?
Question 9
Which version will compile
#![allow(unused)] fn main() { // Version A fn func_a() { 42 } // Version B fn func_b() { 42; } }
- A) A
- B) B
- C) Both
- D) Neither
Question 10
What does this print?
#![allow(unused)] fn main() { let x = println!("hello"); println!("{:?}", x); }
- A) hello \n hello
- B) hello \n ()
- C) hello
- D) ()
- E) Compiler error
- F) Runtime error
Loops and Arrays
Key Concepts
- Ranges:
1..5vs1..=5 - Arrays: Creating (
[5,6]vs[5;6]), accessing (x[i]), 0-indexing - If/else: how to write
if / elseblocks with correct syntax - Loop types:
for,while,loop- how and when to use each breakandcontinue: For controlling loop flow- Basic enumerating
for (i, val) in x.iter().enumerate() - Compact notation (
let x = if y ...orlet y = loop {...) - Labeled loops, breaking out of an outer loop
What's Not Important
- Enumerating over a string array with
for (i, &item) in x.iter().enumerate()
Quick Questions: Loops & Arrays
Question 11
What's the difference between 1..5 and 1..=5?
Question 12
What does this print?
#![allow(unused)] fn main() { for i in 0..3 { if i == 1 { continue; } println!("{}", i); } }
Question 13
How do you get both index and value when looping over an array?
Enums and Pattern Matching
Key Concepts
- Enum definition: Creating custom types with variants
- Data in variants: Enums can hold data
matchexpressions: syntax by hand, needs to be exhaustive, how to use a catch-all (_)#[derive(Debug)]: For making enums printable- Data extraction: Getting values out of enum variants with
match,unwrap, orexpect
Quick Questions: Enums & Match
Question 14
What's wrong with this code?
#![allow(unused)] fn main() { enum Status { Loading, Complete, Error, } let stat = Status::Loading; match stat { Status::Loading => println!("Loading..."), Status::Complete => println!("Done!"), } }
Question 15
What does #[derive(Debug)] do?
Question 16
What does this return when called with divide_with_remainder(10, 2)?
How about with divide_with_remainder(10, 0)?
#![allow(unused)] fn main() { enum MyResult { Ok(u32,u32), // Store the result of the integer division and the remainder DivisionByZero, } fn divide_with_remainder(a: u32, b: u32) -> MyResult { if b == 0 { MyResult::DivisionByZero } else { MyResult::Ok(a / b, a % b) } } }
Midterm Strategy
- Focus on concepts: Understand the "why" behind the syntax and it will be easier to remember
- Practice with your hands: Literally and figuratively - practice solving problems, and practice on paper
- Take bigger problems step-by-step: Understand each line of code before reading the next. And make a plan before you start to hand-code
Good Luck!
Ownership and Borrowing in Rust
Introduction
- Rust's most distinctive feature: ownership system
- Enables memory safety without garbage collection
- Compile-time guarantees with zero runtime cost
- Three key concepts: ownership, borrowing, and lifetimes
Prework
Prework Readings
Read the following sections from "The Rust Programming Language" book:
- Chapter 4: Understanding Ownership - All sections
Pre-lecture Reflections
Before class, consider these questions:
- What problems does Rust's ownership system solve compared to manual memory management?
- How does ownership differ from garbage collection in other languages?
- What is the difference between moving and borrowing a value?
- When would you use
Box<T>instead of storing data on the stack? - How do mutable and immutable references help prevent data races?
Memory Layout: Stack vs Heap
Stack:
- Fast, fixed-size allocation
- LIFO (Last In, First Out) structure
- Stores data with known, fixed size at compile time
- Examples: integers, booleans, fixed-size arrays
Heap:
- Slower, dynamic allocation
- For data with unknown or variable size
- Allocator finds space and returns a pointer
- Examples: String, Vec, Box
Stack Memory Example
fn main() { let x = 5; // stored on stack let y = true; // stored on stack let z = x; // copy of value on stack println!("{}, {}", x, z); // both still valid }
- Simple types implement
Copytrait - Assignment creates a copy, both variables remain valid
String and the Heap
Heap Memory: The String Type
Let's look more closely at the String type.
#![allow(unused)] fn main() { let s1 = String::from("hello"); }
Stringstores pointer, length, capacity on stack- Actual string data stored on heap

In fact we can inspect the memory layout of a String:
#![allow(unused)] fn main() { let mut s = String::from("hello"); println!("&s:{:p}", &s); println!("ptr: {:p}", s.as_ptr()); println!("len: {}", s.len()); println!("capacity: {}\n", s.capacity()); // Let's add some more text to the string s.push_str(", world!"); println!("&s:{:p}", &s); println!("ptr: {:p}", s.as_ptr()); println!("len: {}", s.len()); println!("capacity: {}", s.capacity()); }
Shallow Copy with Move
fn main() { let s1 = String::from("hello"); // s1 has three parts on stack: // - pointer to heap data // - length: 5 // - capacity: 5 let s2 = s1; // shallow copy of stack data println!("{}", s1); // ERROR! s1 is no longer valid println!("{}", s2); // OK }
Stringstores pointer, length, capacity on stack- Actual string data stored on heap
Shallow Copy:
- Copying the pointer, length, and capacity
- The actual string data is not copied
- The owner of the string data is transferred to the new structure

#![allow(unused)] fn main() { let s1 = String::from("hello"); println!("&s1:{:p}", &s1); println!("ptr: {:p}", s1.as_ptr()); println!("len: {}", s1.len()); println!("capacity: {}\n", s1.capacity()); let s2 = s1; println!("&s2:{:p}", &s2); println!("ptr: {:p}", s2.as_ptr()); println!("len: {}", s2.len()); println!("capacity: {}", s2.capacity()); }
The Ownership Rules
- Each value in Rust has an owner
- There can only be one owner at a time
- When the owner goes out of scope, the value is dropped
These rules prevent:
- Double free errors
- Use after free
- Data races
Ownership Transfer: Move Semantics
fn main() { let s1 = String::from("hello"); let s2 = s1; // ownership moves from s1 to s2 // s1 is now invalid - compile error if used println!("{}", s2); // OK // When s2 goes out of scope, memory is freed }
- Move prevents double-free
- Only one owner can free the memory
Clone: Deep Copy
fn main() { let s1 = String::from("hello"); let s2 = s1.clone(); // deep copy of heap data println!("s1 = {}, s2 = {}", s1, s2); // both valid }
clone()creates a full copy of heap data- Both variables are independent owners
- More expensive operation
Vec and the Heap
Vec: Dynamic Arrays on the Heap
What is Vec?
Vec<T>is Rust's growable, heap-allocated array type- Generic over type
T(e.g.,Vec<i32>,Vec<String>) - Contiguous memory allocation for cache efficiency
- Automatically manages capacity and growth
Three ways to create a Vec:
#![allow(unused)] fn main() { // 1. Empty vector with type annotation let v1: Vec<i32> = Vec::new(); // 2. Using vec! macro with initial values let v2 = vec![1, 2, 3, 4, 5]; // 3. With pre-allocated capacity let v3: Vec<i32> = Vec::with_capacity(10); }
Vec Memory Structure
#![allow(unused)] fn main() { let mut v = Vec::new(); v.push(1); v.push(2); v.push(3); // Vec structure (on stack): // - pointer to heap buffer // - length: 3 (number of elements) // - capacity: (at least 3, often more) println!("&v:{:p}", &v); println!("ptr: {:p}", v.as_ptr()); println!("Length: {}", v.len()); println!("Capacity: {}", v.capacity()); }
- Pointer: points to heap-allocated buffer
- Length: number of initialized elements
- Capacity: total space available before reallocation
Vec Growth and Reallocation
fn main() { let mut v = Vec::new(); println!("Initial capacity: {}", v.capacity()); // 0 v.push(1); println!("After 1 push: {}", v.capacity()); // typically 4 v.push(2); v.push(3); v.push(4); v.push(5); // triggers reallocation println!("After 5 pushes: {}", v.capacity()); // typically 8 }
- Capacity doubles when full (amortized O(1) push)
- Reallocation: new buffer allocated, old data copied
- Pre-allocate with
with_capacity()to avoid reallocations
Accessing Vec Elements
fn main() { let v = vec![10, 20, 30, 40, 50]; // Indexing - panics if out of bounds // Try with index 5 and see what happens let third = v[2]; println!("Third element: {}", third); // Using get() - returns Option<T> // Safely handles out of bounds indices match v.get(2) { Some(value) => println!("Third element: {}", value), None => println!("No element at index 2"), } }
Option<T>
Option<T> is an enum that can be either Some(T) or None.
Defined in the standard library as:
enum Option<T> {
Some(T),
None,
}Let's you handle the case where there is no return value.
fn main() { let v = vec![1, 2, 3, 4, 5]; // Try with index 5 and see what happens match v.get(0) { Some(value) => println!("Element: {}", value), None => println!("No element at index"), } }
Modifying Vec Elements
fn main() { let mut v = vec![1, 2, 3, 4, 5]; // Direct indexing for modification v[0] = 10; // Adding elements v.push(6); // add to end // Removing elements let last = v.pop(); // remove from end, returns Option<T> // Insert/remove at position v.insert(2, 99); // insert 99 at index 2 v.remove(1); // remove element at index 1 println!("{:?}", v); }
Note that
insertandremovecan be expensive operations and are time. On the other hand,pushandpopare time.
Vec Ownership
fn main() { let v1 = vec![1, 2, 3, 4, 5]; let v2 = v1; // ownership moves // println!("{:?}", v1); // ERROR! println!("{:?}", v2); // OK let v3 = v2.clone(); // deep copy println!("{:?}, {:?}", v2, v3); // both OK }
- Vec follows same ownership rules as String
- Move transfers ownership of heap allocation
Functions and Ownership
Functions and Ownership
fn takes_ownership(s: String) { println!("{}", s); } // s is dropped here fn main() { let s = String::from("hello"); takes_ownership(s); // println!("{}", s); // ERROR! s was moved }
- Passing to function transfers ownership
- Original variable becomes invalid
Returning Ownership
fn gives_ownership(s: String) -> String { let new_s = s + " world"; new_s // ownership moves to caller } fn main() { let s1 = String::from("hello"); let s2 = gives_ownership(s1); println!("{}", s2); // OK }
- Return value transfers ownership out of function
- Caller becomes new owner
References: Borrowing Without Ownership
fn main() { let s1 = String::from("hello"); let len = calculate_length(&s1); // borrow with & println!("'{}' has length {}", s1, len); // s1 still valid! } fn calculate_length(s: &String) -> usize { s.len() } // s goes out of scope, but doesn't own data
&creates a reference (borrow)- Original owner retains ownership
- Reference allows reading data

Immutable References
fn main() { let s = String::from("hello"); let r1 = &s; // immutable reference let r2 = &s; // another immutable reference let r3 = &s; // yet another println!("{}, {}, {}", r1, r2, r3); // all valid // Let's take a look at the memory layout println!("&s: {:p}, s.as_ptr(): {:p}", &s, s.as_ptr()); println!("&r1: {:p}, r1.as_ptr(): {:p}", &r1, r1.as_ptr()); println!("&r2: {:p}, r2.as_ptr(): {:p}", &r2, r2.as_ptr()); println!("&r3: {:p}, r3.as_ptr(): {:p}", &r3, r3.as_ptr()); }
- Multiple immutable references allowed simultaneously
- Cannot modify through immutable reference
// ERROR fn main() { let s = String::from("hello"); change(&s); println!("{}", s); } fn change(s: &String) { s.push_str(", world"); }
Mutable References
fn main() { let mut s = String::from("hello"); change(&mut s); // mutable reference with &mut println!("{}", s); // prints "hello, world" } fn change(s: &mut String) { s.push_str(", world"); }
&mutcreates mutable reference- Allows modification of borrowed data
Mutable Reference Restrictions
fn main() { let mut s = String::from("hello"); let r1 = &mut s; let r2 = &mut s; // ERROR! Only one mutable reference println!("{}", r1); }
- Only ONE mutable reference at a time
- Prevents data races at compile time
- No simultaneous readers when there's a writer
Mixing References: Not Allowed
fn main() { let mut s = String::from("hello"); let r1 = &s; // immutable let r2 = &s; // immutable let r3 = &mut s; // ERROR! Can't have mutable with immutable println!("{}, {}", r1, r2); }
- Cannot have mutable reference while immutable references exist
- Immutable references expect data won't change
Reference Scopes and Non-Lexical Lifetimes
fn main() { let mut s = String::from("hello"); let r1 = &s; let r2 = &s; println!("{}, {}", r1, r2); // r1 and r2 no longer used after this point let r3 = &mut s; // OK! Previous references out of reference scope println!("{}", r3); }
- Reference scope: from introduction to last use, rather than lexical scope (till end of block)
- Non-lexical lifetimes allow more flexible borrowing
Vec with References
fn main() { let mut v = vec![1, 2, 3, 4, 5]; let first = &v[0]; // immutable borrow // v.push(6); // ERROR! Can't mutate while borrowed println!("First element: {}", first); v.push(6); // OK now, first is out of reference scope }
- Borrowing elements prevents mutation of Vec
- Protects against invalidation (reallocation)
Function Calls: Move vs Reference vs Mutable Reference
fn process_string(s: String) { } // takes ownership (move) fn read_string(s: &String) { } // immutable borrow fn modify_string(s: &mut String) { } // mutable borrow fn main() { let mut s = String::from("hello"); read_string(&s); // borrow modify_string(&mut s); // mutable borrow read_string(&s); // borrow again process_string(s); // move // s is now invalid }
This is ok because the move (ownership transfer) happens last, so the other references are still valid.
Key Takeaways
- Stack: fixed-size, fast; Heap: dynamic, flexible
- Ownership ensures memory safety without garbage collection
- Move semantics prevent double-free
- Borrowing allows temporary access without ownership transfer
- One mutable reference XOR many immutable references
- References must be valid (no dangling pointers)
- Compiler enforces these rules at compile time
Best Practices
- Prefer borrowing over ownership transfer when possible
- Use immutable references by default
- Keep mutable reference scope minimal
- Let the compiler guide you with error messages
- Clone only when necessary (performance cost)
- Understand whether functions need ownership or just access
In-Class Exercise
Challenge: Fix the Broken Code
The following code has several ownership and borrowing errors. Your task is to fix them so the code compiles and runs correctly.
fn main() { let mut numbers = vec![1, 2, 3, 4, 5]; // Task 1: Calculate sum without taking ownership let total = calculate_sum(numbers); // Task 2: Double each number in the vector double_values(numbers); // Task 3: Print both the original and doubled values println!("Original sum: {}", total); println!("Doubled values: {:?}", numbers); // Task 4: Add new numbers to the vector add_numbers(numbers, vec![6, 7, 8]); println!("After adding: {:?}", numbers); } fn calculate_sum(v: Vec<i32>) -> i32 { let mut sum = 0; for num in v { sum += num; } sum } fn double_values(v: Vec<i32>) { for num in v { num *= 2; } } fn add_numbers(v: Vec<i32>, new_nums: Vec<i32>) { for num in new_nums { v.push(num); } }
Hints:
- Think about which functions need ownership vs borrowing
- Consider when you need
&vs&mut - Remember: you can't modify through an immutable reference
- The original vector should still be usable in
mainafter function calls
Fini
Slices in Rust
About This Module
This module introduces slices, a powerful feature in Rust that provides references to contiguous sub-sequences of collections. We'll explore how slices work with arrays and vectors, their memory representation, and how they interact with Rust's borrowing rules.
Prework
Prework Reading
Read the following sections from "The Rust Programming Language" book:
You might want to go back and review:
Pre-lecture Reflections
Before class, consider these questions:
- How do slices provide safe access to sub-sequences without copying data?
- What are the advantages of slices over passing entire arrays or vectors?
- How do borrowing rules apply to slices and prevent data races?
- When would you use slices instead of iterators for processing sub-sequences?
- What are the memory efficiency benefits of slices compared to copying data?
Learning Objectives
By the end of this module, you should be able to:
- Create and use immutable and mutable slices from arrays and vectors
- Understand slice syntax and indexing operations
- Apply borrowing rules correctly when working with slices
- Analyze the memory representation of slices
- Use slices for efficient sub-sequence processing without data copying
- Design functions that work with slice parameters for flexibility
Slices (§4.3)
Slice = reference to a contiguous sub-sequence of elements in a collection
Slices of an array:
- array of type
[T, _], e.g. datatype and length - slice of type
&[T](immutable) or&mut [T](mutable)
fn main() { let arr: [i32; 5] = [0,1,2,3,4]; println!("arr: {:?}", arr); // immutable slice of an array let slice: &[i32] = &arr[1..3]; println!("slice: {:?}",slice); println!("slice[0]: {}", slice[0]); }
The slice slice is a reference to the array arr from index 1 to 3 and hence is borrowed from arr.
Immutable slices
Note:
- The slice is a reference to the array, which by default is immutable.
- Even if the source array is mutable, the slice is immutable.
fn main() { let mut arr: [i32; 5] = [0,1,2,3,4]; println!("arr: {:?}", arr); // immutable slice of an array let slice: &[i32] = &arr[1..3]; println!("slice: {:?}",slice); println!("slice[0]: {}", slice[0]); slice[0] = 100; // ERROR! Cannot modify an immutable slice println!("slice: {:?}", slice); println!("slice[0]: {}", slice[0]); }
Mutable slices
We can create a slice of a mutable array which borrows from arr mutably.
fn main(){ // mutable slice of an array let mut arr = [0,1,2,3,4]; println!("arr: {:?}", arr); let slice = &mut arr[2..4]; println!("slice: {:?}",slice); // ERROR: Cannot modify the source array after a borrow //arr[0] = 10; //println!("arr: {:?}", arr); println!("\nLet's modify the slice[0]"); slice[0] = slice[0] * slice[0]; println!("slice[0]: {}", slice[0]); println!("slice: {:?}", slice); println!("arr: {:?}", arr); }
What about this?
What's happening here?!?!?
Why are we able to modify the array after the slice is created?
fn main() { let mut arr: [i32; 5] = [0,1,2,3,4]; println!("arr: {:?}", arr); // immutable slice of an array let slice: &[i32] = &arr[1..3]; println!("slice: {:?}",slice); println!("slice[0]: {}", slice[0]); arr[0] = 10; // OK! We can modify the array println!("arr: {:?}", arr); // What happens if you uncomment this line? //println!("slice: {:?}", slice); }
Answer:
Slices with Vectors
Work for vectors too!
fn main() { let mut v = vec![0,1,2,3,4]; { let slice = &v[1..3]; println!("{:?}",slice); } { let mut slice = &mut v[1..3]; // iterating over slices works as well for x in slice { *x *= 1000; } }; println!("{:?}",v); }
Slices are references: all borrowing rules still apply!
- At most one mutable reference at a time
- No immutable references allowed with a mutable reference
- Many immutable references allowed simultaneously
#![allow(unused)] fn main() { // this won't work! let mut v = vec![1,2,3,4,5,6,7]; { let ref_1 = &mut v[2..5]; let ref_2 = &v[1..3]; ref_1[0] = 7; println!("{}",ref_2[1]); } }
#![allow(unused)] fn main() { // and this reordering will let mut v = vec![1,2,3,4,5,6,7]; { let ref_1 = &mut v[2..5]; ref_1[0] = 7; // ref_1 can be dropped let ref_2 = &v[1..3]; println!("{}",ref_2[1]); } }
Memory representation of slices
- Pointer
- Length
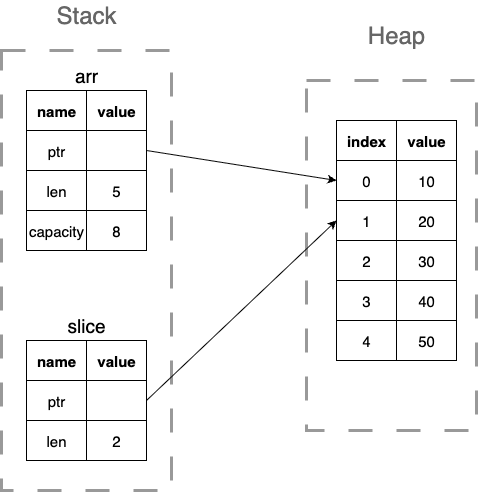
Let's return to &str?
&str is slice
-
&strcan be a slice of a string literal or a slice of aString -
&stritself (the reference) is stored on the stack, -
but the string data it points to can be in different locations depending on the context.
Let's break this down:
The &str Data (Various Locations)
The actual string data that &str points to can be in:
- Binary's read-only data segment (most common for string literals):
#![allow(unused)] fn main() { let s: &str = "hello"; // "hello" is in read-only memory println!("&s:{:p}", &s); println!("ptr: {:p}", s.as_ptr()); println!("len: {}", s.len()); // println!("capacity: {}\n", s.capacity()); // ERROR! Not applicable }
- Heap (when it's a slice of a
String):
#![allow(unused)] fn main() { let string = String::from("hello"); let s: &str = &string; // points to heap-allocated data println!("&s:{:p}", &s); println!("ptr: {:p}", s.as_ptr()); println!("len: {}", s.len()); }
True/False Statements on Rust Slices
- A slice of type
&[i32]is always immutable, even if it's created from a mutable array. - Slices in Rust consist of two components in memory: a pointer to the data and a length.
- You can have both an immutable slice and a mutable slice of the same vector active at the same time.
- The
&strtype is a slice, and the actual string data it points to is always stored in the binary's read-only data segment. - Slices work with both arrays and vectors in Rust.
Enter your answers into gradescope.
Solutions will be posted after the lecture.
Summary
- Slices are references to contiguous sub-sequences of elements in a collection
- Slices are immutable by default
- We can create mutable slices from mutable arrays
- Slices are references: all borrowing rules still apply!
&stris a slice of a string literal or a slice of aString&stritself (the reference) is stored on the stack, but the string data it points to can be in different locations depending on the context.
Structs in Rust
About This Module
This module introduces Rust's struct (structure) types, which allow you to create custom data types by grouping related values together with named fields. Structs provide more semantic meaning than tuples by giving names to data fields and are fundamental for building complex data models.
Prework
Prework Readings
Read the following sections from "The Rust Programming Language" book:
- Chapter 5: Structs Introduction
- Chapter 5.1: Defining and Instantiating Structs
- Chapter 5.2: An Example Program Using Structs
Pre-lecture Reflections
Before class, consider these questions:
- How do structs provide more semantic meaning than tuples?
- What are the advantages of named fields over positional access?
- How do tuple structs combine benefits of both tuples and structs?
- When would you choose structs over other data structures?
- How do structs help with type safety and preventing logical errors?
Learning Objectives
By the end of this module, you should be able to:
- Define and instantiate regular structs with named fields
- Create and use tuple structs for type safety
- Access and modify struct fields
- Use struct update syntax for efficient instantiation
- Understand when to use structs vs. tuples vs. other data types
- Apply structs in enum variants for complex data modeling
- Design data structures using struct composition
What Are Structs?
Definition:
A struct (structure) is a custom data type that lets you name and package together multiple related values. Unlike tuples, structs give meaningful names to each piece of data.
Key Benefits:
- Semantic meaning: Named fields make code self-documenting
- Type safety: Prevent mixing up different types of data
- Organization: Group related data logically
- Maintainability: Changes are easier when fields have names
Structs
Previously we saw tuples, e.g., (12, 1.7, true), where we can mix different types of data.
Structs compared to tuples:
- Similar: can hold items of different types
- Different: the items have names
#![allow(unused)] fn main() { // Definition: list items (called fields) // and their types struct Person { name: String, year_born: u16, time_100m: f64, likes_ice_cream: bool, } }
Struct Instantiation
- Replace types with values
struct Person { name: String, year_born: u16, time_100m: f64, likes_ice_cream: bool, } fn main() { let mut cartoon_character: Person = Person { name: String::from("Tasmanian Devil"), year_born: 1954, time_100m: 7.52, likes_ice_cream: true, }; }
Struct Field Access
- Use "." to access fields
struct Person { name: String, year_born: u16, time_100m: f64, likes_ice_cream: bool, } fn main() { let mut cartoon_character: Person = Person { name: String::from("Tasmanian Devil"), year_born: 1954, time_100m: 7.52, likes_ice_cream: true, }; // Accessing fields: use ".field_name" println!("{} was born in {}", cartoon_character.name, cartoon_character.year_born); cartoon_character.year_born = 2022; println!("{} was born in {}", cartoon_character.name, cartoon_character.year_born); }
Challenge: How would we update the last println! statement to print
Tasmanian Devil was born in 2022, can run a mile in 7.52 seconds and likes ice cream ?
Tuple Structs
Example: The tuple (f64,f64,f64) could represent:
- box size (e.g., height width depth)
- Euclidean coordinates of a point in 3D
We can use tuple structs to give a name to a tuple and make it more meaningful.
fn main() { struct BoxSize(f64,f64,f64); struct Point3D(f64,f64,f64); let mut my_box = BoxSize(3.2,6.0,2.0); let mut p : Point3D = Point3D(-1.3,2.1,0.0); }
Tuple Structs, cont.
- Impossible to accidentally confuse different types of triples.
- No runtime penalty! Verified at compilation.
fn main() { struct BoxSize(f64,f64,f64); struct Point3D(f64,f64,f64); let mut my_box = BoxSize(3.2,6.0,2.0); let mut p : Point3D = Point3D(-1.3,2.1,0.0); // won't work my_box = p; }
Tuple Structs, cont.
- Acessing via index
- Destructuring
fn main() { struct Point3D(f64,f64,f64); let mut p : Point3D = Point3D(-1.3,2.1,0.0); // Acessing via index println!("{} {} {}",p.0,p.1,p.2); p.0 = 17.2; // Destructuring let Point3D(first,second,third) = p; println!("{} {} {}", first, second, third); }
Named structs in enums
Structs with braces and exchangable with tuples in many places
enum LPSolution { None, Point{x:f64,y:f64} } fn main() { let example = LPSolution::Point{x:1.2, y:4.2}; if let LPSolution::Point{x:first,y:second} = example { println!("coordinates: {} {}", first, second); }; }
How is that different from enum variants with values?
enum LPSolution2 { None, Point(f64,f64) } fn main() { let example = LPSolution2::Point(1.2, 4.2); if let LPSolution2::Point(first,second) = example { println!("coordinates: {} {}", first, second); }; }
In-Class Activity: Course Grade Calculator
Define a Student struct and use it to compute a weighted course average.
Instructions:
- Define a struct
Studentwith four fields:name(String),homework(f64),midterm(f64), andfinal_exam(f64). - In
main, create aStudentinstance with your own name and made-up grades (0–100). - Compute the weighted average: 30% homework + 30% midterm + 40% final exam.
- Print the student's name, their weighted average (to one decimal place), and whether they passed (average >= 60.0) or failed.
Expected output format:
Alice averaged 83.2 and passed
Hints:
- Use
String::from("...")for the name field - Use
{:.1}inprintln!to format a float to one decimal place - Use an
if/elseexpression insideprintln!for passed/failed
Optional stretch for fast finishers: Create a second student and print who scored higher.
// your code here
Solution will be posted after the lecture.
Recap and Next Steps
Recap
- Structs are a way to group related data together
- Tuple structs are a way to give a name to a tuple
- Named structs in enums are a way to group related data together
- Structs are critical to Rust's OO capabilities
Next Steps
- We will see how connect structs to methods (e.g. functions)
- Important step towards Object-Oriented style of programming in Rust
Method Syntax
About This Module
This module introduces method syntax in Rust, which brings aspects of object-oriented programming to the language by combining properties and methods in one object. You'll learn how methods are functions defined within the context of a struct and how to use impl blocks to define methods.
Prework
Prework Readings
Read the following sections from "The Rust Programming Language" book:
Pre-lecture Reflections
Before class, consider these questions:
- How do methods differ from regular functions in Rust?
- What is the significance of the
selfparameter in method definitions? - When would you choose to use associated functions vs. methods?
- How do methods help with code organization and encapsulation?
- What are the benefits of the
implblock approach compared to other languages?
Learning Objectives
By the end of this module, you should be able to:
- Define methods within
implblocks for structs - Understand the role of
selfin method definitions - Create associated functions that don't take
self - Use methods to encapsulate behavior with data
- Apply method syntax for cleaner, more readable code
Method Syntax Overview
Brings aspects of object-oriented programming to Rust: combine properties and methods in one object.
Methods are functions that are defined within the context of a struct.
The first parameter is always self, which refers to the instance of the
struct the method is being called on.
Use and impl (implementation) block on the struct to define methods.
struct Point { // stores x and y coordinates x: f64, y: f64, } struct Rectangle { // store upper left and lower right points p1: Point, p2: Point, } impl Rectangle { // This is a method fn area(&self) -> f64 { // `self` gives access to the struct fields via the dot operator let Point { x: x1, y: y1 } = self.p1; let Point { x: x2, y: y2 } = self.p2; // `abs` is a `f64` method that returns the absolute value of the // caller ((x1 - x2) * (y1 - y2)).abs() } fn perimeter(&self) -> f64 { let Point { x: x1, y: y1 } = self.p1; let Point { x: x2, y: y2 } = self.p2; 2.0 * ((x1 - x2).abs() + (y1 - y2).abs()) } } fn main() { let rectangle = Rectangle { p1: Point{x:0.0, y:0.0}, p2: Point{x:3.0, y:4.0}, }; println!("Rectangle perimeter: {}", rectangle.perimeter()); println!("Rectangle area: {}", rectangle.area()); }
Associated Functions without self parameter
Useful as constructors.
You can have more than one impl block on the same struct.
struct Point { // stores x and y coordinates x: f64, y: f64, } struct Rectangle { // store upper left and lower right points p1: Point, p2: Point, } impl Rectangle { // This is a method fn area(&self) -> f64 { // `self` gives access to the struct fields via the dot operator let Point { x: x1, y: y1 } = self.p1; let Point { x: x2, y: y2 } = self.p2; // `abs` is a `f64` method that returns the absolute value of the // caller ((x1 - x2) * (y1 - y2)).abs() } fn perimeter(&self) -> f64 { let Point { x: x1, y: y1 } = self.p1; let Point { x: x2, y: y2 } = self.p2; 2.0 * ((x1 - x2).abs() + (y1 - y2).abs()) } } impl Rectangle { fn new(p1: Point, p2: Point) -> Rectangle { Rectangle { p1, p2 } // instantiate a Rectangle struct and return it } } fn main() { // instantiate a Rectangle struct and return it let rect = Rectangle::new(Point{x:0.0, y:0.0}, Point{x:3.0, y:4.0}); println!("Rectangle area: {}", rect.area()); }
Common Patterns
Builder Pattern with Structs:
struct Config { host: String, port: u16, debug: bool, timeout: u32, } impl Config { fn new() -> Self { Config { host: String::from("localhost"), port: 8080, debug: false, timeout: 30, } } fn with_host(mut self, host: &str) -> Self { self.host = String::from(host); self } fn with_debug(mut self, debug: bool) -> Self { self.debug = debug; self } } fn main() { // Usage let config = Config::new() .with_host("api.example.com") .with_debug(true); }
Methods Continued
About This Module
This module revisits and expands on method syntax in Rust, focusing on different types of self parameters and their implications for ownership and borrowing. You'll learn the differences between self, &self, and &mut self, and when to use each approach for method design.
Prework
Prework Readings
Read the following sections from "The Rust Programming Language" book:
- Chapter 5.3: Method Syntax - Review
- Chapter 4.2: References and Borrowing - Focus on method calls
Pre-lecture Reflections
Before class, consider these questions:
- What are the implications of using
selfvs&selfvs&mut selfin method signatures? - How does method call syntax relate to function call syntax with explicit references?
- When would you design a method to take ownership of
self? - How do method calls interact with Rust's borrowing rules?
- What are the trade-offs between different
selfparameter types?
Learning Objectives
By the end of this module, you should be able to:
- Distinguish between
self,&self, and&mut selfparameter types - Understand when methods take ownership vs. borrow references
- Design method APIs that appropriately handle ownership and mutability
- Apply method call syntax with different reference types
- Recognize the implications of different
selfparameter choices
Method Review
We saw these in the previous lecture.
- We can add functions that are directly associated with structs and enums!
- Then we could call them:
road.display()orroad.update_speed(25)
- Then we could call them:
- How?
- Put them in the namespace of the type
- make
selfthe first argument
#[derive(Debug)] struct Road { intersection_1: u32, intersection_2: u32, max_speed: u32, } impl Road { // constructor fn new(i1:u32,i2:u32,speed:u32) -> Road { Road { intersection_1: i1, intersection_2: i2, max_speed: speed, } } // note &self: immutable reference fn display(&self) { println!("{:?}",*self); } } // You can invoke the display method on the road instance // or on a reference to the road instance. fn main() { let mut road = Road::new(1,2,35); road.display(); &road.display(); (&road).display(); }
In C++ the syntax is different. It would be something like:
road.display();(&road)->display();
Method with immutable self reference
Rember that self is a reference to the instance of the struct.
By default, self is an immutable reference, so we can't modify the struct.
The following will cause a compiler error.
#![allow(unused)] fn main() { struct Road { intersection_1: u32, intersection_2: u32, max_speed: u32, } // ERROR impl Road { fn update_speed(&self, new_speed:u32) { self.max_speed = new_speed; } } }
Method with mutable self reference
Let's change it to a mutable reference.
#[derive(Debug)] struct Road { intersection_1: u32, intersection_2: u32, max_speed: u32, } impl Road { // constructor fn new(i1:u32,i2:u32,speed:u32) -> Road { Road { intersection_1: i1, intersection_2: i2, max_speed: speed, } } // note &self: immutable reference fn display(&self) { println!("{:?}",*self); } fn update_speed(&mut self, new_speed:u32) { self.max_speed = new_speed; } } fn main() { let mut road = Road::new(1,2,35); road.display(); road.update_speed(45); road.display(); }
Methods that take ownership of self
There are some gotchas to be aware of.
Consider the following code:
#![allow(unused)] fn main() { #[derive(Debug)] struct Road { intersection_1: u32, intersection_2: u32, max_speed: u32, } impl Road { fn this_will_move(self) -> Road { // this will take ownership of the instance of Road self } fn this_will_not_move(&self) -> &Road { // this will _not_ take ownership of the instance of Road self } } }
We'll talk about ownership and borrowing in more detail later.
Methods that borrow self
Let's experiment a bit.
#![allow(unused_variables)] #[derive(Debug)] struct Road { intersection_1: u32, intersection_2: u32, max_speed: u32, } impl Road { // constructor fn new(i1:u32,i2:u32,speed:u32) -> Road { Road { intersection_1: i1, intersection_2: i2, max_speed: speed, } } // note &self: immutable reference fn display(&self) { println!("{:?}",*self); } fn update_speed(&mut self, new_speed:u32) { self.max_speed = new_speed; } fn this_will_move(self) -> Road { // this will take ownership of the instance of Road self } fn this_will_not_move(&self) -> &Road { self } } fn main() { let r = Road::new(1,2,35); // create a new instance of Road, r let r3 = r.this_will_not_move(); // create a new reference to r, r3 // run the code with the following line commented, then try uncommenting it //let r2 = r.this_will_move(); // this will take ownership of r r.display(); // r2.display(); r3.display(); }
Methods (summary)
- Make first parameter
self - Various options:
self: move will occur&self: self will be immutable reference&mut self: self will be mutable reference
In-Class Poll
Select ALL statements below that are true. Multiple answers may be correct.
- Structs can hold items of different types, similar to tuples
- Tuple structs provide type safety by preventing confusion between different tuple types
-
Methods with
&selfallow you to modify the struct's fields -
You can have multiple
implblocks for the same struct -
Associated functions without
selfare commonly used as constructors -
Enum variants can contain named struct-like data using curly braces
{} -
Methods are called using
::syntax, likerectangle::area()
Enter your answers on Gradescope.
In-Class Activity
Coding Exercise: Student Grade Tracker (15 minutes)
Objective: Practice defining structs and implementing methods with different types of self parameters.
Scenario: You're building a simple grade tracking system for a course. Create a Student struct and implement various methods to manage student information and grades.
You can work in teams of 2-3 students. Suggest cargo new grades-struct to create a new project and then work in VS Code.
Copy your answer into Gradescope.
Part 1: Define the Struct (3 minutes)
Create a Student struct with the following fields:
name: String (student's name)id: u32 (student ID number)grades: [f64; 5] (array of up to 5 grades)num_grades: usize (number of grades added)
Part 2: Implement Methods (10 minutes)
Implement the following methods in an impl block:
-
Constructor (associated function):
new(name: String, id: u32) -> Student- Creates a new student with grades initialized to
[0.0; 5]andnum_gradesset to 0
-
Immutable reference methods (
&self):display(&self)- debug prints the Student structaverage_grade(&self) -> f64- returns average grade- Optional:
get_letter_grade(&self) -> Option<char>- returns 'A' (≥90), 'B' (≥80), 'C' (≥70), 'D' (≥60), or 'F' (<60)
-
Mutable reference methods (
&mut self):add_grade(&mut self, grade: f64)- adds a grade to the student's record
Part 3: Test Your Implementation (2 minutes)
Write a main function that creates a new student.
We provide code to:
- Add several grades
- Displays the student info, average and letter grade
Expected Output Example:
Student { name: "Alice Smith", id: 12345, grades: [85.5, 92.0, 78.5, 88.0, 0.0], num_grades: 4 }
Average grade: 86
Letter grade: B
Starter Code:
#![allow(unused)] #[derive(Debug)] struct Student { // TODO: Add fields } impl Student { // TODO: Implement methods } fn main() { let mut student = ... // TODO: Create a new student // Add several grades student.add_grade(85.5); student.add_grade(92.0); student.add_grade(78.5); student.add_grade(88.0); // Display initial information student.display(); println!(); }
Generics: Avoiding Code Duplication for Different Types
About This Module
This module introduces Rust's powerful generics system, which allows writing flexible, reusable code that works with multiple types while maintaining type safety and performance. You'll learn how to create generic functions, structs, and methods, as well as understand key built-in generic types like Option<T> and Result<T, E>.
Prework
Prework Reading
Please read the following sections from The Rust Programming Language Book:
- Chapter 10.1: Generic Data Types
- Chapter 10.2: Traits (for understanding trait bounds)
- Chapter 6.1: Defining an Enum (for Option
review) - Chapter 9.2: Recoverable Errors with Result (for Result<T, E> review)
Pre-lecture Reflections
- How do generics in Rust compare to similar features in languages you know (templates in C++, generics in Java)?
- What are the performance implications of Rust's monomorphization approach?
- Why might
Option<T>be safer than null values in other languages? - When would you choose
Result<T, E>overOption<T>?
Learning Objectives
By the end of this module, you will be able to:
- Write generic functions and structs using type parameters
- Apply trait bounds to constrain generic types
- Use
Option<T>andResult<T, E>for safe error handling - Understand monomorphization and its performance benefits
How python handles argument types
Python is dynamically typed and quite flexible in this regard. We can pass many different types to a function.
def max(x,y):
return x if x > y else y
>>> max(3,2)
3
>>> max(3.1,2.2)
3.1
>>> max('s', 't')
't'
Very flexible! Any downsides?
- Requires inferring types each time function is called
- Incurs runtime penalty
- No compile-time guarantees about type safety
>>> max('s',5)
Traceback (most recent call last):
File "<stdin>", line 1, in <module>
File "<stdin>", line 2, in max
TypeError: '>' not supported between instances of 'str' and 'int'
Rust without generics
Rust is strongly typed, so we would have to create a version of the function for each type.
fn max_i32(x:i32,y:i32) -> i32 { if x > y {x} else {y} } fn max_f64(x:f64,y:f64) -> f64 { if x > y {x} else {y} } fn max_char(x:char,y:char) -> char { if x > y {x} else {y} } fn main() { println!("{}", max_i32(3,8)); println!("{}", max_f64(3.3,8.1)); println!("{}", max_char('a','b')); }
Rust Generics
Generics allow us to write one version of a function and then have the compiler generate versions for different types.
The process of going from one to the other is monomorphization.
GENERIC SOURCE COMPILER OUTPUT (roughly)
┌─────────────────┐ ┌─────────────────────┐
│ fn pass<T>(x:T) │ ────────► │ fn pass_i32(x:i32) │
│ { ... } │ │ fn pass_f64(x:f64) │
│ │ │ fn pass_char(x:char)│
└─────────────────┘ └─────────────────────┘
One source Multiple functions
Rust Generics: Syntax
Use the <T> syntax to indicate that the function is generic.
The T is a placeholder for the type and could be any character.
fn passit<T>(x:T) -> T { x } fn main() { let x = passit(5); println!("x is {x}"); let x = passit(1.1); println!("x is {x}"); let x = passit('s'); println!("x is {x}"); }
Watch Out!
Let's try this:
// ERROR -- this doesn't work fn show<T>(x:T,y:T){ println!("x is {x} and y is {y}"); } fn main() { show(3,5); show(1.1, 2.1); show('s', 't'); }
The Rust compiler is thorough enough to recognize that not all generic type may have the behavior we want.
The Fix: Trait Bounds
We can place restrictions on the generic types we would support.
fn show<T: std::fmt::Display>(x:T,y:T){ println!("x is {x} and y is {y}"); } fn main() { show(3,5); show(1.1, 2.1); show('s', 't'); show( "hello", "world"); show( true, false); //show( vec![1,2,3], vec![4,5,6]); // doesn't work }
We'll talk about traits in a later module.
Another Watch Out!
// ERROR -- similarly we could try this, but it doesn't work fn max<T>(x:T,y:T) -> T { if x > y {x} else {y} } fn main() { println!("{}", max(3,8)); println!("{}", max(3.3,8.1)); println!("{}", max('a','b')); }
Not all types support the > operator.
The Fix: Trait Bounds
We can further restrict the type of T to only allow types that implement the
PartialOrd trait.
// add info that elements of T are comparable fn max<T:PartialOrd>(x:T,y:T) -> T { if x > y {x} else {y} } fn main() { println!("{}",max(3,8)); println!("{}",max(3.3,8.1)); println!("{}",max('a','b')); }
Generics / Generic data types
In other programming languages:
- C++: templates
- Java: generics
- Go: generics
- ML, Haskell: parametric polymorphism
Generic Structs
We can define a struct that is generic.
#[derive(Debug)] struct Point<T> { x: T, y: T, } fn main() { let point_int = Point {x: 2, y: 3}; println!("{:?}", point_int); let point_float = Point {x: 4.2, y: 3.0}; println!("{:?}", point_float); }
Struct contructor method
We can define methods in the context of Structs that support generic data types
impl<T> Point<T> means that this is an implementation block and all the methods
are implemented for any type T that Point might be instantiated with.
#[derive(Debug)] struct Point<T> { x: T, y: T, } // define a constructor method for the Point struct impl<T> Point<T> { fn create(x:T,y:T) -> Point<T> { Point{x,y} } } fn main() { // create instances of the Point struct using the constructor method let point = Point::create(1, 2); let point2 = Point::<char>::create('c','d'); let point3 : Point<char> = Point::create('e','f'); println!("{:?} {:?} {:?}", point, point2, point3); }
Struct swap method
Let's implement another method that operates on an instance of the struct,
hence the use of &mut self.
Remember, &mut self means that the method is allowed to modify the instance of
the struct.
#[derive(Debug)] struct Point<T> { x: T, y: T, } // define a constructor method for the Point struct impl<T> Point<T> { fn create(x:T,y:T) -> Point<T> { Point{x,y} } } // implement a method that swaps the x and y values impl<T:Copy> Point<T> { fn swap(&mut self) { let z = self.x; self.x = self.y; self.y = z; } } fn main() { let mut point = Point::create(2,3); println!("{:?}",point); point.swap(); println!("{:?}",point); }
impl<T:Copy> specifies that T must implement the Copy trait.
You can see what happens if we remove the Copy trait.
Question: What datatype might not implement the Copy trait?
Specialized versions
Even though we have generic functions defined, we can still specify methods/functions for specific types.
#[derive(Debug)] struct Point<T> { x: T, y: T, } // define a constructor method for the Point struct impl<T> Point<T> { fn create(x:T,y:T) -> Point<T> { Point{x,y} } } impl Point<i32> { fn do_you_use_f64(&self) -> bool { false } } impl Point<f64> { fn do_you_use_f64(&self) -> bool { true } } fn main() { let p_i32 = Point::create(2,3); println!("p_i32 uses f64? {}",p_i32.do_you_use_f64()); let p_f64 = Point::create(2.1,3.1); println!("p_f64 uses f64? {}",p_f64.do_you_use_f64()); }
Useful predefined generic data types
There are two useful predefined generic data types: Option<T> and Result<T, E>.
Enum Option<T>
There is a built-in enum
Option<T>
in the standard library with two variants:
Some(T)-- The variantSomecontains a value of typeTNone
Useful for when there may be no output
- Compared to
Noneornullin other programming languages:- Rust forces handling of this case
From Option enum advantage over null:
The Option type encodes the very common scenario in which a value could be something or it could be nothing.
For example, if you request the first item in a non-empty list, you would get a value. If you request the first item in an empty list, you would get nothing.
Expressing this concept in terms of the type system means the compiler can check whether you’ve handled all the cases you should be handling;
This functionality can prevent bugs that are extremely common in other programming languages.
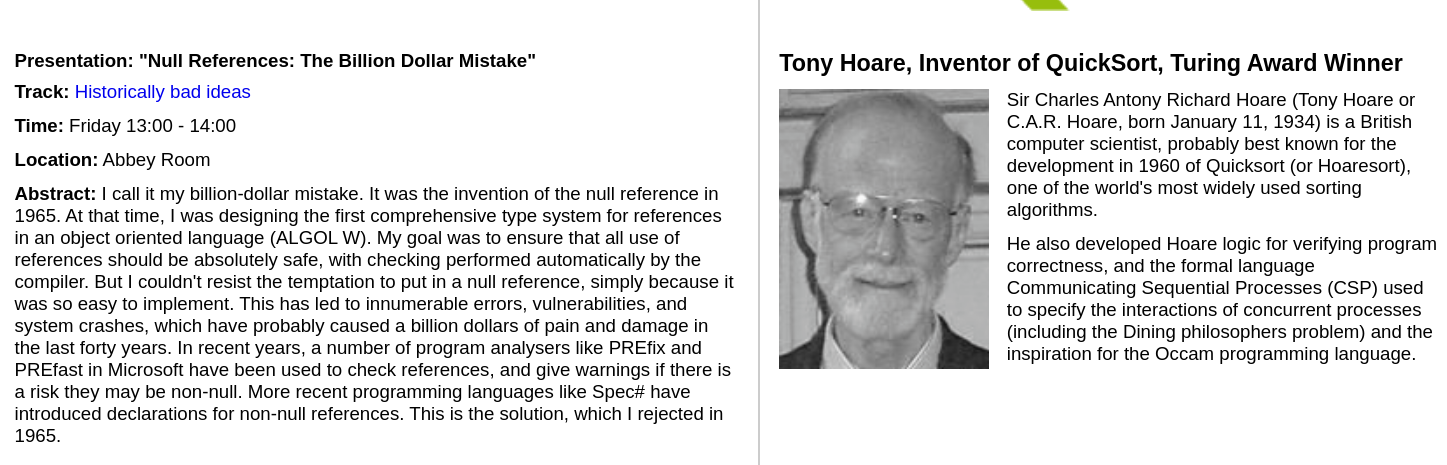
Example: Prime Number Finding
Here's example prime number finding code that returns Option<u32> if a prime number is found, or None if not.
fn prime(x:u32) -> bool { if x <= 1 { return false;} // factors would come in pairs. if one factor is > sqrt(x), then // the other factor must be < sqrt(x). // So we only have to search up to sqrt(x) for i in 2..=((x as f64).sqrt() as u32) { if x % i == 0 { // can be divided by i without a remainder -> not prime return false; } } true } fn prime_in_range(a:u32,b:u32) -> Option<u32> { // returns an Option<u32> for i in a..=b { if prime(i) {return Some(i);} } None } fn main() { println!("prime in 90-906? {:?}",prime_in_range(90,906)); println!("prime in 90-92? {:?}",prime_in_range(90,92)); let tmp : Option<u32> = prime_in_range(830,856); println!("prime in 830-856? {:?}",tmp); }
- If a prime number is found, it returns
Some(u32)variant with the prime number. - If the prime number is not found, it returns
None.
Extracting the content of Some(...)
There are various ways to extract the content of Some(...)
if letmatchunwrap()
fn prime(x:u32) -> bool { if x <= 1 { return false;} // factors would come in pairs. if one factor is > sqrt(x), then // the other factor must be < sqrt(x). // So we only have to search up to sqrt(x) for i in 2..=((x as f64).sqrt() as u32) { if x % i == 0 { // can be divided by i without a remainder -> not prime return false; } } true } fn prime_in_range(a:u32,b:u32) -> Option<u32> { // returns an Option<u32> for i in a..=b { if prime(i) {return Some(i);} } None } fn main() { let tmp : Option<u32> = prime_in_range(830,856); // extracting the content of Some(...) if let Some(x) = tmp { println!("{}",x); } match tmp { Some(x) => println!("{}",x), None => println!("None"), }; println!("Another way {}", tmp.unwrap()) }
Be careful with unwrap()
Be careful with unwrap(), it will crash the program if the value is None.
//ERROR fn main() { // extracting the content of Some(...) let tmp: Option<u32> = None; // try changing this to Some(3) if let Some(x) = tmp { println!("{}",x); // will skip this block if tmp is None } match tmp { Some(x) => println!("{}",x), None => println!("{:?}", tmp), }; // Boom!!!!! Will crash the program if tmp is None println!("Another way {}", tmp.unwrap()) }
Interesting related fact: Bertrand's postulate
There is always a prime number in . See Prime Number Theorem
Enum Option<T>: useful methods
Check the variant
.is_some() -> bool.is_none() -> bool
Get the value in Some or terminate with an error
.unwrap() -> T.expect(message) -> T
Get the value in Some or a default value
.unwrap_or(default_value:T) -> T
Get the value in Some or a default value computed by a closure
.unwrap_or_else(|| ...) -> T
#![allow(unused)] fn main() { let x = Some(3); println!("x is some? {}",x.is_some()); }
If exception, print a message.
#![allow(unused)] fn main() { // Try line 3 instead of 4 //let x:Option<u32> = Some(3); let x = None; let y:u32 = x.expect("This should have been an integer!!!"); println!("y is {}",y); }
A better way to handle this is to use unwrap_or().
#![allow(unused)] fn main() { let x = None; println!("{}",x.unwrap_or(0)); let y = Some(3); println!("{}",y.unwrap_or(0)); }
More details:
- https://doc.rust-lang.org/std/option/
- https://doc.rust-lang.org/std/option/enum.Option.html
Enum Result<T, E>
Another built-in enum
Result<T, E>
in the standard library with two variants:
Ok(T)Err(E)
Useful when you want to pass a solution or information about an error.
fn divide(a:u32,b:u32) -> Result<u32,String> { match b { 0 => Err(String::from("Division by zero")), _ => Ok(a / b) } } fn main() { println!("{:?}",divide(3,0)); println!("{:?}",divide(2022,3)); }
Enum Result<T, E>: useful methods
Check the variant
.is_ok() -> bool.is_err() -> bool
Get the value in Ok or terminate with an error
.unwrap() -> T.expect(message) -> T
Get the value in Ok or a default value
.unwrap_or(default_value:T) -> T
#![allow(unused)] fn main() { let r1 : Result<i32,()> = Ok(3); println!("{}",r1.is_err()); println!("{}",r1.is_ok()); println!("{}",r1.unwrap()); }
But again, that will crash the program if the value is Err, so use unwrap_or().
#![allow(unused)] fn main() { let r2 : Result<u32,()> = Err(()); let r3 : Result<u32,()> = Ok(123); println!("r2: {}\nr3: {}", r2.unwrap_or(0), r3.unwrap_or(0)); }
More details:
- https://doc.rust-lang.org/std/result/
- https://doc.rust-lang.org/std/result/enum.Result.html
In-Class Poll
- Monomorphization is the process by which the Rust compiler generates specific versions of generic functions for each concrete type that is used with them.
- Python's dynamic typing approach is faster than Rust's generics because Python doesn't need to generate multiple versions of functions.
-
The Option
enum has exactly two variants: Some(T) which contains a value, and None which represents no value. -
Once you define a generic implementation impl
for a struct, you cannot create specialized implementations for specific types like impl Point . - The type parameter in Rust generics must always be the letter T and cannot use any other character.
- The Result<T, E> enum is designed to return either Ok(T) for successful operations or Err(E) to provide information about errors.
- The unwrap_or() method will crash your program if the Option value is None.
In-Class Activity: Practicing Generics
Time: 10 minutes
Instructions
Work individually or in pairs. Complete as many exercises as you can in 10 minutes. You can test your code in the Rust playground or in your local environment.
Exercise 1: Fix the Generic Function (3 minutes)
The following code doesn't compile. Fix it by adding the appropriate trait bound(s).
// TODO: Fix this function so it compiles fn compare_and_print<T>(a: T, b: T) { if a > b { println!("{} is greater than {}", a, b); } else { println!("{} is less than or equal to {}", a, b); } } fn main() { compare_and_print(10, 5); compare_and_print(2.71, 3.14); compare_and_print('z', 'a'); }
Hint
You need TWO trait bounds:
- One to enable comparison (
>) - One to enable printing with
{}
Exercise 2: Complete the Generic Struct (4 minutes)
Complete the Container<T> struct by implementing the missing methods.
#[derive(Debug)] struct Container<T> { value: T, } impl<T> Container<T> { // TODO: Implement a constructor that creates a new Container fn new(value: T) -> Container<T> { // Your code here } // TODO: Implement a method that returns a reference to the value fn get(&self) -> &T { // Your code here } // TODO: Implement a method that replaces the value and returns the old one fn replace(&mut self, new_value: T) -> T { // Your code here } } fn main() { let mut container = Container::new(42); println!("Value: {:?}", container.get()); let old_value = container.replace(100); println!("Old value: {}, New value: {:?}", old_value, container.get()); }
Hint for replace()
Use std::mem::replace(&mut self.value, new_value) or swap manually using a temporary variable.
Exercise 3: Use Option (3 minutes)
Implement a function that finds the first even number in a vector. Return Some(number) if found, or None if no even numbers exist.
// TODO: Implement this function fn find_first_even(numbers: &Vec<i32>) -> Option<i32> { // Your code here } fn main() { let numbers1 = vec![1, 3, 5, 7]; let numbers2 = vec![1, 3, 6, 7]; match find_first_even(&numbers1) { Some(n) => println!("Found even number: {}", n), None => println!("No even numbers found"), } // TODO: Use unwrap_or() to print the result with a default value of -1 println!("First even in numbers2: {}", /* your code here */); }
Bonus Challenge (if you finish early)
Combine everything you learned! Create a generic Pair<T, U> struct that can hold two values of different types, and implement a method swap() that returns a new Pair<U, T> with the values swapped.
// TODO: Define the struct and implement the method struct Pair<T, U> { // Your code here } impl<T, U> Pair<T, U> { fn new(first: T, second: U) -> Self { // Your code here } fn swap(self) -> Pair<U, T> { // Your code here } } fn main() { let pair = Pair::new(42, "hello"); let swapped = pair.swap(); // This should compile and show that types are swapped! }
Closures (Anonymous Functions) in Rust
About This Module
This module introduces Rust closures - anonymous functions that can capture variables from their environment. Closures are powerful tools for functional programming patterns, lazy evaluation, and creating flexible APIs. Unlike regular functions, closures can capture variables from their surrounding scope, making them ideal for customizing behavior and implementing higher-order functions.
Prework
Prework Reading
Read the following sections from "The Rust Programming Language" book:
Pre-lecture Reflections
Before class, consider these questions:
- How do closures differ from regular functions in terms of variable capture?
- What are the advantages of lazy evaluation using closures over eager evaluation?
- How does Rust's type inference work with closure parameters and return types?
- When would you choose a closure over a function pointer for API design?
- How do closures enable functional programming patterns in systems programming?
Learning Objectives
By the end of this module, you should be able to:
- Define and use closures with various syntactic forms
- Understand how closures capture variables from their environment
- Implement lazy evaluation patterns using closures
- Use closures with Option and Result methods like unwrap_or_else
- Apply closures for HashMap entry manipulation and other standard library methods
- Choose between closures and function pointers based on use case
Closures (Anonymous Functions)
- Closures are anonymous functions you can:
- save in a variable, or
- pass as arguments to other functions
In Python they are called lambda functions:
>>> x = lambda a, b: a * b
>>> print(x(5,6))
30
In Rust syntax (with implicit or explicit type specification):
|a, b| a * b
|a: i32, b: i32| -> i32 {a * b}
Basic Closure Syntax
- types are inferred
#![allow(unused)] fn main() { // Example 1: Basic closure syntax let add = |x, y| x + y; println!("Basic closure: 5 + 3 = {}", add(5, 3)); }
Can't change types
- Once inferred, the type cannot change.
#![allow(unused)] fn main() { let example_closure = |x| x; let s = example_closure(String::from("hello")); let n = example_closure(5); }
Basic Closure Syntax with Explicit Types
- Type annotations in closures are optional unlike in functions.
- Required in functions because those are interfaces exposed to users.
For comparison:
#![allow(unused)] fn main() { fn add_one_v1 (x: u32) -> u32 { x + 1 } // function println!("{}", add_one_v1(5)); let add_one_v2 = |x: u32| -> u32 { x + 1 }; // closures... println!("{}", add_one_v2(6)); let add_one_v3 = |x| { x + 1 }; // ... remove types println!("{}", add_one_v3(4)); let add_one_v4 = |x| x + 1 ; // ... remove brackets println!("{}", add_one_v4(2)); }
Another example:
#![allow(unused)] fn main() { let add = |x: i32, y: i32| -> i32 {x + y}; println!("Basic closure: 5 + 3 = {}", add(5, 3)); }
Closure Capturing a Variable from the Environment
Note how multiplier is used from the environment.
#![allow(unused)] fn main() { let multiplier = 2; let multiply = |x| x * multiplier; println!("Closure with captured variable: 4 * {} = {}", multiplier, multiply(4)); }
Closure with Multiple Statements
#![allow(unused)] fn main() { let process = |x: i32| { let doubled = x * 2; doubled + 1 }; println!("Multi-statement closure: process(3) = {}", process(3)); }
Digression
- You can assign regular functions to variables as well
#![allow(unused)] fn main() { fn median2(arr: &mut [i32]) -> i32 { arr.sort(); println!("{}", arr[2]); arr[2] } let f = median2; f(&mut [1,4,5,6,4]); }
- but you can't capture variables from the environment.
Lazy Evaluation
Closures enable lazy evaluation: delaying computation until the result is actually needed.
unwrap_or()andunwrap_or_else()are methods onOptionandResultunwrap_or_else()takes a closure and only executes on else case.
// Expensive computation function // What is this computing??? fn expensive_computation(n: i32) -> i32 { println!("Computing expensive result..."); if n <= 1 { 1 } else { expensive_computation(n-1) + expensive_computation(n-2) } } fn main() { let x = Some(5); // EAGER evaluation - always computed, even if not needed! println!("EAGER evaluation"); let result1 = x.unwrap_or(expensive_computation(5)); println!("Result 1: {}", result1); // LAZY evaluation - only computed if needed println!("\nLAZY evaluation"); let result2 = x.unwrap_or_else(|| expensive_computation(5)); // <-- note the closure! println!("Result 2: {}", result2); // When x is None, the closure is called println!("\nNone evaluation"); let y: Option<i32> = None; let result3 = y.unwrap_or_else(|| expensive_computation(5)); println!("Result 3: {}", result3); }
Key insight: unwrap_or_else takes a closure, delaying execution until needed.
Recap
- Closures are anonymous functions that can be saved in variables or passed as arguments
- Syntax:
|params| expressionor|params| { statements }- type annotations are optional - Type inference: Closure types are inferred from first use and cannot change afterward
- Environment capture: Unlike regular functions, closures can capture variables from their surrounding scope
- Flexibility: Closures are more flexible than functions, but functions can also be assigned to variables
- Closures enable lazy evaluation, functional programming patterns, and flexible API design
In-Class Activity
Exercise: Mastering Closures (10 minutes)
Setup: Work individually or in pairs. Open the Rust Playground or your local editor.
Paste your solutions in GradeScope.
Part 1: Basic Closure Practice (3 minutes)
Create closures for the following tasks. Try to use the most concise syntax possible:
- A closure that takes two integers and returns their maximum
- A closure that takes a string slice and returns its length
- A closure that captures a
tax_ratevariable from the environment and calculates the total price (price + tax)
fn main() { // TODO 1: Write a closure that returns the maximum of two integers let max = // YOUR CODE HERE println!("Max of 10 and 15: {}", max(10, 15)); // TODO 2: Write a closure that returns the length of a string slice // Hint: what method call returns the length? // Hint 2: you'll get an error: "type must be known..." let str_len = // YOUR CODE HERE println!("Length of 'hello': {}", str_len("hello")); // TODO 3: Write a closure that captures tax_rate and calculates total let tax_rate = 0.08; let calculate_total = // YOUR CODE HERE println!("Price $100 with {}% tax: ${:.2}", tax_rate * 100.0, calculate_total(100.0)); }
Part 2: Lazy vs Eager Evaluation (4 minutes)
Fix the following code by converting eager evaluation to lazy evaluation where appropriate:
fn expensive_database_query(id: i32) -> String { println!("Querying database for id {}...", id); // Simulate expensive operation format!("User_{}", id) } fn main() { // Scenario 1: We have a cached user let cached_user = Some("Alice".to_string()); // This always queries the database, even when we have a cached value! let user1 = cached_user.unwrap_or(expensive_database_query(42)); println!("User 1: {}", user1); // TODO: Fix below to only query when needed // Scenario 2: No cached user let cached_user2: Option<String> = Some("Bob".to_string()); let user2 = // YOUR CODE HERE - use lazy evaluation println!("User 2: {}", user2); }
Part 3: Counter using a mutable closure
Create a closure that captures and modifies a variable and assigns
it to a variable called increment.
fn main() { // Create a counter using a mutable closure // This closure captures and modifies a variable let mut count = 0; // YOUR CODE HERE - a closure that captures and modifies the count variable let mut increment = ... println!("Count: {}", increment()); println!("Count: {}", increment()); println!("Count: {}", increment()); }
Bonus: Challenge - Functions That Accept Closures (3 minutes)
Write a function that takes a closure as a parameter and uses it:
// TODO: Complete this function that applies an operation to a number // only if the number is positive. Otherwise returns None. fn apply_if_positive<F>(value: i32, operation: F) -> Option<i32> where F: Fn(i32) -> i32 // F is a closure that takes i32 and returns i32 { // YOUR CODE HERE } fn main() { // Test with different closures let double = |x| x * 2; let square = |x| x * x; println!("Double 5: {:?}", apply_if_positive(5, double)); println!("Square 5: {:?}", apply_if_positive(5, square)); println!("Double -3: {:?}", apply_if_positive(-3, double)); }
Discussion Questions (during/after activity):
- When did you need explicit type annotations vs. relying on inference?
- In Part 2, what's the practical difference in performance between eager and lazy evaluation?
- Can you think of other scenarios where lazy evaluation with closures would be beneficial?
- What happens if you try to use a closure after the captured variable has been moved?
Iterators in Rust
About This Module
This module introduces Rust's iterator pattern, which provides a powerful and efficient way to process sequences of data. Iterators in Rust are lazy, meaning they don't do any work until you call methods that consume them. You'll learn to create custom iterators, use built-in iterator methods, and understand how iterators enable functional programming patterns while maintaining Rust's performance characteristics.
Prework
Prework Reading
Read the following sections from "The Rust Programming Language" book:
- Chapter 13.2: Processing a Series of Items with Iterators
- Chapter 13.4: Comparing Performance: Loops vs. Iterators
Pre-lecture Reflections
Before class, consider these questions:
- How do iterators in Rust differ from traditional for loops in terms of performance and safety?
- What does it mean for iterators to be "lazy" and why is this beneficial?
- How do iterator adapters (like map, filter) differ from iterator consumers (like collect, fold)?
- Why can't floating-point ranges be directly iterable in Rust?
- How does implementing the Iterator trait enable custom data structures to work with Rust's iteration ecosystem?
Learning Objectives
By the end of this module, you should be able to:
- Create and use iterators from ranges and collections
- Implement custom iterators by implementing the Iterator trait
- Apply iterator adapters (map, filter, take, cycle) to transform data
- Use iterator consumers (collect, fold, reduce, any) to produce final results
- Understand lazy evaluation in the context of Rust iterators
- Choose between iterator-based and loop-based approaches for different scenarios
Iterators
The iterator pattern allows you to perform some task on a sequence of items in turn.
An iterator is responsible for the logic of iterating over each item and determining when the sequence has finished.
- provide values one by one
- method
nextprovides next one Some(value)orNoneif no more available
Some ranges are iterators:
1..1000..
First value has to be known (so .. and ..123 are not)
Range as an Iterator Example
fn main() { let mut iter = 1..3; // must be mutable println!("{:?}", iter.next()); println!("{:?}", iter.next()); println!("{:?}", iter.next()); println!("{:?}", iter.next()); println!("{:?}", iter.next()); }
Range between floats is not iterable
- What about a range between floats?
#![allow(unused)] fn main() { let mut iter = 1.0..3.0; // must be mutable println!("{:?}", iter.next()); println!("{:?}", iter.next()); println!("{:?}", iter.next()); println!("{:?}", iter.next()); println!("{:?}", iter.next()); }
-
In Rust, ranges over floating-point numbers (f64) are not directly iterable.
-
This is because floating-point numbers have inherent precision issues that make it difficult to guarantee exact iteration steps.
Range between characters is iterable
- But this works.
#![allow(unused)] fn main() { let mut iter = 'a'..'c'; // must be mutable println!("{:?}", iter.next()); println!("{:?}", iter.next()); println!("{:?}", iter.next()); println!("{:?}", iter.next()); println!("{:?}", iter.next()); }
Iterator from Scratch: Implementing the Iterator Trait
- Note the new syntax
impl Iterator for Fib { ... } - As we'll see later, a trait defines what methods we need to support
struct Fib { current: u128, next: u128, } impl Fib { fn new() -> Fib { Fib{current: 0, next: 1} } } // Syntax here tells compiler we are making Fibc compliant with Iterator trait // We must implement the `next` method impl Iterator for Fib { type Item = u128; // Calculate the next number in the Fibonacci sequence fn next(&mut self) -> Option<Self::Item> { let now = self.current; self.current = self.next; self.next = now + self.current; Some(now) } } fn main() { let mut fib = Fib::new(); for _ in 0..10 { print!("{:?} ",fib.next().unwrap()); } println!(); }
Iterator Methods and Adapters
Pay special attention to what the output is.
next()-> Get the next element of an iterator (None if there isn't one)collect()-> Put iterator elements in collectiontake(N)-> take first N elements of an iterator and turn them into an iteratorcycle()-> Turn a finite iterator into an infinite one that repeats itselffor_each(||, )-> Apply a closure to each element in the iteratorfilter(||, )-> Create new iterator from old one for elements where closure is truemap(||, )-> Create new iterator by applying closure to input iteratorany(||, )-> Return true if closure is true for any element of the iteratorfold(a, |a, |, )-> Initialize expression to a, execute closure on iterator and accumulate into areduce(|x, y|, )-> Similar to fold but the initial value is the first element in the iteratorzip(iterator)-> Zip two iterators together to turn them into pairs
If the method returns an iterator, you have to do something with the iterator.
See Rust provided methods for the complete list.
Iterator Methods Examples
#![allow(unused)] fn main() { // this does nothing! let v1 = vec![1, 2, 3]; let mut v1_iter = v1.iter(); println!("{:?}", v1_iter); println!("{:?}", v1_iter.next()); }
collect can be used to put elements of an iterator into a vector:
#![allow(unused)] fn main() { let small_numbers : Vec<_> = (1..=10).collect(); println!("{:?}", small_numbers); }
take turns an infinite iterator into an iterator that provides at most a specific number of elements
#![allow(unused)] fn main() { let small_numbers : Vec<_> = (1..).take(15).collect(); println!("{:?}", small_numbers); }
cycle creates an iterator that repeats itself forever:
#![allow(unused)] fn main() { let cycle : Vec<_> = (1..4).cycle().take(21).collect(); println!("{:?}", cycle); }
Recap
- Iterators provide values one by one via the
next()method, returningSome(value)orNone - Ranges like
1..100and0..are iterators (but floating-point ranges are not) - Custom iterators can be created by implementing the
Iteratortrait withnext()method - Lazy evaluation: Iterators don't do work until consumed
- Adapters (like
map,filter,take,cycle) transform iterators into new iterators - Consumers (like
collect,fold,reduce,any) produce final results from iterators - Iterators enable functional programming patterns while maintaining Rust's performance
Iterators + Closures: Functional Programming in Rust
About This Module
This module explores the powerful combination of iterators and closures in Rust, which enables elegant functional programming patterns. You'll learn how to chain iterator methods with closures to create expressive, efficient data processing pipelines. This combination allows you to write concise code for complex operations like filtering, mapping, reducing, and combining data sequences while maintaining Rust's performance guarantees.
Prework
Prework Reading
Read the following sections from "The Rust Programming Language" book:
- Chapter 13.2: Processing a Series of Items with Iterators - Focus on iterator methods with closures
- Review Chapter 13.1: Closures for closure capture patterns
- Iterator documentation - Browse common methods like map, filter, fold
Pre-lecture Reflections
Before class, consider these questions:
- How do closures enable powerful iterator chaining patterns that would be difficult with function pointers?
- What are the performance implications of chaining multiple iterator adapters together?
- How does the combination of map and reduce/fold relate to the MapReduce paradigm in distributed computing?
- When would you choose fold vs reduce for aggregation operations?
- How does Rust's type system help prevent common errors in functional programming patterns?
Learning Objectives
By the end of this module, you should be able to:
- Combine iterators with closures for concise data processing
- Use functional programming patterns like map, filter, and fold effectively
- Implement complex algorithms using iterator method chaining
- Choose appropriate aggregation methods (fold, reduce, sum) for different scenarios
- Apply zip to combine multiple data sequences
- Build efficient data processing pipelines using lazy evaluation
Iterator + Closure Magic
- Operate on entire sequence, sometimes lazily by creating a new iterator
- Allows for concise expression of many concepts
for_each applies a function to each element
#![allow(unused)] fn main() { let x = (0..5).for_each(|x| println!("{}",x)); }
It is a terminal operation that returns () so you can't put another iterator after it.
filter creates a new iterator that has elements for which the given function is true
#![allow(unused)] fn main() { let not_divisible_by_3 : Vec<_> = (0..10).filter(|x| x % 3 != 0).collect(); println!("{:?}", not_divisible_by_3); }
More Iterator Operations with Closures
- Operate on entire sequence, sometimes lazily by creating a new iterator
- Allows for concise expression of many concepts
map creates a new iterator in which values are processed by a function
struct Fib { current: u128, next: u128, } impl Fib { fn new() -> Fib { Fib{current: 0, next: 1} } } impl Iterator for Fib { type Item = u128; // Calculate the next number in the Fibonacci sequence fn next(&mut self) -> Option<Self::Item> { let now = self.current; self.current = self.next; self.next = now + self.current; Some(now) } } fn main() { let fibonacci_squared : Vec<_> = Fib::new().take(10).map(|x| x*x).collect(); println!("{:?}", fibonacci_squared); }
Calculate Primes with .any()
any is true if the passed function is true on some element
Is a number prime?
fn is_prime(k:u32) -> bool { !(2..k).any(|x| k % x == 0) } fn main() { println!("{}", is_prime(33)); println!("{}", is_prime(31)); }
Create infinite iterator over primes:
#![allow(unused)] fn main() { // create a new iterator let primes = (2..).filter(|k| !(2..*k).any(|x| k % x == 0)); let v : Vec<_> = primes.take(20).collect(); println!("{:?}", v); }
Maybe unnecessarily complex? A closure in a closure!
Functional Programming Classic: fold
fold(init, |acc, x| f(acc, x) ) -> acc- Initialize expression to
init, execute closure on iterator and accumulate intoacc. - If the iterator is empty, simply return
init. - If the iterator is not empty, return the accumulated value.
It is equivalent to the following explicit implementation:
// Explicit implementation of `fold`
fn fold(iterator: Iterator<T>, init: T, f: |T, T| -> T) -> T {
// initialize accumulator to init
let mut accumulator = init;
// iterate over the iterator and put next element into x
while let Some(x) = iterator.next() {
// execute closure on iterator and accumulate into `acc`
accumulator = f(accumulator, x);
}
// return the accumulated value
return accumulator;
}Example: compute
#![allow(unused)] fn main() { let sum_of_squares: i32 = (1..=10).fold(5, |a,x| a + x * x); println!("{}", sum_of_squares); }
fold example
Or let's say we want to compute the final position after a series of moves.
// Move directions on a 2D grid enum Direction { North, South, East, West, } fn main() { let moves = vec![Direction::North, Direction::East, Direction::North, Direction::West]; // Starting position (x, y) = (3, 4) let final_position = moves.iter().fold((3, 4), |(x, y), dir| { match dir { Direction::North => (x, y + 1), // move north (increase y) Direction::South => (x, y - 1), // move south (decrease y) Direction::East => (x + 1, y), // move east (increase x) Direction::West => (x - 1, y), // move west (decrease x) } }); println!("Final position: {:?}", final_position); }
Functional Programming Classic: reduce
reduce(|x, y|, ) -> Option<T>- Similar to fold but the initial value is the first element in the iterator
- No default value for an empty sequence
- Returns
Option<T>instead ofTbecause the iterator may be empty
iterator.reduce(f) equivalent to
// Explicit implementation of `reduce`
fn reduce(iterator: Iterator<T>, f: |T, T| -> T) -> Option<T> {
// get the first element in the iterator
if let Some(x) = iterator.next() {
let mut accumulator = x; // initialize accumulator to the first element
while let Some(y) = iterator.next() { accumulator = f(accumulator,y)}
Some(accumulator) // return the accumulated value in Some() variant
} else {
None // return None if the iterator is empty
}
}Example: Find the maximum number in a sequence.
#![allow(unused)] fn main() { let x = vec![33, 21, 2, 88, 42]; let x = x.into_iter().reduce(|x,y| x.max(y)).unwrap(); println!("{}", x); }
reduce example
Example: Find the longest word in a sequence.
fn main() { let words = vec!["apple", "strawberry", "pear", "banana"]; // reduce returns an Option because the vector might be empty let longest_word = words.iter().reduce(|longest, current| { if current.len() > longest.len() { current } else { longest } }); match longest_word { Some(word) => println!("The longest word is: {}", word), None => println!("The list was empty!"), } }
Another reduce example
Example: computing the maximum number in , i.e. finds the largest squared value (modulo 7853) across all integers from 1 to 123.
#![allow(unused)] fn main() { let x = (1..=123).map(|x| (x*x) % 7853).reduce(|x,y| x.max(y)).unwrap(); println!("{}", x); }
where y is the next element in the iterator.
#![allow(unused)] fn main() { // in this case one can use the builtin `max` method (which can be implemented, using `fold`) let x = (1..=123).map(|x| (x*x) % 7853).max().unwrap(); println!("{}", x); }
Combining Two Iterators: zip
- Returns an iterator of pairs
- The length is the minimum of the lengths
#![allow(unused)] fn main() { let v: Vec<_>= (1..10).zip(11..20).collect(); println!("{:?}", v); }
Inner product of two vectors:
#![allow(unused)] fn main() { let x: Vec<f64> = vec![1.1, 2.2, -1.3, 2.2]; let y: Vec<f64> = vec![2.7, -1.2, -1.1, -3.4]; let inner_product: f64 = x.iter().zip(y.iter()).map(|(a,b)| a * b).sum(); println!("{}", inner_product); }
Recap
for_each- apply function to each elementfilter- create iterator with elements matching a conditionmap- transform elements into new valuesany- test if any element satisfies a conditionfold- accumulate with explicit initial valuereduce- accumulate using first element (returnsOption)zip- combine two iterators into pairs
In-Class Exercise
Time: 5 minutes
Complete the following tasks using iterators and their methods:
- Create a vector containing the first 10 odd numbers (1, 3, 5, ..., 19)
- Use a range starting from 1
- Use iterator adapters and
collect()
Task 1 Solution: First 10 odd numbers
#![allow(unused)] fn main() { let odd_numbers: Vec<_> = (1..).step_by(2).take(10).collect(); println!("{:?}", odd_numbers); // Output: [1, 3, 5, 7, 9, 11, 13, 15, 17, 19] }
Alternative solution using filter:
#![allow(unused)] fn main() { let odd_numbers: Vec<_> = (1..20).filter(|x| x % 2 == 1).collect(); println!("{:?}", odd_numbers); }
- Using the Fibonacci iterator from earlier, collect the first 15 Fibonacci numbers into a vector and print them.
Task 2 Solution: First 15 Fibonacci numbers
struct Fib { current: u128, next: u128, } impl Fib { fn new() -> Fib { Fib{current: 0, next: 1} } } impl Iterator for Fib { type Item = u128; // Calculate the next number in the Fibonacci sequence fn next(&mut self) -> Option<Self::Item> { let now = self.current; self.current = self.next; self.next = now + self.current; Some(now) } } fn main() { let fib_numbers: Vec<_> = Fib::new().take(15).collect(); println!("{:?}", fib_numbers); // Output: [0, 1, 1, 2, 3, 5, 8, 13, 21, 34, 55, 89, 144, 233, 377] }
- Create an iterator that:
- Starts with the range 1..=20
- Filters to keep only numbers divisible by 3
- Multiplies each remaining number by 2
- Collects into a vector
Task 3: Filter and map
#![allow(unused)] fn main() { let result: Vec<_> = (1..=20) .filter(|x| x % 3 == 0) .map(|x| x * 2) .collect(); println!("{:?}", result); // Output: [6, 12, 18, 24, 30, 36] }
Bonus Challenge: Without running the code, predict what this will output:
#![allow(unused)] fn main() { let result: Vec<_> = (0..5).map(|x| x * 2).collect(); println!("{:?}", result); }
Bonus Challenge Solution
#![allow(unused)] fn main() { let result: Vec<_> = (0..5).map(|x| x * 2).collect(); println!("{:?}", result); // Output: [0, 2, 4, 6, 8] }
Solution Discussion
After attempting the exercise, compare your solutions with a neighbor. Key concepts to verify:
- Did you chain iterator adapters before calling a consumer?
- Did you understand that
mapandfilterreturn iterators, not final values? - Did you remember that iterators are lazy and need a consumer to produce results?
Solutions will be posted after the lecture.
Modules and Organization
About This Module
This module introduces Rust's module system for organizing code into logical namespaces. You'll learn how to create modules, control visibility with public/private access, navigate module hierarchies, and organize code across multiple files.
Prework
Prework Readings
Read the following sections from "The Rust Programming Language" book:
- Chapter 7: Managing Growing Projects with Packages, Crates, and Modules - Complete chapter
- Chapter 7.2: Defining Modules to Control Scope and Privacy
- Chapter 7.4: Bringing Paths into Scope with the use Keyword
Pre-lecture Reflections
Before class, consider these questions:
- Why is code organization important in larger software projects?
- What are the benefits of controlling which parts of your code are public vs. private?
- How do namespaces prevent naming conflicts in large codebases?
- When would you organize code into separate files vs. keeping it in one file?
- How do module systems help with code maintainability and collaboration?
Learning Objectives
By the end of this module, you should be able to:
- Create and organize code using Rust's module system
- Control access to code using
puband private visibility - Navigate module hierarchies using paths and
usestatements - Organize modules across multiple files and directories
- Design clean module interfaces for code reusability
- Apply module patterns to structure larger programs
Introduction to Modules
Up to now: our functions and data types (mostly) in the same namespace:
- exception: functions in structs and enums
Question: What is a namespace?
One can create a namespace, using mod
mod things_to_say { fn say_hi() { say("Hi"); } fn say_bye() { say("Bye"); } fn say(what: &str) { println!("{}!",what); } } fn main() {}
Intro, continued...
You have to use the module name to refer to a function.
That's necessary, but not sufficient!
mod things_to_say { fn say_hi() { say("Hi"); } fn say_bye() { say("Bye"); } fn say(what: &str) { println!("{}!",what); } } fn main() { // ERROR: function `say_hi` is private things_to_say::say_hi(); }
Module Basics
-
By default, all definitions in the namespace are private.
-
Advantage: Can hide all internally used code and control external interface
-
Use
pubto make functions or types public -
Try removing the
pubkeyword from the functions and see what happens.
mod things_to_say { pub fn say_hi() { say("Hi"); } pub fn say_bye() { say("Bye"); } fn say(what: &str) { println!("{}!",what); } } fn main() { things_to_say::say_hi(); things_to_say::say_bye(); // ERROR: function `say` is private //things_to_say::say("Say what??"); }
Why modules?
-
limit number of additional identifiers in the main namespace
-
organize your codebase into meaningful parts
-
hide auxiliary internal code
-
By default, all definitions in the namespace are private.
-
Advantage: one can hide all internally used code and publish an external interface
-
Ideally you semantically version your external interface. See https://semver.org
-
Use
pubto make functions or types public
Nesting possible
- but be careful
mod level_1 { mod level_2_1 { mod level_3 { pub fn where_am_i() {println!("3");} } pub fn where_am_i() {println!("2_1");} } mod level_2_2 { pub fn where_am_i() {println!("2_2");} } pub fn where_am_i() {println!("1");} } fn main() { level_1::level_2_1::level_3::where_am_i(); }
Nesting, continued...
But all parent modules have to be public as well.
mod level_1 { pub mod level_2_1 { pub mod level_3 { pub fn where_am_i() {println!("3");} } pub fn where_am_i() {println!("2_1");} } pub mod level_2_2 { pub fn where_am_i() {println!("2_2");} } pub fn where_am_i() {println!("1");} } fn main() { level_1::level_2_2::where_am_i(); }
Module Hierarchy
level_1
├── level_2_1
│ └── level_3
│ └── where_am_i
│ └── where_am_i
├── level_2_2
│ └── where_am_i
└── where_am_i
Paths to modules
pub mod level_1 { pub mod level_2_1 { pub mod level_3 { pub fn where_am_i() {println!("3");} pub fn call_someone_else() { where_am_i(); } } pub fn where_am_i() {println!("2_1");} } pub mod level_2_2 { pub fn where_am_i() {println!("2_2");} } pub fn where_am_i() {println!("1");} } fn where_am_i() {println!("main namespace");} fn main() { level_1::level_2_1::level_3::call_someone_else(); }
Question: What will be printed?
Paths to modules
Global paths: start from crate
mod level_1 { pub mod level_2_1 { pub mod level_3 { pub fn where_am_i() {println!("3");} pub fn call_someone_else() { crate::where_am_i(); crate::level_1::level_2_2:: where_am_i(); where_am_i(); } } pub fn where_am_i() {println!("2_1");} } pub mod level_2_2 { pub fn where_am_i() {println!("2_2");} } pub fn where_am_i() {println!("1");} } fn where_am_i() {println!("main namespace");} fn main() { level_1::level_2_1::level_3::call_someone_else(); }
Question: What will be printed?
Paths to modules
Local paths:
- going one or many levels up via
super
mod level_1 { pub mod level_2_1 { pub mod level_3 { pub fn where_am_i() {println!("3");} pub fn call_someone_else() { super::where_am_i(); super::super::where_am_i(); super::super:: level_2_2::where_am_i(); } } pub fn where_am_i() {println!("2_1");} } pub mod level_2_2 { pub fn where_am_i() {println!("2_2");} } pub fn where_am_i() {println!("1");} } fn where_am_i() {println!("main namespace");} fn main() { level_1::level_2_1::level_3::call_someone_else(); }
Question: What will be printed?
use to import things into the current scope
mod level_1 { pub mod level_2_1 { pub mod level_3 { pub fn where_am_i() {println!("3");} pub fn call_someone_else() { super::where_am_i(); } pub fn i_am_here() {println!("I am here");} } pub fn where_am_i() {println!("2_1");} } pub mod level_2_2 { pub fn where_am_i() {println!("2_2");} } pub fn where_am_i() {println!("1");} } fn where_am_i() {println!("main namespace");} fn main() { // Bring a submodule to current scope: use level_1::level_2_2; level_2_2::where_am_i(); // Note that we still preface with the module name where_am_i(); // Which instance is called here might surprise you crate::where_am_i(); // // Bring a specific function/type to current scope: // (Don't do that, it can be confusing). use level_1::level_2_1::where_am_i; where_am_i(); // Bring multiple items to current scope: use level_1::level_2_1::level_3::{call_someone_else, i_am_here}; call_someone_else(); i_am_here(); // ERROR: Name clash! Won't work! See explanation below. //use level_1::where_am_i; //where_am_i(); // But this would work use level_1::where_am_i as level_1_where_am_i; level_1_where_am_i(); }
Updated April 2, 2026
Function shadowing works differently than variable shadowing:
- Lexical Shadowing: When you use
useinside a function, that name takes priority over the same name in the global (crate) namespace for the remainder of that scope. - The Single-Definition Rule: Unlike variables, you cannot define or import the same name twice in the exact same scope (block). Attempting to
usetwo different paths for the same name in the same block results in a "defined multiple times" compilation error. - Conflict Resolution: To use multiple items with the same name in one block, you must either use an alias (e.g.,
use path::item as nickname;) or call the global version explicitly using thecrate::prefix.
Structs within modules
- You can put structs and methods in modules
- Fields are private by default
- Use
pubto make fields public
pub mod test { #[derive(Debug)] pub struct Point { x: i32, pub y: i32, } impl Point { pub fn create(x:i32,y:i32) -> Point { Point{x,y} } } } use test::Point; fn main() { let mut p = Point::create(2,3); println!("{:?}",p); p.x = 3; // Error: try commenting this out p.y = 4; // Why does this work? println!("{:?}",p); }
Structs within modules
Make fields and functions public to be accessible
mod test { #[derive(Debug)] pub struct Point { pub x: i32, y: i32, // still private } impl Point { pub fn create(x:i32,y:i32) -> Point { Point{x,y} } // public function can access private data pub fn update_y(&mut self, y:i32) { self.y = y; } } } use test::Point; fn main() { let mut p = Point::create(2,3); println!("{:?}",p); p.x = 3; println!("{:?}",p); p.update_y(2022); // only way to update y println!("{:?}",p); // The create function seemed trivial in the past but the following won't work: //let mut q = Point{x: 4, y: 5}; }
True/False Statements on Rust Modules
- In Rust, all definitions within a module are private by default, and you must use the
pubkeyword to make them accessible outside the module. - When accessing a nested module function, only the innermost module and the function need to be declared as
pub- parent modules can remain private. - The
superkeyword is used to navigate up one or more levels in the module hierarchy, whilecraterefers to the root of the current crate for absolute paths. - Fields in a struct are public by default, so you need to use the
privkeyword to make them private within a module. - Using the
usestatement to bring a submodule into scope is recommended, but bringing individual functions directly into the current scope can be confusing and is discouraged in the lecture.
Enter your answers into gradescope.
Solutions will be posted after the lecture.
Recap
- You can put structs and methods in modules
- Fields are private by default
- Use
pubto make fields public - Use
useto import things into the current scope - Use
modto create modules - Use
crateandsuperto navigate the module hierarchy
Rust Crates and External Dependencies
About This Module
This module introduces Rust's package management system through crates, which are reusable libraries and programs. Students will learn how to find, add, and use external crates in their projects, with hands-on experience using popular crates like rand, csv, and serde. The module covers the distinction between binary and library crates, how to manage dependencies in Cargo.toml, and best practices for working with external code.
Prework
Before this lecture, please read:
- The Rust Book Chapter 7: "Managing Growing Projects with Packages, Crates, and Modules"
- The Rust Book Chapter 14: "More about Cargo and Crates.io"
Pre-lecture Reflections
- What is the difference between a package, crate, and module in Rust?
- How does Cargo manage dependencies and versions?
- Why might you choose to use an external crate versus implementing functionality yourself?
Learning Objectives
By the end of this lecture, you should be able to:
- Distinguish between binary and library crates
- Add external dependencies to your Rust project using
Cargo.toml - Use popular crates like
rand,csv, andserdein your code - Understand semantic versioning and dependency management
- Evaluate external crates for trustworthiness and stability
What are crates?
Crates provided by a project:
- Binary Crate: Programs you compile to an executable and run.
- Each must have a
main()function that is the program entry point - So far we have seen single binaries
- Each must have a
- Library Crate: Define functionality than can be shared with multiple projects.
- Do not have a
main()function - A single library crate: can be used by other projects
- Do not have a
We'll talk more about creating and building binary and library crates in Rust Projects.
Shared crates
Where to find crates:
Documentation:
Crate rand: random numbers
Tell Rust you want to use it:
cargo add randfor the latest versioncargo add rand --version="0.8.5"for a specific versioncargo remove randto remove it
This adds to Cargo.toml:
[dependencies]
rand = "0.8.5"
Note: Show demo in VS Code.
Question: Why put the version number in Cargo.toml?
To generate a random integer from 1 through 100:
extern crate rand; // only needed in mdbook use rand::Rng; fn main() { let mut rng = rand::rng(); let secret_number = rng.random_range(1..=100); println!("The secret number is: {secret_number}"); }
Useful Crates
csv: reading and writing CSV filesserde: serializing and deserializing dataserde_json: serializing and deserializing JSON data
See: crates.io/crates/csv See: crates.io/crates/serde See: crates.io/crates/serde_json
Rust Project Organization and Multi-Binary Projects
About This Module
This module covers advanced Rust project organization, focusing on how to structure projects with multiple binaries and libraries. Students will learn about Rust's package system, understand the relationship between packages, crates, and modules, and gain hands-on experience organizing complex projects. The module also discusses best practices for managing external dependencies and the trade-offs involved in using third-party crates.
Prework
Before this lecture, please read:
- The Rust Book Chapter 7: "Managing Growing Projects with Packages, Crates, and Modules"
- The Rust Book Chapter 7.1: "Packages and Crates"
Pre-lecture Reflections
- What are the conventional file locations for binary and library crates in a Rust project?
- How does Rust's module system help organize large projects?
- What are the security and maintenance implications of depending on external crates?
Learning Objectives
By the end of this lecture, you should be able to:
- Organize Rust projects with multiple binaries and libraries
- Understand the Rust module system hierarchy (packages → crates → modules)
- Configure
Cargo.tomlfor complex project structures - Evaluate external dependencies for trustworthiness and stability
- Apply best practices for project organization and dependency management
Using Multiple Libraries or Binaries in your Project
-
So far, we went from a single source file, to multiple source files organized as Modules.
-
But we built our projects into single binaries with
cargo buildorcargo run. -
We can also build multiple binaries.
When we create a new program with cargo new my_program, it creates a folder
.
├── Cargo.toml
└── src
└── main.rs
And Cargo.toml has:
[package]
name = "my_program"
version = "0.1.0"
edition = "2024"
[dependencies]
Our program is considered a Rust package with the source in src/main.rs
that compiles (cargo build) into a single binary at target/debug/my_program.
The Rust Module System
- Packages: Cargo's way of organizing, building, testing, and sharing crates
- It's a bundle of one or more crates.
- Crates: A tree of modules that produces a library or executable
- Modules and
use: Let you control the organization, scope, and privacy of paths - Paths: A way of naming an item, such as a struct, function, or module, e.g.
my_library::library1::my_function
A package can contain as many binary crates as you want, but only one library crate.
There is a workaround using Cargo Workspaces.
By default src/main.rs is the crate root of a binary crate with the same name as the package (e.g. my_program).
Also by default, src/lib.rs would contain a library crate with the same name as the package and src/lib.rs is its crate root.
How to add multiple binaries to your project
[[bin]]
name = "some_name"
path = "some_directory/some_file.rs"
The file some_file.rs must contain a fn main()
How to add a library to your project
[lib]
name = "some_name"
path = "src/lib/lib.rs"
The file lib.rs does not need to contain a fn main()
You can have as many binaries are you want in a project but only one library!
Example: simple_package
Create a new project with cargo new simple_package.
Copy the code below so your has the same structure and contents.
- Try
cargo run. - Since there are two binaries, you can try
cargo run --bin first_binorcargo run --bin second_bin.
.
├── Cargo.lock
├── Cargo.toml
└── src
├── bin
│ └── other.rs
├── lib
│ ├── bar.rs
│ ├── foo.rs
│ └── lib.rs
└── main.rs
Cargo.toml:
[package]
name = "simple_library2"
version = "0.1.0"
edition = "2021"
# the double brackets indicate this is part of an array of bins
[[bin]]
name = "first_bin"
path = "src/main.rs"
[[bin]]
name = "second_bin"
path = "src/bin/other.rs"
# single bracket means we can have only one lib
[lib]
name = "librs"
path = "src/lib/lib.rs"
[dependencies]
src/bin/other.rs:
//use librs; // not needed. already in scope.
fn main() {
println!("This is other.rs using a library");
librs::bar::say_something();
}src/lib/bar.rs:
use crate::foo;
pub fn say_something() {
println!("Bar");
foo::say_something();
}src/lib/foo.rs:
pub fn say_something() {
println!("Foo");
}src/lib/lib.rs:
/*
* This will make the compiler look for either:
* 1. src/lib/bar.rs or
* 2. src/lib/bar/mod.rs
*/
pub mod bar;
/*
* This will make the compiler look for either:
* 1. src/lib/foo.rs or
* 2. src/lib/foo/mod.rs
*/
pub mod foo;src/main.rs:
//use librs; // not needed. already in scope.
fn main() {
println!("This is main.rs using a library");
librs::bar::say_something();
}
Relying on external projects
Things to consider about external libraries:
- trustworthy?
- stable?
- long–term survival?
- do you really need it?
Many things best left to professionals:
Never implement your own cryptography!
Implementing your own things can be a great educational experience!
Extreme example
Yanking a published module version: article about left-pad
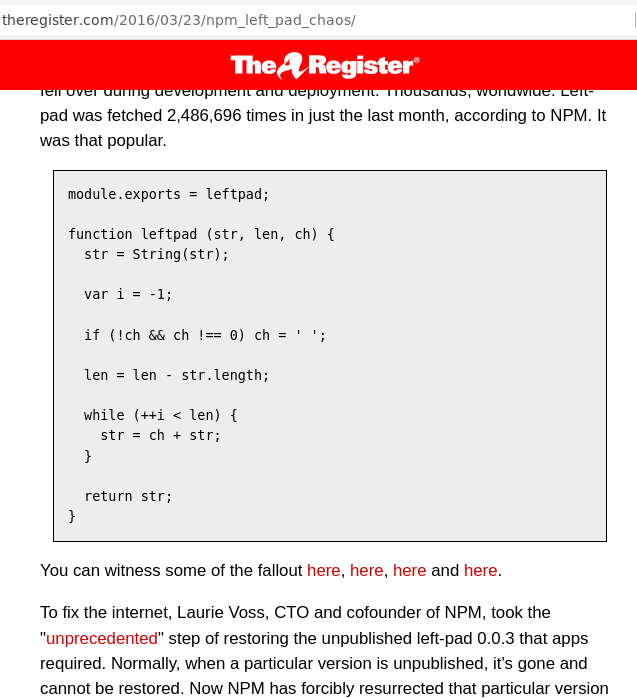
Rust and cargo: can't delete libraries that were published.
Testing in Rust: Ensuring Code Quality
About This Module
This short module introduces testing in Rust, covering how to write effective unit tests, integration tests, and use Rust's built-in testing framework. You'll learn testing best practices and understand why comprehensive testing is crucial for reliable software development.
Prework
Prework Reading
Please read the following sections from The Rust Programming Language Book:
- Chapter 11: Writing Automated Tests
- Chapter 11.1: How to Write Tests
- Chapter 11.2: Controlling How Tests Are Run
- Chapter 11.3: Test Organization
Pre-lecture Reflections
- Why is testing important in software development, especially in systems programming?
- How does Rust's testing framework compare to testing frameworks you've used in other languages?
- What is the difference between unit tests, integration tests, and documentation tests?
- What makes a good test case?
Learning Objectives
By the end of this module, you will be able to:
- Write unit tests using Rust's testing framework
- Use assertions effectively in tests
- Organize and run test suites
- Understand testing best practices and test-driven development
Tests
- Why are tests useful?
- What is typical test to functional code ratio?
730K lines of code in Meta proxy server, roughly 1:1 ratio of tests to actual code. https://github.com/facebook/proxygen
Creating a Library Crate
You can use cargo to create a library project:
$ cargo new adder --lib
Created library `adder` project
$ cd adder
This will create a new project in the adder directory with the following structure:
.
├── Cargo.lock
├── Cargo.toml
└── src
└── lib.rs
Library Crate Code
Similar to the "Hello, world!" binary crate, the library crate is prepopulated with some minimal code.
pub fn add(left: u64, right: u64) -> u64 {
left + right
}
#[cfg(test)]
mod tests {
use super::*;
#[test]
fn it_works() {
let result = add(2, 2);
assert_eq!(result, 4);
}
}-
The
#[cfg(test)]attribute tells Rust to compile and run the tests only when you runcargo test. -
The
use super::*;line tells Rust to bring all the items defined in the outer scope into the scope of the tests module. -
The
#[test]attribute tells Rust that the function is a test function. -
The
assert_eq!(result, 4);line tells Rust to check that the result of theaddfunction is equal to 4.- assert! is a macro that takes a boolean expression and panics if the expression is false.
- there are many other assert! macros, including assert_ne!, assert_approx_eq!, etc.
Running the Tests
You can run the tests with the cargo test command.
% cargo test
Compiling adder v0.1.0 (...path_to_adder/adder)
Finished `test` profile [unoptimized + debuginfo] target(s) in 0.50s
Running unittests src/lib.rs (target/debug/deps/adder-1dfa21403f25b3c4)
running 1 test
test tests::it_works ... ok
test result: ok. 1 passed; 0 failed; 0 ignored; 0 measured; 0 filtered out; finished in 0.00s
Doc-tests adder
running 0 tests
test result: ok. 0 passed; 0 failed; 0 ignored; 0 measured; 0 filtered out; finished in 0.00s
0 ignoredmeans no tests were ignored with the#[ignore]attribute.0 measuredmeans no tests were measured with Rust's built-in benchmarking framework.0 filtered outmeans no subset of tests were specified- Doc-tests automatically test any example code that is provided in
///comments.
Example Unit Test Code
Here is an example of a set of tests for a function that doubles the elements of a vector.
fn doubleme(inp: &Vec<f64>) -> Vec<f64> { let mut nv = inp.clone(); for (i, x) in inp.iter().enumerate() { nv[i] = *x * 2.0; } nv } #[test] fn test_doubleme_positive() { let v = vec![1.0, 2.0, 3.0]; let w = doubleme(&v); for (x, y) in v.iter().zip(w.iter()) { assert_eq!(*y, 2.0 * *x, "Element is not double"); } } #[test] fn test_doubleme_negative() { let v = vec![-1.0, -2.0, -3.0]; let w = doubleme(&v); for (x, y) in v.iter().zip(w.iter()) { assert_eq!(*y, 2.0 * *x, "Negative element is not double"); } } #[test] fn test_doubleme_zero() { let v = vec![0.0]; let w = doubleme(&v); for (x, y) in v.iter().zip(w.iter()) { assert_eq!(*y, 2.0 * *x, "Zero element is not double"); } } #[test] fn test_doubleme_empty() { let v: Vec<f64> = vec![]; let w = doubleme(&v); assert_eq!(w.len(), 0, "Empty Vector is not empty"); } fn testme() { let v: Vec<f64> = vec![2.0, 3.0, 4.0]; let w = doubleme(&v); println!("V = {:?} W = {:?}", v, w); } fn main() { testme(); }
Further Reading
Read 11.1 How to Write Tests for more information.
In-Class Activity
In this activity, you will write tests for a function that finds the second largest element in a slice of integers.
Be creative with your tests! With the right tests, you will be able to find the bug in the function.
Fix the bug in the function so all tests pass.
Part 1: Create a New Library Project
Create a new Rust library project:
cargo new --lib testing_practice
cd testing_practice
Part 2: Implement and Test
Replace the contents of src/lib.rs with the following function:
/// Returns the second largest element in a slice of integers.
/// Returns None if there are fewer than 2 distinct elements.
///
/// # Examples
/// ```
/// use testing_practice::second_largest;
/// assert_eq!(second_largest(&[1, 2, 3]), Some(2));
/// assert_eq!(second_largest(&[5, 5, 5]), None);
/// ```
pub fn second_largest(numbers: &[i32]) -> Option<i32> {
if numbers.len() < 2 {
return None;
}
let mut largest = numbers[0];
let mut second = numbers[1];
if second > largest {
std::mem::swap(&mut largest, &mut second);
}
for &num in &numbers[2..] {
if num > largest {
second = largest;
largest = num;
} else if num > second {
second = num;
}
}
if largest == second {
None
} else {
Some(second)
}
}
#[cfg(test)]
mod tests {
use super::*;
#[test]
fn test_all_same() {
let result = second_largest(&[1, 1, 1]);
assert_eq!(result, None);
}
}Part 3: Write Tests
Your task is to write at least 3-4 comprehensive tests for this function. Think about:
- Normal cases
- Edge cases (empty, single element, etc.)
- Special cases (all same values, duplicates of largest, etc.)
Add your tests in a #[cfg(test)] module below the function.
Part 4: Debug
Run cargo test. If any of your tests fail, there is a bug in the function.
Your goal is to:
- Identify what test case reveals the bug
- Understand why the function fails
- Fix the function so all tests pass
Hint: Think carefully about what happens when the largest element appears multiple times in the array.
Part 5: Submit
Submit your code to Gradescope.
Midterm 2 Review
Table of Contents:
Suggested way to use this review material
- The material is organized by major topics.
- For each topic, there are:
- links to lecture modules
- high level overview
- examples,
- true/false questions,
- predict the output questions, and
- coding challenges.
- Try to answer the questions without peaking at the solutions.
- The material is not guaranteed to be complete, so you should review the material in the lectures as well as this review material.
Book References:
The lectures modules all start with pre-reading assignments that point to the relevant chapters in The Rust Language Book.
Exam Format:
To be added.
Preliminaries
The material for midterm 2 assumes that you have gained proficiency with Rust's basic syntax such as main and function definitions, basic data types including tuples and enums as well as defining and passing values as arguments to functions, etc.
For example you should be familiar enough with Rust syntax type in the following program code from memory, without notes.
Basic main function
// Write a main function that prints "Hello, DS210!"
Expected output:
Hello, DS210!
Basic Function Calling
// Create a function called `print_hello` that takes no arguments and // doesn't return anything, but prints "Hello, DS210!". // Write a main function that calls `print_hello`.
Expected output:
Hello, DS210!
Calling Function with Argument
// Create a function called 'print_hello' that takes an integer argument // and prints, for example for argument `340`, "Hello, DS340!". // Write a main function that call `print_hello with some integer number.
Output for argument 110:
Hello, DS110!
Challenge yourself with increasingly more complex exercises.
If you struggled with remembering the syntax for those exercises, then consider practicing these basics before moving on to the slightly more advanced syntax below. Practice by writing code into an empty Rust Playground.
You can review the basics of Rust syntax in the A1 Midterm 1 Review.
Review basic and complex data types, e.g. tuples, arrays, Vecs, Strings, enums, etc., methods on these data types like len(), push(), pop(), get(), insert(), remove(), etc.
1. Structs and Methods
Modules
Quick Review
Structs group related data together with named fields, providing type safety and semantic meaning. Unlike tuples, fields have names making code self-documenting.
Key Concepts:
- Regular structs:
struct Person { name: String, age: u32 } - Tuple structs:
struct Point3D(f64, f64, f64)- named tuples for type safety - Field access with
.notation - Methods with
self,&self, or&mut self
Examples
#![allow(unused)] fn main() { // Regular struct struct Rectangle { width: u32, height: u32, } // Implementation block with methods impl Rectangle { // Constructor (associated function) fn new(width: u32, height: u32) -> Rectangle { Rectangle { width, height } } // Method borrowing immutably fn area(&self) -> u32 { self.width * self.height } // Method borrowing mutably fn scale(&mut self, factor: u32) { self.width *= factor; self.height *= factor; } } // Tuple struct for type safety struct Miles(f64); struct Kilometers(f64); // Cannot accidentally mix these types! }
True/False Questions
-
T/F: A tuple struct
Point3D(i32, i32, i32)can be assigned to a variable of type(i32, i32, i32). -
T/F: Methods that take
&selfcan modify the struct's fields. -
T/F: You can have multiple
implblocks for the same struct. -
T/F: Struct fields are public by default in Rust.
-
T/F: Associated functions (like constructors) don't take any form of
selfas a parameter.
Answers
- False - Tuple structs create distinct types, even with identical underlying structure
- False -
&selfis immutable; you need&mut selfto modify fields - True - Multiple impl blocks are allowed and sometimes useful
- False - Struct fields are private by default; use
pubto make them public - True - Associated functions are called on the type itself (e.g.,
Rectangle::new())
Predict the Output (3-4 questions)
Question 1:
struct Counter { count: i32, } impl Counter { fn new() -> Counter { Counter { count: 0 } } fn increment(&mut self) { self.count += 1; } } fn main() { let mut c = Counter::new(); c.increment(); c.increment(); println!("{}", c.count); }
Question 2:
struct Point(i32, i32); fn main() { let p = Point(3, 4); println!("{} {}", p.0, p.1); let Point(x, y) = p; println!("{} {}", x, y); }
Question 3:
struct Temperature { celsius: f64, } impl Temperature { fn new(celsius: f64) -> Self { Self { celsius } } fn to_fahrenheit(&self) -> f64 { self.celsius * 1.8 + 32.0 } } fn main() { let temp = Temperature::new(100.0); println!("{:.1}", temp.to_fahrenheit()); }
Question 4:
struct Box3D { width: u32, height: u32, depth: u32, } impl Box3D { fn volume(&self) -> u32 { self.width * self.height * self.depth } } fn main() { let b = Box3D { width: 2, height: 3, depth: 4 }; let v1 = b.volume(); let v2 = b.volume(); println!("{} {}", v1, v2); }
Answers
- Output:
2 - Output:
3 4(newline)3 4 - Output:
212.0 - Output:
24 24
Coding Challenges
Challenge 1: Circle struct
Create a Circle struct with a radius field. Implement methods:
new(radius: f64) -> Circle- constructorarea(&self) -> f64- returns area (use π ≈ 3.14159)scale(&mut self, factor: f64)- multiplies radius by factor
// your code here
Challenge 2: Student struct with grade calculation
Create a Student struct with fields for name (String) and three exam scores (exam1, exam2, exam3 as u32). Implement:
new(name: String, e1: u32, e2: u32, e3: u32) -> Studentaverage(&self) -> f64- returns average of three examsletter_grade(&self) -> char- returns 'A' (90+), 'B' (80-89), 'C' (70-79), 'D' (60-69), 'F' (<60)
// your code here
2. Ownership and Borrowing, Strings and Vecs
Modules
Quick Review
Ownership Rules:
- Each value has exactly one owner
- When owner goes out of scope, value is dropped
- Ownership can be moved or borrowed
Borrowing:
- Immutable references
&T: multiple allowed, read-only - Mutable references
&mut T: only ONE at a time, exclusive access - References must always be valid (no dangling)
Key Types:
String: heap-allocated, growable, ownedVec<T>: heap-allocated dynamic array, owns elements- Both have ptr, length, capacity on stack
Examples
#![allow(unused)] fn main() { // Ownership transfer (move) let s1 = String::from("hello"); let s2 = s1; // s1 is now invalid // println!("{}", s1); // ERROR! // Borrowing immutably let s3 = String::from("world"); let len = calculate_length(&s3); // borrow println!("{} has length {}", s3, len); // s3 still valid // Borrowing mutably let mut v = vec![1, 2, 3]; add_one(&mut v); // exclusive mutable borrow fn calculate_length(s: &String) -> usize { s.len() } fn add_one(v: &mut Vec<i32>) { for item in v.iter_mut() { *item += 1; } } }
True/False Questions
-
T/F: After
let s2 = s1;wheres1is aString, boths1ands2are valid. -
T/F: You can have multiple immutable references to the same data simultaneously.
-
T/F:
Vec::push()takes&mut selfbecause it modifies the vector. -
T/F: When you pass a
Vec<i32>to a function without&, the function takes ownership. -
T/F: A mutable reference
&mut Tcan coexist with immutable references&Tto the same data. -
T/F:
String::clone()creates a deep copy of the string data on the heap.
Predict the Output
Question 1:
fn main() { let mut v = vec![1, 2, 3]; v.push(4); println!("{}", v.len()); }
Question 2:
fn process(s: String) -> usize { s.len() } fn main() { let text = String::from("hello"); let len = process(text); println!("{}", len); //println!("{}", text); // Would this compile? }
Question 3:
fn main() { let mut s = String::from("hello"); let r1 = &s; let r2 = &s; println!("{} {}", r1, r2); let r3 = &mut s; r3.push_str(" world"); println!("{}", r3); }
Question 4:
fn main() { let v1 = vec![1, 2, 3]; let v2 = v1.clone(); println!("{} {}", v1.len(), v2.len()); }
Coding Challenges
Challenge 1: Fix the borrowing errors
// Fix this code so it compiles fn main() { let mut numbers = vec![1, 2, 3]; let sum = calculate_sum(numbers); double_all(numbers); println!("Sum: {}, Doubled: {:?}", sum, numbers); } fn calculate_sum(v: Vec<i32>) -> i32 { v.iter().sum() } fn double_all(v: Vec<i32>) { for x in v.iter() { x *= 2; } }
Challenge 2: String manipulation
Write a function reverse_words(s: &str) -> String that takes a string slice and returns a new String with words in reverse order. For example, "hello world rust" becomes "rust world hello".
hint #1
The string method .split_whitespace() might be very useful.
hint #2
Collect the splitted string into a Vec<&str>.
// Your code here
3. Modules, Crates and Projects
Modules
Quick Review
Modules organize code within a crate:
modkeyword defines modulespubmakes items publicusebrings items into scope- File structure:
mod.rsormodule_name.rs
Crates and Projects:
- Binary crate: has
main(), produces executable - Library crate: has
lib.rs, provides functionality Cargo.toml: manifest with dependenciescargo build,cargo test,cargo run
Examples
// lib.rs pub mod shapes { pub struct Circle { pub radius: f64, } impl Circle { pub fn new(radius: f64) -> Circle { Circle { radius } } pub fn area(&self) -> f64 { std::f64::consts::PI * self.radius * self.radius } } } // main.rs use crate::shapes::Circle; fn main() { let c = Circle::new(5.0); println!("Area: {}", c.area()); }
True/False Questions
-
T/F: By default, all items (functions, structs, etc.) in a module are public.
-
T/F: A Rust package can have both
lib.rsandmain.rs. -
T/F: The
usestatement imports items at compile time and has no runtime cost. -
T/F: Tests are typically placed in a
testsmodule marked with#[cfg(test)]. -
T/F: External dependencies are listed in
Cargo.tomlunder the[dependencies]section.
Predict the Output
Question 1:
mod math { pub fn add(a: i32, b: i32) -> i32 { a + b } fn private_func() { println!("Private"); } } fn main() { println!("{}", math::add(3, 4)); // math::private_func(); // What happens? }
Question 2:
mod outer { pub mod inner { pub fn greet() { println!("Hello from inner"); } } } use outer::inner; fn main() { inner::greet(); }
Coding Challenge
Challenge: Create a temperature conversion module
Create a module called temperature with:
- Function
celsius_to_fahrenheit(c: f64) -> f64- fahrenheit = celsius * 1.8 + 32.0
- Function
fahrenheit_to_celsius(f: f64) -> f64- celsius = (fahrenheit - 32.0) / 1.8
- Function
celsius_to_kelvin(c: f64) -> f64- kelvin = celsius + 273.15
All functions should be public.
In a main function, use the module to convert 100°C to Fahrenheit, 32°F to Celsius, and 0°C to Kelvin and print the results.
// your code here
4. Tests and Error Handling
Modules
Quick Review
Testing in Rust:
- Unit tests: in same file with
#[cfg(test)]module #[test]attribute marks test functionsassert!,assert_eq!,assert_ne!macroscargo testruns all tests#[should_panic]for testing panicsResult<T, E>return type for tests that can fail
Error Handling in Rust:
See Error Handling for more details.
panic!for unrecoverable errorsResult<T,E>for recoverable errors?to propagate errors
Examples
#![allow(unused)] fn main() { pub fn add(a: i32, b: i32) -> i32 { a + b } #[cfg(test)] mod tests { use super::*; #[test] fn test_add() { assert_eq!(add(2, 3), 5); } #[test] fn test_add_negative() { assert_eq!(add(-1, 1), 0); } #[test] #[should_panic] fn test_overflow() { let _x = i32::MAX + 1; // Should panic in debug mode } } }
True/False Questions
-
T/F: Test functions must return
()orResult<T, E>. -
T/F: The
assert_eq!macro checks if two values are equal using the==operator. -
T/F: Tests marked with
#[should_panic]pass if they panic. -
T/F: Private functions cannot be tested in unit tests.
-
T/F:
cargo testcompiles the code in release mode by default.
Predict the Output
Question 1:
What would the result be for cargo test on this code?
#![allow(unused)] fn main() { #[cfg(test)] mod tests { #[test] fn test_pass() { assert_eq!(2 + 2, 4); } #[test] fn test_fail() { assert_eq!(2 + 2, 5); } } }
Question 2:
What would the result be for cargo test on this code?
fn divide(a: i32, b: i32) -> Result<i32, String> {
if b == 0 {
Err(String::from("Division by zero"))
} else {
Ok(a / b)
}
}
#[cfg(test)]
mod tests {
use super::*;
#[test]
fn test_divide_ok() -> Result<(), String> {
let result = divide(10, 2);
assert_eq!(result, Ok(5));
Ok(())
}
#[test]
fn test_divide_err() {
let result = divide(10, 0);
assert_eq!(result, Err(String::from("Division by zero")));
}
}Coding Challenge
Challenge: Write tests for a max function
Write a function max_of_three(tup: (i32, i32, i32)) -> i32 that returns the maximum of three integers given in a tuple. Then write at least 3 test cases.
// your code here
5. Generics and Traits
Modules
Quick Review
Generics enable code reuse across different types:
- Type parameters:
<T>,<T, U>, etc. - Monomorphization: compiler generates specialized versions
- Zero runtime cost
- Trait bounds constrain generic types:
<T: Display>
Traits define shared behavior:
- Like interfaces in other languages
impl Trait for Typesyntax- Standard traits:
Debug,Clone,PartialEq,PartialOrd,Display, etc. - Trait bounds:
fn foo<T: Trait>(x: T) - Trait bounds can be combined with multiple traits:
fn foo<T: Trait1 + Trait2>(x: T)
Examples
Generic function:
#![allow(unused)] fn main() { // Generic function fn largest<T: PartialOrd>(list: &[T]) -> &T { let mut largest = &list[0]; for item in list { if item > largest { largest = item; } } largest } }
Generic struct:
#![allow(unused)] fn main() { // Generic struct struct Point<T> { x: T, y: T, } impl<T> Point<T> { fn new(x: T, y: T) -> Self { Point { x, y } } } }
Trait definition:
#![allow(unused)] fn main() { // Trait definition trait Summary { fn summarize(&self) -> String; } // Trait implementation struct Article { title: String, author: String, } impl Summary for Article { fn summarize(&self) -> String { format!("{} by {}", self.title, self.author) } } }
True/False Questions
-
T/F: Generics in Rust have runtime overhead because type checking happens at runtime.
-
T/F: A struct
Point<T>where both x and y are type T means x and y must be the same type. -
T/F:
Option<T>andResult<T, E>are examples of generic enums in the standard library. -
T/F: Trait bounds like
<T: Display + Clone>require T to implement both traits. -
T/F: The
deriveattribute can automatically implement certain traits likeDebugandClone.
Predict the Output
Question 1:
fn print_type<T: std::fmt::Display>(x: T) { println!("{}", x); } fn main() { print_type(42); print_type("hello"); print_type(3.14); }
Question 2:
fn swap<T>(a: T, b: T) -> (T, T) { (b, a) } fn main() { let (x, y) = swap(1, 2); println!("{} {}", x, y); }
Question 3:
struct Container<T> { value: T, } impl<T: std::fmt::Display> Container<T> { fn show(&self) { println!("Value: {}", self.value); } } fn main() { let c = Container { value: 42 }; c.show(); }
Question 4:
trait Double { fn double(&self) -> Self; } impl Double for i32 { fn double(&self) -> Self { self * 2 } } fn main() { let x = 5; println!("{}", x.double()); }
Coding Challenges
Challenge 1: Generic pair
Create a generic struct Pair<T> that holds two values of the same type. Implement:
new(first: T, second: T) -> Selfswap(&mut self)- swaps the two valueslarger(&self) -> &T- returns reference to the larger value (requiresT: PartialOrd)
// your code here
Challenge 2: Trait for area calculation
Define a trait Area with a method area(&self) -> f64. Implement it for Circle (radius) and Rectangle (width, height).
// your code here
7. Closures and Iterators
Modules
Quick Review
Closures are anonymous functions that can capture environment:
- Syntax:
|param| expressionor|param| { body } - Capture variables from surrounding scope
- Enable lazy evaluation
- Used with iterators and functional programming
- A predicate is a closure (or function) that returns a boolean value.
Iterators:
- Trait-based:
Iteratortrait withnext()method - Lazy evaluation - only compute when consumed
- Common methods:
map,filter,fold,collect forloops useIntoIterator- Three forms:
iter(),iter_mut(),into_iter()
Iterator Creation Methods
iter()-> Create an iterator from a collection that yields immutable references(&T)to elementsiter_mut()-> Create an iterator that yields mutable references(&mut T)to elementsinto_iter()-> Consumes the collection and yields owned values(T)transferring ownership to the iterator
Iterator Methods and Adapters
From Iterator Methods and Adapters module:
Pay special attention to what the output is.
into_iter()-> Create an iterator that consumes the collectionnext()-> Get the next element of an iterator (None if there isn't one)enumerate()-> Create an iterator that yields the index and the element (added)collect()-> Put iterator elements in collectiontake(N)-> take first N elements of an iterator and turn them into an iteratorcycle()-> Turn a finite iterator into an infinite one that repeats itselffor_each(||, )-> Apply a closure to each element in the iteratorfilter(||, )-> Create new iterator from old one for elements where closure is truemap(||, )-> Create new iterator by applying closure to input iteratorfilter_map(||, )-> Creates an iterator that both filters and maps (added)any(||, )-> Return true if closure is true for any element of the iteratorfold(a, |a, |, )-> Initialize expression to a, execute closure on iterator and accumulate into areduce(|x, y|, )-> Similar to fold but the initial value is the first element in the iteratorzip(iterator)-> Zip two iterators together to turn them into pairs
Other useful methods:
sum()-> Sum the elements of an iteratorproduct()-> Product the elements of an iteratormin()-> Minimum element of an iteratormax()-> Maximum element of an iteratorcount()-> Count the number of elements in an iteratornth(N)-> Get the Nth element of an iteratorskip(N)-> Skip the first N elements of an iteratorskip_while(||, )-> Skip elements while the closure is true
If the method returns an iterator, you have to do something with the iterator.
See Rust provided methods for the complete list.
Examples
#![allow(unused)] fn main() { // Closure basics let add = |x, y| x + y; let result = add(3, 4); // 7 // Capturing environment let multiplier = 3; let multiply = |x| x * multiplier; println!("{}", multiply(5)); // 15 // Iterators let numbers = vec![1, 2, 3, 4, 5]; // map and filter (lazy) let doubled: Vec<i32> = numbers.iter() .map(|x| x * 2) .filter(|x| x > &5) .copied() .collect(); // fold let sum: i32 = numbers.iter().fold(0, |acc, x| acc + x); // Lazy evaluation let result = Some(5).unwrap_or_else(|| expensive_function()); }
True/False Questions
-
T/F: Closures can capture variables from their environment, but regular functions cannot.
-
T/F: Iterator methods like
mapandfilterare eagerly evaluated. -
T/F: The
collect()method consumes an iterator and produces a collection. -
T/F:
for x in vecmoves ownership, whilefor x in &vecborrows. -
T/F: Closures can have explicit type annotations like
|x: i32| -> i32 { x + 1 }. -
T/F: The
foldmethod requires an initial accumulator value.
Predict the Output
Question 1:
fn main() { let numbers = vec![1, 2, 3, 4, 5]; let sum: i32 = numbers.iter().map(|x| x * 2).sum(); println!("{}", sum); }
Question 2:
fn main() { let numbers = vec![1, 2, 3, 4, 5]; let result: Vec<i32> = numbers.iter() .filter(|x| *x % 2 == 0) .map(|x| x * x) .collect(); println!("{:?}", result); }
Question 3:
fn main() { let factor = 3; let multiply = |x| x * factor; println!("{}", multiply(7)); }
Question 4:
fn main() { let numbers = vec![1, 2, 3]; let result = numbers.iter() .fold(0, |acc, x| acc + x); println!("{}", result); }
Coding Challenges
Challenge 1: Custom filter
Write a function count_if<F>(vec: &Vec<i32>, predicate: F) -> usize where F is a closure that takes &i32 and returns bool. The function returns the count of elements satisfying the predicate.
// your code here
Challenge 2: Iterator chain
Given a Vec<i32>, create an iterator chain that:
- Filters for numbers > 5
- Squares each number
- Sums the results
// your code here
Challenge 3: Custom map
Implement a function apply_to_all<F>(vec: &mut Vec<i32>, f: F) that applies a closure to each element, modifying the vector in place.
// your code here
5. Iterators and Iterator Chains
Quick Review
Iterator Creation:
iter()- yields&T(immutable references)iter_mut()- yields&mut T(mutable references)into_iter()- consumes collection, yields ownedT
Key Iterator Methods:
map(|x| ...)- transform each elementfilter(|x| ...)- keep elements matching predicatefold(init, |acc, x| ...)- accumulate into single valuecollect()- consume iterator into collectionsum()- sum all elementscount()- count elementstake(n)- take first n elementsskip(n)- skip first n elementsenumerate()- yields(index, value)pairs
Important: Iterator adaptors (map, filter, etc.) are lazy - they don't execute until consumed by a method like collect(), sum(), or for loop.
Examples
#![allow(unused)] fn main() { let numbers = vec![1, 2, 3, 4, 5, 6]; // Filter and map let result: Vec<i32> = numbers.iter() .filter(|&&x| x % 2 == 0) // keep even: [2, 4, 6] .map(|x| x * 2) // double: [4, 8, 12] .collect(); // Sum let sum: i32 = numbers.iter().sum(); // 21 // Filter, map, take let result: Vec<i32> = numbers.iter() .filter(|&&x| x % 2 == 1) // keep odd: [1, 3, 5] .map(|x| x * x) // square: [1, 9, 25] .take(2) // first 2: [1, 9] .collect(); // Enumerate for (i, val) in numbers.iter().enumerate() { println!("Index {}: {}", i, val); } // Fold for custom accumulation let product: i32 = numbers.iter() .fold(1, |acc, x| acc * x); // 720 }
True/False Questions
-
T/F: Iterator methods like
map()andfilter()are lazily evaluated. -
T/F: The
collect()method transforms an iterator into a collection. -
T/F: Calling
.iter()on a Vec transfers ownership of the elements. -
T/F: The
fold()method requires an initial accumulator value. -
T/F: Iterator chains are evaluated from right to left.
Find the Bug
Question 1:
#![allow(unused)] fn main() { fn double_evens(numbers: &[i32]) -> Vec<i32> { numbers.iter() .filter(|&x| x % 2 == 0) .map(|x| x * 2) } }
Question 2:
#![allow(unused)] fn main() { fn sum_positive(numbers: &[i32]) -> i32 { numbers.iter() .filter(|x| x > 0) .sum() } }
Predict the Output
Question 1:
fn main() { let numbers = vec![1, 2, 3, 4, 5, 6]; let result: Vec<i32> = numbers.iter() .filter(|&x| x % 2 == 1) .map(|x| x * x) .take(2) .collect(); println!("{:?}", result); }
Question 2:
fn main() { let data = vec![10, 20, 30, 40, 50]; let result: i32 = data.iter() .skip(1) .take(3) .filter(|&&x| x > 25) .sum(); println!("{}", result); }
Question 3:
fn main() { let numbers = vec![1, 2, 3, 4, 5]; let sum: i32 = numbers.iter() .enumerate() .filter(|(i, _)| i % 2 == 0) .map(|(_, v)| v) .sum(); println!("{}", sum); }
Coding Challenge
Challenge: Count elements in range
Write a function that counts how many elements in a slice fall within a given range [low, high] (inclusive).
fn count_in_range(numbers: &[i32], low: i32, high: i32) -> usize { // Your code here - use iterator methods } fn main() { let nums = vec![1, 5, 10, 15, 20, 25]; println!("{}", count_in_range(&nums, 5, 20)); // Should print 4 }
Final Tips for the Exam
- Ownership & Borrowing: Remember the rules - one owner, multiple
&OR one&mut - Lifetimes: Think about what references your function returns and where they come from
- Generics: Use trait bounds when you need specific capabilities (PartialOrd, Display, etc.)
- Iterators: They're lazy - need
collect()orsum()to actually compute - Tests: Write tests that cover normal cases, edge cases, and error cases
- Read error messages: Rust's compiler errors are very helpful - read them carefully!
Good luck on your midterm!
Traits: Defining Shared Behavior
About This Module
This module introduces Rust's trait system, which allows you to define shared behavior that can be implemented by different types. Traits are similar to interfaces in other languages but more powerful, enabling polymorphism, generic programming, and code reuse while maintaining Rust's safety guarantees.
Prework
Prework Reading
Please read the following sections from The Rust Programming Language Book:
- Chapter 10.2: Traits: Defining Shared Behavior
- Chapter 17.2: Using Trait Objects That Allow for Values of Different Types
- Chapter 19.3: Advanced Traits
Pre-lecture Reflections
- How do traits in Rust compare to interfaces in Java or abstract base classes in Python?
- What are the benefits of default method implementations in traits?
- When would you use
impl Traitvs generic type parameters with trait bounds? - How do trait objects enable dynamic polymorphism in Rust?
Learning Objectives
By the end of this module, you will be able to:
- Define and implement traits for custom types
- Use trait bounds to constrain generic functions
- Understand different syntaxes for trait parameters (
impl Trait, generic bounds,whereclauses) - Return types that implement traits
Traits
From Traits: Defining Shared Behavior.
- A trait defines the functionality a particular type has and can share with other types.
- We can use traits to define shared behavior in an abstract way.
- We can use trait bounds to specify that a generic type can be any type that has certain behavior.
Some other programming languages call this an interface.
Sample trait definition
The general idea is:
-
define method signatures as behaviors that need to be implemented by any type that implements the trait
-
We can also define default implementations of methods.
#![allow(unused)] fn main() { trait Person { // method header specifications // must be implemented by any type that implements the trait fn get_name(&self) -> String; fn get_age(&self) -> u32; // default implementation of a method fn description(&self) -> String { format!("{} ({})",self.get_name(),self.get_age()) } } }
Sample trait implementation 1
Let's look at a simple example of a trait implementation.
trait Person { // method header specifications // must be implemented by any type that implements the trait fn get_name(&self) -> String; fn get_age(&self) -> u32; // default implementation of a method fn description(&self) -> String { format!("{} ({})",self.get_name(),self.get_age()) } } #[derive(Debug)] struct SoccerPlayer { name: String, age: u32, team: String, } // Implement the `Person` trait for `SoccerPlayer` so that // it can be used as a `Person` object. impl Person for SoccerPlayer { // We must implement all trait methods that don't have a default implementation fn get_age(&self) -> u32 { self.age } fn get_name(&self) -> String { self.name.clone() } } // Implement a constructor for `SoccerPlayer` impl SoccerPlayer { fn create(name:String, age:u32, team:String) -> SoccerPlayer { SoccerPlayer{name,age,team} } } // Since `SoccerPlayer` implements the `Person` trait, // we can use the `description` method on instances of `SoccerPlayer`. fn main() { let zlatan = SoccerPlayer::create(String::from("Zlatan Ibrahimovic"), 40, String::from("AC Milan")); println!("{}", zlatan.description()); }
Sample trait implementation 2
Now let's look at another example of a trait implementation.
trait Person { // method header specifications // must be implemented by any type that implements the trait fn get_name(&self) -> String; fn get_age(&self) -> u32; // default implementation of a method fn description(&self) -> String { format!("{} ({})",self.get_name(),self.get_age()) } } #[derive(Debug)] struct RegularPerson { year_born: u32, first_name: String, middle_name: String, last_name: String, } impl Person for RegularPerson { fn get_age(&self) -> u32 { 2024 - self.year_born } fn get_name(&self) -> String { if self.middle_name == "" { format!("{} {}",self.first_name,self.last_name) } else { format!("{} {} {}",self.first_name,self.middle_name,self.last_name) } } } impl RegularPerson { fn create(first_name:String,middle_name:String,last_name:String,year_born:u32) -> RegularPerson { RegularPerson{first_name,middle_name,last_name,year_born} } } fn main() { let mlk = RegularPerson::create( String::from("Martin"), String::from("Luther"), String::from("King"), 1929 ); println!("{}", mlk.description()); }
Using traits in functions -- Trait Bounds
So now, we specify that we need a function that accepts an object that implements the Person trait.
#![allow(unused)] fn main() { // sample function accepting object implementing trait fn long_description(person: &impl Person) { println!("{}, who is {} years old", person.get_name(), person.get_age()); } }
This way we know we can call the get_name and get_age methods on the object that is passed to the function.
It allows us to specify a whole class of objects and know what methods are available on them.
Examples
We can see this in action with the two examples we saw earlier.
trait Person { // method header specifications // must be implemented by any type that implements the trait fn get_name(&self) -> String; fn get_age(&self) -> u32; // default implementation of a method fn description(&self) -> String { format!("{} ({})",self.get_name(),self.get_age()) } } #[derive(Debug)] struct SoccerPlayer { name: String, age: u32, team: String, } // Implement the `Person` trait for `SoccerPlayer` so that // it can be used as a `Person` object. impl Person for SoccerPlayer { fn get_age(&self) -> u32 { self.age } // We must implement all trait items fn get_name(&self) -> String { self.name.clone() } } // Implement a constructor for `SoccerPlayer` impl SoccerPlayer { fn create(name:String, age:u32, team:String) -> SoccerPlayer { SoccerPlayer{name,age,team} } } #[derive(Debug)] struct RegularPerson { year_born: u32, first_name: String, middle_name: String, last_name: String, } impl Person for RegularPerson { fn get_age(&self) -> u32 { 2024 - self.year_born } fn get_name(&self) -> String { if self.middle_name == "" { format!("{} {}",self.first_name,self.last_name) } else { format!("{} {} {}",self.first_name,self.middle_name,self.last_name) } } } impl RegularPerson { fn create(first_name:String,middle_name:String,last_name:String,year_born:u32) -> RegularPerson { RegularPerson{first_name,middle_name,last_name,year_born} } } // sample function accepting object implementing trait fn long_description(person: &impl Person) { println!("{}, who is {} years old", person.get_name(), person.get_age()); } fn main() { let mlk = RegularPerson::create( String::from("Martin"), String::from("Luther"), String::from("King"), 1929 ); let zlatan = SoccerPlayer::create(String::from("Zlatan Ibrahimovic"), 40, String::from("AC Milan")); long_description(&mlk); // we can pass a `RegularPerson` object to the function long_description(&zlatan); // we can pass a `SoccerPlayer` object to the function }
Using traits in functions: long vs. short form
There's a longer, generic version of the function that we can use.
trait Person { // method header specifications // must be implemented by any type that implements the trait fn get_name(&self) -> String; fn get_age(&self) -> u32; // default implementation of a method fn description(&self) -> String { format!("{} ({})",self.get_name(),self.get_age()) } } #[derive(Debug)] struct SoccerPlayer { name: String, age: u32, team: String, } // Implement the `Person` trait for `SoccerPlayer` so that // it can be used as a `Person` object. impl Person for SoccerPlayer { fn get_age(&self) -> u32 { self.age } // We must implement all trait items fn get_name(&self) -> String { self.name.clone() } } // Implement a constructor for `SoccerPlayer` impl SoccerPlayer { fn create(name:String, age:u32, team:String) -> SoccerPlayer { SoccerPlayer{name,age,team} } } #[derive(Debug)] struct RegularPerson { year_born: u32, first_name: String, middle_name: String, last_name: String, } impl Person for RegularPerson { fn get_age(&self) -> u32 { 2024 - self.year_born } fn get_name(&self) -> String { if self.middle_name == "" { format!("{} {}",self.first_name,self.last_name) } else { format!("{} {} {}",self.first_name,self.middle_name,self.last_name) } } } impl RegularPerson { fn create(first_name:String,middle_name:String,last_name:String,year_born:u32) -> RegularPerson { RegularPerson{first_name,middle_name,last_name,year_born} } } // short version fn long_description(person: &impl Person) { println!("{}, who is {} old", person.get_name(), person.get_age()); } // longer version fn long_description_2<T: Person>(person: &T) { println!("{}, who is {} old", person.get_name(), person.get_age()); } fn main() { let mlk = RegularPerson::create( String::from("Martin"), String::from("Luther"), String::from("King"), 1929 ); let zlatan = SoccerPlayer::create(String::from("Zlatan Ibrahimovic"), 40, String::from("AC Milan")); long_description(&zlatan); long_description_2(&zlatan); long_description(&mlk); long_description_2(&mlk); }
Using traits in functions: multiple traits
trait Person { // method header specifications // must be implemented by any type that implements the trait fn get_name(&self) -> String; fn get_age(&self) -> u32; // default implementation of a method fn description(&self) -> String { format!("{} ({})",self.get_name(),self.get_age()) } } #[derive(Debug)] struct SoccerPlayer { name: String, age: u32, team: String, } // Implement the `Person` trait for `SoccerPlayer` so that // it can be used as a `Person` object. impl Person for SoccerPlayer { fn get_age(&self) -> u32 { self.age } // We must implement all trait items fn get_name(&self) -> String { self.name.clone() } } // Implement a constructor for `SoccerPlayer` impl SoccerPlayer { fn create(name:String, age:u32, team:String) -> SoccerPlayer { SoccerPlayer{name,age,team} } } #[derive(Debug)] struct RegularPerson { year_born: u32, first_name: String, middle_name: String, last_name: String, } impl Person for RegularPerson { fn get_age(&self) -> u32 { 2024 - self.year_born } fn get_name(&self) -> String { if self.middle_name == "" { format!("{} {}",self.first_name,self.last_name) } else { format!("{} {} {}",self.first_name,self.middle_name,self.last_name) } } } impl RegularPerson { fn create(first_name:String,middle_name:String,last_name:String,year_born:u32) -> RegularPerson { RegularPerson{first_name,middle_name,last_name,year_born} } } // sample function accepting object implementing trait fn long_description(person: &impl Person) { println!("{}, who is {} years old", person.get_name(), person.get_age()); } use std::fmt::Debug; fn multiple_1(person: &(impl Person + Debug)) { println!("{:?}",person); println!("Age: {}",person.get_age()); } fn main() { let mlk = RegularPerson::create( String::from("Martin"), String::from("Luther"), String::from("King"), 1929 ); let zlatan = SoccerPlayer::create(String::from("Zlatan Ibrahimovic"), 40, String::from("AC Milan")); multiple_1(&zlatan); multiple_1(&mlk); }
Using traits in functions: multiple traits
trait Person { // method header specifications // must be implemented by any type that implements the trait fn get_name(&self) -> String; fn get_age(&self) -> u32; // default implementation of a method fn description(&self) -> String { format!("{} ({})",self.get_name(),self.get_age()) } } #[derive(Debug)] struct SoccerPlayer { name: String, age: u32, team: String, } // Implement the `Person` trait for `SoccerPlayer` so that // it can be used as a `Person` object. impl Person for SoccerPlayer { fn get_age(&self) -> u32 { self.age } // We must implement all trait items fn get_name(&self) -> String { self.name.clone() } } // Implement a constructor for `SoccerPlayer` impl SoccerPlayer { fn create(name:String, age:u32, team:String) -> SoccerPlayer { SoccerPlayer{name,age,team} } } #[derive(Debug)] struct RegularPerson { year_born: u32, first_name: String, middle_name: String, last_name: String, } impl Person for RegularPerson { fn get_age(&self) -> u32 { 2024 - self.year_born } fn get_name(&self) -> String { if self.middle_name == "" { format!("{} {}",self.first_name,self.last_name) } else { format!("{} {} {}",self.first_name,self.middle_name,self.last_name) } } } impl RegularPerson { fn create(first_name:String,middle_name:String,last_name:String,year_born:u32) -> RegularPerson { RegularPerson{first_name,middle_name,last_name,year_born} } } // sample function accepting object implementing trait fn long_description(person: &impl Person) { println!("{}, who is {} years old", person.get_name(), person.get_age()); } use std::fmt::Debug; // three options, useful for different settings // This is good if you want to pass many parameters to the function // and the parameters are of different types fn multiple_1(person: &(impl Person + Debug)) { println!("{:?}",person); println!("Age: {}",person.get_age()); } // This is better if you want all your parameters to be of the same type fn multiple_2<T: Person + Debug>(person: &T) { println!("{:?}",person); println!("Age: {}",person.get_age()); } // This is like option 2 but easier to read if your parameter // combines many traits fn multiple_3<T>(person: &T) where T: Person + Debug { println!("{:?}",person); println!("Age: {}",person.get_age()); } fn main() { let mlk = RegularPerson::create( String::from("Martin"), String::from("Luther"), String::from("King"), 1929 ); multiple_1(&mlk); multiple_2(&mlk); multiple_3(&mlk); }
Returning types implementing a trait
trait Person { // method header specifications // must be implemented by any type that implements the trait fn get_name(&self) -> String; fn get_age(&self) -> u32; // default implementation of a method fn description(&self) -> String { format!("{} ({})",self.get_name(),self.get_age()) } } #[derive(Debug)] struct SoccerPlayer { name: String, age: u32, team: String, } // Implement the `Person` trait for `SoccerPlayer` so that // it can be used as a `Person` object. impl Person for SoccerPlayer { fn get_age(&self) -> u32 { self.age } // We must implement all trait items fn get_name(&self) -> String { self.name.clone() } } // Implement a constructor for `SoccerPlayer` impl SoccerPlayer { fn create(name:String, age:u32, team:String) -> SoccerPlayer { SoccerPlayer{name,age,team} } } #[derive(Debug)] struct RegularPerson { year_born: u32, first_name: String, middle_name: String, last_name: String, } impl Person for RegularPerson { fn get_age(&self) -> u32 { 2024 - self.year_born } fn get_name(&self) -> String { if self.middle_name == "" { format!("{} {}",self.first_name,self.last_name) } else { format!("{} {} {}",self.first_name,self.middle_name,self.last_name) } } } impl RegularPerson { fn create(first_name:String,middle_name:String,last_name:String,year_born:u32) -> RegularPerson { RegularPerson{first_name,middle_name,last_name,year_born} } } // sample function accepting object implementing trait fn long_description(person: &impl Person) { println!("{}, who is {} years old", person.get_name(), person.get_age()); } fn get_zlatan() -> impl Person { SoccerPlayer::create(String::from("Zlatan Ibrahimovic"), 40, String::from("AC Milan")) } fn main() { let zlatan = SoccerPlayer::create(String::from("Zlatan Ibrahimovic"), 40, String::from("AC Milan")); let zlatan_2 = get_zlatan(); long_description(&zlatan_2); }
Recap
- Traits are a way to define shared behavior that can be implemented by different types.
- We can use traits to define shared behavior in an abstract way.
- We can use trait bounds to specify that a generic type can be any type that has certain behavior.
In-Class Activity: Practicing Traits and Trait Bounds
Time: 10 minutes
Instructions
Work individually or in pairs. Complete as many exercises as you can in 10 minutes. You can test your code in the Rust playground or in your local environment.
Exercise 1: Define and Implement a Trait (3 minutes)
Define a trait called Describable with a method describe() that returns a String. Then implement it for the Book struct.
// TODO: Define the Describable trait trait Describable { // Your code here } struct Book { title: String, author: String, pages: u32, } // TODO: Implement Describable for Book // The describe() method should return a string like: // "'The Rust Book' by Steve Klabnik (500 pages)" fn main() { let book = Book { title: String::from("The Rust Book"), author: String::from("Steve Klabnik"), pages: 500, }; println!("{}", book.describe()); }
Hint
Remember the trait definition syntax:
#![allow(unused)] fn main() { trait TraitName { fn method_name(&self) -> ReturnType; } }
And implementation:
#![allow(unused)] fn main() { impl TraitName for StructName { fn method_name(&self) -> ReturnType { // implementation } } }
Exercise 2: Multiple Trait Bounds with Where Clause (3 minutes)
Refactor the following function to use a where clause instead of inline trait bounds. Then add a call to the function in main.
use std::fmt::{Debug, Display}; // TODO: Refactor this to use a where clause fn print_info<T: Debug + Display + PartialOrd>(item: &T, compare_to: &T) { println!("\nItem: {}", item); println!("Item (Debug Print): {:?}", item); if item > compare_to { println!("{} is greater than {}", item, compare_to); } } fn main() { // TODO: Call print_info with: // - &42 and &10 // - &3.14 and &2.71 // - &'z' and &'a' }
Hint
The where clause syntax is:
#![allow(unused)] fn main() { fn function_name<T>(params) -> ReturnType where T: Trait1 + Trait2 { // body } }
Bonus Challenge (if you finish early)
Create a trait called Area with a method area() that returns f64. Implement it for both Circle and Rectangle structs. Then write a generic function print_area that accepts anything implementing the Area trait.
// TODO: Define the Area trait // TODO: Define Circle struct (radius: f64) // TODO: Define Rectangle struct (width: f64, height: f64) // TODO: Implement Area for Circle (π * r²) // TODO: Implement Area for Rectangle (width * height) // TODO: Write a generic function that prints the area // fn print_area(...) { ... } fn main() { let circle = Circle { radius: 5.0 }; let rectangle = Rectangle { width: 4.0, height: 6.0 }; print_area(&circle); print_area(&rectangle); }
Lifetimes in Rust
About This Module
This module introduces Rust's lifetime system, which ensures memory safety by tracking how long references remain valid. We'll explore lifetime annotations, the borrow checker, lifetime elision rules, and how lifetimes work with functions, structs, and methods.
Prework
Prework Reading
Read the following sections from "The Rust Programming Language" book:
Pre-lecture Reflections
Before class, consider these questions:
- How do lifetimes prevent dangling pointer bugs that plague other systems languages?
- When does Rust require explicit lifetime annotations vs. lifetime elision?
- How do lifetime parameters relate to generic type parameters?
- What are the trade-offs between memory safety and programming convenience in lifetime systems?
- How do lifetimes enable safe concurrent programming patterns?
Learning Objectives
By the end of this module, you should be able to:
- Understand how the borrow checker prevents dangling references
- Write explicit lifetime annotations when required by the compiler
- Apply lifetime elision rules to understand when annotations are optional
- Use lifetimes in function signatures, structs, and methods
- Combine lifetimes with generics and trait bounds
- Debug lifetime-related compilation errors effectively
Lifetimes Overview
- Ensures references are valid as long as we need them to be
- The goal is to enable Rust compiler to prevent dangling references.
- A dangling reference is a reference that points to data that has been freed or is no longer valid.
Note: you can separate declaration and initialization
#![allow(unused)] fn main() { let r; // declaration r = 32; // initialization println!("r: {r}"); }
- Consider the following code:
#![allow(unused)] fn main() { let r; { let x = 5; r = &x; } println!("r: {r}"); }
The Rust Compiler Borrow Checker
-
Let's annotate the lifetimes of
randx. -
Rust uses a special naming pattern for lifetimes:
'a(single quote followed by identifier)
fn main() { let r; // ---------+-- 'a // | { // | let x = 5; // -+-- 'b | r = &x; // | | } // -+ | // | println!("r: {r}"); // | } // ---------+
-
We can see that
xgoes out of scope before we use a reference,r, tox. -
We can can fix the scope so lifetimes overlap
fn main() { let x = 5; // ----------+-- 'b // | let r = &x; // --+-- 'a | // | | println!("r: {r}"); // | | // | | } // --+-------+
Generic Lifetimes in Functions
-
Let's see an example of why we need to be able to specify lifetimes.
-
Say we want to compare to strings and return a reference to the longest one
// Compiler Error // compare two string slices and return reference to the longest fn longest(x: &str, y: &str) -> &str { if x.len() > y.len() {x} else {y} } fn main() { let string1 = String::from("abcd"); let string2 = "xyz"; let result = longest(string1.as_str(), string2); println!("The longest string is {result}"); }
Why is this a problem?
Answer: The compiler analyzes the function body without executing it so it doesn't know which reference will be returned and so it can't know the lifetime of the return reference.
Also, it looks at function longest() in isolation. It doesn't look at how
main is using it.
The Solution: Lifetime Annotation Syntax
- names of lifetime parameters must start with an apostrophe (') and are usually all lowercase and very short, like generic types
&i32 // a reference with inferred lifetime
&'a i32 // a reference with an explicit lifetime
&'a mut i32 // a mutable reference with an explicit lifetime- now we can annotate our function with lifetime
fn longest<'a>(x: &'a str, y: &'a str) -> &'a str {
if x.len() > y.len() {x} else {y}
}Update Example with Lifetime Annotation
-
we use the same syntax like we used for generic types,
fn longest<'a>(... -
The lifetime
'ais the shorter of the two input lifetimes:(x: &'a str, y: &'a str) -
The returned is guaranteed to live no longer than
'a, e.g.-> &'a str
fn longest<'a>(x: &'a str, y: &'a str) -> &'a str { if x.len() > y.len() {x} else {y} } fn main() { let string1 = String::from("abcd"); let string2 = "xyz"; let result = longest(string1.as_str(), string2); println!("The longest string is {result}"); }
- Above is not an issue, because all lifetimes are the same.
Example of Valid Code
// this code is still fine fn longest<'a>(x: &'a str, y: &'a str) -> &'a str { if x.len() > y.len() {x} else {y} } fn main() { let string1 = String::from("long string is long"); { let string2 = String::from("xyz"); let result = longest(string1.as_str(), string2.as_str()); println!("The longest string is {result}"); } }
- Above is not an issue, because the returned reference is no longer than the shorter of the two args
Example of Invalid Code
- But what about below?
fn longest<'a>(x: &'a str, y: &'a str) -> &'a str { if x.len() > y.len() {x} else {y} } fn main() { let string1 = String::from("abcd"); // ----------+-- 'a let result; // | { // | let string2 = String::from("xyz"); // --+-- 'b | result = longest(&string1, &string2); // | | } // --+ | println!("The longest string is {result}"); // | } // ----------+
- We're trying to use
resultafter the shortest arg lifetime ended
Lifetime of return type must match lifetime of at least one parameter
- This won't work
#![allow(unused)] fn main() { fn first_str<'a>(_x: &str, _y: &str) -> &'a str { let result = String::from("really long string"); result.as_str() } }
Why is this a problem?
Answer: The return reference is to `result` which gets dropped at end of function.
Lifetime Annotations in Struct Definitions
-
So far, we've only used structs that fully owned their member types.
-
We can define structs to hold references, but then we need lifetime annotations
#[derive(Debug)] struct ImportantExcerpt<'a> { part: &'a str, } fn main() { let novel = String::from("Call me Ishmael. Some years ago..."); let first_sentence = novel.split('.').next().unwrap(); let i = ImportantExcerpt { part: first_sentence, }; println!("{:?}", i); }
- An instance of
ImportantExcerptcan't outlive the reference it holds in thepartfield.
Lifetime Elision
- In Rust, the cases where we can omit lifetime annotations are called lifetime elision.
e·li·sion
/əˈliZH(ə)n/
noun
the omission of a sound or syllable when speaking (as in I'm, let's, e ' en ).
* an omission of a passage in a book, speech, or film.
"the movie's elisions and distortions have been carefully thought out"
* the process of joining together or merging things, especially abstract ideas.
"unease at the elision of so many vital questions"
Lifetime Elision Example
So why does this function compile without errors?
fn first_word(s: &str) -> &str { let bytes = s.as_bytes(); for (i, &item) in bytes.iter().enumerate() { if item == b' ' { return &s[0..i]; } } &s[..] } fn main() { let s = String::from("Call me Ishmael."); let word = first_word(&s); println!("The first word is: {word}"); }
Shouldn't we have to write?
#![allow(unused)] fn main() { fn first_word<'a>(s: &'a str) -> &'a str { }
Inferring Lifetimes
The compiler developers decided that some patterns were so common and simple to infer that the compiler could just infer and automatically generate the lifetime specifications.
-
input lifetimes: lifetimes on function or method parameters
-
output lifetimes: lifetimes on return values
Three Rules for Compiler Lifetime Inference
First Rule
Compiler assigns a lifetime parameter to each parameter that is a reference.
So:
// function with one parameter
fn foo(x: &i32);
//a function with two parameters
fn foo(x: &i32, y: &i32);
// and so on.would automaticallybecome:
// function with one parameter gets a lifetime parameter
fn foo<'a>(x: &'a i32);
//a function with two parameters gets two separate lifetime parameters:
fn foo<'a, 'b>(x: &'a i32, y: &'b i32);
// and so on.Three Rules for Compiler Lifetime Inference
Second Rule
If there is exactly one input lifetime parameter, that lifetime is assigned to all output lifetime parameters
So:
fn foo(x: &i32) -> &i32would automatically become:
fn foo<'a>(x: &'a i32) -> &'a i32Three Rules for Compiler Lifetime Inference
Third Rule -- Methods
If there are multiple input lifetime parameters, but one of them is &self or &mut self because this is a method, the lifetime of self is assigned to all output lifetime parameters.
So:
fn foo(&self, x: &i32, y: &i32) -> &i32would automatically become:
fn foo<'a, 'b, 'c>(&'a self, x: &'b i32, y: &'c i32) -> &'a i32Let's Test Our Understanding
You're the compiler and you see this function.
fn first_word(s: &str) -> &str {...}Do any rules apply? which one would you apply first?
Answer:
First rule: Apply input lifetime annotations.
fn first_word<'a>(s: &'a str) -> &str {...}Second rule: Apply output lifetime annotation.
fn first_word<'a>(s: &'a str) -> &'a str {...}Done! Everything is accounted for.
Test Our Understanding Again
What about if you see this function signature?
fn longest(x: &str, y: &str) -> &str {...}Can we apply any rules?
We can apply first rule again. Each parameter gets it's own lifetime.
fn longest<'a, 'b>(x: &'a str, y: &'b str) -> &str {...}Can we apply anymore rules?
No! Produce a compiler error asking for annotations.
Lifetime Annotations in Method Definitions
Let's take a look at the third rule again:
If there are multiple input lifetime parameters, but one of them is
&selfor&mut selfbecause this is a method, the lifetime of self is assigned to all output lifetime parameters.
Previously, we defined a struct with a field that takes a string slice reference.
#![allow(unused)] fn main() { #[derive(Debug)] struct ImportantExcerpt<'a> { part: &'a str, } // For implementation, `impl` of methods, we use the generics style annotation, // which is required. impl<'a> ImportantExcerpt<'a> { // But we don't have to annotate the following method. // The **First Rule** applies. fn level(&self) -> i32 { 3 } } // For the following method... impl<'a> ImportantExcerpt<'a> { fn announce_and_return_part(&self, announcement: &str) -> &str { println!("Attention please: {announcement}"); self.part } } }
For the announce_and_return_part method, there are two input lifetimes so:
- Rust applies the first lifetime elision rule and gives both
&selfand announcement their own lifetimes. - Then, because one of the parameters is
&self, the return type gets the lifetime of&self, and all lifetimes have been accounted for.
The Static Lifetime
- a special lifetime designation
- lives for the entire duration of the program
#![allow(unused)] fn main() { // This is actually redundant since string literals are always 'static let s: &'static str = "I have a static lifetime."; }
-
use only if necessary, e.g. most helpful for multi-threaded programs
-
manage lifetimes more fine grained if at all possible
For more, see for example:
- https://doc.rust-lang.org/rust-by-example/scope/lifetime/static_lifetime.html
Combining Lifetimes with Generics and Trait Bounds
Let's look at an example that combines:
- lifetimes
- generics with trait bounds
use std::fmt::Display; fn longest_with_announce<'a, T>(x: &'a str, y: &'a str, ann: T) -> &'a str where T: Display, // T must implement the Display trait { println!("Announcement! {ann}"); if x.len() > y.len() { x } else { y } } fn main() { let string1 = String::from("short"); let string2 = "longer"; let result = longest_with_announce(&string1, &string2, "Hear ye! Hear ye!"); println!("The longest string is {result}"); }
Breaking Down the Function Declaration
Let's break down the function declaration:
fn longest_with_announce<'a, T>(x: &'a str, y: &'a str, ann: T) -> &'a str
where
T: Display, // T must implement the Display trait- It has two generic parameters:
'a: A lifetime parameterT: A type parameter
- It takes three arguments:
x: A string slice with lifetime'ay: A string slice with lifetime'aann: A value of generic typeT
- Returns a string slice with lifetime
'a - The
whereclause specifies that typeTmust implement theDisplaytrait
Recap
- Lifetimes are a way to ensure that references are valid as long as we need them to be.
- The borrow checker is a tool that helps us ensure that our references are valid.
- We can use lifetime annotations to help the borrow checker understand our code better.
- We can use lifetime elision to help the compiler infer lifetimes for us.
- We can use lifetimes in function signatures, structs, and methods.
- We can combine lifetimes with generics and trait bounds.
In-Class Exercise
Part 1 -- Illustrate the Lifetimes
Annotate the lifetimes of the variables in the following code using the notation from the beginning of the module.
Paste the result in GradeScope.
#![allow(unused)] fn main() { { let s = String::from("never mind how long precisely --"); // { // let t = String::from("Some years ago -- "); // { // let v = String::from("Call me Ishmael."); // println!("{v}"); // } // println!("{t}"); // } // println!("{s}"); // } // }
Part 2 -- Fix the Function with Multiple References
The following function is supposed to take a vector of string slices, a default value, and an index, and return either the string at the given index or the default if the index is out of bounds. However, it won't compile without lifetime annotations.
Add the appropriate lifetime annotations to make this code compile and paste the result in GradeScope.
fn get_or_default(strings: &Vec<&str>, default: &str, index: usize) -> &str { if index < strings.len() { strings[index] } else { default } } fn main() { let vec = vec!["hello", "world", "rust"]; let default = "not found"; let result = get_or_default(&vec, default, 5); println!("{}", result); }
Part 3 -- Generic Type with Lifetime Annotations
The following code defines a Wrapper struct that holds both a generic value and a
reference. The struct and its method won't compile without proper lifetime annotations.
Add the appropriate lifetime annotations to make this code compile and paste the result in GradeScope.
struct Wrapper<T> { value: T, description: &str, } impl<T> Wrapper<T> { fn new(value: T, description: &str) -> Self { Wrapper { value, description } } fn get_description(&self) -> &str { self.description } fn get_value(&self) -> &T { &self.value } } fn main() { let desc = String::from("A number"); let wrapper = Wrapper::new(42, &desc); println!("Value: {}, Description: {}", wrapper.get_value(), wrapper.get_description()); }
Complexity Analysis: Understanding Algorithm Performance
About This Module
This module covers algorithmic complexity analysis with a focus on how memory is managed in Rust vectors. You'll learn to analyze time and space complexity of operations and understand the performance characteristics of different data structures and algorithms.
Prework
Prework Reading
Please read the following:
- (review) Chapter 8.1: Storing Lists of Values with Vectors
- (optional) Additional reading: Wikipedia: Analysis of Algorithms
Pre-lecture Reflections
- What is the difference between time complexity and space complexity?
- Why is amortized analysis important for dynamic data structures?
- How does Rust's memory management affect algorithm complexity?
Learning Objectives
By the end of this module, you will be able to:
- Analyze time and space complexity using Big O notation
- Understand amortized analysis for vector operations
- Compare complexity of some algorithms and data structures
Complexity Analysis (e.g. memory management in vectors)
Let's dive deeper into algorithmic complexity analysis by considering how memory is manged in Rust Vecs.
Previously: vectors Vec<T>
- Dynamic-length array/list
- Allowed operations:
- access item at specific location
push: add something to the endpop: remove an element from the end
Other languages:
- Python: list
- C++:
vector<T> - Java:
ArrayList<T>/Vector<T>
Implementation details
Challenges
- Size changes: allocate on the heap?
- What to do if a new element added?
- Allocate a larger array and copy everything?
- Linked list?
Solution
- Allocate more space than needed!
- When out of space:
- Increase storage size by, say, 100%
- Copy everything
Under the hood
Variable of type Vec<T> contains:
- pointer to allocated memory
- size: the current number of items
- capacity: how many items could currently fit
Important: size capacity
Example (adding elements to a vector)
Method capacity() reports the current storage size
#![allow(unused)] fn main() { // print out the current size and capacity // define a generic function `info` that takes one argument, `vector`, // of generic `Vec` type and prints it's length and capacity fn info<T>(vector:&Vec<T>) { println!("length = {}, capacity = {}",vector.len(),vector.capacity()); } // Let's keep adding elements to Vec and see what happens to capacity let mut v = Vec::with_capacity(7); // instantiate empty Vec with capacity 7 let mut capacity = v.capacity(); info(&v); for i in 1..=1000 { v.push(i); // push the index onto the Vec // if capacity changed, print the length and new capacity if v.capacity() != capacity { capacity = v.capacity(); info(&v); } }; info(&v); }
Example (decreasing the size of a vector)
#![allow(unused)] fn main() { fn info<T>(vector:&Vec<T>) { println!("length = {}, capacity = {}",vector.len(),vector.capacity()); } // what happens when we decrease the Vec by popping off values? let mut v = vec![10; 1000]; info(&v); // `while let` is a control flow construct that will continue // as long as pattern `Some(_) = v.pop()` matches. // If there is a value to pop, v.pop() returns Option enum, which // is either Some(Vec<T>) // otherwise it will return None and the loop will end. while let Some(_) = v.pop() {} info(&v); }
Questions
- What is happening as we push elements?
- When does it happen?
- How much is it changing by?
- What happens when we pop? Is capacity changing?
Example -- Shrink to Fit
- We can shrink the size of a vector manually
#![allow(unused)] fn main() { fn info<T>(vector:&Vec<T>) { println!("length = {}, capacity = {}",vector.len(),vector.capacity()); } let mut v = vec![10; 1000]; while let Some(_) = v.pop() {} info(&v); for i in 1..=13 { v.push(i); } info(&v); // shrink the size manually v.shrink_to_fit(); info(&v); }
Note: size and capacity not guaranteed to be the same
Example -- Creating a vector with specific capacity
Avoid reallocation if you know how many items to expect.
#![allow(unused)] fn main() { fn info<T>(vector:&Vec<T>) { println!("length = {}, capacity = {}",vector.len(),vector.capacity()); } // creating vector with specific capacity let mut v2 : Vec<i32> = Vec::with_capacity(1234); info(&v2); }
.get() versus .pop()
.get()does not remove from the vector, but you must specify the index.pop()removes the last element from the vector- both return an
Option<T>.get()returnsSome(T)if the index is valid,Noneotherwise.pop()returnsSome(T)if the vector is not empty,Noneotherwise
#![allow(unused)] fn main() { let mut v = Vec::new(); for i in 1..=13 { v.push(i); } println!("{:?}", v); // Does not remove from the vector, but you must specify the index println!("{:?} {:?}", v.get(v.len()-1), v); // But this one does, and removes the last element println!("{:?} {:?}", v.pop(), v); }
Other useful functions
appendAdd vector at the end of anothervec.append(&mut vec2)clearRemove all elements from the vectorvec.clear()dedupRemove consecutive identical elementsvec.dedup(), most useful when combined withsortdrainRemove a slice from the vectorvec.drain(2..4)-- removes and shifts -- expensiveremoveRemove an element from the vectorvec.remove(2)-- removes and shifts -- expensivesortSort the elements of a mutable vectorvec.sort()- Complete list at https://doc.rust-lang.org/std/vec/struct.Vec.html
Note: append moves the contents of the second vector into the first, and the second vector becomes empty.
#![allow(unused)] fn main() { let mut vec = vec![1, 2, 3]; let mut vec2 = vec![4, 5, 6]; vec.append(&mut vec2); println!("{:?}", vec); // Prints [1, 2, 3, 4, 5, 6] println!("{:?}", vec2); // Prints [] - It's still here, just empty! }
Sketch of analysis: Amortization
- Inserting an element not constant time (i.e. ) under all conditions
However
-
Assumption: allocating memory size takes either or time
-
Slow operations: current_size time
-
Fast operations: time
What is the average time?
- Consider an initial 100-capacity Vec.
- Continually add element
- First 100 added elements:
- For 101st element:
So on average for the first 101 elements:
- On average: amortized time
- Fast operations pay for slow operations
Dominant terms and constants in notation
We ignore constants and all but dominant terms as :
Which is worse? or ?
Shrinking?
- Can be implemented this way too
- Example: shrink by 50% if less than 25% used
- Most implementations don't shrink automatically
Notations
-> Algorithm takes no more than n time (worst case scenario)
-> Algorithm takes at least n time (best case scenario)
-> Average/Typical running time for the algorithm (average case scenario)
Digression (Sorting Vectors in Rust)
Sorting on on integer vectors works fine.
#![allow(unused)] fn main() { // This works great let mut a = vec![1, 4, 3, 6, 8, 12, 5]; a.sort(); println!("{:?}", a); }
But sorting on floating point vectors does not work directly.
#![allow(unused)] fn main() { // But the compiler does not like this one, since sort depends on total order let mut a = vec![1.0, 4.0, 3.0, 6.0, 8.0, 12.0, 5.0]; a.sort(); println!("{:?}", a); }
Why?
Because floats in Rust support special values like NaN and inf which don't obey normal sorting rules.
More technically, floats in Rust don't implement the
Ordtrait, only thePartialOrdtrait.The
Ordtrait is a total order, which means that for any two numbers and , either , , or .The
PartialOrdtrait is a partial order, which means that for any two numbers and , either , , , or the comparison is not well defined.
Example -- inf
#![allow(unused)] fn main() { let mut x: f64 = 6.8; println!("{}", x/0.0); }
We can push inf onto a Vec.
#![allow(unused)] fn main() { let mut a = vec![1.0, 4.0, 3.0, 6.0, 8.0, 12.0, 5.0]; let mut x: f64 = 6.8; a.push(x/0.0); a.push(std::f64::INFINITY); println!("{:?}", a); }
Example -- NaN
#![allow(unused)] fn main() { let mut x: f64 = -1.0; println!("{}", x.sqrt()); }
Similarly, we can push NaN onto a Vec.
#![allow(unused)] fn main() { let mut a = vec![1.0, 4.0, 3.0, 6.0, 8.0, 12.0, 5.0]; let mut x: f64 = -1.0; a.push(x.sqrt()); a.push(std::f64::NAN); println!("{:?}", a); }
Example -- Sorting with sort_by()
We can work around this by:
- not relying on the Rust implementation of
sort(), but rather - defining our own comparison function using
partial_cmp, which is a required method for the PartialOrd trait, and - using the
.sort_by()function.
#![allow(unused)] fn main() { // This is ok since we don't use sort, sort_by depends on the function you pass in to compute order let mut a: Vec<f32> = vec![1.0, 4.0, 3.0, 6.0, 8.0, 12.0, 5.0]; // a.sort(); a.sort_by(|x, y| x.partial_cmp(y).unwrap()); println!("{:?}", a); }
where partial_cmp is a method that returns for types that implement the PartialOrd trait:
Some(std::cmp::Ordering::Equal)when ,Some(std::cmp::Ordering::Less)whenSome(std::cmp::Ordering::Greater)whenNonewhen the comparison is not well defined, e.g x ? NaN
Example -- Can even handle inf
#![allow(unused)] fn main() { let mut a: Vec<f32> = vec![1.0, 4.0, 3.0, std::f32::INFINITY, 6.0, 8.0, 12.0, 5.0]; println!("{:?}", a); a.sort_by(|x, y| x.partial_cmp(y).unwrap()); println!("{:?}", a); }
#![allow(unused)] fn main() { let mut a: Vec<f32> = vec![1.0, 4.0, 3.0, std::f32::INFINITY, 6.0, std::f32::NEG_INFINITY, 8.0, 12.0, 5.0]; println!("{:?}", a); a.sort_by(|x, y| x.partial_cmp(y).unwrap()); println!("{:?}", a); }
#![allow(unused)] fn main() { let mut a: Vec<f32> = vec![1.0, 4.0, 3.0, std::f32::INFINITY, 6.0, 8.0, std::f32::INFINITY, 12.0, 5.0]; println!("{:?}", a); a.sort_by(|x, y| x.partial_cmp(y).unwrap()); println!("{:?}", a); }
Infinity goes to the end:
Infinity has a well-defined ordering in IEEE 754 floating-point arithmetic:
- Positive infinity is explicitly defined as greater than all finite numbers
inf.partial_cmp(finite_number)returnsSome(Ordering::Greater)- This is a valid comparison, so the
unwrap_orfallback is never used - Result: infinity naturally sorts to the end
Just be careful!
It will panic if you try to unwrap a special value like NaN.
#![allow(unused)] fn main() { // When partial order is not well defined in the inputs you get a panic let mut a = vec![1.0, 4.0, 3.0, 6.0, 8.0, 12.0, 5.0]; let mut x: f32 = -1.0; x = x.sqrt(); a.push(x); println!("{:?}", a); a.sort_by(|x, y| x.partial_cmp(y).unwrap()); println!("{:?}", a); }
Workaround
Return a default value when the comparison is not well defined.
#![allow(unused)] fn main() { // When partial order is not well defined in the inputs you get a panic let mut a = vec![1.0, 4.0, 3.0, 6.0, 8.0, 12.0, 5.0]; // push a NaN (sqrt(-1.0)) let mut x: f32 = -1.0; x = x.sqrt(); a.push(x); // push an inf (10.0/0.0) a.push(10.0/0.0); println!("{:?}", a); a.sort_by(|x, y| x.partial_cmp(y).unwrap_or(std::cmp::Ordering::Less)); println!("{:?}", a); }
NaN goes to the beginning:
The .unwrap_or(std::cmp::Ordering::Less) says: "if the comparison is undefined (returns None), pretend that x is less than y".
So when NaN is compared with any other value:
NaN.partial_cmp(other)→None- Falls back to
Ordering::Less - This means NaN is always treated as "smaller than" everything else
- Result: NaN gets sorted to the beginning
In-Class Poll
Answer on Gradescope.
Select all that are true:
-
The
push()operation on a RustVec<T>always has O(1) time complexity in the worst case. -
When a
Vec<T>runs out of capacity and needs to grow, it typically doubles its capacity, resulting in O(n) time for that specific push operation where n is the current size. -
The
pop()operation on a RustVec<T>has O(1) time complexity and automatically shrinks the vector's capacity when the size drops below 25% of capacity. -
The amortized time complexity of
push()operations on aVec<T>is O(1), meaning that averaged over many operations, each push takes constant time. - In Big O notation, O(n² + 100n + 50) simplifies to O(n²) because we ignore constants and non-dominant terms as n approaches infinity.
Hash Maps and Hash Sets: Key-Value Storage
About This Module
This module introduces HashMap and HashSet collections in Rust, which provide efficient key-value storage and set operations. You'll learn how to use these collections for fast lookups, counting, and deduplication tasks common in data processing.
Prework
Prework Reading
Please read the following sections from The Rust Programming Language Book:
- Chapter 8.3: Storing Keys with Associated Values in Hash Maps
- (Optional)Additional reading about hash tables and their complexity Wikipedia: Hash table (intro only)
Pre-lecture Reflections -- Part 1
- Why must a
HashMaptake ownership of values likeString, and what memory safety problems does this solve? - How does the
entryAPI help you safely update a value? - The
getmethod returns anOption. Why is this a crucial design choice, and what common bugs does it prevent? - When would you choose to use a
HashMapover aVec, and what is the main performance trade-off for looking up data?
Pre-lecture Reflections -- Part 2
- How do hash maps achieve O(1) average-case lookup time?
- What are the tradeoffs between HashMap and BTreeMap in Rust?
- When would you use a HashSet vs a Vec
for storing unique values? - What makes a good hash function?
Learning Objectives
By the end of this module, you will be able to:
- Create and manipulate HashMap and HashSet collections
- Understand hash table operations and their complexity
- Choose appropriate collection types for different use cases
- Handle hash collisions and understand their implications
Hash maps
Collection HashMap<K,V>
Goal: a mapping from elements of K to elements of V
- elements of
Kcalled keys -- must be unique - elements of
Vcalled values -- need not be unique
Similar structure in other languages:
- Python: dictionaries
- C++:
unordered_map<K,V> - Java:
Hashtable<K,T>
Creating a HashMap
- Create a hash map and insert key-value pairs
- Extract a reference with
.get()
#![allow(unused)] fn main() { use std::collections::HashMap; // number of wins in a local Counterstrike league let mut wins = HashMap::<String,u16>::new(); // Insert creates a new key/value if exists and overwrites old value if key exists wins.insert(String::from("Boston University"),24); wins.insert(String::from("Harvard"),22); wins.insert(String::from("Boston College"),20); wins.insert(String::from("Northeastern"),32); // Extracting a reference: returns `Option<&V>` println!("Boston University wins: {:?}", wins.get("Boston University")); println!("MIT wins: {:?}", wins.get("MIT")); }
Inserting a key-value pair if not present
To check if a key is present, and if not, insert a default value, you can use .entry().or_insert().
#![allow(unused)] fn main() { use std::collections::HashMap; // number of wins in a local Counterstrike league let mut wins = HashMap::<String,u16>::new(); // Insert creates a new key/value if exists and overwrites old value if key exists wins.insert(String::from("Boston University"),24); wins.insert(String::from("Harvard"),22); wins.insert(String::from("Boston College"),20); wins.insert(String::from("Northeastern"),32); //Insert if not present, you can use `.entry().or_insert()`. wins.entry(String::from("MIT")).or_insert(10); println!("MIT wins: {:?}", wins.get("MIT")); }
Updating a value based on the old value
To update a value based on the old value, you can use .entry().or_insert()
and get a mutable reference to the value.
#![allow(unused)] fn main() { use std::collections::HashMap; // number of wins in a local Counterstrike league let mut wins = HashMap::<String,u16>::new(); // Insert creates a new key/value if exists and overwrites old value if key exists wins.insert(String::from("Boston University"),24); wins.insert(String::from("Harvard"),22); wins.insert(String::from("Boston College"),20); wins.insert(String::from("Northeastern"),32); // Updating a value based on the old value: println!("Boston University wins: {:?}", wins.get("Boston University")); { // code block to limit how long the reference lasts let entry = wins.entry(String::from("Boston University")).or_insert(10); *entry += 50; } //wins.insert(String::from("Boston University"),24); println!("Boston University wins: {:?}", wins.get("Boston University")); }
Iterating
You can iterate over each key-value pair with a for loop similar to vectors.
#![allow(unused)] fn main() { use std::collections::HashMap; // number of wins in a local Counterstrike league let mut wins = HashMap::<String,u16>::new(); // Insert creates a new key/value if exists and overwrites old value if key exists wins.insert(String::from("Boston University"),24); wins.insert(String::from("Harvard"),22); wins.insert(String::from("Boston College"),20); wins.insert(String::from("Northeastern"),32); for (k,v) in &wins { println!("{}: {}",k,v); }; println!("\nUse .iter(): "); for (k,v) in wins.iter() { println!("{}: {}",k,v); }; }
Iterating and Modifying Values
To modify values, you have to use mutable versions:
#![allow(unused)] fn main() { use std::collections::HashMap; // number of wins in a local Counterstrike league let mut wins = HashMap::<String,u16>::new(); // Insert creates a new key/value if exists and overwrites old value if key exists wins.insert(String::from("Boston University"),24); wins.insert(String::from("Harvard"),22); wins.insert(String::from("Boston College"),20); wins.insert(String::from("Northeastern"),32); for (k,v) in &wins { // note: `wins` is immutable, so we can't mutate the values println!("{}: {}",k,v); }; println!("\nUse implicit mutable iterator: "); for (k,v) in &mut wins { // note: `wins` is mutable, so we can mutate the values *v += 1; println!("{}: {}",k,v); }; println!("\nUse .iter_mut(): "); for (k,v) in wins.iter_mut() { // note: `wins` is mutable, so we can mutate the values *v += 1; println!("{}: {}",k,v); }; }
Using HashMaps with Match statements
- Let's use a hash map to store the price of different items in a cafe
- Use
.get(&key)to get the value of a key wrapped in anOptionenum.
#![allow(unused)] fn main() { use std::collections::HashMap; let mut crispy_crêpes_café = HashMap::new(); crispy_crêpes_café.insert(String::from("Nutella Crêpe"),5.85); crispy_crêpes_café.insert(String::from("Strawberries and Nutella Crêpe"),8.75); crispy_crêpes_café.insert(String::from("Roma Tomato, Pesto and Spinach Crêpe"),8.90); crispy_crêpes_café.insert(String::from("Three Mushroom Crêpe"),8.90); fn on_the_menu(cafe: &HashMap<String,f64>, key:String) { print!("{}: ",key); match cafe.get(&key) { // .get() returns an Option enum None => println!("not on the menu"), Some(price) => println!("${:.2}",price), } } on_the_menu(&crispy_crêpes_café, String::from("Four Mushroom Crêpe")); on_the_menu(&crispy_crêpes_café, String::from("Three Mushroom Crêpe")); }
Summary of Useful HashMap Methods
TODO: Add details on return values.
Basic Operations:
new(): Creates an empty HashMap.insert(key, value) -> Option<V>: Adds a key-value pair to the map. If the map did not have the key thenNoneis returned, if the map did have the key the old value is returned asSome(V).remove(key) -> Option<V>: Removes a key-value pair from the map. If the map did not have the key thenNoneis returned, if the map did have the key the value is returned asSome(V).get(key) -> Option<&V>: Returns a reference to the value in the map, if any, that is equal to the given key. ReturnsNoneif the key is not present.contains_key(key) -> bool: Checks if the map contains a specific key. Returnstrueif present,falseotherwise.len() -> usize: Returns the number of key-value pairs in the map.is_empty() -> bool: Checks if the map contains no key-value pairs.clear(): Removes all key-value pairs from the map.drain(): Clears the map and returns all key-value pairs as an iterator.
Entry API:
entry(key).or_insert(value): Returns a mutable reference to the value in the map, if any, that is equal to the given key. If the key is not present, inserts the given value and returns a mutable reference to the new value.
Iterators and Views:
iter(): Returns an immutable iterator over the key-value pairs in the map.iter_mut(): Returns a mutable iterator over the key-value pairs in the map.keys(): Returns an iterator over the keys in the map.values(): Returns an iterator over the values in the map.values_mut(): Returns a mutable iterator over the values in the map.
See the documentation for more details.
True/False Statements on HashMaps
- In a Rust
HashMap<K,V>, keys must be unique, but values need not be unique. - Calling
.insert()on a HashMap with a key that already exists will cause a runtime panic. - The
.get(&key)method returns a reference directly to the value, or panics if the key is missing. - The expression
map.entry(key).or_insert(0)returns a mutable reference to the value, allowing in-place updates like*entry += 1. - To mutate values while iterating over a HashMap, you must use
&mut mapor.iter_mut()— iterating with&mapyields immutable references.
Enter your answers into gradescope.
Solutions will be posted after the lecture.
How Hash Tables Work
Internal Representation
Array of Option
- A hash map is represented as an array of buckets, e.g. capacity
- The array is an array of
Option<T>enums likeVec<Option<T>>) , - And the
Some(<T>)variant has valueTwith tuple(key, value, hash) - So the internal representation is like
Vec<Option<(K, V, u64)>>
Hash function
- Use a hash function which is like a pseudorandom number generator with key as the seed, e.g.
- Pseudorandom means that the same key will always produce the same hash, but different keys will produce different hashes.
- Then take modulo of capacity , e.g.
index = hash % 8 = 6 - So ultimately maps keys into one of the buckets
Hash Function Examples
Let's calculate hash and index for different inputs using Rust's built-in hash function.
use std::collections::hash_map::DefaultHasher; use std::hash::{Hash, Hasher}; fn hash_function(input: &str) -> u64 { let mut hasher = DefaultHasher::new(); input.hash(&mut hasher); hasher.finish() } fn main() { let B = 8; // capacity of the hash map (e.g. number of buckets) let input = "Hello!"; let hash = hash_function(input); let index = hash % B; println!("Hash of '{}' is: {} and index is: {}", input, hash, index); let input = "Hello"; // slight change in input let hash = hash_function(input); let index = hash % B; println!("Hash of '{}' is: {} and index is: {}", input, hash, index); let input = "hello"; // slight change in input let hash = hash_function(input); let index = hash % B; println!("Hash of '{}' is: {} and index is: {}", input, hash, index); }
- Any collisions?
- Try increasing the capacity to 16 and see how the index changes.
More Hash Function Examples
- Keys don't have to be strings.
- They can be any type that implements the
Hashtrait.
use std::collections::hash_map::DefaultHasher; use std::hash::{Hash, Hasher}; fn generic_hash_function<T: Hash>(input: &T) -> u64 { let mut hasher = DefaultHasher::new(); input.hash(&mut hasher); hasher.finish() } fn main() { // Using the generic hash function with different types println!("\nUsing generic_hash_function:"); println!("String hash: {}", generic_hash_function(&"Hello, world!")); println!("Integer hash: {}", generic_hash_function(&42)); // println!("Float hash: {}", generic_hash_function(&3.14)); // what if we try float? println!("Bool hash: {}", generic_hash_function(&true)); println!("Tuple hash: {}", generic_hash_function(&(1, 2, 3))); println!("Vector hash: {}", generic_hash_function(&vec![1, 2, 3, 4, 5])); println!("Char hash: {}", generic_hash_function(&'A')); }
What if you try to hash a float?
General ideas
- Store keys (and associated values and hashes) in buckets
- Indexing: Use hash function to find bucket holding key and value.
Collision: two keys mapped to the same bucket
- Very unlikely given the pseudorandom nature of the hash function
- What to do if two keys in the same bucket
Handling collisions
Probing
- Each bucket entry: (key, value, hash)
- Use a deterministic algorithm to find an open bucket
Inserting:
- entry busy: try , , etc.
- insert into first empty
Searching:
- try , , , etc.
- stop when found or empty entry
Handling collisions, example
Step 1
Step 1: Empty hash map with 4 buckets
Index: 0 1 2 3
+-------+ +-------+ +-------+ +-------+
| empty | | empty | | empty | | empty |
+-------+ +-------+ +-------+ +-------+
Step 2
Step 2: Insert key="apple", hash("apple") = 42
hash("apple") = 42
42 % 4 = 2 ← insert at index 2
Index: 0 1 2 3
+-------+ +-------+ +-------+ +-------+
| empty | | empty | |apple,v| | empty |
| | | | | h=42 | | |
+-------+ +-------+ +-------+ +-------+
^
insert here
Step 3
Step 3: Insert key="banana", hash("banana") = 14
hash("banana") = 14
14 % 4 = 2 ← collision! index 2 is occupied, and not same key
Index: 0 1 2 3
+-------+ +-------+ +-------+ +-------+
| empty | | empty | |apple,v| | empty |
| | | | | h=42 | | |
+-------+ +-------+ +-------+ +-------+
^
occupied, check next
Step 4
Step 4: Linear probing - check next bucket (index 3)
Index 2 is full, try (2+1) % 4 = 3
Index: 0 1 2 3
+-------+ +-------+ +-------+ +-------+
| empty | | empty | |apple,v| |banana,v|
| | | | | h=42 | | h=14 |
+-------+ +-------+ +-------+ +-------+
^
insert here
Step 5
Step 5: Insert key="cherry", hash("cherry") = 10
hash("cherry") = 10
10 % 4 = 2 ← collision again!
Check index 2: occupied (apple), not (cherry)
Check index 3: occupied (banana), not (cherry)
Check index 0: empty! ← wrap around and insert
Index: 0 1 2 3
+-------+ +-------+ +-------+ +-------+
|cherry,v| | empty | |apple,v| |banana,v|
| h=10 | | | | h=42 | | h=14 |
+-------+ +-------+ +-------+ +-------+
^
insert here after wrapping around
Searching for a key
Current state of hash map:
Index: 0 1 2 3
+-------+ +-------+ +-------+ +-------+
|cherry,v| | empty | |apple,v| |banana,v|
| h=10 | | | | h=42 | | h=14 |
+-------+ +-------+ +-------+ +-------+
Step 1
Step 1: Search for key="cherry"
hash("cherry") = 10
10 % 4 = 2 ← start searching at index 2
Index: 0 1 2 3
+-------+ +-------+ +-------+ +-------+
|cherry,v| | empty | |apple,v| |banana,v|
| h=10 | | | | h=42 | | h=14 |
+-------+ +-------+ +-------+ +-------+
^
check here first
Step 2
Step 2: Check index 2
Index 2: key = "apple" ≠ "cherry"
bucket occupied, continue probing
Index: 0 1 2 3
+-------+ +-------+ +-------+ +-------+
|cherry,v| | empty | |apple,v| |banana,v|
| h=10 | | | | h=42 | | h=14 |
+-------+ +-------+ +-------+ +-------+
^
not found, try next
Step 3
Step 3: Check index 3 (next probe)
Index 3: key = "banana" ≠ "cherry"
bucket occupied, continue probing
Index: 0 1 2 3
+-------+ +-------+ +-------+ +-------+
|cherry,v| | empty | |apple,v| |banana,v|
| h=10 | | | | h=42 | | h=14 |
+-------+ +-------+ +-------+ +-------+
^
not found, try next
Step 4
Step 4: Check index 0 (wrap around)
Index 0: key = "cherry" = "cherry" ✓
FOUND! Return value
Index: 0 1 2 3
+-------+ +-------+ +-------+ +-------+
|cherry,v| | empty | |apple,v| |banana,v|
| h=10 | | | | h=42 | | h=14 |
+-------+ +-------+ +-------+ +-------+
^
FOUND: return value v
Key point: Linear probing continues until we either:
- Find a matching key (success)
- Find an empty bucket (key doesn't exist)
- Check all buckets (hash map is full)
What is worse case scenario?
-
All keys map to the same bucket.
-
We have to check all buckets to find the key.
-
This is time complexity.
-
This is the worst case scenario for linear probing.
What is the average case scenario?
-
Each bucket has 1 key.
-
We have to check about 1 bucket to find the key.
-
This is time complexity.
-
This is the average case scenario for linear probing.
Growing the collection: amortization
Keep track of the number of filled entries.
When the number of keys
- Double
- Pick new hash function
- Move the information
Adversarial data
-
Could create lots of collisions
-
Potential basis for denial of service attacks
What makes a good hash function?
- Uniform distribution of inputs to the buckets available!!!
- Consistent hashing adds the property that not too many things move around when the number of buckets changes
http://www.partow.net/programming/hashfunctions/index.html https://en.wikipedia.org/wiki/Consistent_hashing https://doc.rust-lang.org/std/collections/struct.HashMap.html
To Dig Deeper (Optional)
Clone, inspect and debug/single-step through a simple implementation that supports creation, insert, get and remove.
See how index is found from hashing the key.
See how collision is handled.
Hashing with custom types in Rust
How do we use custom datatypes as keys?
Required for hashing:
- check if
Kequal - compute a hash function for elements of
K
#![allow(unused)] fn main() { use std::collections::HashMap; struct Point { x:i64, y:i64, } let point = Point{x:2,y:-1}; let mut elevation = HashMap::new(); elevation.insert(point,2.3); }
Most importantly:
[E0277] Error: the trait bound `Point: Eq` is not satisfied
[E0277] Error: the trait bound `Point: Hash` is not satisfied
Required traits for custom types
In order for a data structure to work as a key for hashmap, they need three traits:
PartialEq(required byEq)- ✅ Symmetry: If a == b, then b == a.
- ✅ Transitivity: If a == b and b == c, then a == c.
- ❌ Reflexivity is NOT guaranteed (because e.g. NaN != NaN in floats).
Eq- ✅ Reflexivity: a == a is always true.
- ✅ Symmetry: If a == b, then b == a.
- ✅ Transitivity: If a == b and b == c, then a == c.
Hash- Supports deterministic output of a hash function
- Consistency with Equality -- if two values are equal , then their hashes are equal
- Non-Invertibility -- One way. You cannot reconstruct the original value from the hash
- etc...
Default implementation
EqandPartialEqare automatically derived for most types.
#![allow(unused)] fn main() { use std::collections::HashMap; #[derive(Debug,Hash,Eq,PartialEq)] struct DistanceKM(u64); let mut tired = HashMap::new(); tired.insert(DistanceKM(30),true); println!("{:?}", tired); }
Reminder: All the traits that you can automatically derive from
- Clone: Allow user to make an explicit copy
- Copy: Allow user to make an implicit copy
- Debug: Allow user to print contents
- Default: Allow user to initialize with default values (Default::default())
- Hash: Allow user to use it as a key to a hash map or set.
- Eq: Allow user to test for equality
- Ord: Allow user to sort and fully order types
- PartialEq: Obeys most rules for equality but not all
- PartialOrd: Obeys most rules for ordering but not all
HashSet<K>
"A HashMap without values"
- No value associated with keys
- Just a set of items
- Same implementation
- Fastest way to do membership tests and some set operations
Creating a HashSet
- Create:
HashSet::new() .insert(),.is_empty(),.contains()
#![allow(unused)] fn main() { use std::collections::HashSet; // create let mut covid = HashSet::new(); println!("Is empty: {}", covid.is_empty()); // insert values for i in 2019..=2022 { covid.insert(i); }; println!("Is empty: {}", covid.is_empty()); println!("Contains 2019: {}", covid.contains(&2019)); println!("Contains 2015: {}", covid.contains(&2015)); }
Growing the collection: amortization
- Let's monitor the length and capacity as we insert values.
#![allow(unused)] fn main() { use std::collections::HashSet; // create let mut covid = HashSet::new(); println!("Length: {}, Capacity: {}", covid.len(), covid.capacity()); println!("Is empty: {}", covid.is_empty()); // insert values for i in 2019..=2022 { covid.insert(i); println!("Length: {}, Capacity: {}", covid.len(), covid.capacity()); }; println!("Length: {}, Capacity: {}", covid.len(), covid.capacity()); println!("Is empty: {}", covid.is_empty()); }
- More expensive than growing a
Vecbecause we need to rehash all the elements.
Iterating over a HashSet
You can iterate over a HashSet with a for loop.
#![allow(unused)] fn main() { use std::collections::HashSet; // create let mut covid = HashSet::new(); // insert values for i in 2019..=2022 { covid.insert(i); }; // use the implicit iterator for year in &covid { print!("{} ",year); } println!(); // use the explicit iterator for year in covid.iter() { print!("{} ",year); } println!(); }
Question: Why aren't the years in the order we inserted them?
Using .get() and .insert()
We can use .get() and .insert(), similarly to how we used them in HashMaps.
#![allow(unused)] fn main() { use std::collections::HashSet; // create let mut covid = HashSet::new(); // insert values for i in 2019..=2022 { covid.insert(i); }; // Returns `None` if not in the HashSet println!("{:?}", covid.get(&2015)); println!("{:?}", covid.get(&2021)); covid.insert(2015); // insert 2015 if not present covid.insert(2020); // insert 2020 if not present // iterate over the set for year in &covid { print!("{} ",year); } }
Summary of Useful HashSet Methods
Basic Operations:
new(): Creates an empty HashSet.insert(value): Adds a value to the set. Returns true if the value was not present, false otherwise.remove(value): Removes a value from the set. Returns true if the value was present, false otherwise.contains(value): Checks if the set contains a specific value. Returns true if present, false otherwise.len(): Returns the number of elements in the set.is_empty(): Checks if the set contains no elements.clear(): Removes all elements from the set.drain(): Returns an iterator that removes all elements and yields them. The set becomes empty after this operation.
Entry API:
entry(value).or_insert(value): Returns a mutable reference to the value in the set, if any, that is equal to the given value. If the value is not present, inserts the given value and returns a mutable reference to the new value.
Set Operations:
union(&self, other: &HashSet<T>): Returns an iterator over the elements that are in self or other (or both).intersection(&self, other: &HashSet<T>): Returns an iterator over the elements that are in both self and other.difference(&self, other: &HashSet<T>): Returns an iterator over the elements that are in self but not in other.symmetric_difference(&self, other: &HashSet<T>): Returns an iterator over the elements that are in self or other, but not in both.is_subset(&self, other: &HashSet<T>): Checks if self is a subset of other.is_superset(&self, other: &HashSet<T>): Checks if self is a superset of other.is_disjoint(&self, other: &HashSet<T>): Checks if self has no elements in common with other.
Iterators and Views:
iter(): Returns an immutable iterator over the elements in the set.get(value): Returns a reference to the value in the set, if any, that is equal to the given value.
See the documentation for more details.
In-Class Exercise 1: Word Frequency Counter
Task: Create a HashMap that counts the frequency of each word in the following sentence:
"rust is awesome rust is fast rust is safe"Your code should:
- Split the sentence into words. (Hint: Use
.split_whitespace()on your string and iterate over the result.) - Count how many times each word appears using a HashMap
- Print each word and its frequency
Hint: Use .entry(key).or_insert(value), which returns a mutable reference to the value in the map, to initialize or increment counts.
Expected Output:
rust: 3
is: 3
awesome: 1
fast: 1
safe: 1
In-Class Exercise 2: Programming Languages Analysis
Task: Two developers list their known programming languages. Create two HashSets and perform set operations to analyze their skills.
Developer 1 knows: Rust, Python, JavaScript, C++, Go Developer 2 knows: Python, Java, JavaScript, Ruby, Go
Your code should find and print:
- Languages both developers know (intersection)
- Languages unique to Developer 1 (difference)
- All languages known by at least one developer (union)
- Languages known by exactly one developer (symmetric difference)
Hint: Create two HashSets and use set operations methods shown earlier.
Solutions will be added here after class.
Linked Lists in Rust
About This Module
This module explores linked list data structures in Rust, covering both the theoretical concepts and practical implementation challenges. Students will learn about different types of linked lists (singly and doubly linked), understand their computational complexity, and discover why implementing linked lists in Rust requires careful consideration of ownership rules. The module compares various implementation approaches and discusses when to use linked lists versus other data structures.
Prework
Before this lecture, please read:
- The Rust Book Chapter 15.1: "Using Box
to Point to Data on the Heap" - https://doc.rust-lang.org/book/ch15-01-box.html - The Rust Book Chapter 15.2: "Treating Smart Pointers Like Regular References with Deref" - https://doc.rust-lang.org/book/ch15-02-deref.html
- Learning Rust With Entirely Too Many Linked Lists - https://rust-unofficial.github.io/too-many-lists/ (Introduction and Chapter 1)
Pre-lecture Reflections
- Why can't you implement a recursive data structure directly in Rust without using
Box<T>? - What are the memory layout differences between arrays and linked lists?
- How do ownership rules affect pointer-based data structures in Rust?
Learning Objectives
By the end of this lecture, you should be able to:
- Understand the structure and operations of linked lists
- Analyze the computational complexity of linked list operations
- Implement basic linked lists in Rust using
Box<T>and proper ownership patterns - Compare the performance characteristics of different linked list variants
- Choose appropriate data structures based on access patterns and performance requirements
What is a linked list?
- A recursive data structure
- Simplest version is a single pointer (head) that points to the first element in the list
- Each list element contains some data and a pointer to the next element in the list
- A special pointer value (None) used to indicate the end of the list
- If first == None then the list is empty

An implementation using Box (Optional)
This is optional, but here is an example of how to implement a linked list using Box<T>.
Box<T>is a smart pointer that allocates data on the heap. See the Rust Language Book for more details.
//=============================== // Node struct and method //=============================== // Define a node that contains a value and a pointer to the next node. #[derive(Debug)] struct Node<T> { value: T, next: Option<Box<Node<T>>>, } // Implement a new method for the node. impl<T> Node<T> { fn new(value: T) -> Self { Node { value, next: None } } } //=============================== // List struct and methods //=============================== // Then to implement a linked list, we need to define a type that contains a pointer to the first node. #[derive(Debug)] struct List<T> { head: Option<Box<Node<T>>>, } // Then we can implement methods to add and remove nodes from the list. impl<T> List<T> { fn new() -> Self { List { head: None } } fn push(&mut self, value: T) { let mut new_node = Box::new(Node::new(value)); new_node.next = self.head.take(); self.head = Some(new_node); } // There's a lot packed into this function, but at a high level, it takes // the node that the head points to, replaces head with the next node and // drops what the head previously pointed to. fn pop(&mut self) -> Option<T> { self.head.take().map(|node| { self.head = node.next; node.value }) } } //Then we can use the list to add and remove nodes. fn main() { let mut list = List::<&str>::new(); println!("{:?}", list); list.push("Charlie"); println!("{:?}", list); list.push("Bob"); println!("{:?}", list); list.push("Alice"); println!("{:?}", list); println!("{:?}", list.pop()); println!("{:?}", list.pop()); println!("{:?}", list.pop()); println!("{:?}", list.pop()); }
Inserting and Removing from the beginning of the list
Assume you have a new list element "John". How do you add it to the list?
new "John"
"John".next = *head
head = "John"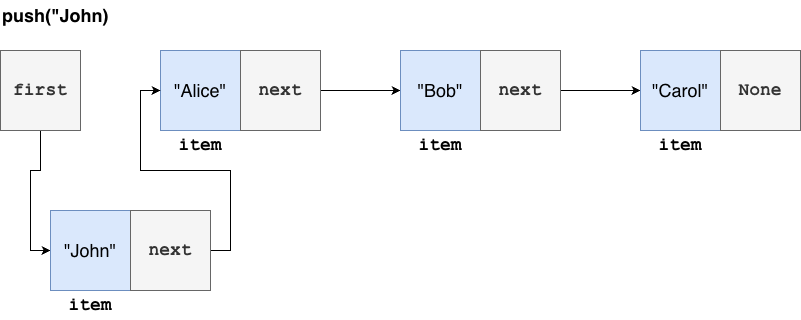
How about getting an element out of the list?
item = head
head = item.next
item.next = None
return item
Common optimization for lists
- Doubly linked list
- Tail pointer

Cost of list operations
- Insert to Front: (SLL O(1), DLL O(1))
- Remove from Front (SLL O(1), DLL O(1))
- Insert to Back (SLL O(N), DLL O(1))
- Remove from Back (SLL O(N), DLL O(1))
- Insert to Middle (SLL O(N), DLL O(N))
- Remove from Middle (SLL O(N), DLL O(N))
Rust's LinkedList
Rust provides a doubly-linked list in the standard library.
use std::collections::LinkedList; fn main() { let mut list = LinkedList::from(["Alice", "Bob", "Charlie"]); println!("{:?}", list); list.push_front("John"); println!("{:?}", list); list.push_back("Donna"); println!("{:?}", list); list.pop_front(); println!("{:?}", list); list.pop_back(); println!("{:?}", list); }
Summary of Useful LinkedList Methods
push_front(value): Adds a value to the front of the list.push_back(value): Adds a value to the back of the list.pop_front(): Removes and returns the value from the front of the list.pop_back(): Removes and returns the value from the back of the list.front(): Returns a reference to the value at the front of the list.back(): Returns a reference to the value at the back of the list.len(): Returns the number of elements in the list.is_empty(): Returns true if the list is empty, false otherwise.clear(): Removes all elements from the list.drain(): Returns an iterator that removes all elements and yields them. The list becomes empty after this operation.
See the documentation for more details.
Don't use LinkedList!
Warning from the Rust documentation on LinkedList:
NOTE: It is almost always better to use Vec or VecDeque because array-based containers are generally faster, more memory efficient, and make better use of CPU cache.
We'll see VecDeque in a later lecture.
Moving on...
In-Class Poll
True or False:
- In a singly linked list, inserting a new element at the front is an O(1) operation.
- A linked list stores its elements in contiguous memory locations, just like a
Vec. - Accessing the element at an arbitrary index
iin a linked list is O(1), the same as indexing into an array orVec. - Removing an element from the back of a singly linked list is O(1), but O(N) for a doubly linked list.
- The Rust standard library's
LinkedListis a doubly-linked list, but the documentation recommends usingVecorVecDequein most cases.
Recap
- Linked lists are a recursive data structure
- They are not contiguous in memory, and poor processor cache utilization
- Simple to access the beginning or end
Stack Data Structure in Rust
About This Module
This module introduces the stack data structure, a fundamental Last-In-First-Out (LIFO) container. Students will learn about stack operations, computational complexity, and multiple implementation strategies using both linked lists and vectors. The module explores the trade-offs between different implementations and demonstrates practical applications of stacks in programming and data science.
Prework
Before this lecture, please read:
- (Review) The Rust Book Chapter 8.1: "Storing Lists of Values with Vectors" - https://doc.rust-lang.org/book/ch08-01-vectors.html
- (Review) Rust std::collections documentation - https://doc.rust-lang.org/std/collections/index.html
Pre-lecture Reflections
- What are some real-world examples where LIFO behavior is useful?
- How might stack implementation affect performance in different scenarios?
- What are the memory layout differences between stack implementations using vectors vs. linked lists?
Learning Objectives
By the end of this lecture, you should be able to:
- Understand the LIFO principle and stack operations
- Implement stacks using different underlying data structures
- Analyze the computational complexity of stack operations
- Compare performance characteristics of vector-based vs. linked list-based stacks
- Choose appropriate stack implementations based on use case requirements
Stacks
- A Stack is a container of objects that are inserted and removed according the LIFO (Last In First Out) principle
- Insertions are known as "Push" operations while removals are known as "Pop" operations

Universal Stack Operations
Stack operations would be along the lines of:
- push(object): Insert object onto top of stack. Input: object, Output: none
- pop(): Remove top object from stack and return it. Input: none, Output: object
- size(): Number of objects in stack
- isEmpty(): Return boolean indicated if stack is empty
- top() or peek(): Return a reference to top object in the stack without removing it
Question: Which Rust data structure could we use to implement a stack?
Computational complexity of Stack operations
Assume we are using a singly (or doubly) linked list
- Push: O(1)
- Pop: O(1)
- Size: O(1) (keep an auxiliary counter)
- isEmpty: O(1)
- top: O(1)
Using Vectors to implement a stack
- Implementing a stack using a vector is straightforward.
- We can build on
Vec<T>methods.
#![allow(unused)] fn main() { #[derive(Debug)] pub struct Stack<T> { v: Vec<T>, } impl <T> Stack<T> { pub fn new() -> Self { Stack {v : Vec::new() } } pub fn push(&mut self, obj:T) { self.v.push(obj) } pub fn pop(&mut self) -> Option<T> { return self.v.pop(); } pub fn size(&mut self) -> usize { return self.v.len(); } pub fn isEmpty(&mut self) -> bool { return self.v.len() == 0; } pub fn top(&mut self) -> Option<&T> { return self.v.last() } } }
Using our stack implementation
Now let's use it!
#[derive(Debug)] pub struct Stack<T> { v: Vec<T>, } impl <T> Stack<T> { pub fn new() -> Self { Stack {v : Vec::new() } } pub fn push(&mut self, obj:T) { self.v.push(obj) } pub fn pop(&mut self) -> Option<T> { return self.v.pop(); } pub fn size(&mut self) -> usize { return self.v.len(); } pub fn isEmpty(&mut self) -> bool { return self.v.len() == 0; } pub fn top(&mut self) -> Option<&T> { return self.v.last() } } fn main() { let mut s: Stack<i32> = Stack::new(); println!("Pushing 13, 11, and 9\n"); s.push(13); s.push(11); s.push(9); println!("size: {}", s.size()); println!("isEmpty: {}", s.isEmpty()); println!("\ntop: {:?}", s.top()); println!("pop: {:?}", s.pop()); println!("size: {}", s.size()); println!("\ntop: {:?}", s.top()); println!("pop: {:?}", s.pop()); println!("size: {}", s.size()); println!("\ntop: {:?}", s.top()); println!("pop: {:?}", s.pop()); println!("size: {}", s.size()); println!("isEmpty: {}", s.isEmpty()); println!("\ntop: {:?}", s.top()); println!("pop: {:?}", s.pop()); }
Which implementation is better: LinkedList or Vec?
- Computation complexity is the same for both (at least on average)
- The Vector implementation has the occasional long operation which may be undesirable in a real-time system
BUT the most important consideration is spatial locality of reference.
- In a vector objects will be contiguous in memory so accessing one will fetch its neighbors into the cache for faster access
- In the linked list version each object is allocated independently so their placement in memory is unclear
In-Class Poll
True or False:
- In a stack, the most recently added element is the first one to be removed.
- The pop() operation on a stack has O(n) time complexity when using a singly linked list implementation.
- A vector-based stack implementation may occasionally have long operations due to resizing.
- The top() or peek() operation removes the top element from the stack.
- Vector-based stacks generally have better spatial locality of reference than linked list-based stacks.
Recap
- Stacks are a fundamental data structure
- They are implemented using a vector or a linked list
- They are a Last-In-First-Out (LIFO) data structure
Queue Data Structure in Rust
About This Module
This module explores queue data structures, which follow the First-In-First-Out (FIFO) principle. Students will learn about queue operations, various implementation strategies, and the trade-offs between different approaches. The module covers both custom implementations and Rust's standard library VecDeque, with a focus on performance considerations and practical applications in data processing and algorithms.
Prework
Before this lecture, please read:
- The Rust Book Chapter 8.1: "Storing Lists of Values with Vectors" - https://doc.rust-lang.org/book/ch08-01-vectors.html
- Rust std::collections::VecDeque documentation - https://doc.rust-lang.org/std/collections/struct.VecDeque.html
- The Rust Book Chapter 4: "Understanding Ownership" - https://doc.rust-lang.org/book/ch04-00-understanding-ownership.html (review for clone operations)
Pre-lecture Reflections
- What are some real-world scenarios where FIFO ordering is essential?
- Why might using a
Vecwithremove(0)be problematic for queue operations? - How does memory layout affect performance in different queue implementations?
Learning Objectives
By the end of this lecture, you should be able to:
- Understand the FIFO principle and queue operations
- Implement queues using different underlying data structures
- Analyze performance trade-offs between queue implementations
- Use Rust's
VecDequeeffectively for both stack and queue operations - Choose appropriate data structures based on access patterns and performance requirements
Queues

Queue:
- FIFO: first in first out
- add items at the end
- get items from the front
Question: Why is it problematic to use Vec as a Queue?
Generic Queue operations
Warning: This is not Rust syntax.
- enqueue(object): Insert object at the end of the queue. Input: object, Output: none
- dequeue(): Remove an object from the front of the queue and return it. Input: none, Output: object
- size(): Number of objects in queue
- isEmpty(): Return boolean indicated if queue is empty
- front(): Return a reference to front object in the queue without removing it
Queue Complexity using Singly Linked List?
- Remember in a singly linked list the most recent element is first pointer while the oldest is at the tail end of the list
- Adding a queue element O(1)
- Removing a queue element requires list traversal so O(n)
You can do better with doubly linked lists and tail pointer
Assume first points to most recently added element and last to oldest element
- Adding a queue element still O(1)
- Removing the older element O(1)
- But the memory fragmentation issues persist
The VecDeque container in Rust
The Deque in then name means double-ended queue.
- generalization of queue and stack
- accessing front: methods
push_front(x)andpop_front() - accessing back: methods
push_back(x)andpop_back() pop_frontandpop_backreturnOption<T>
Using VecDeque as a Stack
Use push_back and pop_back
#![allow(unused)] fn main() { use std::collections::VecDeque; // using as a stack: push_back & pop_back let mut stack = VecDeque::new(); stack.push_back(1); stack.push_back(2); stack.push_back(3); println!("{:?}",stack.pop_back()); println!("{:?}",stack.pop_back()); stack.push_back(4); stack.push_back(5); println!("{:?}",stack.pop_back()); }
Using VecDeque as a Queue
#![allow(unused)] fn main() { use std::collections::VecDeque; // using as a queue: push_back & pop_front let mut queue = VecDeque::new(); queue.push_back(1); queue.push_back(2); queue.push_back(3); println!("{:?}",queue.pop_front()); println!("{:?}",queue.pop_front()); queue.push_back(4); queue.push_back(5); println!("{:?}",queue.pop_front()); }
VecDeque operation semantics
- push_back + pop_back (Stack Behavior)
- push_front + pop_front (Stack Behavior)
- push_back + pop_front (Queue Behavior)
- push_front + pop_back (Queue Behavior)
Implementation of VecDeque
- use an array allocated on the heap
- think of it as a circular buffer
- keep index of the front filled item and the last filled item
- wrap around
Out of space?
- double the size
- good complexity due to amortization
Here's an animation of a circular buffer for a keyboard, but it's the same concept for a VecDeque.
See Wikipedia: Circular Buffer for more details.
Priority Queues (for a later lecture)

In-Class Poll
True or False:
- In a queue data structure, the first element added is the first element removed (FIFO principle).
- When using a singly linked list to implement a queue, both enqueue and dequeue operations can be performed in O(1) time complexity.
- Rust's
VecDequecan function as both a stack and a queue depending on which methods you use. - To use a
VecDequeas a queue, you should usepush_back()to add elements andpop_back()to remove elements. VecDequeis implemented using a doubly linked list that grows by 1 as needed.
Recap
- Queues follow the First-In-First-Out (FIFO) principle: add at the back, remove from the front
- Using a
Vecas a queue is problematic becauseremove(0)is O(n); a singly linked list also gives O(n) dequeue - A doubly linked list with a tail pointer achieves O(1) enqueue and dequeue, but suffers from memory fragmentation and poor cache locality
- Rust's
VecDequeis a double-ended queue implemented as a heap-allocated circular buffer that doubles in size when full (amortized O(1)) VecDequecan act as a stack (push_back/pop_back) or a queue (push_back/pop_front), withpop_*returningOption<T>- Choose your data structure based on access patterns and performance requirements —
VecDequeis usually the right default for queues in Rust
Entry API and Collections Deep Dive
About This Module
This module is a deep dive into Rust's standard collections beyond Vec and HashMap. It starts with the Entry API for efficient, single-lookup updates and grouping patterns, then introduces BTreeMap and BTreeSet for sorted iteration, range queries, and applications like histograms and nearest-neighbor lookups. It closes with BinaryHeap for priority queues (including min-heap via Reverse), plus a recap of when to reach for each collection and their operation costs.
Prework
Prework Reading
Please read the following:
- The Rust Book: HashMap
- Review Entry API section
- Rust Collections
Pre-lecture Reflections
- What's the difference between using
.get()then.insert()vs using the Entry API? - When would you want keys to be sorted (BTreeMap) vs unsorted (HashMap)?
- Why can't
f64be used directly as a HashMap/BTreeMap key?
Learning Objectives
By the end of this module, you will be able to:
- Use the Entry API to efficiently update collections without double lookups
- Choose between HashMap and BTreeMap based on requirements
- Use BTreeMap for ordered data, range queries, and percentile calculations
Part 1: Mastering the Entry API
The Double-Lookup Problem
A common pattern when updating HashMaps:
#![allow(unused)] fn main() { use std::collections::HashMap; fn count_words_inefficient(text: &str) -> HashMap<String, usize> { let mut counts = HashMap::new(); for word in text.split_whitespace() { // DON'T: This does TWO lookups! if counts.contains_key(word) { let count = counts.get_mut(word).unwrap(); *count += 1; } else { counts.insert(word.to_string(), 1); } } counts } let result = count_words_inefficient("rust is awesome rust is fast"); println!("{:?}", result); }
Problem: We look up the key twice - once to check, once to modify.
The Entry API Solution
#![allow(unused)] fn main() { use std::collections::HashMap; fn count_words_efficient(text: &str) -> HashMap<String, usize> { let mut counts = HashMap::new(); for word in text.split_whitespace() { // DO: Single lookup with Entry API! *counts.entry(word.to_string()).or_insert(0) += 1; } counts } let result = count_words_efficient("rust is awesome rust is fast"); println!("{:?}", result); }
Understanding Entry
The .entry() method returns an Entry enum:
#![allow(unused)] fn main() { use std::collections::HashMap; let mut map: HashMap<&str, i32> = HashMap::new(); println!("{:?}", map.entry("key")); // Entry can be Occupied or Vacant match map.entry("key") { std::collections::hash_map::Entry::Occupied(entry) => { println!("Key exists with value: {}", entry.get()); } std::collections::hash_map::Entry::Vacant(entry) => { println!("Key doesn't exist, inserting..."); entry.insert(42); // returns the previous value if the key was already present } } println!("{:?}", map.entry("key")); }
Entry API Methods
entry: Returns anEntryenum, which can be eitherOccupiedorVacantinsert: Inserts a value into the map, returning the previous value if the key was already present, or the inserted value if the key was not presentor_insert: Insert default if vacant, return mutable referenceor_insert_with: Insert computed value if vacant (lazy evaluation)or_default: Insert Default::default() if vacant, e.g. 0 for i32, "" for String, etc. (types with Default trait)and_modify: Modify existing value, or insert default
#![allow(unused)] fn main() { use std::collections::HashMap; let mut scores: HashMap<String, Vec<i32>> = HashMap::new(); // or_insert: Insert default if vacant, return mutable reference scores.entry("Alice".to_string()).or_insert(vec![]).push(95); scores.entry("Alice".to_string()).or_insert(vec![]).push(87); // or_insert_with: Insert computed value if vacant (lazy evaluation) scores.entry("Bob".to_string()).or_insert_with(|| { println!("Computing default for Bob..."); vec![100] // This only runs if key is vacant }); // or_default: Insert Default::default() if vacant let mut counts: HashMap<String, usize> = HashMap::new(); *counts.entry("hello".to_string()).or_default() += 1; // and_modify: Modify existing value, or insert default counts.entry("hello".to_string()) .and_modify(|c| *c += 1) .or_insert(1); println!("Scores: {:?}", scores); println!("Counts: {:?}", counts); }
Entry API for Grouping (Split-Apply-Combine)
Perfect for grouping data by categories:
#![allow(unused)] fn main() { use std::collections::HashMap; let data = vec![("A", 10), ("B", 20), ("A", 30), ("B", 40), ("A", 50)]; // Group values by category let mut groups: HashMap<&str, Vec<i32>> = HashMap::new(); for (category, value) in data { groups.entry(category).or_default().push(value); } // Now calculate aggregates per group for (category, values) in &groups { let sum: i32 = values.iter().sum(); let mean = sum as f64 / values.len() as f64; println!("{}: values={:?}, sum={}, mean={:.1}", category, values, sum, mean); } }
Entry API Works with BTreeMap Too!
#![allow(unused)] fn main() { use std::collections::BTreeMap; let mut sorted_counts: BTreeMap<String, usize> = BTreeMap::new(); for word in "rust is awesome rust is fast".split_whitespace() { *sorted_counts.entry(word.to_string()).or_insert(0) += 1; } // BTreeMap iterates in sorted key order! for (word, count) in &sorted_counts { println!("{}: {}", word, count); } }
Part 2: BTreeMap for Ordered Data
Meet BTreeMap
BTreeMap<K, V> is Rust's ordered map:
- like a
HashMap, it stores key-value pairs, - but it always keeps its keys in sorted order.
#![allow(unused)] fn main() { use std::collections::BTreeMap; let mut populations: BTreeMap<&str, u32> = BTreeMap::new(); populations.insert("Boston", 650_000); populations.insert("Austin", 975_000); populations.insert("Seattle", 750_000); for (city, pop) in &populations { println!("{city}: {pop}"); } }
Output (note: alphabetical, regardless of insertion order):
- Keys must implement
Ord(they can be compared), notHash. - Same familiar API as
HashMap:insert,get,remove,entry, ... - Plus extras that only make sense when data is ordered:
range,first_key_value,last_key_value.
How is it Ordered? (A Peek Under the Hood)
A HashMap spreads keys across buckets using a hash function — fast, but the
order is effectively random.
A BTreeMap instead stores keys in a B-tree: a balanced, sorted tree
structure. That's where the name comes from.
HashMap (unordered buckets): BTreeMap (sorted B-tree):
┌─────┬─────┬─────┬─────┐ [ M ]
│ ... │ Bos │ ... │ Aus │ / \
└─────┴─────┴─────┴─────┘ [A,B] [S,T]
hash(key) → bucket sorted keys in each node
Practical consequences:
- Insertions and lookups cost
O(log n)instead ofO(1)— still very fast, but slightly slower thanHashMapfor pure point lookups. - Iteration, range queries, and min/max are cheap because the data is already sorted.
HashMap vs BTreeMap
| Feature | HashMap | BTreeMap |
|---|---|---|
| Lookup | O(1) | O(log n) |
| Insert/Delete | O(1) | O(log n) |
| Iteration order | Random | Sorted by key |
| Range queries | ❌ Not supported | ✅ Supported |
| Key requirement | Hash + Eq | Ord |
| Memory | Less predictable | More predictable |
- In HashMaps, memory growth is spiky, requiring rehashing and reallocation of 2X memory.
- In BTreeMaps, memory growth is smoother, allocating new compound nodes as needed.
- By storing multiple keys in each node, BTreeMaps have better cache locality than simple binary trees.
When to Use BTreeMap
Use BTreeMap when you need:
- Sorted iteration over keys
- Range queries (get all keys between X and Y)
- Min/max key operations
- Percentile calculations
- Keys that don't implement
Hash
BTreeMap: Sorted Iteration
#![allow(unused)] fn main() { use std::collections::BTreeMap; let mut temps: BTreeMap<u32, f64> = BTreeMap::new(); temps.insert(2020, 14.9); temps.insert(2018, 14.7); temps.insert(2022, 15.1); temps.insert(2019, 14.8); temps.insert(2021, 15.0); // Iteration is always in sorted order by key! println!("Global temperatures by year:"); for (year, temp) in &temps { println!(" {}: {:.1}°C", year, temp); } // First and last entries println!("\nFirst: {:?}", temps.first_key_value()); println!("Last: {:?}", temps.last_key_value()); }
Note the order of years inserted and the order from the iteration.
BTreeMap: Range Queries
One of BTreeMap's killer features:
#![allow(unused)] fn main() { use std::collections::BTreeMap; use std::ops::Bound; let mut events: BTreeMap<u64, String> = BTreeMap::new(); events.insert(100, "Login".to_string()); events.insert(150, "View page".to_string()); events.insert(200, "Click button".to_string()); events.insert(250, "Submit form".to_string()); events.insert(300, "Logout".to_string()); // Get events in time range [150, 250] println!("Events from 150-250:"); for (time, event) in events.range(150..=250) { println!(" t={}: {}", time, event); } // Events before time 200 println!("\nEvents before 200:"); for (time, event) in events.range(..200) { println!(" t={}: {}", time, event); } // Using Bound for more control use std::ops::Bound::{Included, Excluded}; println!("\nEvents in (150, 300):"); for (time, event) in events.range((Excluded(150), Excluded(300))) { println!(" t={}: {}", time, event); } }
BTreeMap for Histogram Bins
A histogram groups numeric values into fixed-width bins and counts how many values fall into each bin.
Why BTreeMap<i64, usize> is a natural fit:
- Key = bin index (an integer we compute from
value / bin_widthand throw away the fractional part). - Value = count of values in that bin.
- Bins are displayed in order from smallest to largest — free with BTreeMap.
- The Entry API makes the "increment this bin's counter" step a one-liner.
We'll build this up as an in-class exercise on the next slides.
For example, for data:
[1.2, 2.5, 2.7, 3.1, 3.8, 4.2, 4.5, 5.0, 5.5]
bin_width = 1.0
the output should be:
Histogram (bin_width=1.0):
[1.0, 2.0): * 1
[2.0, 3.0): ** 2
[3.0, 4.0): ** 2
[4.0, 5.0): ** 2
[5.0, 6.0): ** 2
In-Class Exercise: Build a Histogram with BTreeMap
Task: Bin a set of floating-point values into integer-indexed buckets and print the histogram in sorted order.
Use Rust Playground or VSCode to develop your solution. We'll build it in three small steps.
Step 1: Compute the Bin Index
Given a value and a bin width, which bin does it fall into?
The bin index is the largest integer b such that b * bin_width <= value.
Hint: Solve for b in the inequality b * bin_width <= value.
fn bin_index(value: f64, bin_width: f64) -> i64 {
// TODO: return the bin index for `value`
todo!()
}
fn main() {
// Quick checks
assert_eq!(bin_index(2.7, 1.0), 2);
assert_eq!(bin_index(4.5, 2.0), 2); // bin [4.0, 6.0)
assert_eq!(bin_index(-0.3, 1.0), -1); // negatives round down
println!("Step 1 OK");
}Step 2: Count Values per Bin
Use a BTreeMap<i64, usize> and the Entry API to count how many values
land in each bin. No if contains_key — one line per value.
use std::collections::BTreeMap;
fn bin_index(value: f64, bin_width: f64) -> i64 {
// TODO: replace with your solution from Step 1
todo!()
}
fn build_histogram(data: &[f64], bin_width: f64) -> BTreeMap<i64, usize> {
let mut bins: BTreeMap<i64, usize> = BTreeMap::new();
// TODO: use a for loop to iterate over each value in data, and
// use bin_index to get the bin index for the value, and increment the count for that bin.
// Hint: use bins.entry(..).or_insert(0) to get the count for the bin, and increment it.
todo!()
bins
}
fn main() {
let data = vec![1.2, 2.5, 2.7, 3.1, 3.8, 4.2, 4.5, 5.0, 5.5];
let hist = build_histogram(&data, 1.0);
println!("{:?}", hist);
// Expected (note sorted by key):
// {1: 1, 2: 2, 3: 2, 4: 2, 5: 2}
}Step 3: Pretty-Print the Histogram
Iterate the map and print one row per bin with an ASCII bar. Because BTreeMap iterates in sorted key order, rows come out smallest-bin first with no extra sorting step.
use std::collections::BTreeMap;
fn bin_index(value: f64, bin_width: f64) -> i64 { todo!() }
fn build_histogram(_data: &[f64], _bin_width: f64) -> BTreeMap<i64, usize> { todo!() }
fn print_histogram(hist: &BTreeMap<i64, usize>, bin_width: f64) {
println!("Histogram (bin_width={:.1}):", bin_width);
// TODO: for each (bin, count) in hist (in sorted order):
// - compute start = bin as f64 * bin_width
// - compute end = start + bin_width
// - print " [start, end): <bar> <count>"
// Hint: "*".repeat(count) builds the bar.
todo!()
}
fn main() {
let data = vec![1.2, 2.5, 2.7, 3.1, 3.8, 4.2, 4.5, 5.0, 5.5];
let hist = build_histogram(&data, 1.0);
print_histogram(&hist, 1.0);
}Bonus: Rerun your code with bin_width = 0.5. Do the labels and counts
still make sense? What happens to an empty bin in the middle of the range —
does it show up, and should it?
Part 3: BTreeSet for Ordered Sets
BTreeSet<T> is a set of unique values that are sorted.
Example from BTreeSet Documentation
#![allow(unused)] fn main() { use std::collections::BTreeSet; // Type inference lets us omit an explicit type signature (which // would be `BTreeSet<&str>` in this example). let mut books = BTreeSet::new(); // Add some books. books.insert("A Dance With Dragons"); books.insert("To Kill a Mockingbird"); books.insert("The Odyssey"); books.insert("The Great Gatsby"); // Check for a specific one. if !books.contains("The Winds of Winter") { println!("We have {} books, but The Winds of Winter ain't one.", books.len()); } // Remove a book. books.remove("The Odyssey"); // Iterate over everything. for book in &books { println!("{book}"); } }
BTreeSet: Range Queries
- Because a
BTreeSetstores its elements in sorted order, we can ask for every element inside some interval inO(log n + k)time (wherekis the number of items in the range). - One slick use: prefix autocomplete — every
string starting with
"ban"is exactly the range["ban", "bao"), because"bao"is the next string after every possible"ban*"in alphabetical order.
#![allow(unused)] fn main() { use std::collections::BTreeSet; // A tiny dictionary. BTreeSet keeps the words in alphabetical order. let mut dict: BTreeSet<&str> = BTreeSet::new(); for w in ["apple", "app", "apricot", "banana", "band", "bandana", "cat", "caterpillar", "dog", "donut"] { dict.insert(w); } // --- Example 1: autocomplete via a prefix range query --- // Build the exclusive upper bound by bumping the last character: "ban" -> "bao". let start = "ban"; let end = "bao"; // bump the last character println!("Completions for {start:?}:"); for word in dict.range(start..end) { println!(" {word}"); } // --- Example 2: alphabetical "slice" between two words --- println!("\nFrom \"app\" up to (but not including) \"cat\":"); for word in dict.range("app".."cat") { println!(" {word}"); } // --- Example 3: the k smallest / k largest elements --- println!("\n3 smallest: {:?}", dict.iter().take(3).collect::<Vec<_>>()); println!("3 largest: {:?}", dict.iter().rev().take(3).collect::<Vec<_>>()); }
In-Class Exercise: BTreeSet
Task: You have a set of train stations along a line, each at an integer distance marker. You are given a list of rider distances from the start of the line, print the nearest station to each rider.
This is a natural fit for BTreeSet: walk one step left (the largest station
<= q) and one step right (the smallest station >= q), then pick whichever
is closer. With a HashSet you'd have to scan every station.
Hint: set.range(..=q).next_back() gives you the nearest predecessor,
and set.range(q..).next() gives you the nearest successor.
use std::collections::BTreeSet;
fn nearest(stations: &BTreeSet<i32>, q: i32) -> Option<i32> {
// TODO: find the closest station to q.
// 1. Get the nearest predecessor (largest value <= q).
// 2. Get the nearest successor (smallest value >= q).
// 3. Return whichever is closer; ties go to the predecessor.
todo!()
}
fn main() {
let stations: BTreeSet<i32> = BTreeSet::from([5, 12, 20, 33, 50, 75]);
let rider_positions = [0, 10, 17, 40, 100];
for q in rider_positions {
println!("rider at {q:>3} -> nearest station {:?}", nearest(&stations, q));
}
}#![allow(unused)] fn main() { // Expected: // rider at 0 -> nearest station Some(5) // rider at 10 -> nearest station Some(12) // rider at 17 -> nearest station Some(20) // 17-12=5 vs 20-17=3, so 20 wins // rider at 40 -> nearest station Some(33) // rider at 100 -> nearest station Some(75) }
Bonus: What does your function return for an empty BTreeSet? What
changes if the rider is standing exactly at a station?
Part 4: BinaryHeap for Priority Queues
BinaryHeap<T> is a priority queue implemented as a binary heap.
A priority queue is a collection that always returns the largest element first.
Example from BinaryHeap Documentation
#![allow(unused)] fn main() { use std::collections::BinaryHeap; let mut heap = BinaryHeap::new(); heap.push(3); heap.push(1); heap.push(2); println!("{:?}", heap.peek()); }
BinaryHeap: Return Smallest with Reverse
Reverse<T>is a zero-cost wrapper fromstd::cmpthat flips the ordering of its inner value:Reverse(a) < Reverse(b)exactly whena > b.- Since
BinaryHeapalways pops the largest element by itsOrdimplementation, pushingReverse(x)turns it into a min-heap — smallestxcomes out first — without writing a custom comparator.
#![allow(unused)] fn main() { use std::collections::BinaryHeap; use std::cmp::Reverse; let mut heap: BinaryHeap<Reverse<i32>> = BinaryHeap::new(); heap.push(Reverse(3)); heap.push(Reverse(1)); heap.push(Reverse(2)); println!("{:?}", heap.peek()); println!("{:?}", heap.pop()); println!("{:?}", heap.pop()); }
BinaryHeap Example: Top-k in a stream
- Wrap values in
Reverse<T>to turn a max-heap into a min-heap. - Keep only the largest
kitems seen so far inO(k)memory - Fill the heap with the first
kitems - For each subsequent item, if it is larger than the smallest item in the heap, replace the smallest item with the new item
- At the end, the heap will contain the
klargest items in the stream
#![allow(unused)] fn main() { use std::collections::BinaryHeap; use std::cmp::Reverse; let stream = [7, 2, 9, 4, 11, 1, 6, 8, 3, 10, 5]; let k = 3; // Min-heap of size k via Reverse: root = smallest of the current top-k. let mut top_k: BinaryHeap<Reverse<i32>> = BinaryHeap::with_capacity(k); for &x in &stream { if top_k.len() < k { // if the heap is not full, add the item to the heap top_k.push(Reverse(x)); } else if x > top_k.peek().unwrap().0 { // if the item is larger than the smallest item in the heap, replace the smallest item with the new item top_k.pop(); // evict the smallest of the top-k top_k.push(Reverse(x)); } } // print the top k items in the heap in descending order // first iterate over the heap and collect the items into a vector let mut result: Vec<i32> = top_k.into_iter().map(|Reverse(x)| x).collect(); // but the vector is not sorted println!("{:?}", result); // then sort the vector in descending order result.sort_by(|a, b| b.cmp(a)); println!("{:?}", result); }
BinaryHeap In-Class Exercise
Task:
- You're writing triage software for a hospital ER.
- Each arriving patient has a severity score from 1 (minor) to 10 (critical).
- Treat the most-critical patient first;
- if two patients have the same severity, treat whoever arrived earlier.
- Print patients in the order they should be treated.
This is a classic priority-queue problem. The twist is the tie-breaker: we
want highest severity to come out first, but lowest arrival index. We get
both behaviors from one max-heap by pushing a tuple
(severity, Reverse(arrival)) — tuples compare lexicographically, so severity
dominates, and Reverse flips only the arrival component.
Hint: heap.push((sev, Reverse(i), name)); and then
while let Some((sev, Reverse(i), name)) = heap.pop() { ... }.
use std::collections::BinaryHeap;
use std::cmp::Reverse;
fn main() {
let patients = [
(3, "Alice"), (8, "Bob"), (5, "Carol"),
(8, "Dan"), (2, "Eve"), (9, "Frank"),
];
let mut er: BinaryHeap<(u32, Reverse<usize>, &str)> = BinaryHeap::new();
// TODO: push each patient as (severity, Reverse(arrival_index), name).
// Hint: use patients.iter().enumerate() to get arrival_index.
// TODO: pop patients one-by-one and print:
// "treat {name} (severity {sev}, arrival #{arrival})"
}Expected output:
treat Frank (severity 9, arrival #5)
treat Bob (severity 8, arrival #1)
treat Dan (severity 8, arrival #3)
treat Carol (severity 5, arrival #2)
treat Alice (severity 3, arrival #0)
treat Eve (severity 2, arrival #4)
Bonus: What happens if you push (severity, arrival, name) without
Reverse? Try it and explain the tie-breaking for Bob vs. Dan.
Rust's Standard Collection Library Recap
Rust’s collections can be grouped into four major categories:
- Sequences:
Vec,VecDeque,LinkedList - Maps:
HashMap,BTreeMap - Sets:
HashSet,BTreeSet - Misc:
BinaryHeap
We've covered them all now.
When Should You Use Which Collection?
These are fairly high-level and quick break-downs of when each collection should be considered. Detailed discussions of strengths and weaknesses of individual collections can be found on their own documentation pages.
Use a Vec when:
- You want to collect items up to be processed or sent elsewhere later, and don't care about any properties of the actual values being stored.
- You want a sequence of elements in a particular order, and will only be appending to (or near) the end.
- You want a stack.
- You want a resizable array.
- You want a heap-allocated array.
Use a VecDeque when:
- You want a
Vecthat supports efficient insertion at both ends of the sequence. - You want a queue.
- You want a double-ended queue (deque).
Use a LinkedList when:
- You want a
VecorVecDequeof unknown size, and can't tolerate amortization. - You want to efficiently split and append lists.
- You are absolutely certain you really, truly, want a doubly linked list.
Use a HashMap when:
- You want to associate arbitrary keys with an arbitrary value.
- You want a cache.
- You want a map, with no extra functionality.
Use a BTreeMap when:
- You want a map sorted by its keys.
- You want to be able to get a range of entries on-demand.
- You're interested in what the smallest or largest key-value pair is.
- You want to find the largest or smallest key that is smaller or larger than something.
Use the Set variant of any of these Maps when:
- You just want to remember which keys you've seen.
- There is no meaningful value to associate with your keys.
- You just want a set.
Use a BinaryHeap when:
- You want to store a bunch of elements, but only ever want to process the "biggest" or "most important" one at any given time.
- You want a priority queue.
Cost of Collection Operations
| get(i) | insert(i) | remove(i) | |
|---|---|---|---|
Vec | O(1) | O(n-i)* | O(n-i) |
VecDeque | O(1) | O(min(i, n-i))* | O(min(i, n-i)) |
LinkedList | O(min(i, n-i)) | O(min(i, n-i)) | O(min(i, n-i)) |
HashMap | O(1)~ | O(1)~* | O(1)~ |
BTreeMap | O(log(n)) | O(log(n)) | O(log(n)) |
Note that where ties occur, Vec is generally going to be faster than
VecDeque, and VecDeque is generally going to be faster than
LinkedList.
For Sets, all operations have the cost of the equivalent Map operation.
Summary
- The Entry API is a powerful tool for efficiently updating collections
- BTreeMap is a sorted map that is efficient for range queries and ordered iteration
- BTreeSet is a sorted set that is efficient for range queries and ordered iteration
- BinaryHeap is a priority queue that is efficient for finding the smallest or largest element
Spring 2026 Final Exam Review
This page is under construction.
Table of Contents:
Suggested way to use this review material
- The material is organized by major topics.
- For each topic, there are:
- high level overview
- examples
- true/false questions
- find the bug questions
- predict the output questions
- coding challenges
- Try to answer the questions without peeking at the solutions.
- This material focuses on the topics covered in the final third of the course, building on what you learned for midterms 1 and 2.
Exam Format:
See final exam question bank for the exam format.
Preliminaries
The final exam is cumulative but emphasizes the material from the final third of the course. You should be comfortable with:
- Basic Rust syntax (functions, variables, types) (see midterm 1 review)
- Structs, enums, and pattern matching
- Ownership, borrowing, and references
- Generics and traits
- Iterators and closures
See midterm 2 review for more details.
This review focuses on new material: collections (HashMap, HashSet, BTreeMap, VecDeque) and algorithm complexity.
References and Dereferencing
When References Are Created
References are created with &:
#![allow(unused)] fn main() { let x = 5; let r = &x; // r is &i32 let s = "hello"; // s is already &str (string slice) let v = vec![1, 2, 3]; let slice = &v[..]; // slice is &[i32] }
And are common patterns in Rust code. For example, to sum a slice of integers:
#![allow(unused)] fn main() { fn process_ints(ints: &[i32]) -> i32 { let mut sum = 0; for int in ints { sum += *int; } sum } let ints = [1, 2, 3]; println!("sum: {}", process_ints(&ints)); }
When Double References (&&) Occur
Optional -- You won't be penalized on the exam for not getting this exactly correct.
Double references commonly appear when:
Iterating over a slice of references:
#![allow(unused)] fn main() { fn process(words: &[&str]) { for word in words { // word is &&str // Rust auto-dereferences `word: &&str` to `word: &str` print!("word: {}, len: {} ", word, word.len()); } println!(); } let words = vec!["art", "bees"]; process(&words); }
Automatic Dereferencing
Rust automatically dereferences in several situations:
1. Method calls (auto-deref):
#![allow(unused)] fn main() { let s = String::from("hello"); let r = &s; let rr = &&s; // All of these work - Rust auto-derefs to call len() s.len(); // String::len(&s) r.len(); // auto-derefs &String to String rr.len(); // auto-derefs &&String through &String to String }
2. Deref coercion in function arguments:
#![allow(unused)] fn main() { fn print_len(s: &str) { println!("{}", s.len()); } let owned = String::from("hello"); print_len(&owned); // &String coerces to &str automatically print_len("hello"); // Already a &str }
3. Comparison operators:
#![allow(unused)] fn main() { let x = 5; let r = &x; // assert!(r == 5); // ERROR! r is a reference, not a value assert!(r == &5); // Compares values, not addresses, but types must match assert!(*r == 5); // Explicit deref to i32 also works }
When Explicit Dereferencing (*) Is Required
1. Assigning to or modifying the underlying value:
#![allow(unused)] fn main() { let mut x = 5; let r = &mut x; *r += 1; // Must deref to modify x println!("x: {}", x); }
2. When types don't match and coercion doesn't apply:
#![allow(unused)] fn main() { let words: &[&str] = &["a", "b"]; for word in words { // word is &&str, but HashMap wants &str as key let key: &str = *word; // Explicit deref needed } }
3. Using entry() or insert() with reference keys:
Just illustrating a point. You will be given less lee-way on the exam for not getting this exactly correct.
#![allow(unused)] fn main() { use std::collections::HashMap; fn count<'a>(words: &[&'a str]) -> HashMap<&'a str, i32> { let mut map = HashMap::new(); for word in words { // word: &&str *map.entry(*word) // *word dereferences &&str to &str .or_insert(0) += 1; } map } let words = vec!["a", "b"]; println!("{:?}", count(&words)); println!("{:?}", words); }
Quick Reference Table
| Situation | Type | Need explicit *? |
|---|---|---|
| Method calls | &T, &&T, etc. | No (auto-deref) |
Deref coercion (&String → &str) | Function args | No |
Modifying through &mut T | *r = value | Yes |
HashMap key from &&str | entry(*word) | Yes |
| Pattern matching | &x pattern | Alternative to * |
6. Lifetimes
Modules
Quick Review
Lifetimes ensure references are valid:
- Prevent dangling references at compile time
- Notation:
'a,'b, etc. - Most lifetimes are inferred
- Explicit annotations needed when ambiguous
- Lifetime elision rules reduce annotations needed
Key Concepts:
- Every reference has a lifetime
- Function signatures sometimes need lifetime annotations
- Structs with references need lifetime parameters
'staticlifetime lasts entire program
Examples
#![allow(unused)] fn main() { // Explicit lifetime annotations fn longest<'a>(x: &'a str, y: &'a str) -> &'a str { if x.len() > y.len() { x } else { y } } // Struct with lifetime struct Book<'a> { title: &'a str, author: &'a str, } // Multiple lifetimes fn first_word<'a, 'b>(s: &'a str, _other: &'b str) -> &'a str { s.split_whitespace().next().unwrap_or("") } // Static lifetime let s: &'static str = "This string lives forever"; }
True/False Questions
-
T/F: All references in Rust have lifetimes, but most are inferred by the compiler.
-
T/F: The lifetime
'staticmeans the reference can live for the entire program duration. -
T/F: Lifetime parameters in function signatures change the actual lifetimes of variables.
-
T/F: A struct that contains references must have lifetime parameters.
-
T/F: The notation
<'a>in a function signature creates a lifetime; it doesn't declare a relationship.
Predict the Output
Question 1:
fn longest<'a>(x: &'a str, y: &'a str) -> &'a str { if x.len() > y.len() { x } else { y } } fn main() { let s1 = String::from("short"); let s2 = String::from("longer"); let result = longest(&s1, &s2); println!("{}", result); }
Question 2:
fn first<'a>(x: &'a str, _y: &str) -> &'a str { x } fn main() { let s1 = "hello"; let s2 = "world"; println!("{}", first(s1, s2)); }
Coding Challenge
Challenge: Implement a function with lifetimes
Write a function get_first_sentence<'a>(text: &'a str) -> &'a str that returns the first sentence (up to the first period, or the whole string if no period exists).
// your code here
1. HashMap and the Entry API
Module(s)
Quick Review
HashMap<K, V> is a hash table that maps keys to values:
- Keys must implement
HashandEqtraits - O(1) average lookup, insertion, and deletion
- Does NOT maintain insertion order
f64cannot be used directly as a key (doesn't implementHashdue to NaN)
Key Methods:
insert(key, value)- inserts or overwritesget(&key)- returnsOption<&V>get_mut(&key)- returnsOption<&mut V>contains_key(&key)- returnsboolremove(&key)- removes and returnsOption<V>
The Entry API is the idiomatic way to insert-or-update:
#![allow(unused)] fn main() { *map.entry(key).or_insert(default) += 1; }
.entry(key)returns anEntryenum, which can be eitherOccupiedorVacant- Entry API methods:
or_insert(default)inserts the default value if the key is not presentor_insert_with(f)inserts the value returned by the function if the key is not presentor_default()inserts the default value for the type if the key is not presentand_modify(f)modifies the value if the key is present
Examples
#![allow(unused)] fn main() { use std::collections::HashMap; // Basic HashMap usage let mut scores = HashMap::new(); // .insert returns None if the key was not in the map let mut result = scores.insert("Alice", 85); println!("result: {:?}", result); // None, because "Alice" was not in the map // .insert() returns Some(&value), where value is the old value if the key was // already in the map result = scores.insert("Alice", 87); println!("result: {:?}", result); // Some(&85) scores.insert("Bob", 90); // get() returns Option println!("scores.get(\"Alice\"): {:?}", scores.get("Alice")); // Some(&85) println!("scores.get(\"Carol\"): {:?}", scores.get("Carol")); // None // unwrap_or provides a default println!("scores.get(\"Carol\").unwrap_or(&0): {:?}", scores.get("Carol").unwrap_or(&0)); // &0 }
#![allow(unused)] fn main() { use std::collections::HashMap; // Entry API for counting let mut word_counts = HashMap::new(); for word in ["apple", "banana", "apple"] { *word_counts.entry(word).or_insert(0) += 1; } // word_counts: {"apple": 2, "banana": 1} println!("word_counts: {:?}", word_counts); }
#![allow(unused)] fn main() { use std::collections::HashMap; // Entry API - or_insert only inserts if key is missing let mut map = HashMap::new(); *map.entry("a").or_insert(0) += 1; // a = 1 *map.entry("a").or_insert(10) += 1; // a = 2 (10 is NOT used, key exists) println!("map: {:?}", map); }
True/False Questions
-
T/F: Keys in a HashMap must implement the
HashandEqtraits. -
T/F: HashMap maintains insertion order of elements.
-
T/F:
f64can be used directly as a HashMap key. -
T/F: The
entry()API allows efficient insert-or-update operations. -
T/F:
map.get(&key)returnsVdirectly. -
T/F: Looking up a value by key in a HashMap is O(1) on average.
Answers
- True - HashMap requires Hash and Eq traits for keys
- False - HashMap does not maintain insertion order (use IndexMap for that)
- False - f64 doesn't implement Hash due to NaN issues; use OrderedFloat
- True - The entry() API is designed for efficient insert-or-update patterns
- False - get() returns Option<&V>, not V directly
- True - HashMap lookup is O(1) average case
Find the Bug
Question 1:
#![allow(unused)] fn main() { use std::collections::HashMap; fn count_words<'a>(words: &[&'a str]) -> HashMap<&'a str, i32> { let mut counts = HashMap::new(); for word in words { counts.entry(word).or_insert(0) += 1; } counts } }
Answer
Bug: We need to dereference the key word to get the &str, not the &&str
and then dereference counts... so we can modify the value.
Fix:
#![allow(unused)] fn main() { use std::collections::HashMap; fn count_words<'a>(words: &[&'a str]) -> HashMap<&'a str, i32> { let mut counts = HashMap::new(); for word in words { *counts.entry(*word).or_insert(0) += 1; } counts } }
Question 2:
#![allow(unused)] fn main() { use std::collections::HashMap; fn merge_maps(map1: HashMap<String, i32>, map2: HashMap<String, i32>) -> HashMap<String, i32> { let mut result = map1; for (key, value) in map2 { result.insert(key, result.get(&key).unwrap() + value); } result } }
Answer
Bug: Using get(&key).unwrap() on a key that might not exist in result (map1). If a key from map2 is not in map1, this panics.
Fix:
#![allow(unused)] fn main() { use std::collections::HashMap; fn merge_maps(map1: HashMap<String, i32>, map2: HashMap<String, i32>) -> HashMap<String, i32> { let mut result = map1; for (key, value) in map2 { *result.entry(key).or_insert(0) += value; } result } }
Predict the Output
Question 1:
use std::collections::HashMap; fn main() { let mut scores = HashMap::new(); scores.insert("Alice", 85); scores.insert("Bob", 90); scores.insert("Alice", 95); let alice_score = scores.get("Alice").unwrap_or(&0); let carol_score = scores.get("Carol").unwrap_or(&0); println!("{} {}", alice_score, carol_score); }
Answer
Output: 95 0
Reasoning:
- "Alice" is inserted twice. The second insert (95) overwrites the first (85).
get("Alice")returns Some(&95), unwrap_or gives 95get("Carol")returns None, unwrap_or provides default &0
Question 2:
use std::collections::HashMap; fn main() { let mut map: HashMap<&str, i32> = HashMap::new(); *map.entry("a").or_insert(0) += 1; *map.entry("b").or_insert(5) += 1; *map.entry("a").or_insert(10) += 1; let a = map.get("a").unwrap(); let b = map.get("b").unwrap(); println!("{} {}", a, b); }
Answer
Output: 2 6
Reasoning:
- First entry("a"): key doesn't exist, inserts 0, then += 1 → a = 1
- entry("b"): key doesn't exist, inserts 5, then += 1 → b = 6
- Second entry("a"): key exists (value 1), or_insert(10) does NOT insert, just returns &mut to existing value, then += 1 → a = 2
Coding Challenge
Challenge: Implement most_frequent
Write a function that takes a slice of integers and returns the value that appears most frequently. Return None if the slice is empty.
use std::collections::HashMap; fn most_frequent(numbers: &[i32]) -> Option<i32> { // Your code here } fn main() { let nums = vec![1, 2, 2, 3, 3, 3, 4]; println!("{:?}", most_frequent(&nums)); // Should print Some(3) println!("{:?}", most_frequent(&[])); // Should print None }
2. HashSet and Set Operations
Quick Review
HashSet
- Elements must implement
HashandEqtraits - O(1) average lookup, insertion, deletion
- Automatically removes duplicates
- Does NOT maintain insertion order
Key Methods:
insert(value)- returnsbool(true if new)contains(&value)- returnsbool(true if value is in the set)remove(&value)- returnsbool(true if value was in the set)
Set Operations:
intersection(&other)- returns a set with elements in both setsunion(&other)- returns a set with elements in either setdifference(&other)- returns a set with elements in self but not othersymmetric_difference(&other)- returns a set with elements in one but not both
Examples
#![allow(unused)] fn main() { use std::collections::HashSet; // Creating HashSets let set1: HashSet<i32> = vec![1, 2, 3, 4].into_iter().collect(); let set2: HashSet<i32> = vec![3, 4, 5, 6].into_iter().collect(); // Set operations let inter: HashSet<_> = set1.intersection(&set2).copied().collect(); println!("inter: {:?}", inter); // inter = {3, 4} let uni: HashSet<_> = set1.union(&set2).copied().collect(); println!("uni: {:?}", uni); // uni = {1, 2, 3, 4, 5, 6} let diff: HashSet<_> = set1.difference(&set2).copied().collect(); println!("diff: {:?}", diff); // diff = {1, 2} (in set1 but not set2) let sym_diff: HashSet<_> = set1.symmetric_difference(&set2).copied().collect(); println!("sym_diff: {:?}", sym_diff); // sym_diff = {1, 2, 5, 6} // Checking membership let has_three = set1.contains(&3); // true println!("has_three: {}", has_three); // HashSet for uniqueness let words = vec!["apple", "banana", "apple", "cherry"]; let unique: HashSet<_> = words.into_iter().collect(); println!("unique: {:?}", unique); // unique = {"apple", "banana", "cherry"} }
True/False Questions
-
T/F: HashSet automatically removes duplicate values.
-
T/F: Elements in a HashSet must implement
HashandEqtraits. -
T/F: HashSet maintains elements in sorted order.
-
T/F: The
intersection()method returns elements common to two sets. -
T/F: Checking if an element exists in a HashSet is O(n).
Find the Bug
Question:
#![allow(unused)] fn main() { use std::collections::HashSet; fn find_common<T: PartialEq>(set1: &HashSet<T>, set2: &HashSet<T>) -> HashSet<T> { set1.intersection(set2).cloned().collect() } }
Predict the Output
Question:
use std::collections::HashSet; fn main() { let set1: HashSet<&str> = vec!["apple", "banana", "cherry"].into_iter().collect(); let set2: HashSet<&str> = vec!["cherry", "date", "elderberry"].into_iter().collect(); let inter: HashSet<_> = set1.intersection(&set2).copied().collect(); println!("inter: {:?}", inter); let diff: HashSet<_> = set1.difference(&set2).copied().collect(); println!("diff: {:?}", diff); let sym_diff: HashSet<_> = set1.symmetric_difference(&set2).copied().collect(); println!("sym_diff: {:?}", sym_diff); println!("{} {} {}", inter.len(), diff.len(), sym_diff.len()); }
Coding Challenge
Challenge: Find duplicates
Write a function that takes a slice of integers and returns a Vec containing only the values that appear more than once. The result should not contain duplicates itself.
use std::collections::{HashMap, HashSet}; fn find_duplicates(numbers: &[i32]) -> Vec<i32> { // Your code here } fn main() { let nums = vec![1, 2, 2, 3, 3, 3, 4, 5, 5]; println!("{:?}", find_duplicates(&nums)); // [2, 3, 5] (order may vary) }
3. BTreeMap and Ordered Collections
Quick Review
BTreeMap<K, V> is a sorted map based on B-trees:
- Keys are always in sorted order
- Keys must implement
Ordtrait (not Hash) - O(log n) lookup, insertion, deletion
- Efficient for range queries
- Iteration yields key-value pairs in sorted key order
When to use BTreeMap vs HashMap:
- HashMap: faster single-key operations (O(1) vs O(log n))
- BTreeMap: need sorted order, range queries, or keys don't implement Hash
Examples
#![allow(unused)] fn main() { use std::collections::BTreeMap; let mut map = BTreeMap::new(); map.insert(3, "three"); map.insert(1, "one"); map.insert(4, "four"); // Iteration is in sorted key order for (k, v) in map.iter() { println!("{}: {}", k, v); } // Output: // 1: one // 3: three // 4: four // First and last keys let first = map.keys().next(); // Some(&1) let last = map.keys().last(); // Some(&4) // Range queries for (k, v) in map.range(2..=4) { println!("{}: {}", k, v); } // Output: 3: three, 4: four }
True/False Questions
-
T/F: BTreeMap stores keys in sorted order.
-
T/F: Insertion into a BTreeMap is O(1).
-
T/F: BTreeMap requires keys to implement the
Hashtrait. -
T/F: Iterating over a BTreeMap yields key-value pairs in sorted key order.
-
T/F: BTreeMap is faster than HashMap for all operations.
Predict the Output
Question:
use std::collections::BTreeMap; fn main() { let mut scores = BTreeMap::new(); scores.insert("Charlie", 85); scores.insert("Alice", 95); scores.insert("Bob", 90); let first_key = scores.keys().next().unwrap(); let last_key = scores.keys().last().unwrap(); println!("{} {}", first_key, last_key); }
4. VecDeque and Circular Buffers
Quick Review
VecDeque
- O(1) push/pop from both ends
- Implemented as a circular/ring buffer
- Can be used as a stack OR a queue
- Grows dynamically like Vec
Key Methods:
push_front(value)- add to frontpush_back(value)- add to backpop_front()- remove from front, returnsOption<T>pop_back()- remove from back, returnsOption<T>front()/back()- peek without removing
Use Cases:
- Queue (FIFO): push_back + pop_front
- Stack (LIFO): push_back + pop_back
- Rolling windows / circular buffers
Examples
#![allow(unused)] fn main() { use std::collections::VecDeque; let mut deque: VecDeque<i32> = VecDeque::new(); // Building a deque deque.push_back(1); // [1] deque.push_back(2); // [1, 2] deque.push_front(3); // [3, 1, 2] deque.push_back(4); // [3, 1, 2, 4] // Removing elements let front = deque.pop_front(); // Some(3), deque is [1, 2, 4] let back = deque.pop_back(); // Some(4), deque is [1, 2] // Using as a queue (FIFO) let mut queue = VecDeque::new(); queue.push_back("first"); queue.push_back("second"); let next = queue.pop_front(); // Some("first") // Iteration for val in deque.iter() { println!("{}", val); } }
True/False Questions
-
T/F: VecDeque allows efficient O(1) insertion and removal at both ends.
-
T/F: VecDeque is implemented as a circular buffer.
-
T/F: VecDeque can only store elements that implement
Copy. -
T/F:
push_front()andpush_back()are the primary insertion methods. -
T/F: VecDeque maintains elements in sorted order.
-
T/F:
VecDeque::push_front()is O(n).
Predict the Output
Question 1:
use std::collections::VecDeque; fn main() { let mut buffer: VecDeque<i32> = VecDeque::new(); buffer.push_back(1); buffer.push_back(2); buffer.push_front(3); buffer.push_back(4); buffer.pop_front(); let sum: i32 = buffer.iter().sum(); println!("{}", sum); }
Question 2:
use std::collections::VecDeque; fn main() { let mut q: VecDeque<i32> = VecDeque::new(); q.push_back(10); q.push_back(20); q.push_back(30); let first = q.pop_front().unwrap(); q.push_back(first + 5); for val in q.iter() { print!("{} ", val); } println!(); }
Coding Challenge
Challenge: Implement a Rolling Average
Write a function that calculates the running (cumulative) average at each position. The running average at position i is the mean of all elements from index 0 to i.
fn running_average(values: &[f64]) -> Vec<f64> { // Your code here } fn main() { let data = vec![2.0, 4.0, 6.0, 8.0]; let result = running_average(&data); println!("{:?}", result); // Should print [2.0, 3.0, 4.0, 5.0] }
6. Algorithm Complexity
Quick Review
Big O Notation describes how runtime grows with input size:
| Complexity | Name | Example |
|---|---|---|
| O(1) | Constant | HashMap lookup, Vec::push (amortized) |
| O(log n) | Logarithmic | BTreeMap operations, binary search |
| O(n) | Linear | Linear search, single loop |
| O(n log n) (*) | Linearithmic | Sorting (merge sort, quicksort) |
| O(n²) | Quadratic | Nested loops, bubble sort |
(*) Optional -- not on the exam.
Common Operations:
| Data Structure | Insert | Lookup | Delete |
|---|---|---|---|
| Vec (end) | O(1)* | O(1) | O(1) |
| Vec (middle) | O(n) | O(1) | O(n) |
| HashMap | O(1) | O(1) | O(1) |
| BTreeMap | O(log n) | O(log n) | O(log n) |
| VecDeque (ends) | O(1) | O(1) | O(1) |
*amortized
True/False Questions
-
T/F: A
Vec::push()operation is O(1) amortized. -
T/F: Searching for a key in a HashMap is O(n) in the average case.
-
T/F: Sorting a vector with
.sort()is O(n log n).
- T/F: Inserting into a BTreeMap is O(1).
7. Option and Result Types
Quick Review
Option
Some(value)- contains a valueNone- no value
Result<T, E> - for operations that might fail:
Ok(value)- success with valueErr(error)- failure with error
Common Methods:
unwrap()- get value or panicunwrap_or(default)- get value or defaultunwrap_or_else(|| ...)- get value or compute default?operator - propagate errors (Result) or None (Option)is_some()/is_ok()- check variantmap(|x| ...)- transform if Some/Ok
Examples
#![allow(unused)] fn main() { // Option let maybe_value: Option<i32> = Some(5); let no_value: Option<i32> = None; let x = maybe_value.unwrap_or(0); // 5 let y = no_value.unwrap_or(0); // 0 // Result fn divide(a: i32, b: i32) -> Result<i32, String> { if b == 0 { Err(String::from("division by zero")) } else { Ok(a / b) } } let result = divide(10, 2); // Ok(5) let error = divide(10, 0); // Err("division by zero") // Using ? to propagate fn calculate(a: i32, b: i32) -> Result<i32, String> { let quotient = divide(a, b)?; // Returns Err early if divide fails Ok(quotient * 2) } }
True/False Questions
-
T/F:
Option::unwrap()will panic if the value isNone. -
T/F: The
?operator can be used to propagate errors fromResult. -
T/F:
Some(5)andNoneare both variants ofOption<i32>. -
T/F:
Result<T, E>is used for operations that might fail with an error. -
T/F:
unwrap_or(default)returns the contained value or a provided default.
Final Tips for the Exam
-
HashMap vs BTreeMap: Use HashMap for fast O(1) lookups. Use BTreeMap when you need sorted keys or range queries.
-
Entry API: Always use
entry().or_insert()for counting patterns instead ofget().unwrap(). -
HashSet trait bounds: Remember that HashSet requires
Hash + Eq, not justPartialEq. -
Iterator laziness: Remember to call
.collect()or another consumer - map/filter alone don't execute! -
Reference patterns in closures:
iter()yields&Tfilter(|x| ...)receives&&Twhen used with iter()- Use
|&x|or|&&x|to destructure
-
VecDeque for both ends: Use VecDeque when you need efficient push/pop from both front and back.
-
Complexity matters: Know that HashMap is O(1), BTreeMap is O(log n), and sorting is O(n log n).
-
Understand references and when to dereference: Remember that iterators yield references, not values.
-
Review the preliminaries as well!
Good luck on your final exam! 🦀