Mini Project 4: Build a client/server data analytics stack!
In this homework, you will:
- Build a small data analytics library capable of computing simple relational queries with various types of aggregation.
- Develop a client that defines the analytics to compute, and a server that executes the provided analytics over a dataset it controls.
Git
Do all your work on a branch called analytics. We expect to see several commits spread across your work: roughly one per task or unit of work.
Use your experience so far to guide what counts as a meaningful commit boundary.
Use meaningful commit messages.
Part 1: Build the Analytics Library
Your task for part 1 is to build out the missing features in the provided analytics library, which you can find on our course’s GitHub repo
at project_4_client_server_analytics/analytics_lib.
Stencil Layout
Open the analytics_lib folder in VSCode and look at its content. You will notice two directories:
srcwhich contains the provided stencil code as well as where you will provide your solutions.testswhich contains various tests that we will use to grade you, and you can use to ensure your code is correct.
Furthermore, src itself contains the following important files:
-
dataset.rs: This file contains theDatasetstruct, which is our provided type that represents an entire dataset (read from a csv file). For example,project_4_client_server_analytics/grades.csv.Datasetcontainscolumns, a vector of pairs each describing one column in the csv file (e.g. grade) and the type of data in that column (e.g. Integer). It also containsrows, a vector of rows that contain the actual data.Rowis a vector of values, and provides API to either get a specific value by reference or move all the values out of the row.Valueis an enum with two cases: it either contains anIntegeror aString. To use data of typeValueyou have to use amatchstatement to check for either case, similarly to how you couldmatchon anOptiontype.
-
query.rs: This file contains the structs that represent our query language.Queryrepresents an entire query that contains several parts: a filter condition that filters out irrelevant data, a group by column name indicating how to group the data into buckets, and an aggregation that describes how data within a single bucket is aggregated together.Conditionhas four cases and represents either a direct equality condition (e.g., the value in the column"section"must be equal toValue::String("A1")), or the negation of a different condition or combining two conditions together using AND or OR.Aggregationis eitherCount,Sum, orAverage. In addition, it also contains the column name to aggregate over, e.g.,Aggregation::Average("grade")indicates that the query wants to average the “grades”.
-
solution.rs: This is where you will provide your solution. Specifically, you will implement three functions:filter_dataset(): you must write correct code that looks at the rows in the givendataset, checks whether they meet thefiltercondition, and returns a newDatasetthat only contains matching rows.group_by_dataset(): your function must take a given dataset and the name of the column to group by. It must then build subsets of the datasets for each value of that column. For example, grouping the dataset fromproject_4_client_server_analytics/grades.csvbysectionmust result in two datasets. The first contains all rows with section “A1” and the second contains all rows with section “B1”.aggregate_dataset(): your function takes several groups of datasets, and aggregates each group, e.g. by computing the count or average of some column inside each group separately.
Example
We will break this down with an example. Say the query is the following:
let query = Query::new(
    Condition::Equal(String::from("grade"), Value::Integer(90)),  // filter condition
    String::from("section"),   // group by
    Aggregation::Count(String::from("name")),  // aggregation
);
This query indicates that we want to find the count of students in each section that have a grade equal to 90.
Starting with the dataset in project_4_client_server_analytics/grades.csv, the input dataset will be:
name	section	grade
Alice	A1   	80
Bob  	A1   	90
Carol	B1  	85
Sophie	A1  	100
Corinn	B1  	90
After performing the filter only, we end up with:
name	section	grade
Bob  	A1   	90
Corinn	B1  	90
After performing the group by, the result becomes:
HashMap containing {
    "A1": [{Bob,  	A1,   	90}],
    "B1": [{Corinn,	B1,  	90}]
}
Note that if the dataset was different, there could have been more than one row in a group.
Finally, after performing the aggregation, we end up with the final result:
HashMap containing {
    "A1": 1,
    "B1": 1
}
Your tasks
You should implement each of the three functions in solution.rs.
For simplicity, only implement the case where the filter condition is a direct Condition::Equal. When you are happy with that implementation, move forward and implement the remaining cases.
Hint: You will notice that in order to figure out whether a Condition::Not or And or Or is satisfied or not, you will need to determine whether one or more nested conditions are satisfied. Consider creating a new helper function that looks at one row and a given condition and returns either true or false based on whether the row
meets the condition. You can then re-use that function, e.g., by calling it recursively, to find out whether a row meets nested conditions.
Hint: Avoid duplicating code in general in this project, if you find yourself writing duplicate code, ask yourself whether you can turn it into a helper function that you can reuse in different parts of your code.
Hint: You will be graded on how clean your code is and on its quality. This means that you will receive higher grades for clean code with little code duplication, clean indentation and clear variable names. It also means we will give you higher grades if you use move, clone, and refs in reasonable ways. E.g., it is better
to avoid needless clones, as they slow the program down!
While working on your code, you can test each function separately using the provided tests.
cargo test filter
cargo test group_by
cargo test aggregate
Continue working on each function until you pass all of its tests.
Hint: the filter tests have separate cases for Equal, Not, And, and Or conditions. If you only implemented one of these cases, run the tests anyway, and check whether the one test that corresponds to that case succeeds.
Lastly, we also provide a complete end-to-end test that checks whether your code can execute an entire query including all of its filters, group by, and aggregation. Make sure your code passes this test after you combine your solutions for all three functions.
cargo test albums
Part 2: Build the Client and Server
Your task for part 2 is to build out the client and server code to enable performing data analytics using the library from part 1.
When you are done with this part, you will have implemented the following components:
- analytics_lib: this is what you implement in part 1, and is a library for executing queries over datasets.
- server: this is a server that receives queries from clients, runs them on the client’s behalf, and returns the resulting dataset to the client.
- client: a client that issues queries to the server and then receives and prints the output dataset.
This part is based on remote procedure calls (RPC). This is a technology that allows a client to invoke a remote function on a server. At a high level, it works like this:
- The programmers who built the server define a public interface, e.g., by publishing it to GitHub. This interface defines one or more functions that clients are allowed to invoke remotely.
- The server programmers implement that interface in their code by implementing the bodies of these functions.
- The server programmers run their code on some publicly accessible machine, e.g., on the cloud (like on Amazon AWS or Google Cloud).
- The client programmers download the public interface and add it to their code.
- The client programmers write some code that connects to the server and calls whatever functions they want, passing any parameters they need and receiving the output. They can then run their code as they desire!
In reality, the server and client programmers would need to implement some authentication mechanism to avoid other unauthorized clients or hackers from abusing the server. We will not worry about this in this project. Read more about RPCs here.
Code Structure
Make sure you sync your GitHub fork with the course repo to retrieve the stencil code for project 4. If you look inside the stencil, you will find the following folders/components:
analytics_lib/: this is what you implemented in part 1.interface/: this contains the public RPC interface.server/: this contains the server code.client/: this contains the client code.
You will have to modify the following files. The instructions will explain how to do this modification.
interface/src/lib.rs: to add RPC functions.analytics_lib/src/dataset.rs: you will need to makeDatasetand other structs serializable and deserializable, to enable sending them between client and server.server/src/{lib,solution}.rs: you will need to implement the server logic for each RPC function.client/src/solution.rs: you will need to implement the client logic for calling server RPC functions and handle the parameters and returned data.
Step 0: Getting Started
This step is important. Follow these instructions carefully and slowly.
First, sync your code with the course GitHub repo and continue working on your analytics branch.
Second, open the [path to repo]/project_4_client_server_analytics folder using VSCode. Make sure you use open folder, and not open a file. Also note that we are asking you to open the entire project_4_client_server_analytics folder, not the analytics_lib, server, client or other sub folders. This will help you modify code in the different components as you need to.
Third, let’s look at the code to understand the RPC structure.
Note: the screenshots below are from a previous version of this project (Mini Project 3) and are nearly identical to what you will see. Ignore any “Project 3” labels you may notice in them.
The RPC interface: using VSCode, navigate to interface/src/lib.rs and look at the code. You should see something similar to the below screenshot.
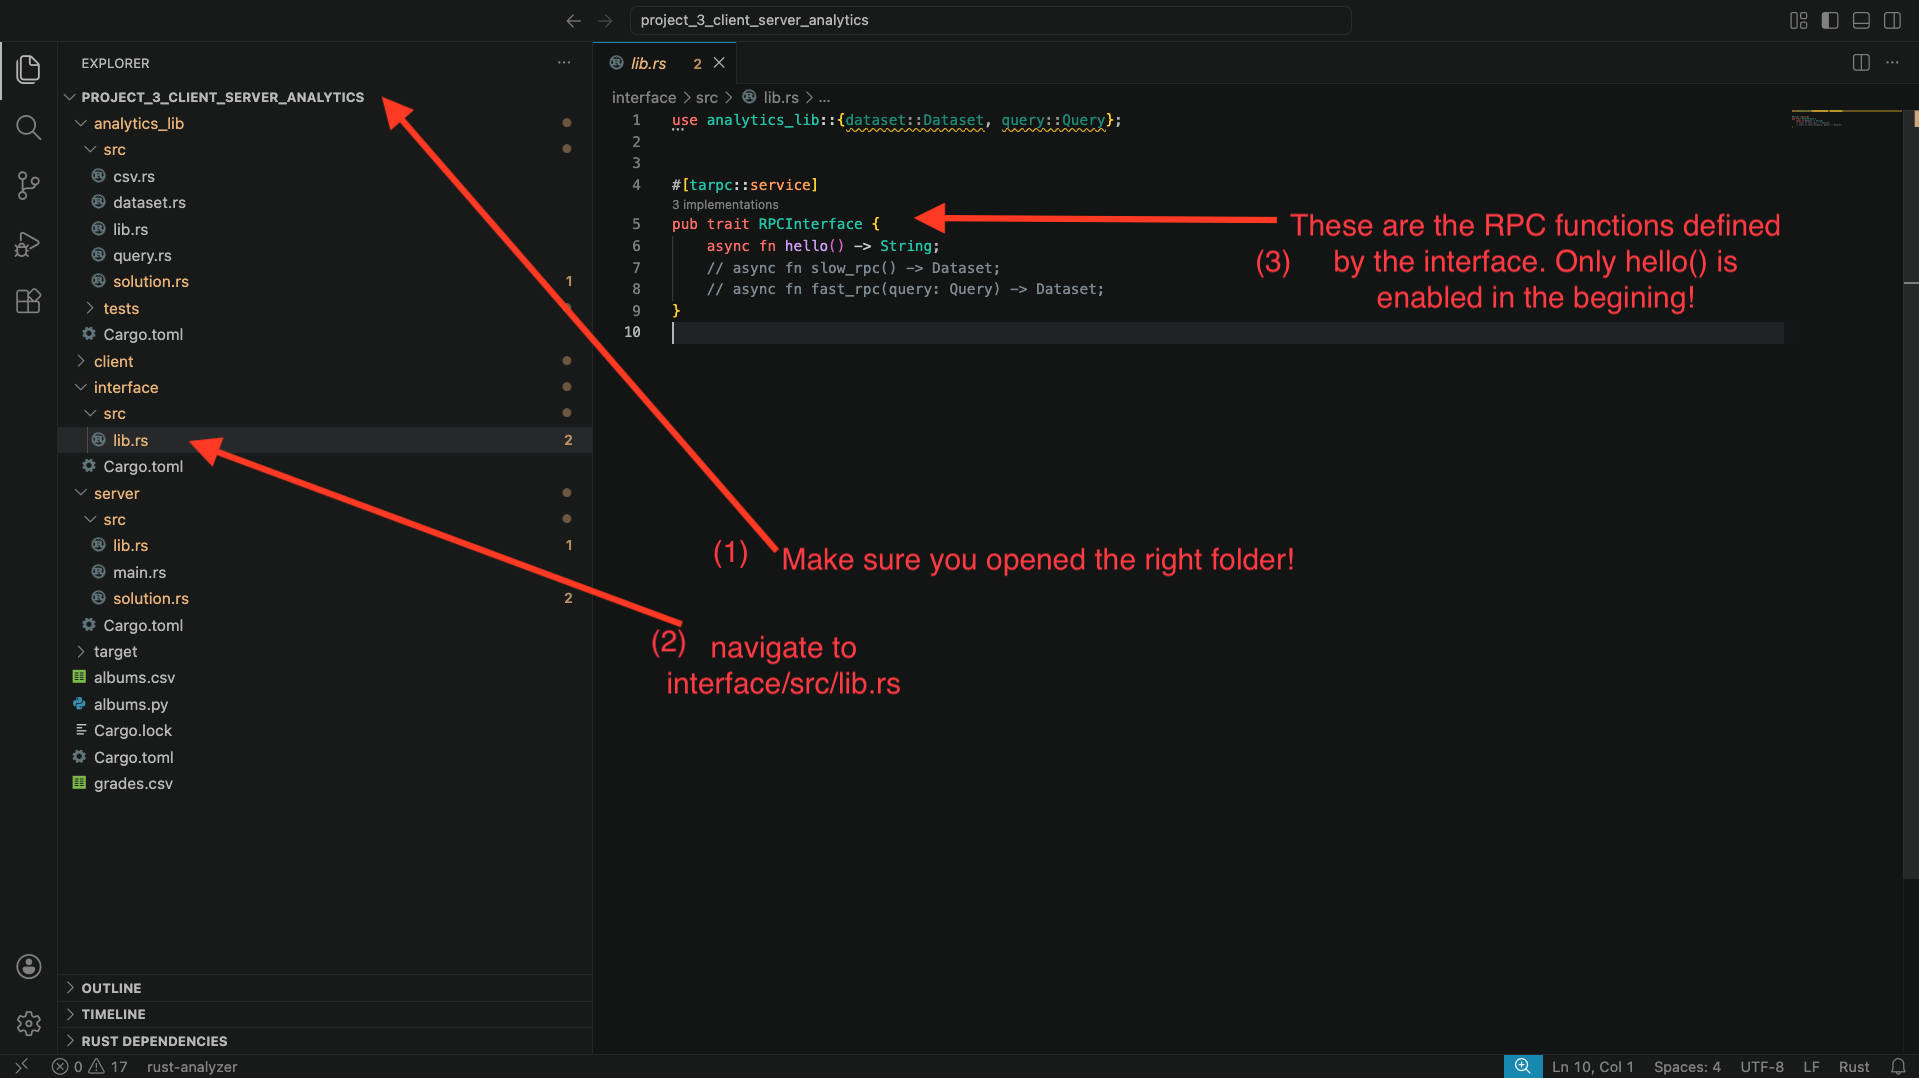
You will see that only the function hello() is enabled, with two other functions commented out.
The server code: navigate to server/src/lib.rs. You will also find the implementation of each RPC function from the interface. Specifically, you will find this around line 24. Again, you will see the implementation for hello(), but the other two functions are commented out. The body of the hello function simply calls solution::hello(). Navigate to server/src/solution.rs to find what that function does: it simply prints a hello message to the screen and returns the string “hello”.
The client code: now, navigate to client/src/solution.rs. Look at function run_hello(..):
- This function takes an
rpc_client: &RPCInterfaceClientparameter that the stencil code provides. This variable is the connector between the client and server. - The function calls
rpc_client.hello(..). This call ends up invoking thehello()function remotely in the server. Note that the function requires a context parameter, and that the code doesawaitandunwrap()on the result. This is because RPC invocations are async (so we must await them) and return a Result<_, _>, in case there was an error connecting to the server (so we must unwrap them!). - The function then prints whatever the server returned.
Great: we have all the ingredients to be able to invoke the hello() RPC function between client and server. Let’s try to do that:
- Open a terminal, navigate to
[path to repo]/project_4_client_server_analytics/server, and then runcargo run -- grades, wait for the program to compile and start running. - Open a second terminal, navigate to
[path to repo]/project_4_client_server_analytics/client, and then runcargo run --bin main -- hello.
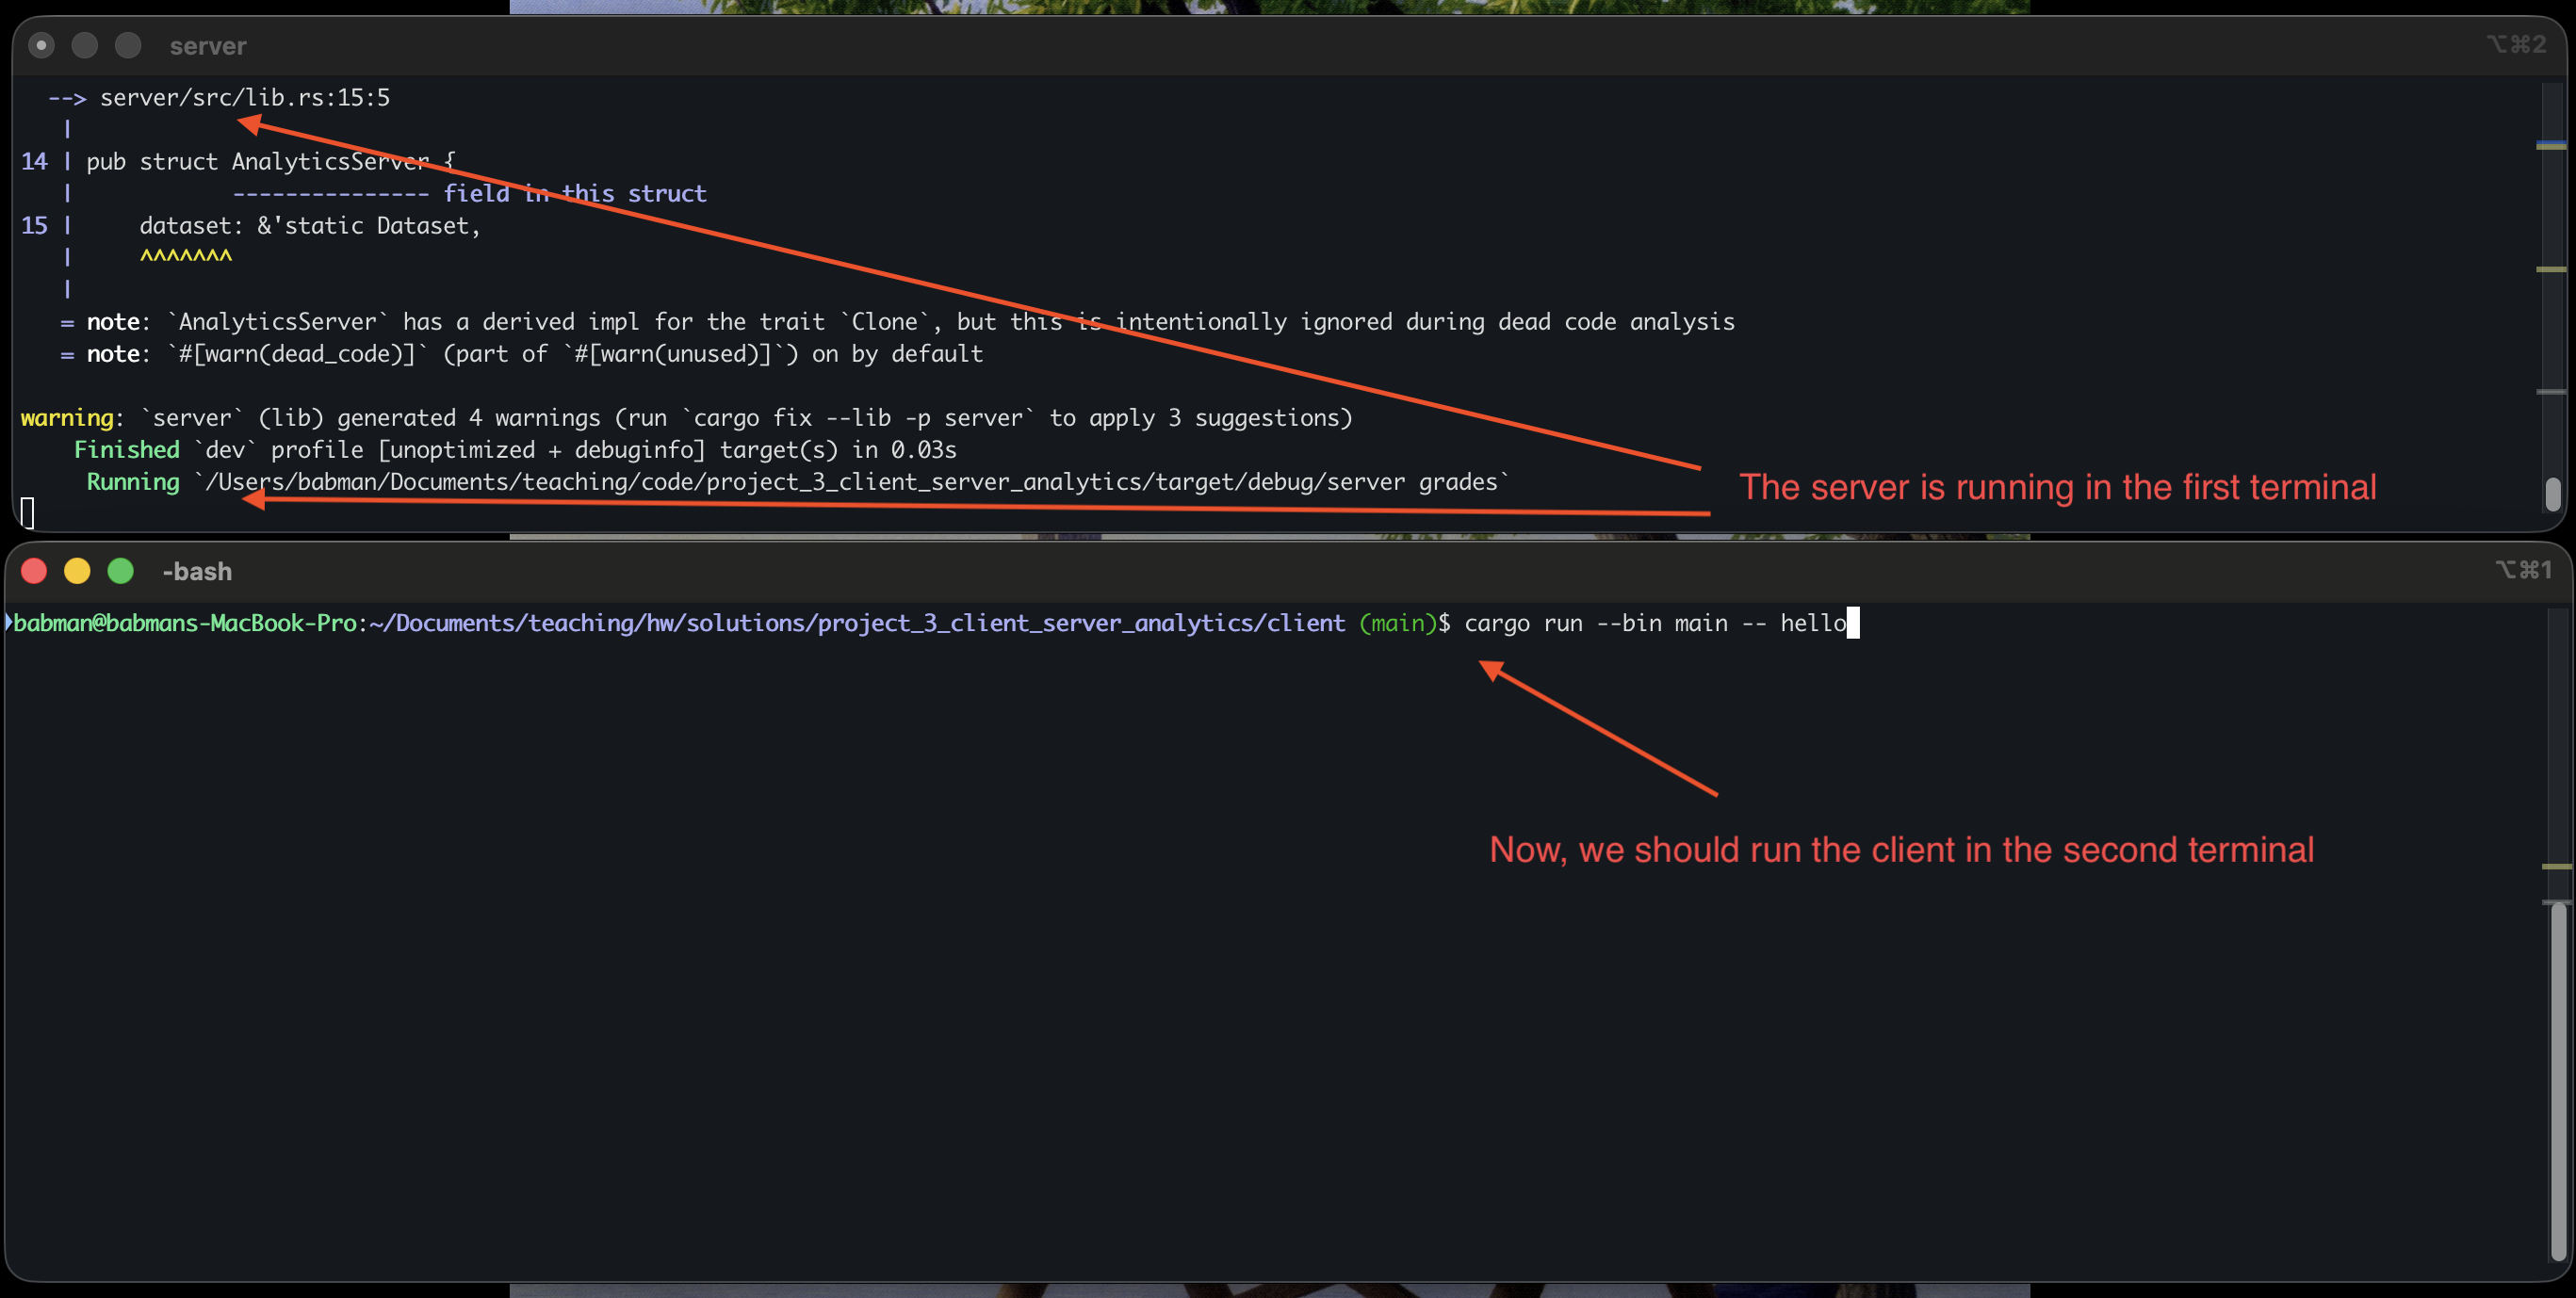
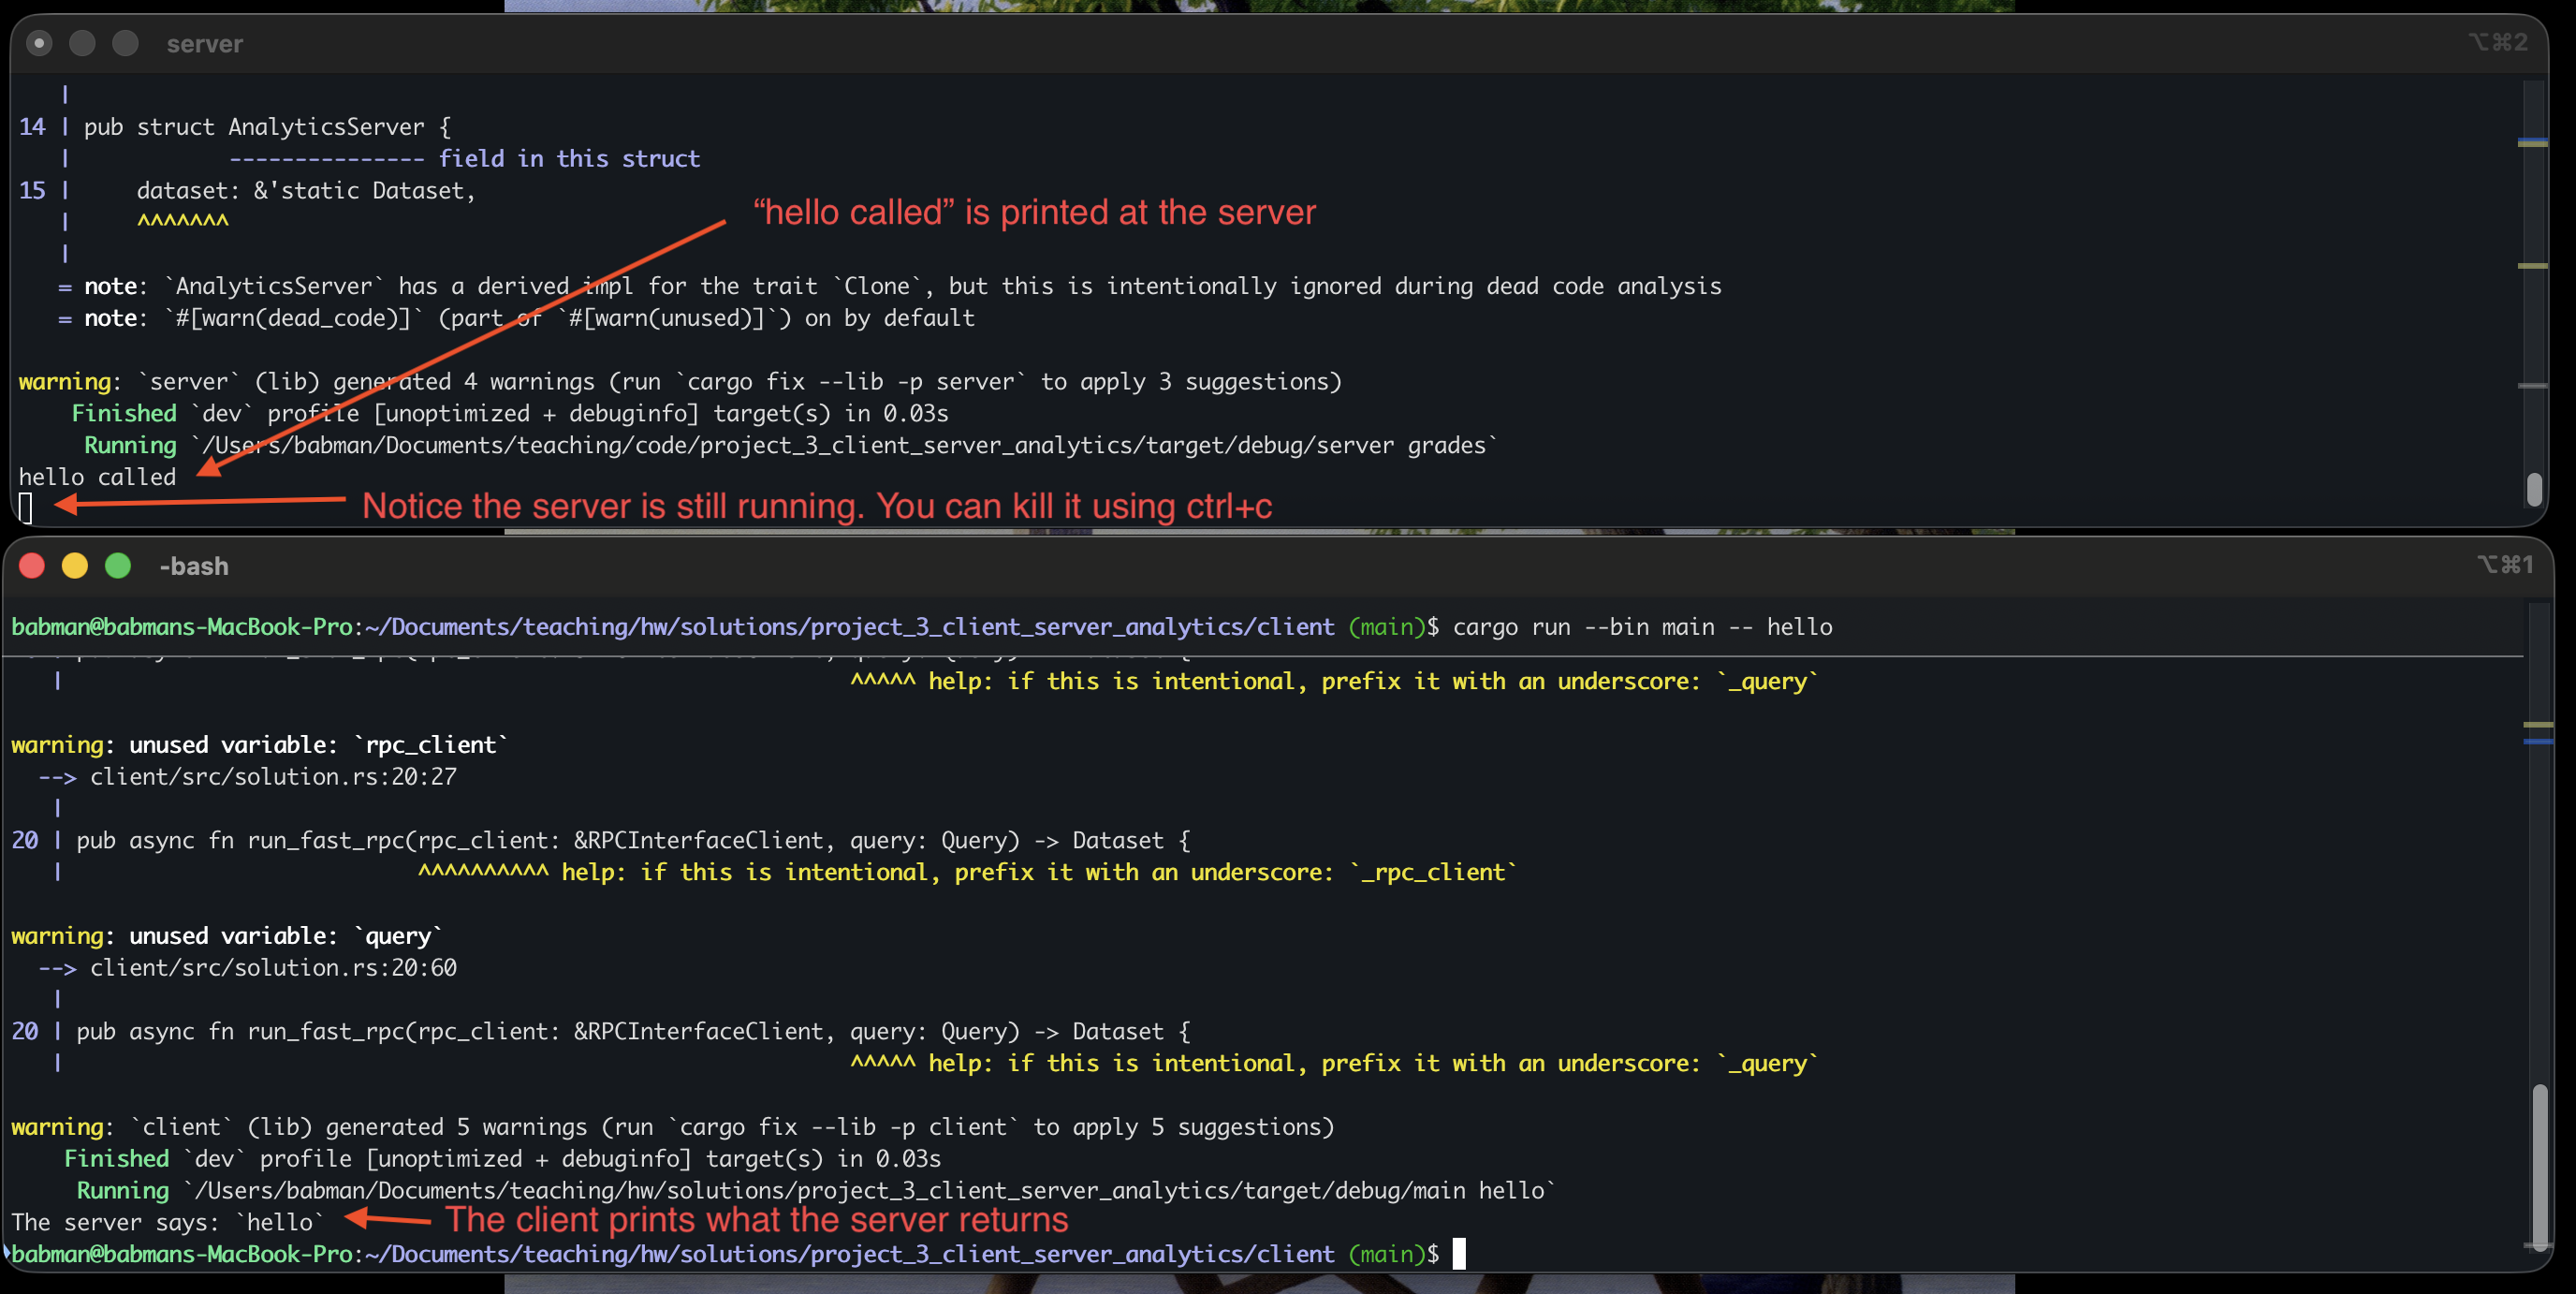
You should see a similar output to what’s in the above screenshot. Note that when you do this, the client completes and exits but the server continues to run. You can run the client again and it will connect to the same server and work correctly! Alternatively, you can kill the server (using ctrl+c) and run it and the client again.
Step 1: slow_rpc
Implement slow_rpc as follows.
interface implementation: First, navigate to interface/src/lib.rs, and uncomment the definition of the slow_rpc function.
When you do this, you should notice several compiler errors in VSCode. The errors will complain about the Dataset type. Specifically, they will complain about it not implementing Serialize and Deserialize.
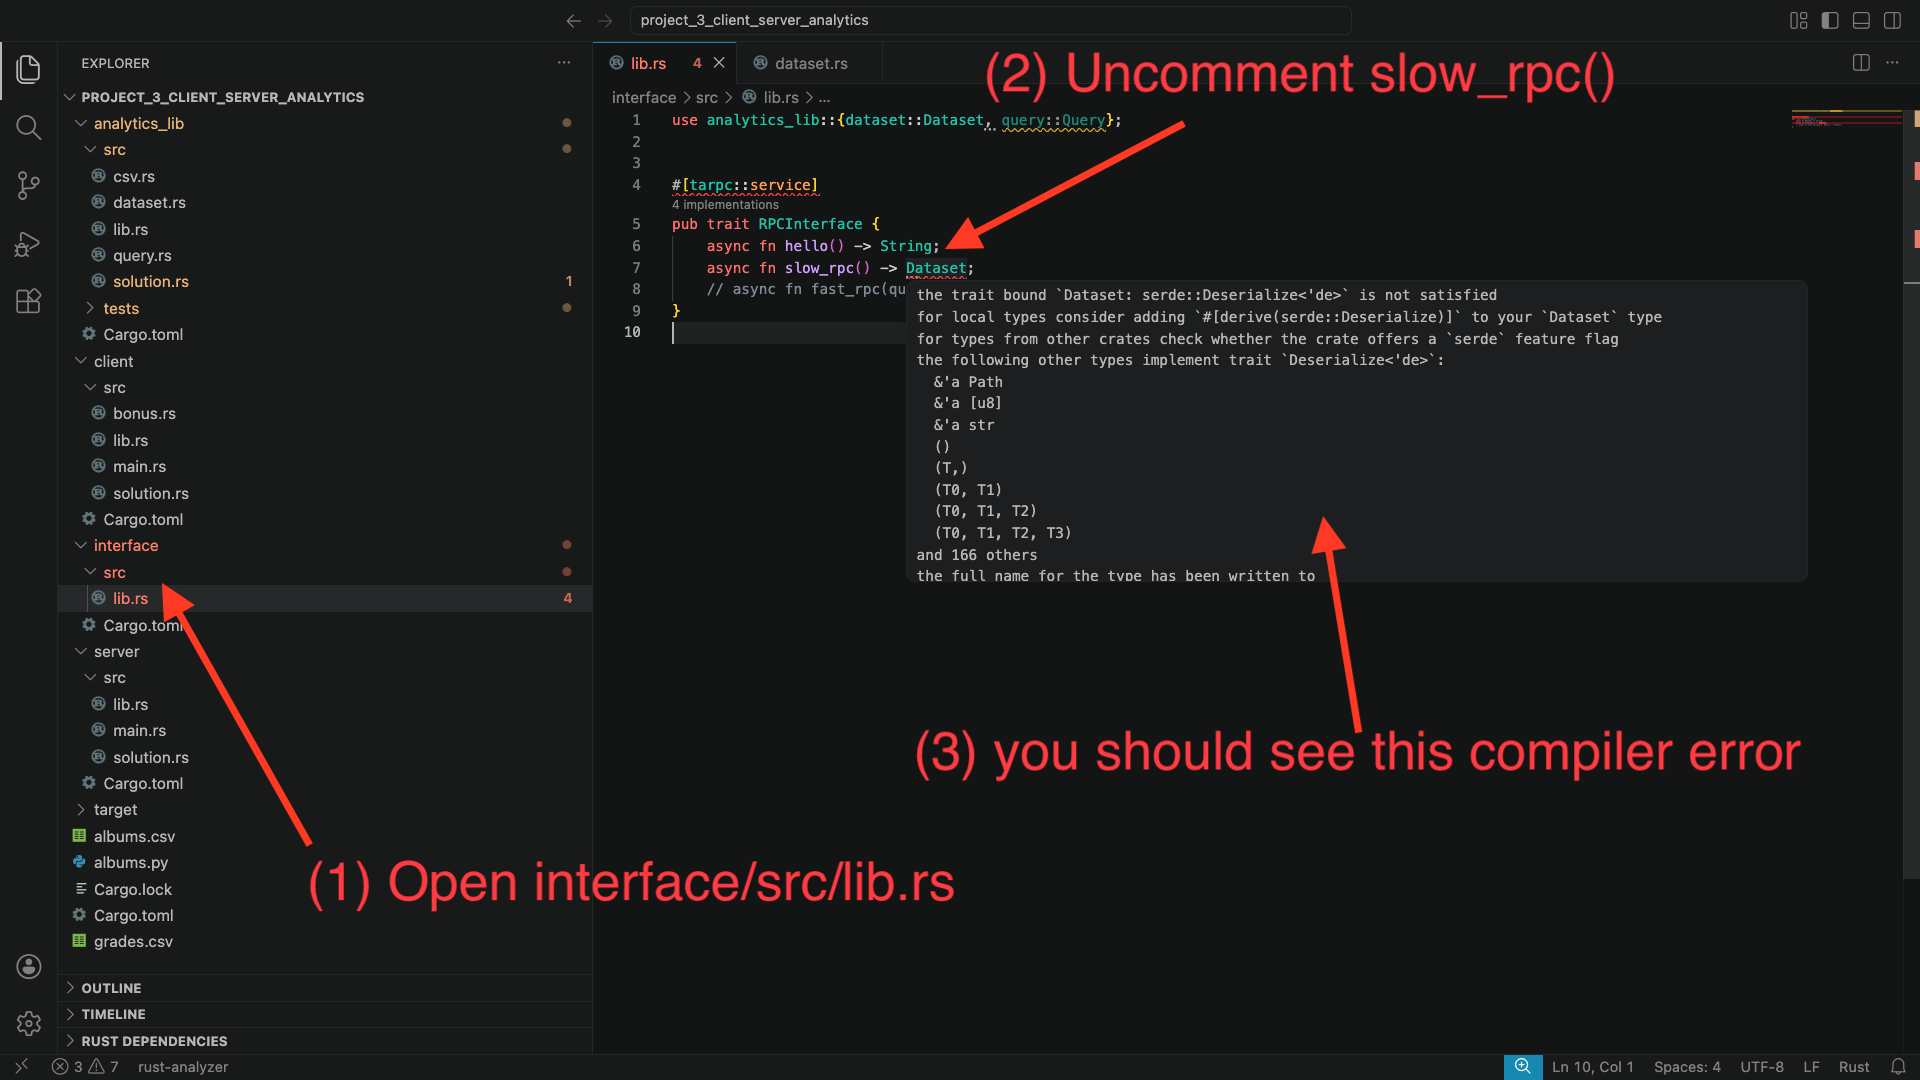
Let’s fix these errors: to do so, we will need to make Dataset implement the Serialize and Deserialize traits. A trait is a way to declare that some type (in this case Dataset) implements some important and reusable functionality (in this case, that it can be serialized and deserialized to bytes for sending between the client and server).
Alright, so how do we make Dataset implement these traits? Fortunately, we can simply ask Rust to derive them for us automatically!
Navigate to analytics_lib/src/dataset.rs. Add the following line to the top of the file use serde::{Deserialize, Serialize};. Then, add #[derive(Serialize, Deserialize)] on top of the definition of Dataset.
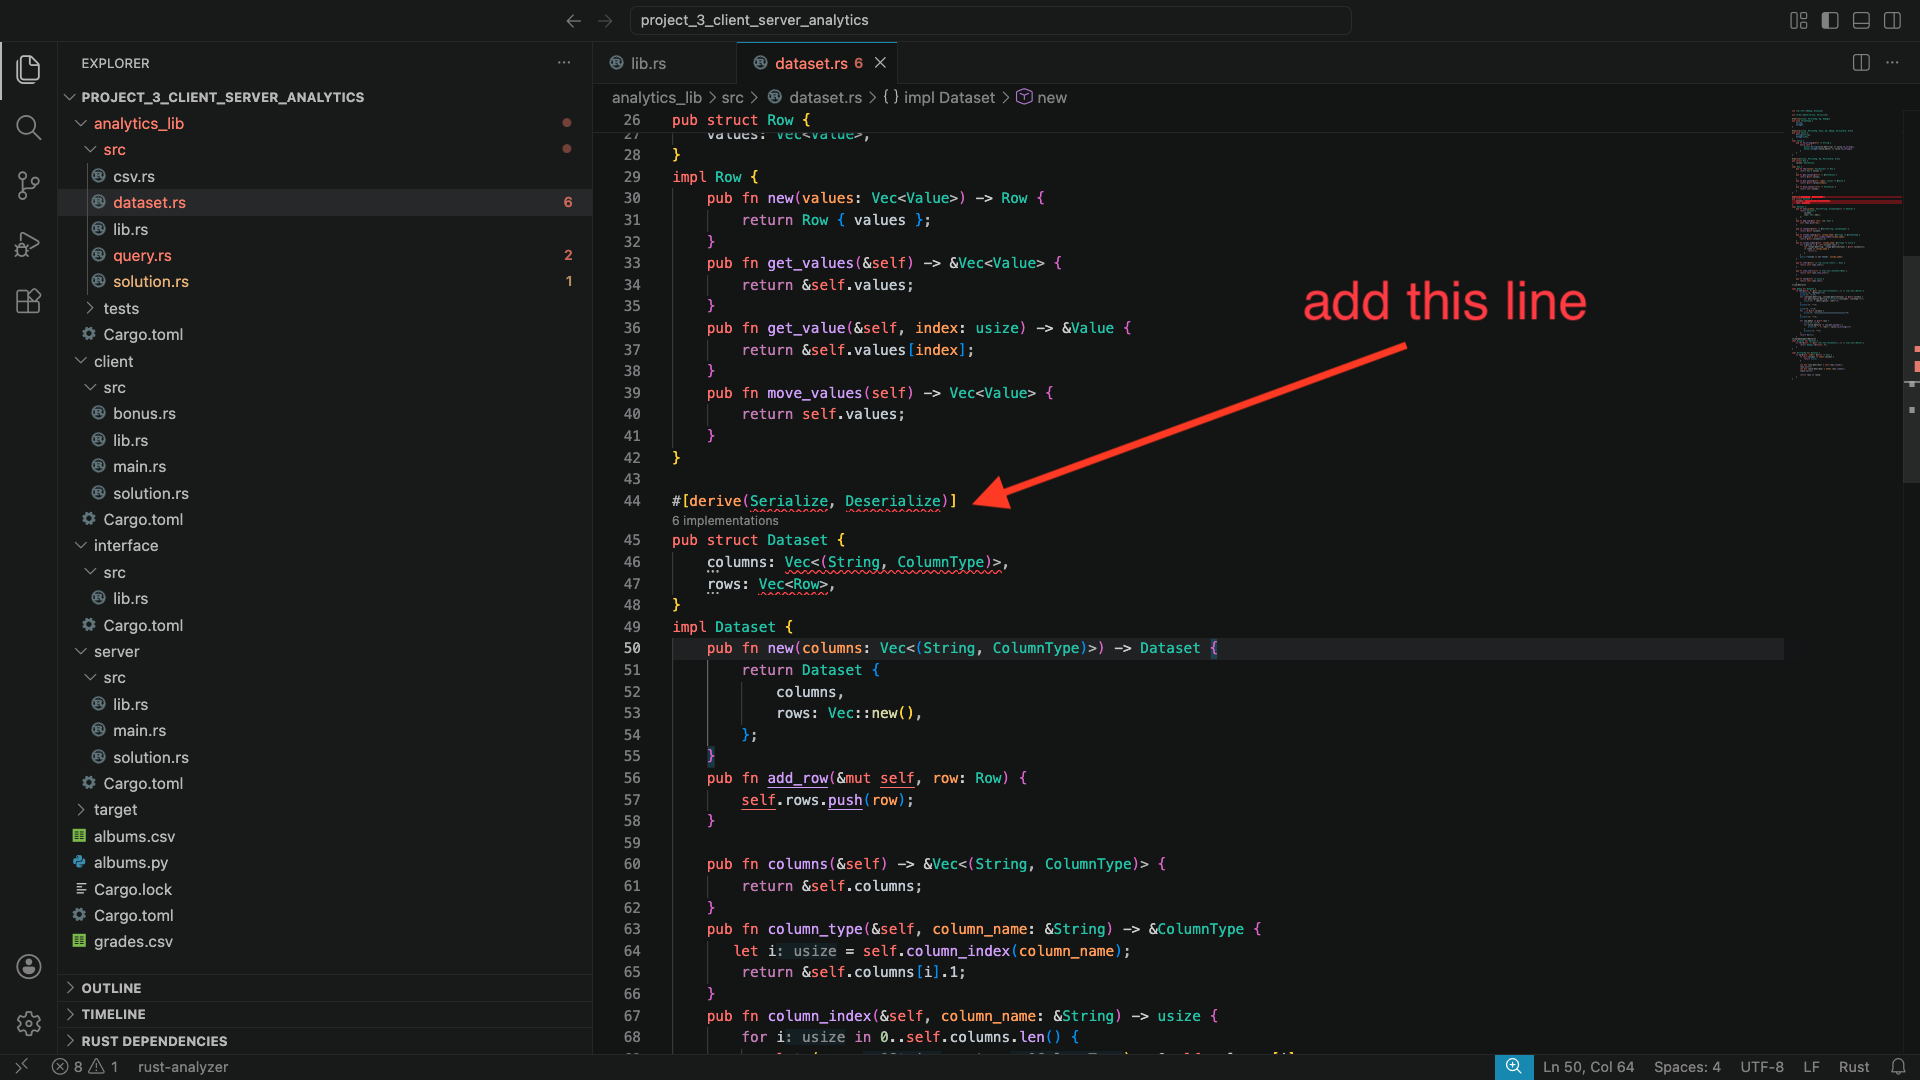
You will notice that Rust is unable to derive these traits automatically. This is because Dataset contains Row and other types in it that do not implement these traits. Scroll up in this file, find where these types are defined, and derive Serialize and Deserialize for them as well. Follow the compiler errors to find which types are missing these traits!
When you are done, go back to interface/src/lib.rs, and check to see if the compiler errors are gone.
Note: We’ve seen trait in an earlier module. This is our first project where we have to use them deeply. You can read more about them here
Server implementation: Next, go to server/src/lib.rs. You will notice a compiler error in the implementation of AnalyticsServer. Specifically, Rust will complain about missing the implementation of slow_rpc(). This is an easy fix, as I gave you the code there, just commented out. Uncomment it and the compiler error will go away.
Then, go to server/src/solution.rs. You will see that slow_rpc() does not do anything. You must implement this function. Simply make it return the dataset – notice how with slow_rpc the server is not given any particular query to execute!
You may run into a compiler error due to a type mismatch: the input dataset is a reference. Try to clone the input dataset, but the compiler will complain that Dataset does not implement Clone. It turns out, Clone is also a trait! We know how to implement traits now: we can derive them! Go back to the Dataset struct and add Clone to its #[derive(...)].
Client implementation: Finally, go to client/src/solution.rs.
Read the code of run_hello() and the comments inside run_slow_rpc(), they should give you an idea of how you can call rpc_client.slow_rpc(...). Note that this call requires a context – mimic what run_hello() does.
If you call rpc_client.slow_rpc(...) correctly, you will get back a Dataset. Start by returning it directly.
Now, run the server in one terminal using cargo run -- grades as in step 0. Then, in a separate terminal, navigate to the client directory and run cargo run --bin main -- grades slow_rpc.
Look at the output: you will see that the entirety of the dataset is printed: the query is not run!
Change the client’s implementation of run_slow_rpc(...) so it computes the query on the dataset it receives from the server using the code you wrote for part 1.
Hint: look for compute_query_on_dataset(...).
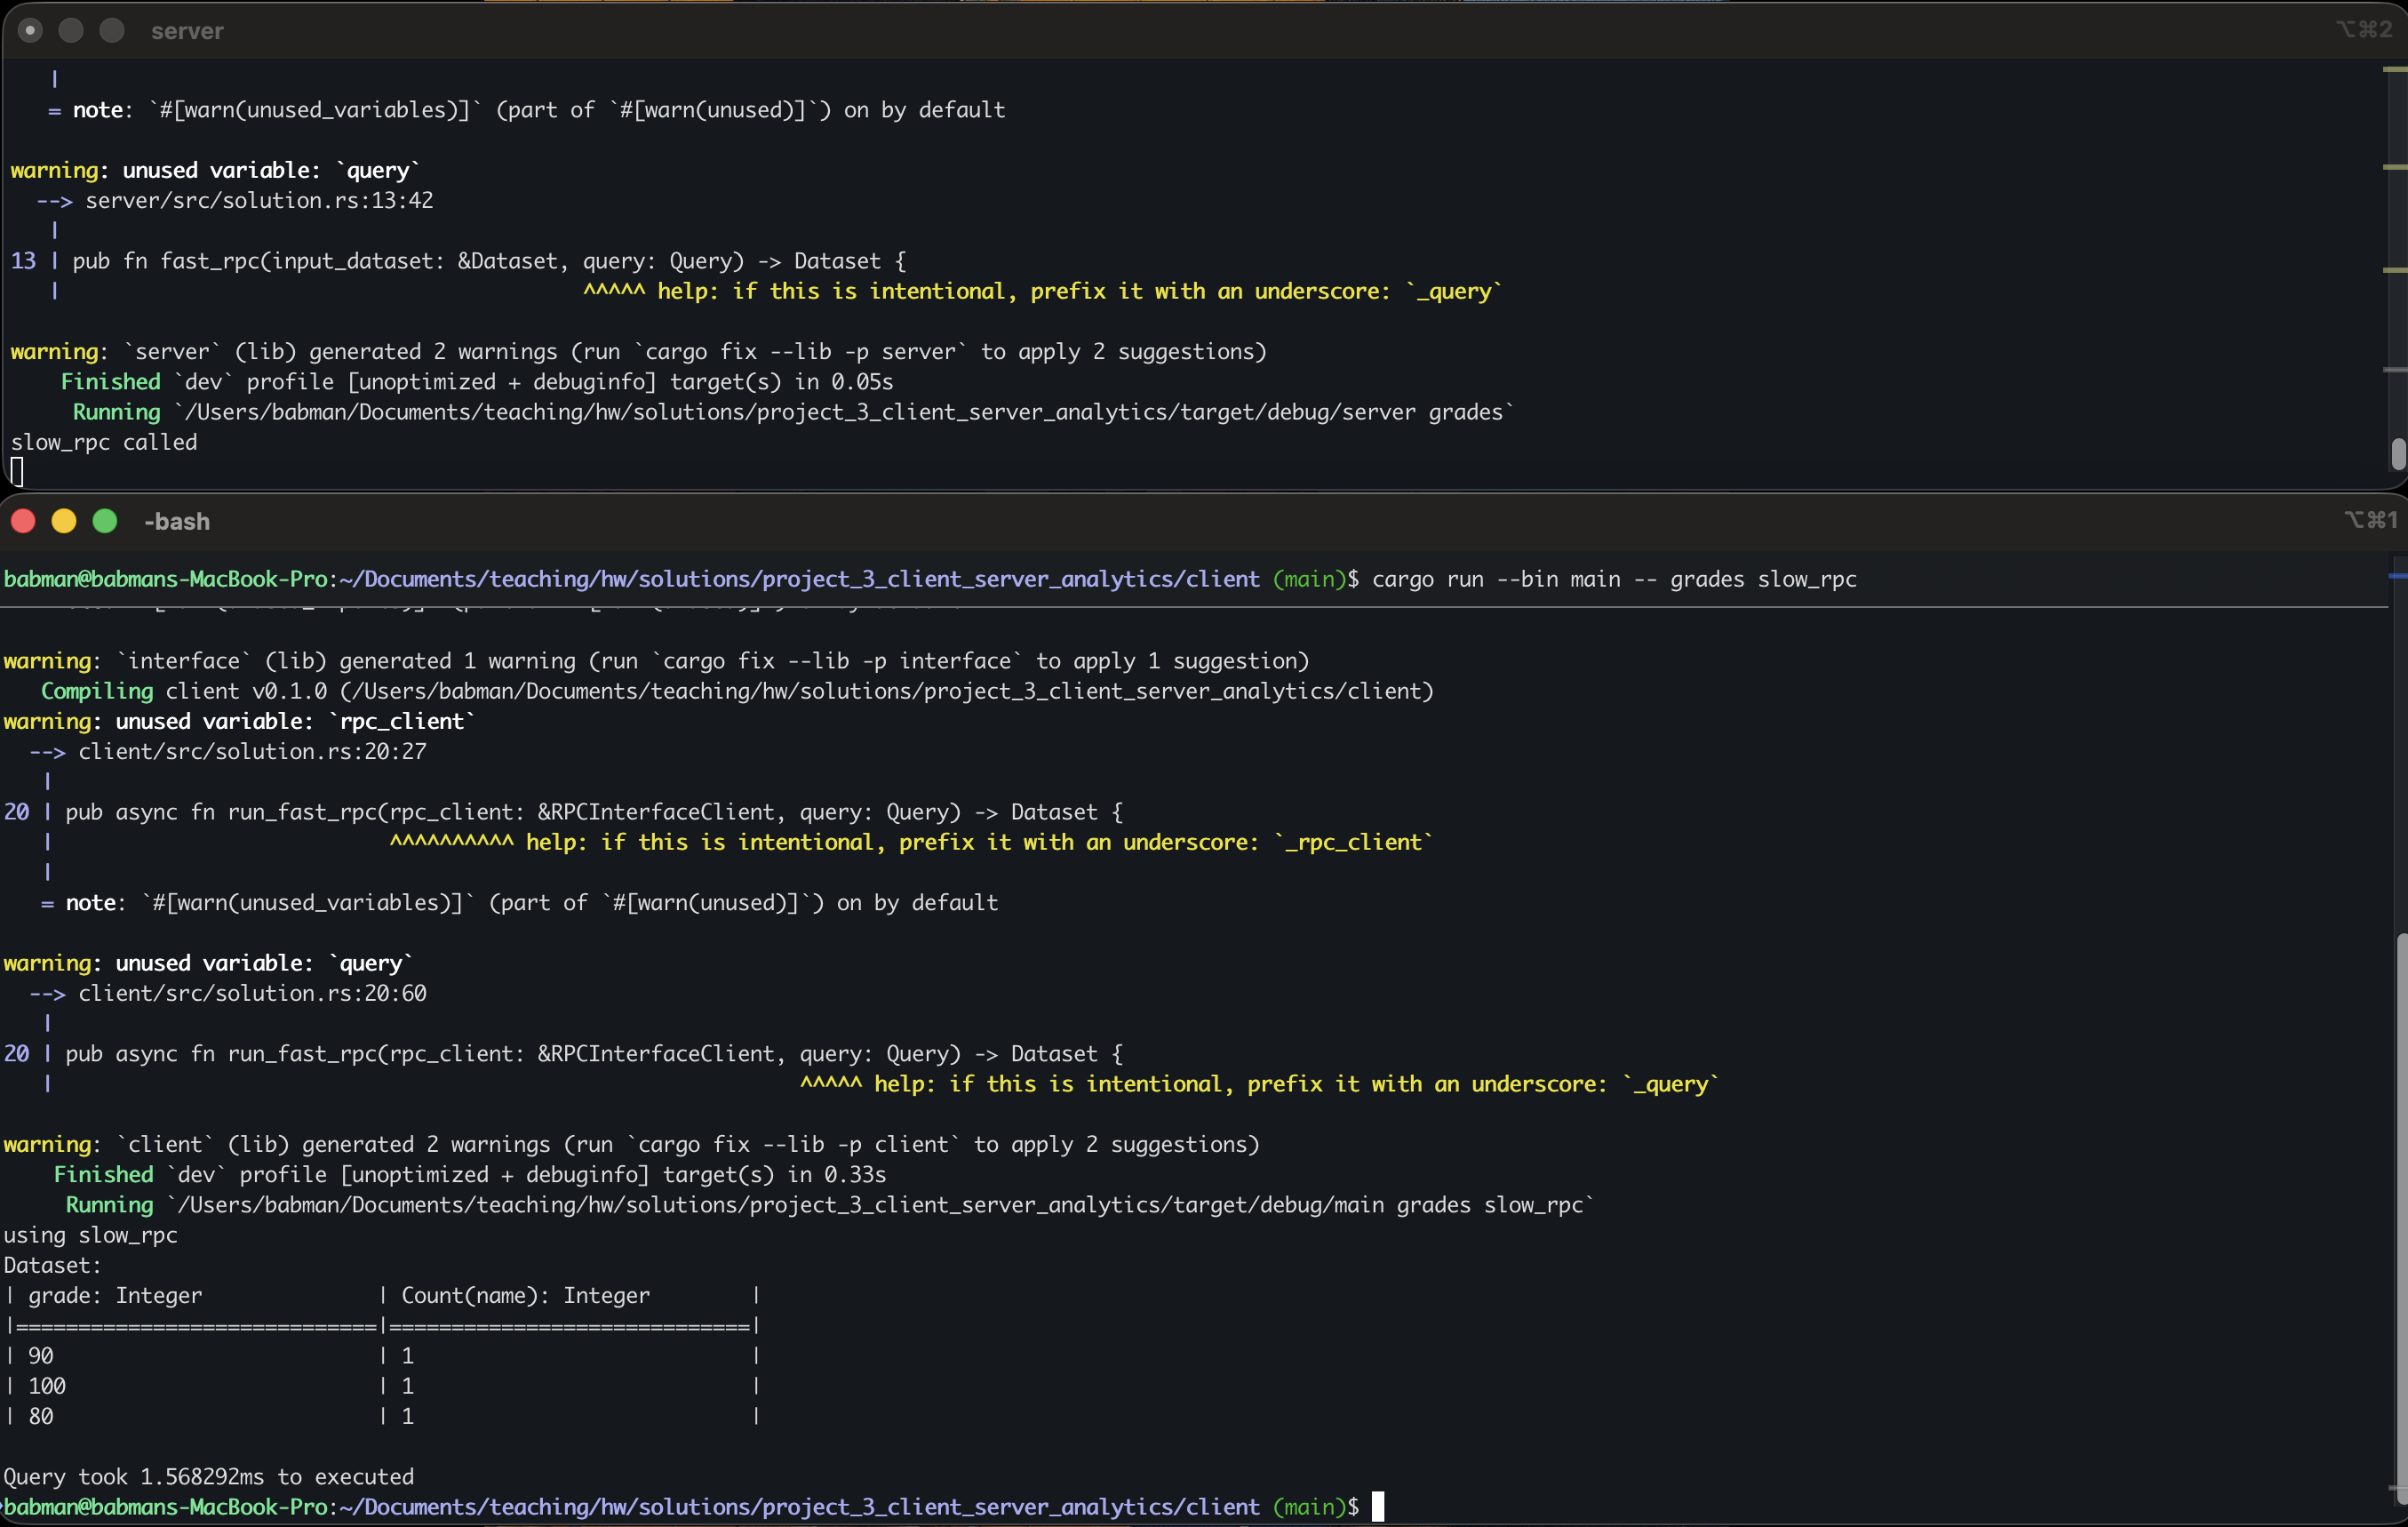
If your implementation is accurate, the client should print out the correct query output as in the screenshot below.
Step 2: fast_rpc
Start by uncommenting fast_rpc in interface/src/lib.rs and fixing any trait related problems.
Then implement the server side fast_rpc(...) code:
- Uncomment the
fast_rpccode inserver/src/lib.rs - Implement the
fast_rpc(...)function inserver/src/solution.rs
Hint: notice that fast_rpc takes the query as a parameter, so, the query can be computed over the dataset at the server, and the server should only return the final result.
Then implement the client side run_fast_rpc(...) function in client/src/solution.rs.
Hint: the client does not need to run the query again – the server already computes it and returns its result!
Test your implementation by:
- running the server using
cargo run -- gradesin one terminal. - running the client using
cargo run --bin main -- grades fast_rpcin a different terminal.
The final output should be identical to slow_rpc.
Step 3: Experiment!
Run the following experiment using the albums dataset.
Run the server in a separate terminal using cargo run -- albums.
Next, run the albums query with the client using slow_rpc. Write down how much time it took.
Finally, run the same query with fast_rpc, and write down how much time it took.
Which one is faster? Why?!
Do the same thing but for grades. Which one is faster? Why?
Submission
Push your analytics branch and submit via Gradescope.