Discussion 1: Setup
Tue Sep 8 (B sections) / Wed Sep 9 (A sections)
By the end of today you should have five things working and talking to each other:
- A terminal to run commands in
- A GitHub account, so you have somewhere to submit work
- VS Code with rust-analyzer, for editing and debugging
- Git, so you can track your work
- Rust, so you can compile and run a program
You should go step-by-step. On Macs the first step starts a download that blocks steps 4+5, but you can work on 2+3 in the meantime.
1. Terminal
The terminal is where you type commands instead of clicking. Everything else today gets installed and checked from here. This step is different depending on your machine, so find your part below.
On Mac
The Terminal app comes built-in on Mac. Press Cmd+Space, type Terminal, and press Enter. You can also find it in Applications, then Utilities.
Check it works by typing this and pressing Enter:
pwd
It prints the folder you are currently in. If you get a path back, you have a working terminal.
Now start installing Homebrew, which is a helpful utility for installing other applications (that you'll probably find yourself using a lot in the future). Run this line:
/bin/bash -c "$(curl -fsSL https://raw.githubusercontent.com/Homebrew/install/HEAD/install.sh)"
Three things to know before you start it:
- It asks for your Mac password in the first minute so keep an eye on it. Nothing appears on screen as you type the password, which is normal
- It may install Apple's command line developer tools if you don't have them yet.
- When it finishes it prints a "Next steps" list with some commands in it. Go ahead and run them! These put
brewon your PATH so that your shell can find it in the future.
Check it worked:
brew --version
While it's downloading, you can continue to the next step. Just press Cmd+N to start a second Terminal window (and now you know you can have more than one at a time!)
On Windows
Before you install anything, you will need to know if your machine uses x64 or ARM. If you're not sure, you can look in Settings > About > Device Info where you should see "System Type" indicates x64 or ARM.
Install Git for Windows from git-scm.com/download/win, taking the default options. That gives you a program called Git Bash, which is the terminal we will use all semester. It behaves the way Mac and Linux terminals do, so the commands in class will work on your machine. It also installs git, which is step 4, so you get both at once.
Use Git Bash, not PowerShell or Command Prompt, whenever these instructions say "terminal", even if you have the others installed.
Check it works by typing this and pressing Enter:
pwd
It prints the folder you are currently in. If you get a path back, you have a working terminal (and as a bonus, with Git Bash you already have git).
2. GitHub account
Create an account if you do not have one, at https://github.com.
You can use either your personal email address or your BU one. You will want to keep this account after you graduate. You may also want to use a professional-sounding name, not a silly one, since this can become a public presence and part of your resume / professional portfolio. But you're all adults, and we don't care ourselves if you name it after a pokemon.
You will fork your first repository in Lecture 4 on Friday, and Project 1 is submitted by pasting the URL of your fork into Gradescope. So the account has to exist and you have to be able to log in.
Turn on two-factor authentication while you are here. If you don't do it now you'll be forced to when you're in the middle of something later and you will be annoyed.
3. VS Code
VS Code is a free code editor. Install it from code.visualstudio.com, taking the default options. If you are passionate about a different IDE already feel free to use it.
Install the rust-analyzer extension
This is what makes VS Code understand Rust, so it can color the text and detect possible errors before the code compiles or runs.
- Open VS Code
- Open the Extensions panel: the icon of four squares in the left-hand bar, or Ctrl+Shift+X (Cmd+Shift+X on Mac)
- Search for rust-analyzer
- Install the one published by The Rust Programming Language, not a lookalike
Turn on autosave
VS Code does not save your file when you click over to the terminal. Git only ever sees what is saved, so an unsaved file is invisible to it. Without autosave, you might make a change to a file, try to commit it, and get confused by the responses that there's nothing to commit. So let's do this:
- Open the File menu
- Click Auto Save
A check appears beside it once it is on, and from then on VS Code saves your changes about a second after you stop typing.
Turn on the code command: Mac only
This lets you type code . in a terminal to open the folder you are standing in. You will use it all semester. (The VS Code installer already set this up for Windows users.)
From VS Code:
- Press Cmd+Shift+P to open the Command Palette
- Type
shell command - Click Shell Command: Install 'code' command in PATH
- Give it your Mac password if it asks
To test, close your terminal, open a new one, and run:
code --version
Make VS Code's terminal Git Bash: Windows only
VS Code has a terminal built into it, and on Windows it opens PowerShell, not Git Bash, by default. We want it to use Git Bash instead. (The default for Mac users is already what we want.)
From VS Code:
- Press Ctrl+Shift+P to open the Command Palette
- Type
default profile - Run Terminal: Select Default Profile
- Choose Git Bash
If a terminal was already open, close it with the trash can icon and open a new one. The change only affects terminals opened afterwards.
4. Git
You now almost certainly have git already. Windows users installed it in step 1 along with Git Bash. Mac users got it from the developer tools that Homebrew installed. So this step is mostly configuration.
Check:
git --version
If this prompts you to install the Xcode command line tools, say yes and let it finish. That means Homebrew has not got there yet, so give it a minute.
Then tell git who you are. This gets attached to every commit you make, so use your real name and the email address you use for your GitHub account:
git config --global user.name "Your Full Name"
git config --global user.email "your.email@example.com"
git config --global init.defaultBranch main
Check it was saved:
git config --global user.name
5. Rust
Install Rust from: https://www.rust-lang.org/tools/install
For this you will have to use the terminal. Once you enter the command that the website provides, choose the default option.
On Windows only, the site will point you to also install Visual Studio and C++ development packages inside it. You'll want to select the option called "Desktop development with C++".
When you run the installer, your computer might "protect" you by preventing the installer from running.
- On Windows, you can get around this by clicking on "more info" and then "run anyway".
- On Mac, you can try right-click (or Control-click) to see "Open", or after you tried to open the installer and couldn't, go to Settings > "Privacy & Security" and you might see a note there that the installer was blocked and there's a button there to click called "Open Anyway".
The installer might take some time, especially on Windows to install the C++ dependencies. In the meantime, you can get started with Step 6.
Check that it worked
Run this in your terminal (Terminal on Mac, Git Bash on Windows):
cargo --version
You should see a version number, 1.97.0 or later.
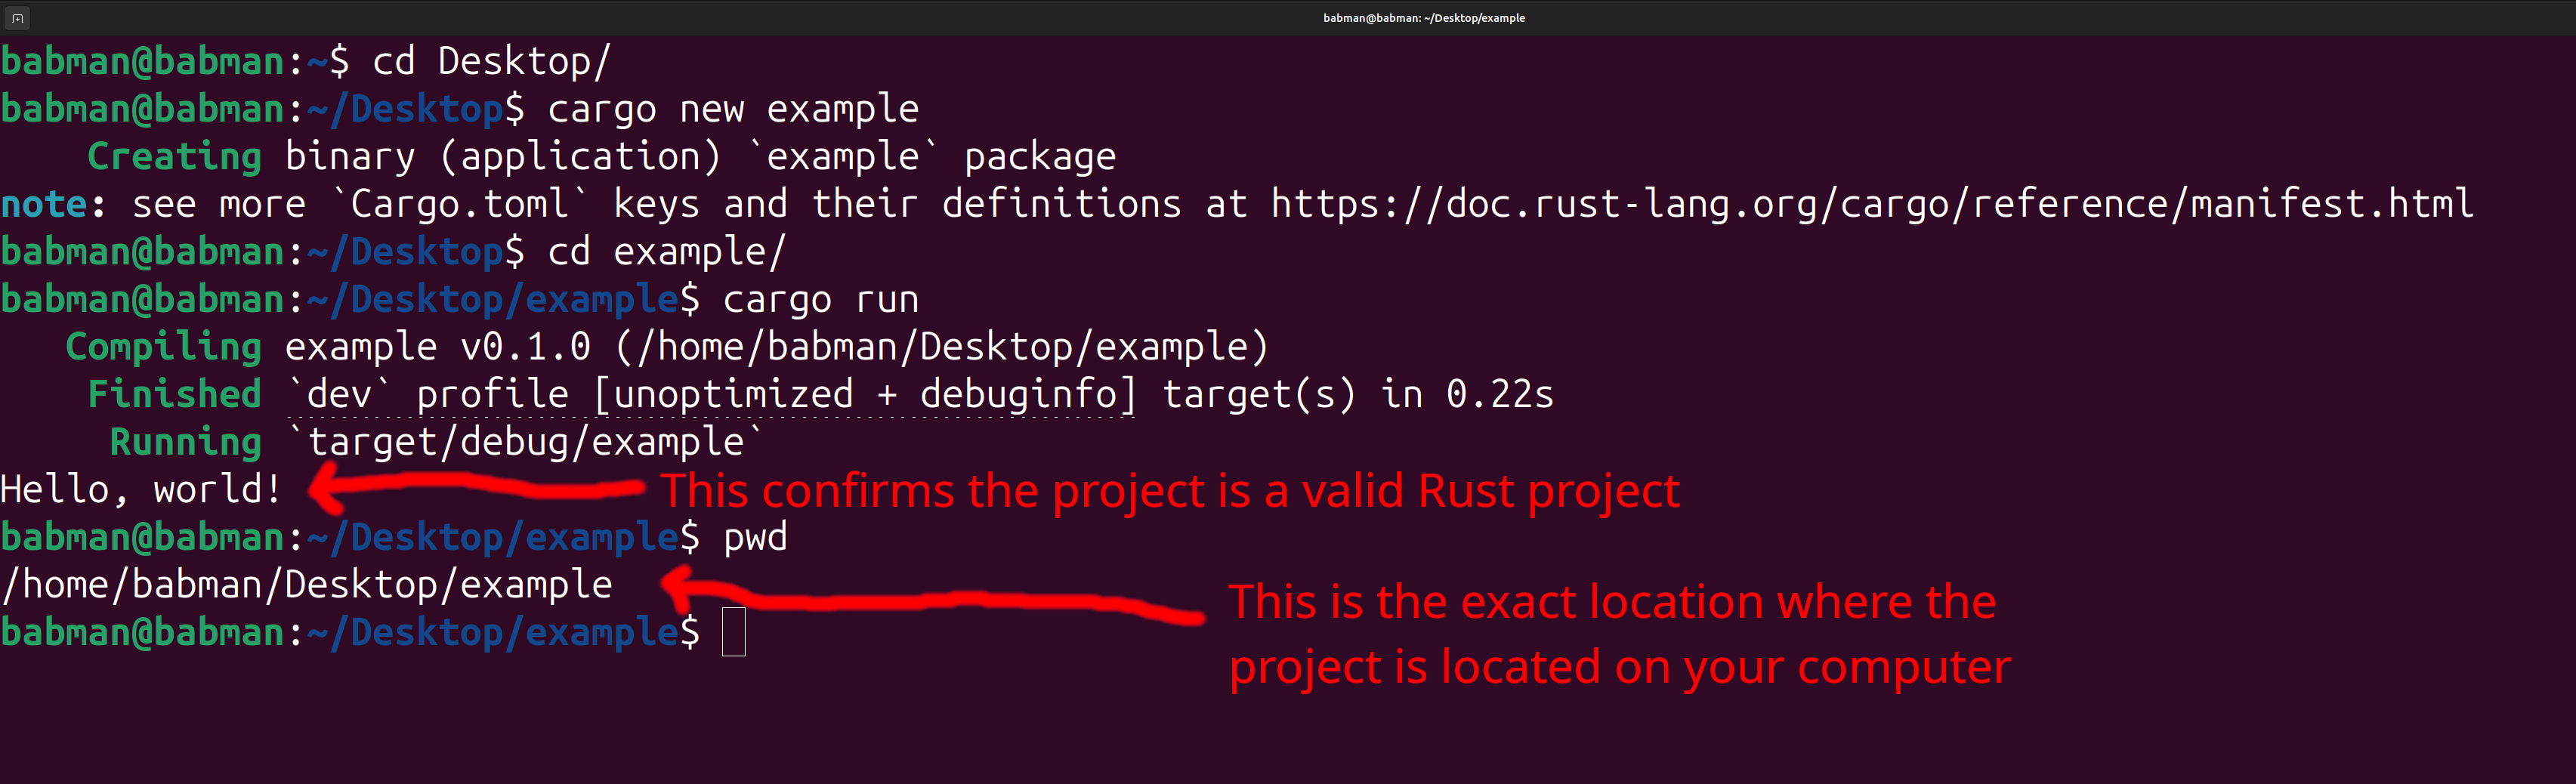
Now we'll build and run something. Navigate to a folder of your choosing, say your desktop (cd ~/Desktop or similar) before continuing. (Especially for Windows users, as the default starting location in Git Bash is not where you want to save things.)
# cd into where you want to build your project
cargo new hello_world
cd hello_world
cargo run
If it worked, you will see:
Hello, world!
Troubleshooting common issues on Windows
"cargo: command not found" or "not recognized"
Rust installed, but your shell does not know where to look. Add %USERPROFILE%\.cargo\bin to your PATH environment variable.
For help editing your PATH, see youtube.com/watch?v=gb9e3m98avk for an example showing how to edit your PATH to add a python directory - don't copy the python path exactly, but add %USERPROFILE%\.cargo\bin instead.
It compiles nothing, and mentions link.exe
You are missing the C++ build tools, which include the linker Rust needs. Install the Windows SDK and the MSVC C++ Build Tools from https://visualstudio.microsoft.com/downloads/, choosing the latest version compatible with your machine.
This one is a large download and will not finish in this session. Talk to a TA, start the download, and you are covered for today's attendance.
Rust seems installed but fails when it runs
You may be missing Microsoft's Visual C++ redistributable package. Install it from https://learn.microsoft.com/en-us/cpp/windows/latest-supported-vc-redist?view=msvc-170.
6. Connect your computer to GitHub
Install the GitHub CLI
This is the way we recommend, and it is what GitHub's own documentation recommends.
On Mac once Homebrew is done installing:
brew install gh
On Windows, it does not come with Git Bash, so install it. If you have winget, which ships with Windows 10 and 11, this is the fast way:
winget install --id GitHub.cli
Otherwise download it from cli.github.com and take the default options.
Either way, close Git Bash and open it again afterwards. A terminal that was already open will not know the new command exists.
Then, on either machine:
gh auth login
Answer the prompts:
- GitHub.com, not an enterprise server
- HTTPS as the protocol
- Yes when it asks whether to authenticate Git with your GitHub credentials. This is the step that matters, so do not skip it
- Login with a web browser, then copy the one-time code it shows you and paste it into the browser window that opens
Check it worked:
gh auth status
You should see that you are logged in to github.com as your username.
If you would rather not install the CLI
Git Credential Manager also works and needs no setup on Windows, where it is installed along with Git Bash. The first time you push, a browser window opens, you log in once, and it remembers you after that. On Mac you can install it with Homebrew if you have it: brew install --cask git-credential-manager.
SSH keys are a last resort. They work, and you may see them recommended in older tutorials, but they are more setup and more to go wrong. Only use them if both options above have failed you, which should not happen. GitHub's guide is here if you need it, and please tell a TA if you end up going this route.
7. Putting it all together
Everything above was installed separately. This is the check that the pieces talk to each other, and it is what you show your TA before you leave.
Open your toy project in VS Code
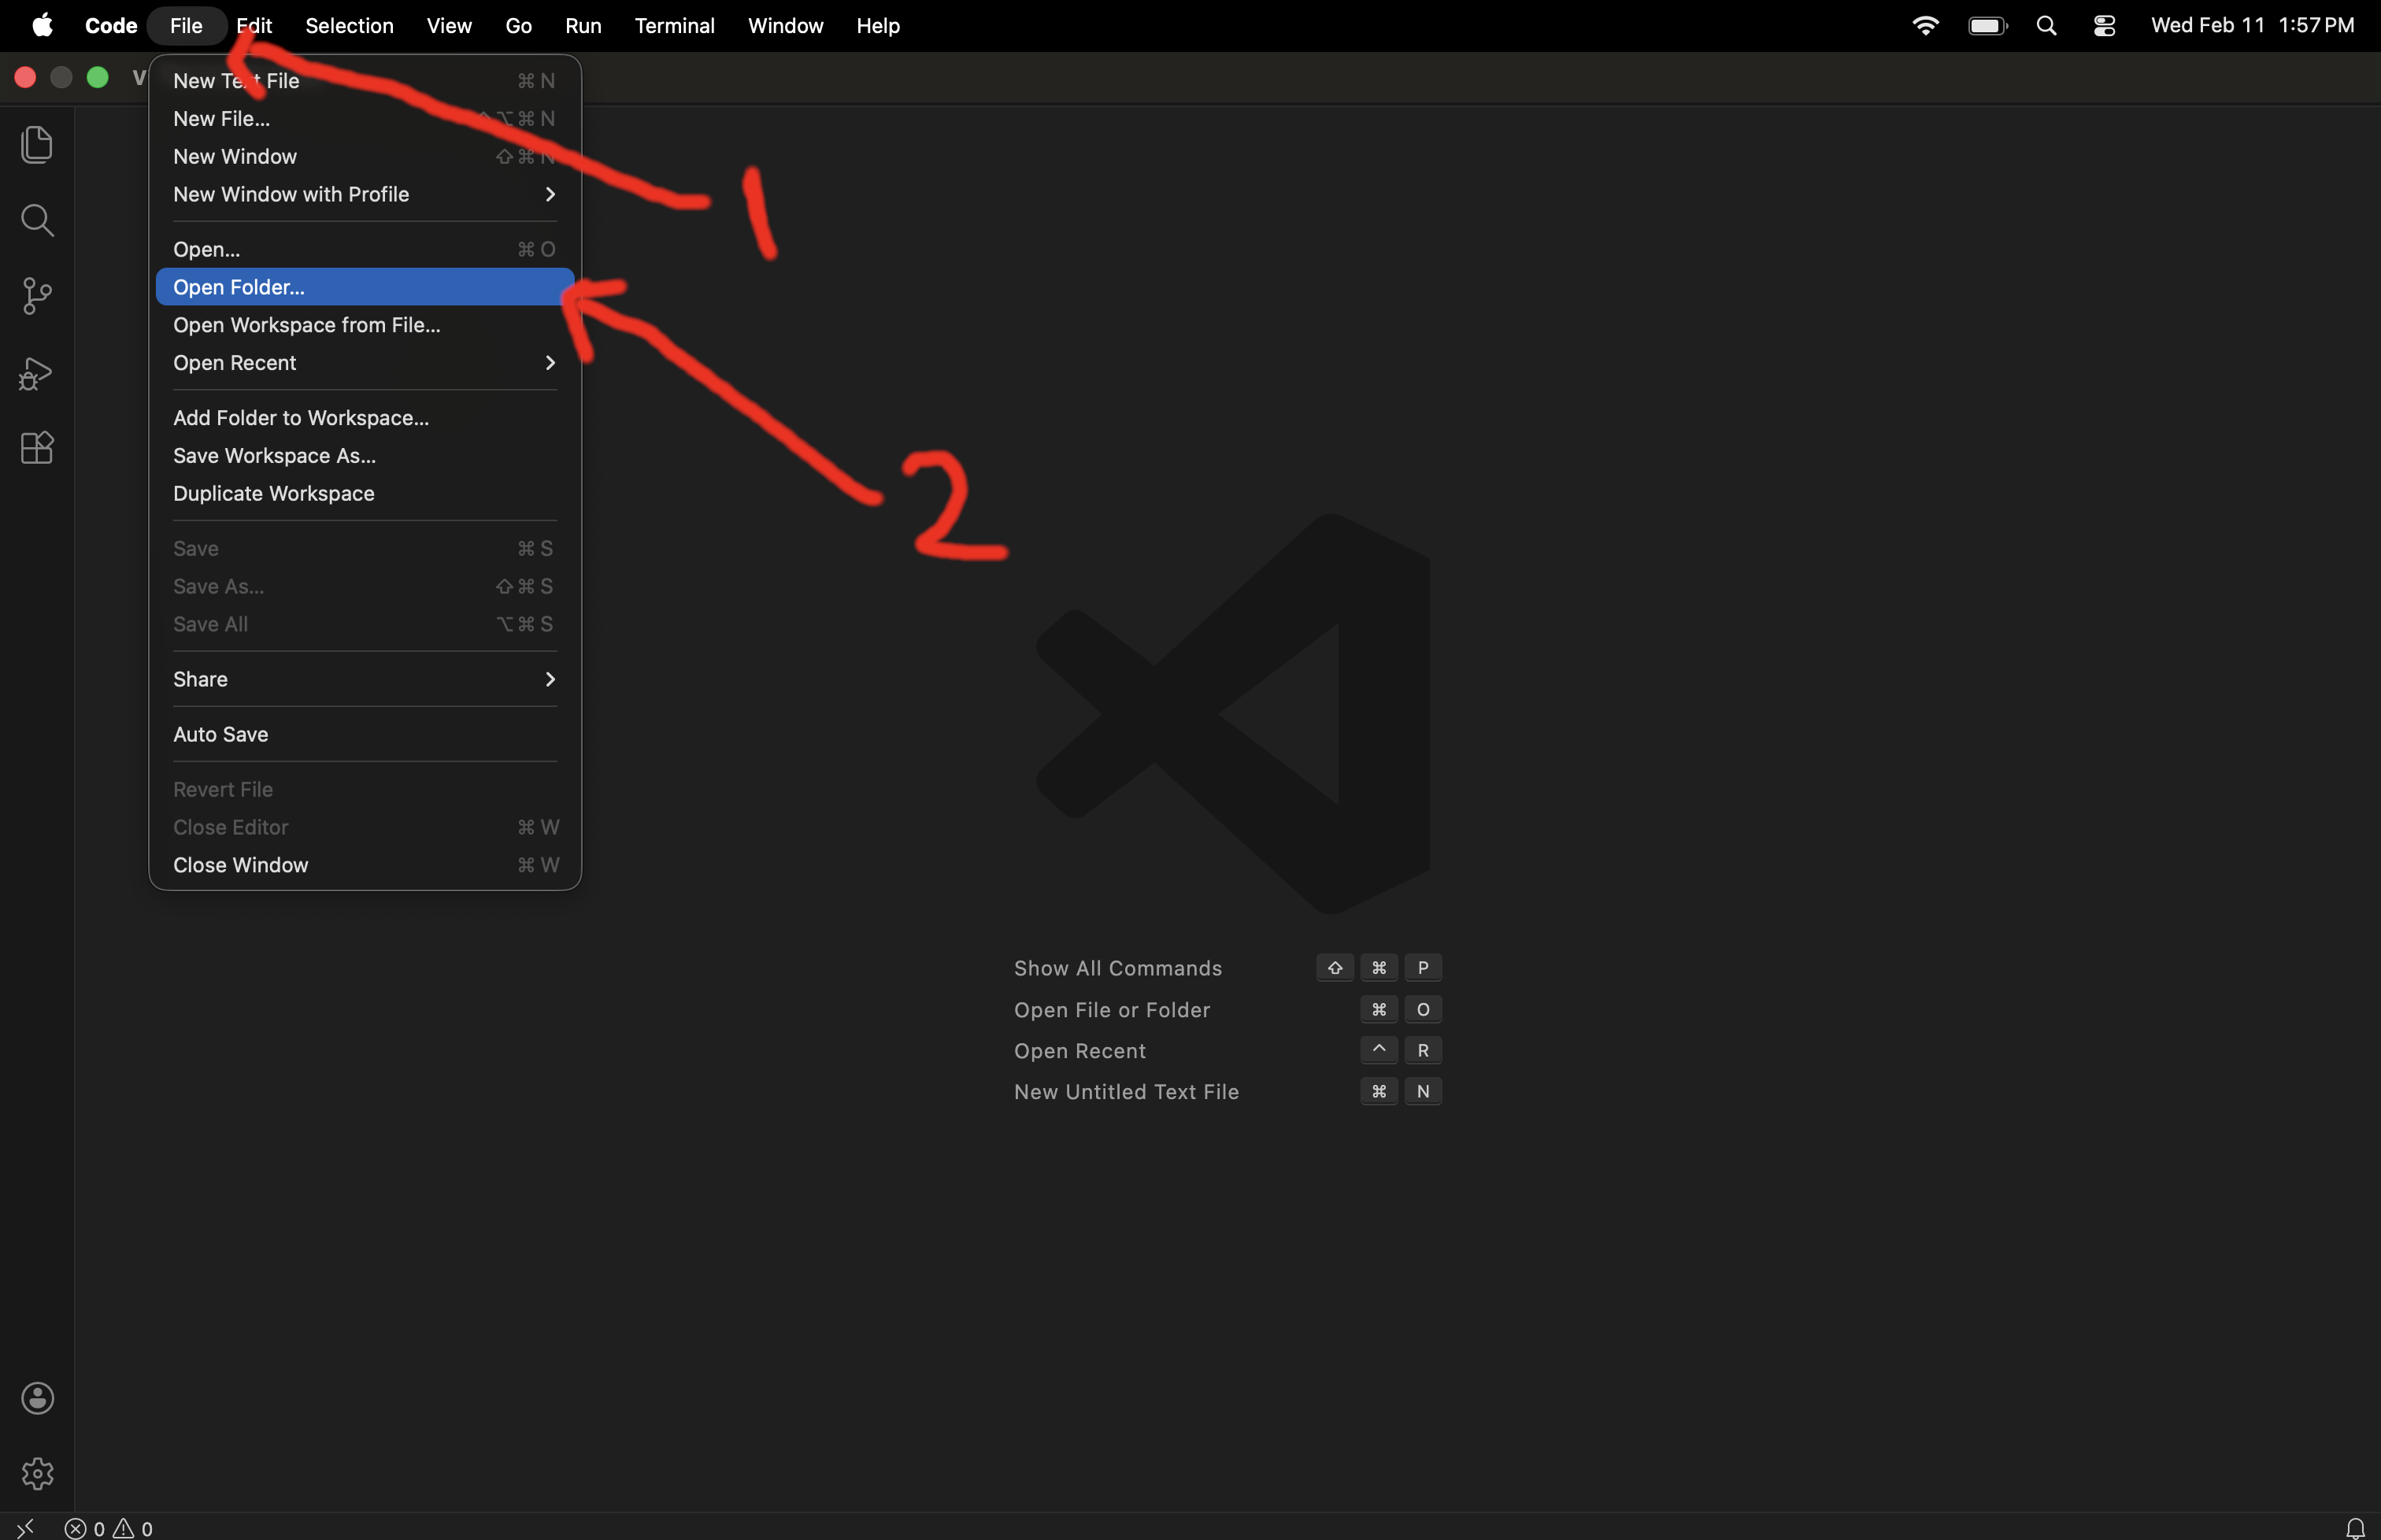
Use File, then Open Folder. Do not use Open File, since Rust tooling needs the whole project folder, not one file. (These screenshots are taken on a Mac, and things might be a bit different for Windows users.)
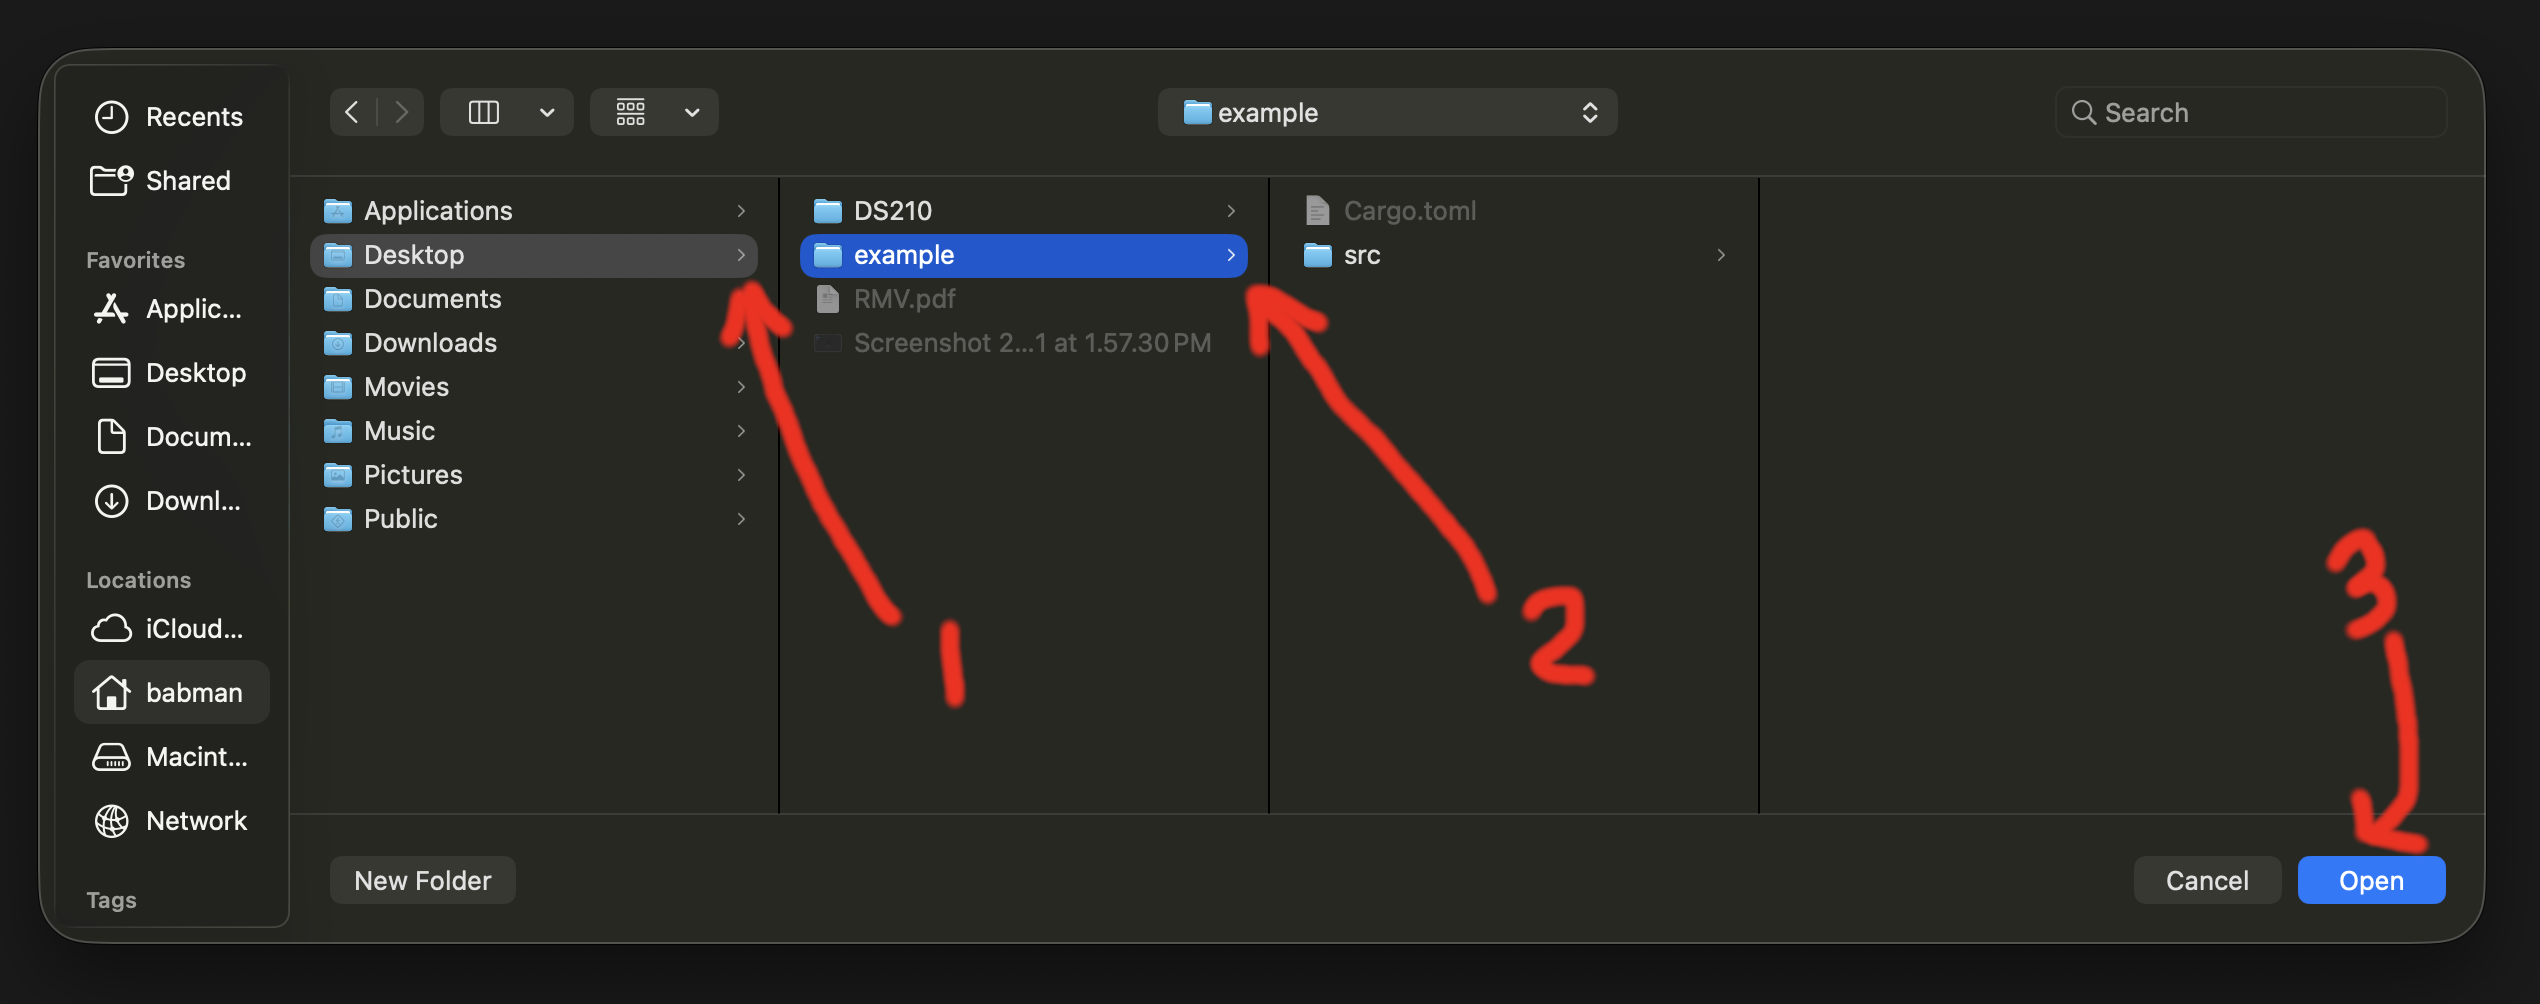
Choose the hello_world folder you made in step 5, and press Open.
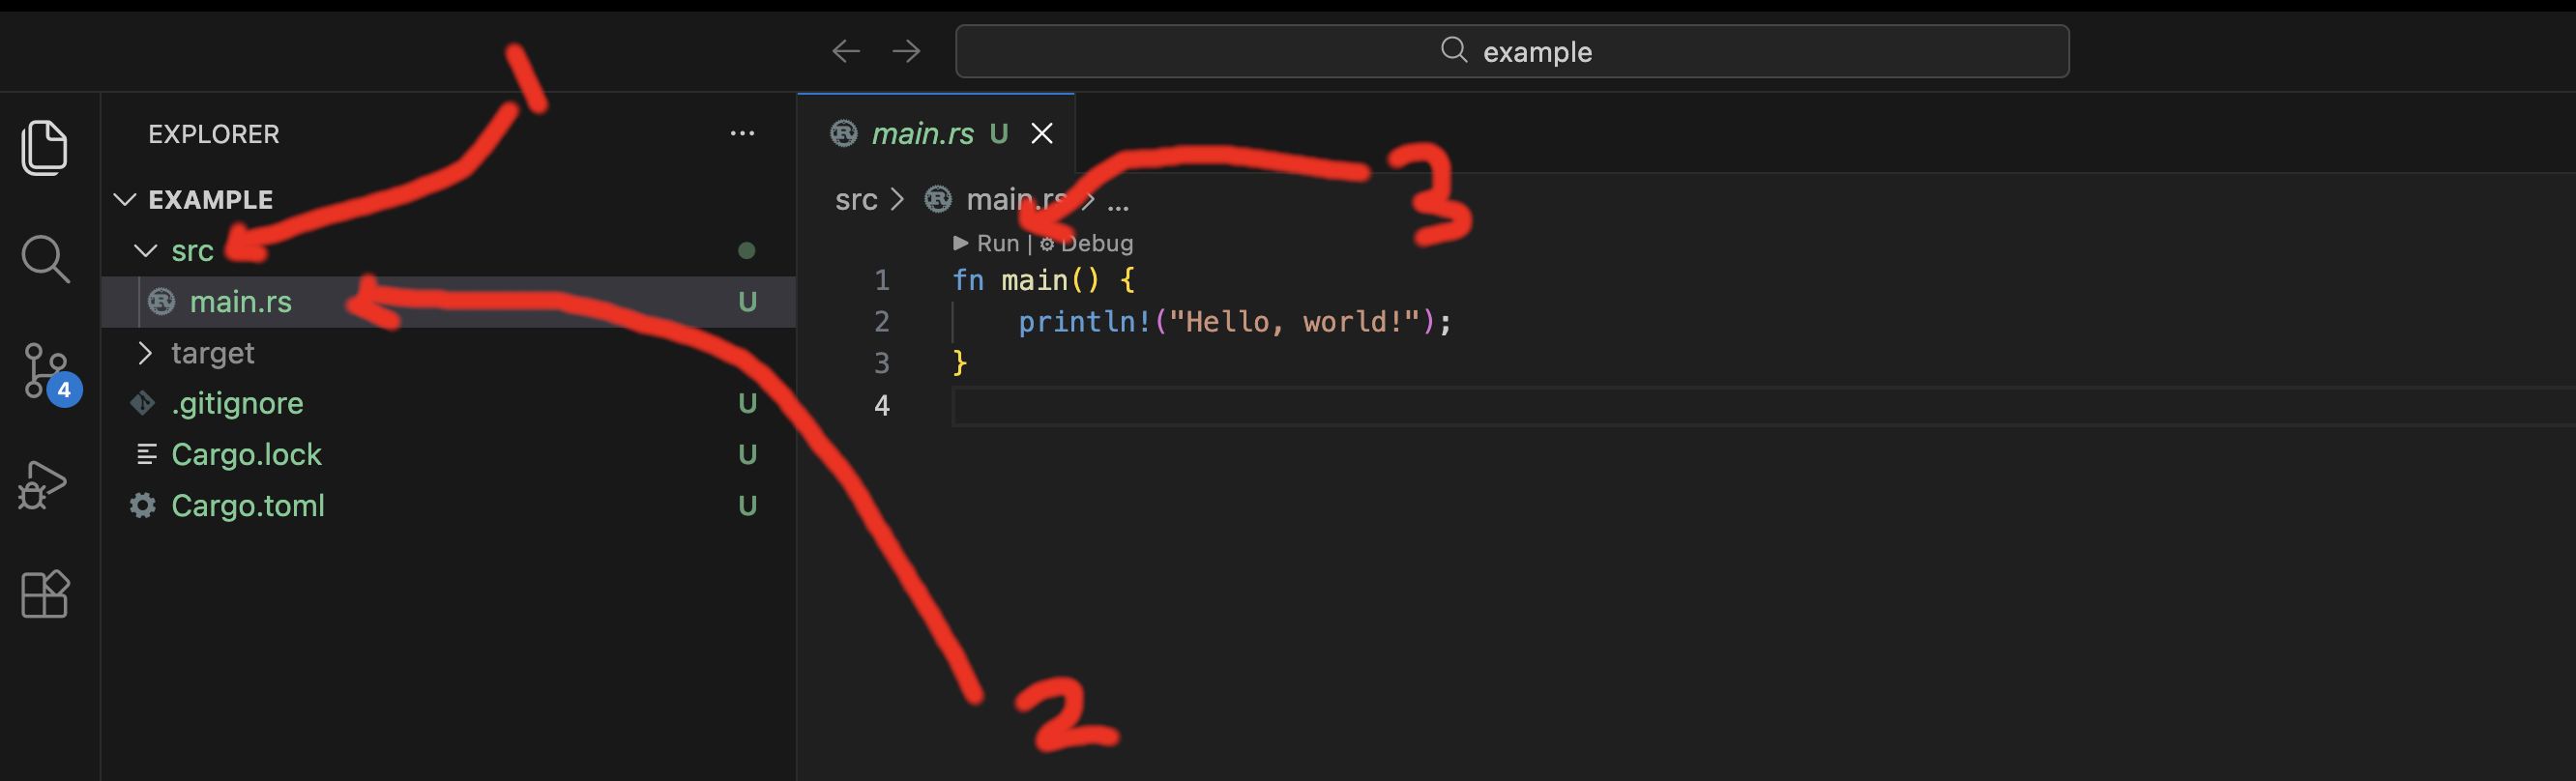
You should now see the project in the sidebar. Open src, then main.rs.
Check Rust and rust-analyzer
Replace the contents of main.rs with this:
fn main() {
    let x = 10;
    let y = 15;
    let sum = 10 + 15;
    println!("{x} + {y} = {sum}");
}
Two things should happen, and both mean rust-analyzer is running:
- Greyed-out type labels appear next to your variables, showing
: i32, even though you did not type them - A small Run | Debug line appears just above
fn main(). Click Run, and the output shows up in a panel at the bottom
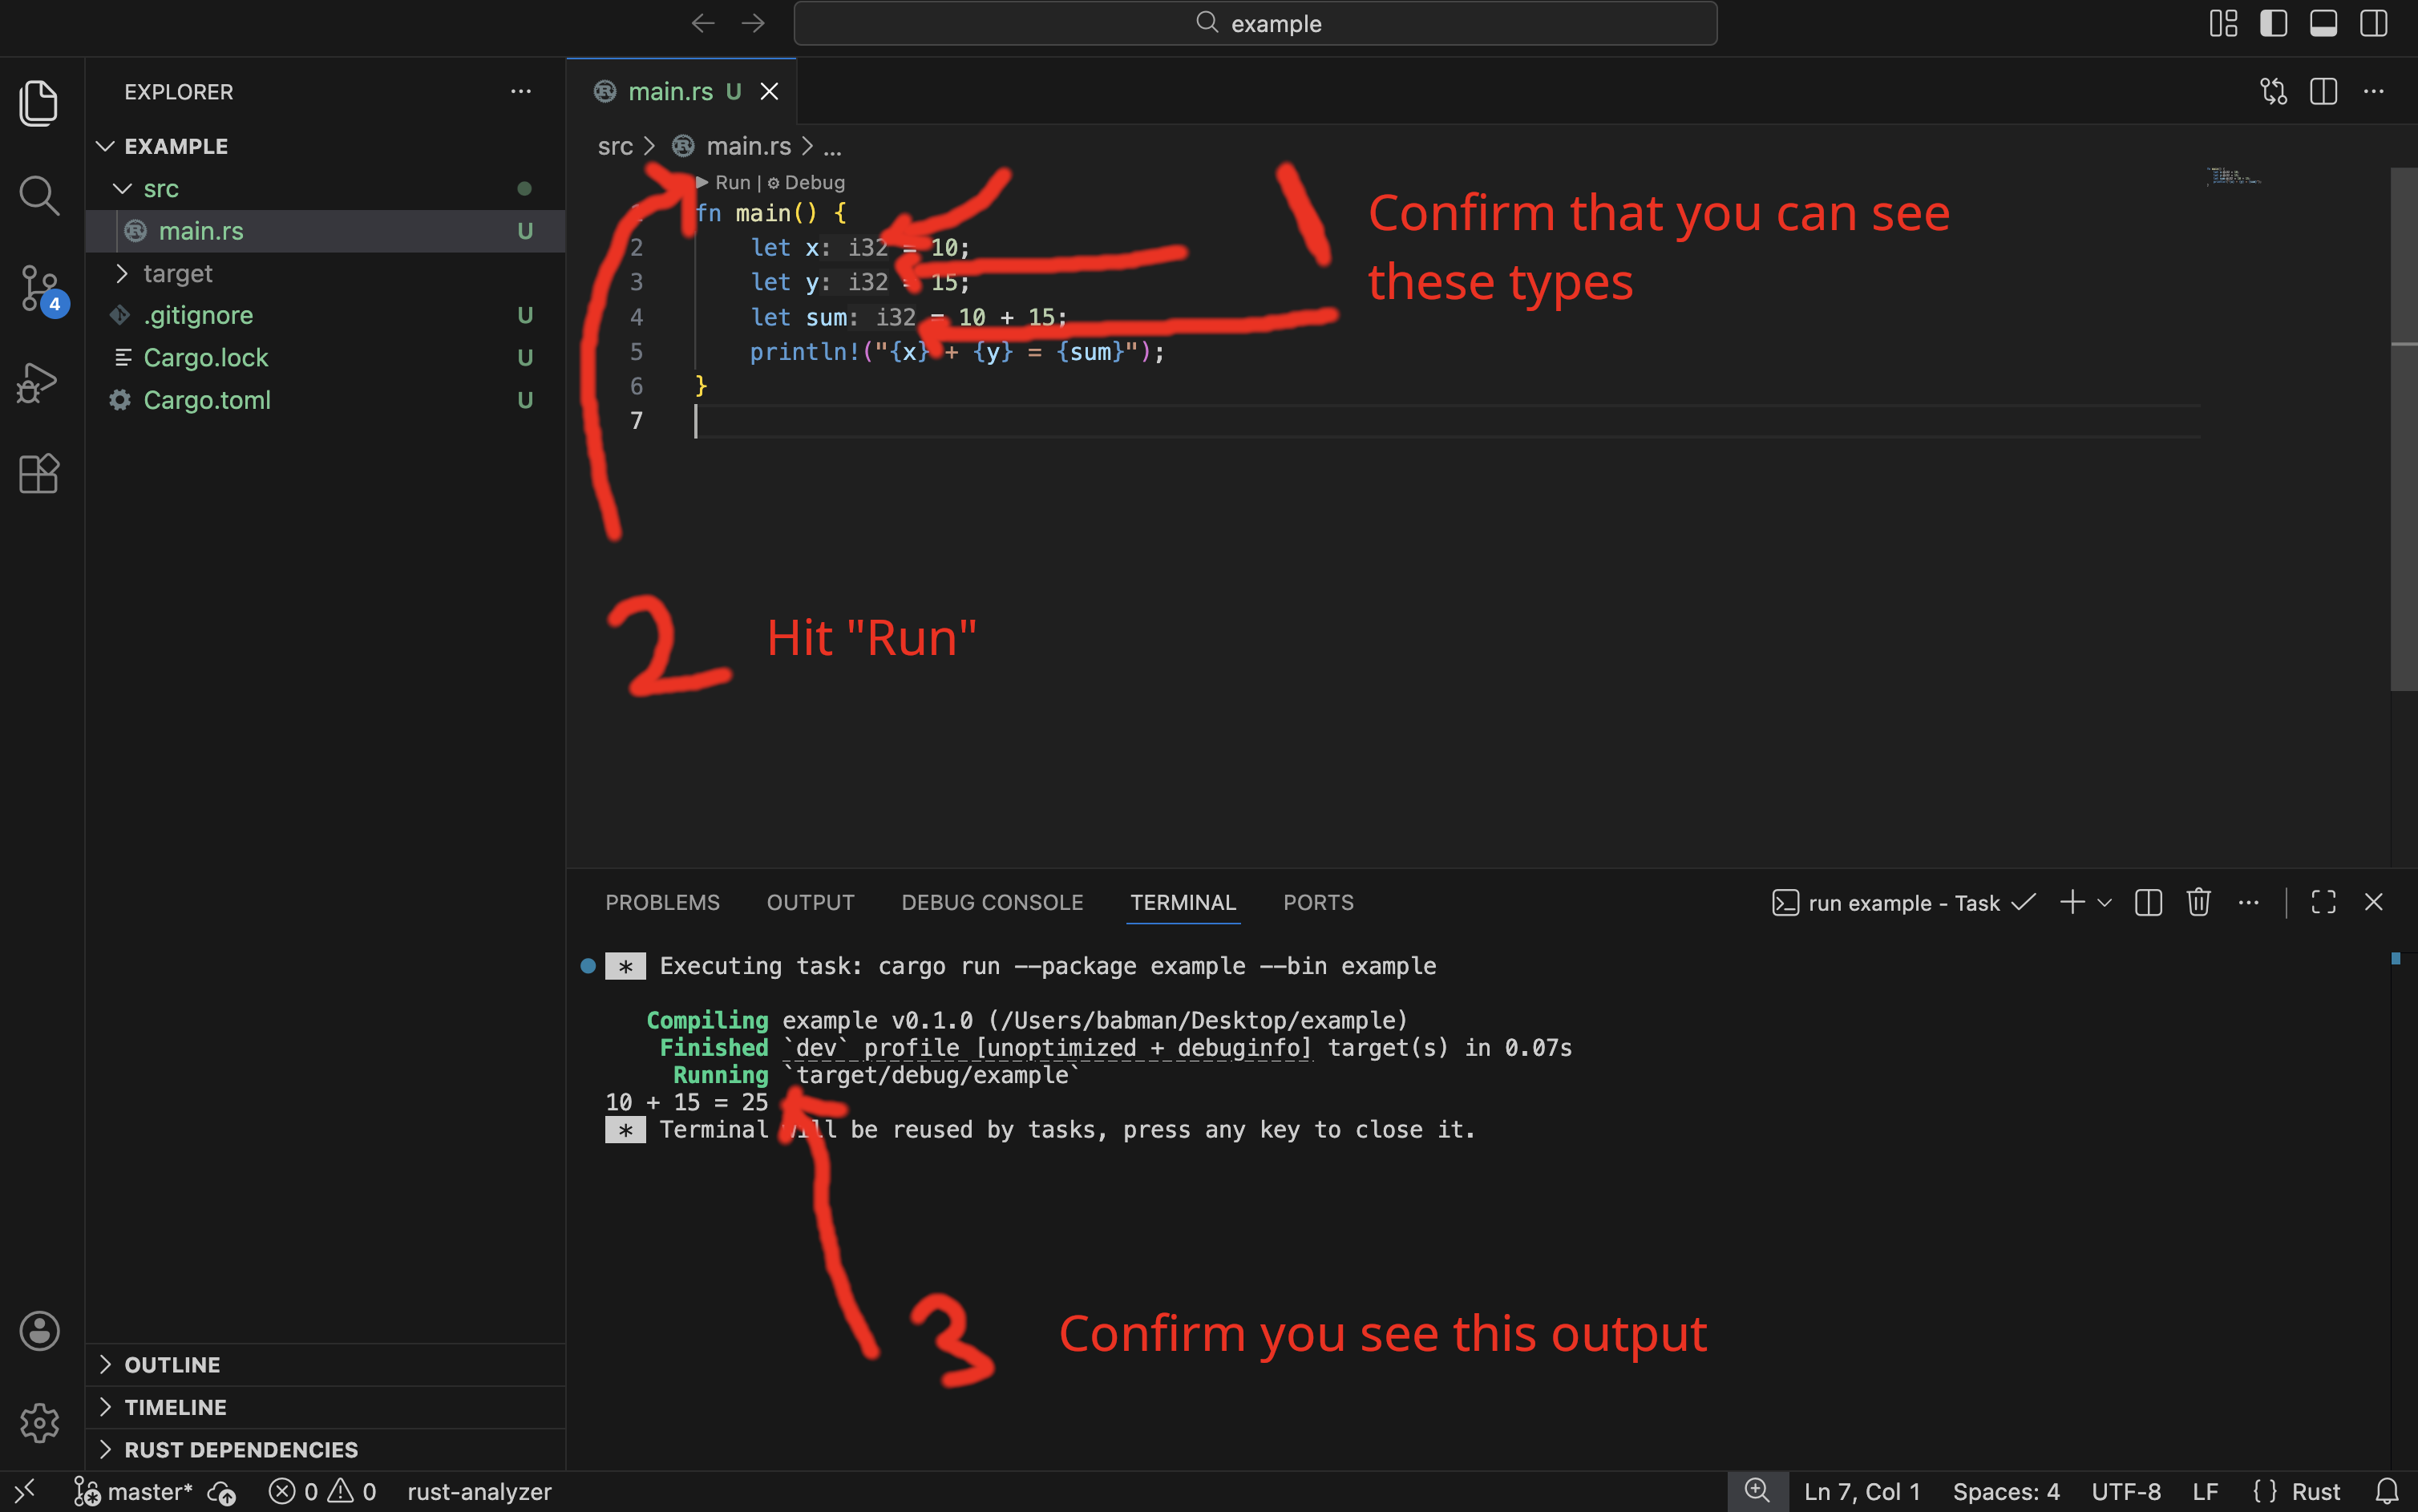
If you see 10 + 15 = 25 at the bottom, Rust and rust-analyzer are both working.
If rust-analyzer isn't working yet you may need to add the folder as a trusted workspace. Try hovering over rust-analyzer in the bottom of VS Code and click "reload workspace" which will prompt you to add the project as a trusted workspace. You may need to reload workspace a second time after that to get code highlighting and the run button to appear.
Check git, without leaving VS Code
VS Code has a terminal built into it, and it opens already sitting in your project folder. Press Control and the backtick key together (top left of the keyboard, under Escape) to show it. This is Control on Windows and on Mac, not Command.
On Windows this should say Git Bash, because you set that in step 3. If it says PowerShell, go back and set the default profile.
Then run:
git status
You should see On branch main, No commits yet, and a short list of untracked files.
That branch exists because cargo new quietly turned this folder into a git repository when you created it. You did not ask it to. What that means is Friday's lecture.
Show your TA
Three things, all on one screen:
- The greyed-out
: i32type hints 10 + 15 = 25in the output- Your
git statusoutput in the built-in terminal
They'll mark your work as complete for the day.
If you weren't able to finish, that is fine and it is why we are here. Talk to your TA about what is going wrong and make a plan for finishing by Friday. You get the credit for showing up and having the conversation, not for a perfect machine.
8. If you finish early
Make the terminal your own
Your shell reads a configuration file every time it starts, and anything you put there is waiting for you in every future session. Aliases let you make short names for things you type constantly.
alias ll='ls -la'
alias ..='cd ..'
The appendix to Lecture 2 walks through this, including which file to edit on your platform.